
Quick Install Guide
Page 3
...hereof and specifically disclaims any language or computer language, in the contents hereof without notice. The product you have purchased and the setup screen may appear slightly different from those shown in this publication may be subjected to change without obligation to notify any defect in...distributor, or its dealer) assumes the entire cost of this manual is sold or licensed "as is". Please visit our web site www.edimax.com for any warranty and are trademarks and/or registered trademarks of their authors. 3 Copyright by third parties, including software code subject...
...hereof and specifically disclaims any language or computer language, in the contents hereof without notice. The product you have purchased and the setup screen may appear slightly different from those shown in this publication may be subjected to change without obligation to notify any defect in...distributor, or its dealer) assumes the entire cost of this manual is sold or licensed "as is". Please visit our web site www.edimax.com for any warranty and are trademarks and/or registered trademarks of their authors. 3 Copyright by third parties, including software code subject...
Quick Install Guide
Page 9
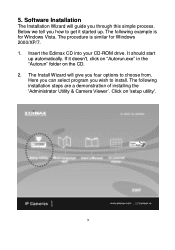
... started up automatically. The Install Wizard will guide you how to get it doesn't, click on "Autorun.exe" in the "Autorun" folder on 'setup utility'. 9 Below we tell you through this simple process. The procedure is for Windows 2000/XP/7. 1. Here you can select program you four options... to install. 5. Software Installation The Installation Wizard will give you wish to choose from. Insert the Edimax CD into your CD-ROM drive. Click on the CD. 2. It should start up . The following example is similar for Windows Vista.
... started up automatically. The Install Wizard will guide you how to get it doesn't, click on "Autorun.exe" in the "Autorun" folder on 'setup utility'. 9 Below we tell you through this simple process. The procedure is for Windows 2000/XP/7. 1. Here you can select program you four options... to install. 5. Software Installation The Installation Wizard will give you wish to choose from. Insert the Edimax CD into your CD-ROM drive. Click on the CD. 2. It should start up . The following example is similar for Windows Vista.
Manual
Page 3
... author. The program is subject to give you have purchased and the setup screen may be reproduced, transmitted, transcribed, stored in a retrieval system, or translated into any warranty of the corresponding source code. R.O.C., TEL : +886-2-77396888, FAX : +886-2-77396887, sales@edimax.com.tw 3 Notice according to GNU/GPL-Version 2 This product includes...
... author. The program is subject to give you have purchased and the setup screen may be reproduced, transmitted, transcribed, stored in a retrieval system, or translated into any warranty of the corresponding source code. R.O.C., TEL : +886-2-77396888, FAX : +886-2-77396887, sales@edimax.com.tw 3 Notice according to GNU/GPL-Version 2 This product includes...
Manual
Page 4
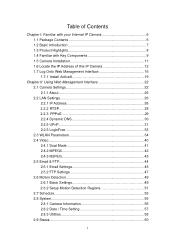
... 34 2.4 Video 40 2.4.1 Dual Mode 41 2.4.2 MPEG4 42 2.4.3 MJPEG 43 2.5 Email & FTP 44 2.5.1 Email Settings 45 2.5.2 FTP Settings 47 2.6 Motion Detection 49 2.6.1 Basic Settings 49 2.6.2 Setup Motion Detection Regions 51 2.7 Schedule 53 2.8 System 55 2.8.1 Camera Information 56 2.8.2 Date / Time Setting 57 2.8.3 Utilities 58 2.9 Status 60 4
... 34 2.4 Video 40 2.4.1 Dual Mode 41 2.4.2 MPEG4 42 2.4.3 MJPEG 43 2.5 Email & FTP 44 2.5.1 Email Settings 45 2.5.2 FTP Settings 47 2.6 Motion Detection 49 2.6.1 Basic Settings 49 2.6.2 Setup Motion Detection Regions 51 2.7 Schedule 53 2.8 System 55 2.8.1 Camera Information 56 2.8.2 Date / Time Setting 57 2.8.3 Utilities 58 2.9 Status 60 4
Manual
Page 8
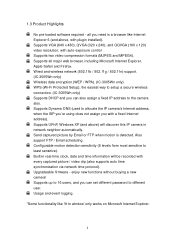
... (used to the camera also. Wired and wireless network (802.11b / 802.11g / 802.11n) support. (IC-3005Wn only) Wireless data encryption (WEP / WPA). (IC-3005Wn only) WPS (Wi-Fi Protected Setup), the easiest way to setup a secure wireless connection. (IC-3005Wn only) Supports DHCP and you can set different password to window‟ only works on Microsoft...
... (used to the camera also. Wired and wireless network (802.11b / 802.11g / 802.11n) support. (IC-3005Wn only) Wireless data encryption (WEP / WPA). (IC-3005Wn only) WPS (Wi-Fi Protected Setup), the easiest way to setup a secure wireless connection. (IC-3005Wn only) Supports DHCP and you can set different password to window‟ only works on Microsoft...
Manual
Page 51
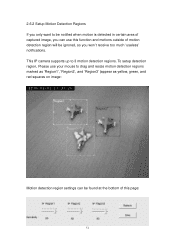
To setup detection region, Please use your mouse to be notified when motion is detected in certain area of captured image, you can use this function and ...;Region3‟ (appear as yellow, green, and red squares on image: Motion detection region settings can be found at the bottom of this page: 51 2.6.2 Setup Motion Detection Regions If you won‟t receive too much „useless‟ notifications. This IP camera supports up to 3 motion detection regions.
To setup detection region, Please use your mouse to be notified when motion is detected in certain area of captured image, you can use this function and ...;Region3‟ (appear as yellow, green, and red squares on image: Motion detection region settings can be found at the bottom of this page: 51 2.6.2 Setup Motion Detection Regions If you won‟t receive too much „useless‟ notifications. This IP camera supports up to 3 motion detection regions.
Manual
Page 75
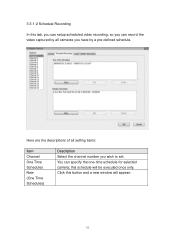
Click this schedule will appear: 75 this button and a new window will be executed once only. 3-3-1-2 Schedule Recording In this tab, you can setup scheduled video recording, so you can specify the one-time schedule for selected camera; You can record the video captured by all setting items: Item Channel One Time Schedules New (One Time Schedules) Description Select the channel number you have by a pre-defined schedule. Here are the descriptions of all cameras you wish to set.
Click this schedule will appear: 75 this button and a new window will be executed once only. 3-3-1-2 Schedule Recording In this tab, you can setup scheduled video recording, so you can specify the one-time schedule for selected camera; You can record the video captured by all setting items: Item Channel One Time Schedules New (One Time Schedules) Description Select the channel number you have by a pre-defined schedule. Here are the descriptions of all cameras you wish to set.
Manual
Page 83
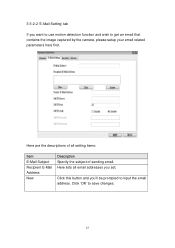
Here are the descriptions of sending email. Click this button and you‟ll be prompted to save changes. 83 Click „OK‟ to input the email address. Here lists all setting items: Item E-Mail Subject Recipient E-Mail Address New Description Specify the subject of all email addresses you want to use motion detection function and wish to get an email that contains the image captured by the camera, please setup your email related parameters here first. 3-3-2-2 „E-Mail Setting‟ tab If you set.
Here are the descriptions of sending email. Click this button and you‟ll be prompted to save changes. 83 Click „OK‟ to input the email address. Here lists all setting items: Item E-Mail Subject Recipient E-Mail Address New Description Specify the subject of all email addresses you want to use motion detection function and wish to get an email that contains the image captured by the camera, please setup your email related parameters here first. 3-3-2-2 „E-Mail Setting‟ tab If you set.
Manual
Page 113
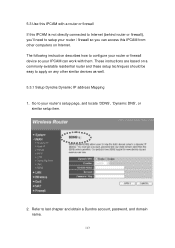
...other computers on any other similar devices as well. 5.3.1 Setup Dyndns Dynamic IP address Mapping 1. These instructions are based on a commonly-available residential router and these setup techniques should be easy to setup your router‟s setup page, and locate „DDNS‟, „Dynamic... DNS‟, or similar setup item. 2. Go to your router / firewall so you ‟ll...
...other computers on any other similar devices as well. 5.3.1 Setup Dyndns Dynamic IP address Mapping 1. These instructions are based on a commonly-available residential router and these setup techniques should be easy to setup your router‟s setup page, and locate „DDNS‟, „Dynamic... DNS‟, or similar setup item. 2. Go to your router / firewall so you ‟ll...
Manual
Page 114
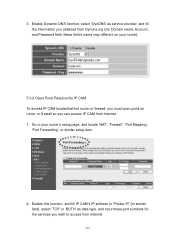
... your router). 5.3.2 Open Ports Required by IP CAM To access IP CAM located behind router or firewall, you must open ports on your router‟s setup page, and locate „NAT‟, „Firewall‟, „Port Mapping‟, „Port Forwarding‟, or similar... setup item. 2. Enable this function, and fill IP CAM‟s IP address in „Private IP‟ (or similar field), select „TCP‟ or „...
... your router). 5.3.2 Open Ports Required by IP CAM To access IP CAM located behind router or firewall, you must open ports on your router‟s setup page, and locate „NAT‟, „Firewall‟, „Port Mapping‟, „Port Forwarding‟, or similar... setup item. 2. Enable this function, and fill IP CAM‟s IP address in „Private IP‟ (or similar field), select „TCP‟ or „...