
User Manual (English)
Page 2
... Dynex DX-L15-L19-L22-10A 15", 19", and 22" LCD TVs Contents Child Safety 1 Important safety instructions 2 Warnings 2 Cautions 2 Installing and removing the stand 3 Installing the stand 3 Adjusting the viewing angle of the TV 4 Removing the stand 4 Installing a wall-mount bracket 4 TV components 5 Front 5 Side 5 Back 5 Remote control 6 Using the remote control 7 Installing remote control batteries 7 Aiming the remote control 7 Programming a universal remote...
... Dynex DX-L15-L19-L22-10A 15", 19", and 22" LCD TVs Contents Child Safety 1 Important safety instructions 2 Warnings 2 Cautions 2 Installing and removing the stand 3 Installing the stand 3 Adjusting the viewing angle of the TV 4 Removing the stand 4 Installing a wall-mount bracket 4 TV components 5 Front 5 Side 5 Back 5 Remote control 6 Using the remote control 7 Installing remote control batteries 7 Aiming the remote control 7 Programming a universal remote...
User Manual (English)
Page 3
... menu settings 25 Selecting the menu language and transparency 25 Labeling an input source 26 Restoring default settings 26 Troubleshooting 27 Video and audio 27 Remote control 27 General 27 Maintenance 27 Cleaning 27 Specifications 27 Legal notices 28 One-year limited warranty 29
... menu settings 25 Selecting the menu language and transparency 25 Labeling an input source 26 Restoring default settings 26 Troubleshooting 27 Video and audio 27 Remote control 27 General 27 Maintenance 27 Cleaning 27 Specifications 27 Legal notices 28 One-year limited warranty 29
User Manual (English)
Page 5
.... 8 Do not install near water. 6 Clean only with the apparatus. Handling the LCD panel • Your TV's screen is made of time. 14 Refer all instructions. 5 Do not use this ... adjustment of broken glass. • If the LCD panel is a class I apparatus to a mains socket outlet with a protective earthing connection. 17 Remote control batteries should not be careful of other apparatus...or expose the device to rain or moisture, does not operate normally, or has been dropped. 15 The mains plug is the disconnecting device. A grounding type plug has two blades and a ...
.... 8 Do not install near water. 6 Clean only with the apparatus. Handling the LCD panel • Your TV's screen is made of time. 14 Refer all instructions. 5 Do not use this ... adjustment of broken glass. • If the LCD panel is a class I apparatus to a mains socket outlet with a protective earthing connection. 17 Remote control batteries should not be careful of other apparatus...or expose the device to rain or moisture, does not operate normally, or has been dropped. 15 The mains plug is the disconnecting device. A grounding type plug has two blades and a ...
User Manual (English)
Page 8
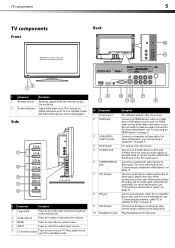
...input source. 5 (Power) button Press to the audio jacks. For service only. Connect an AV device to this manual for audio left). TV components 5 TV components Back Front Model DX-L15-10A is used in the channel list. Side # Component Description 1 CH /CH 2 VOL /VOL Press to go to make an audio connection.... not carry an audio signal, so you do not need to these jacks. Connect a component video device to connect audio cables from the remote control. Connect an AV device (video and audio) to this jack. For more information, see "Connecting an antenna, cable...
...input source. 5 (Power) button Press to the audio jacks. For service only. Connect an AV device to this manual for audio left). TV components 5 TV components Back Front Model DX-L15-10A is used in the channel list. Side # Component Description 1 CH /CH 2 VOL /VOL Press to go to make an audio connection.... not carry an audio signal, so you do not need to these jacks. Connect a component video device to connect audio cables from the remote control. Connect an AV device (video and audio) to this jack. For more information, see "Connecting an antenna, cable...
User Manual (English)
Page 9
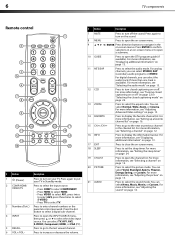
...select AV1, press twice to select AV2, press three times to select S-VIDEO. • Press TV to select TV. 3 Numbers/Dot(.) Press to enter channel numbers or the parental control password. 6 TV components Remote control INFO # Button Description 1 (Power) Press to turn on or off. Press again to .... 9 / ENTER Press direction buttons to navigate in an on page 12. 16 INFO Press to turn closed captioning mode" on page 15. Press to increase or decrease the volume. # Button Description 7 MUTE Press to display the information banner. Press ENTER to confirm selections ...
...select AV1, press twice to select AV2, press three times to select S-VIDEO. • Press TV to select TV. 3 Numbers/Dot(.) Press to enter channel numbers or the parental control password. 6 TV components Remote control INFO # Button Description 1 (Power) Press to turn on or off. Press again to .... 9 / ENTER Press direction buttons to navigate in an on page 12. 16 INFO Press to turn closed captioning mode" on page 15. Press to increase or decrease the volume. # Button Description 7 MUTE Press to display the information banner. Press ENTER to confirm selections ...
User Manual (English)
Page 10
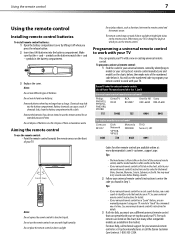
...a code search to identify a code that matches your TV. Five such remotes are available online at which you can operate your universal remote control's instructions for details. 3 If all Dynex TVs manufactured after Jan. 1, 2007) Universal remote control manufacturer and model Philips PHDVD5, PH5DSS, PMDVR8, PDVR8... no longer have a charge. Do not use the remote control for all else fails, you press the release button. 2 Insert two AAA batteries into the battery compartment. Dynex TV codes for universal remote controls (for an extended amount of the numbered code below...
...a code search to identify a code that matches your TV. Five such remotes are available online at which you can operate your universal remote control's instructions for details. 3 If all Dynex TVs manufactured after Jan. 1, 2007) Universal remote control manufacturer and model Philips PHDVD5, PH5DSS, PMDVR8, PDVR8... no longer have a charge. Do not use the remote control for all else fails, you press the release button. 2 Insert two AAA batteries into the battery compartment. Dynex TV codes for universal remote controls (for an extended amount of the numbered code below...
User Manual (English)
Page 13
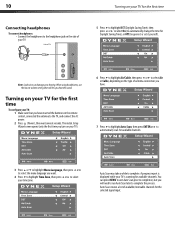
... Scan may take a while to select your time zone. Auto Scan creates a list of your TV. Side of antenna connection you have inserted the batteries in the remote control, connected the antenna to the TV, and connect the AC power. 2 Press (Power), then wait several seconds. 10 Turning on ...your TV for the first time Connecting headphones To connect headphones: • Connect the headphones to ...
... Scan may take a while to select your time zone. Auto Scan creates a list of your TV. Side of antenna connection you have inserted the batteries in the remote control, connected the antenna to the TV, and connect the AC power. 2 Press (Power), then wait several seconds. 10 Turning on ...your TV for the first time Connecting headphones To connect headphones: • Connect the headphones to ...
User Manual (English)
Page 14
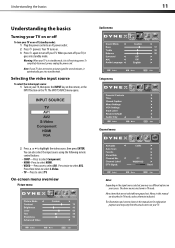
...an input signal for explanation purposes and may see different options on your TV, then press the INPUT key on the remote, or the INPUT button on the TV. The above menus are grayed out. Warning: When your TV is still receiving power. Understanding the basics 11 Understanding the basics Turning... Depending on the signal source selected, you turn off your TV. When you may vary from the actual screens on . 3 Press again to turn off your TV, it is in TV mode. You can also select the input source using the following remote control buttons: • COMP-Press to select Component. ...
...an input signal for explanation purposes and may see different options on your TV, then press the INPUT key on the remote, or the INPUT button on the TV. The above menus are grayed out. Warning: When your TV is still receiving power. Understanding the basics 11 Understanding the basics Turning... Depending on the signal source selected, you turn off your TV. When you may vary from the actual screens on . 3 Press again to turn off your TV, it is in TV mode. You can also select the input source using the following remote control buttons: • COMP-Press to select Component. ...
User Manual (English)
Page 16
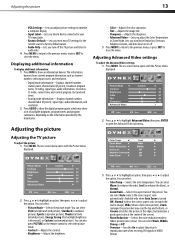
... video input source, and resolution. • Digital mode information-Displays channel number, station name, channel label (if preset), broadcast program name, TV rating, signal type, audio information, resolution, CC mode, current time, and current program start and end times. • Analog mode information-... the picture: 1 Press MENU. You can select Auto (selects the correct aspect ratio automatically. You can also press PICTURE on the remote control to select the picture mode. • Contrast-Adjusts the contrast. • Brightness-Adjusts the brightness. 3 Press or to highlight...
... video input source, and resolution. • Digital mode information-Displays channel number, station name, channel label (if preset), broadcast program name, TV rating, signal type, audio information, resolution, CC mode, current time, and current program start and end times. • Analog mode information-... the picture: 1 Press MENU. You can select Auto (selects the correct aspect ratio automatically. You can also press PICTURE on the remote control to select the picture mode. • Contrast-Adjusts the contrast. • Brightness-Adjusts the brightness. 3 Press or to highlight...
User Manual (English)
Page 18
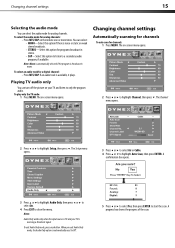
.... 2 Press or to close the menu. Notes: Audio Only works only when the input source is TV and your TV and listen to a secondary audio program, if available. Changing channel settings 15 Selecting the audio mode You can select: • MONO-Select this option if there is noise or ...static on weak stereo broadcasts. • STEREO-Select this option to listen to only the program audio. The on the remote...
.... 2 Press or to close the menu. Notes: Audio Only works only when the input source is TV and your TV and listen to a secondary audio program, if available. Changing channel settings 15 Selecting the audio mode You can select: • MONO-Select this option if there is noise or ...static on weak stereo broadcasts. • STEREO-Select this option to listen to only the program audio. The on the remote...
User Manual (English)
Page 28
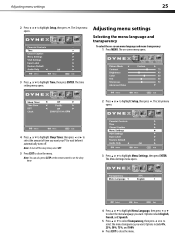
The time setting menu opens. 4 Press or to highlight Sleep Timer, then press or to select the amount of time you want your TV to wait before it automatically turns off the sleep timer, select Off. 5 Press EXIT to select the menu transparency you want . Options include ...to highlight Time, then press ENTER. Options include 0%, 25%, 50%, 75%, and 100% 6 Press EXIT to highlight Setup, then press . The on the remote control to set the sleep timer. 2 Press or to close the menu. Parental Controls Adjusting menu settings Selecting the menu language and transparency To select...
The time setting menu opens. 4 Press or to highlight Sleep Timer, then press or to select the amount of time you want your TV to wait before it automatically turns off the sleep timer, select Off. 5 Press EXIT to select the menu transparency you want . Options include ...to highlight Time, then press ENTER. Options include 0%, 25%, 50%, 75%, and 100% 6 Press EXIT to highlight Setup, then press . The on the remote control to set the sleep timer. 2 Press or to close the menu. Parental Controls Adjusting menu settings Selecting the menu language and transparency To select...
User Manual (English)
Page 30
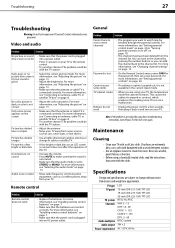
.... General Problem Solution Cannot tune to one or more information, see "Adjusting the picture" on your TV yourself. TV type LCD TV panel 15-inch (DX-L15-10A) TFT LCD 19-inch (DX-L19-10A) TFT LCD TV system Channels 22-inch (DX-L22-10A) TFT LCD NTSC-M, ATSC VHF: 2 - 13 UHF: 14 - 69 CATV: 1 - 125 CADTV: 1-135...color, picture is dark, or color is not correct Only noise (snow) appears on your TV, the temperature inside the cabinet increases. For more information, see "Installing remote control batteries" on page 8. • Adjust the color saturation. You can tune to the ...
.... General Problem Solution Cannot tune to one or more information, see "Adjusting the picture" on your TV yourself. TV type LCD TV panel 15-inch (DX-L15-10A) TFT LCD 19-inch (DX-L19-10A) TFT LCD TV system Channels 22-inch (DX-L22-10A) TFT LCD NTSC-M, ATSC VHF: 2 - 13 UHF: 14 - 69 CATV: 1 - 125 CADTV: 1-135...color, picture is dark, or color is not correct Only noise (snow) appears on your TV, the temperature inside the cabinet increases. For more information, see "Installing remote control batteries" on page 8. • Adjust the color saturation. You can tune to the ...


