User Manual (English)
Page 4
...how and where you use your flat panel display As you enjoy your TV. • Carefully read and understand all enclosed instructions for proper use of this manual, or otherwise listed by an independent laboratory as a chest of TV stand does not fit all. We and the consumer electronics industry are ...committed to safely wall mount your TV and that are not always supported on the proper ...
...how and where you use your flat panel display As you enjoy your TV. • Carefully read and understand all enclosed instructions for proper use of this manual, or otherwise listed by an independent laboratory as a chest of TV stand does not fit all. We and the consumer electronics industry are ...committed to safely wall mount your TV and that are not always supported on the proper ...
User Manual (English)
Page 8
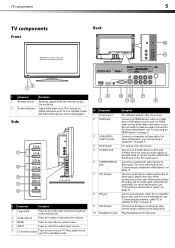
TV components 5 TV components Back Front Model DX-L15-10A is used in this manual for audio left). Lights red when your TV in standby mode. ## Component 1 Service port 2 HDMI jack 3 VGA AUDIO/ VGA ... audio jacks. Do not use . For more information, see "Connecting a component video device" on your TV is turned on page 8. Press to increase or decrease the volume. 3 MENU Press to open the on...an audio signal, so you do not need to turn on page 9. Connect an antenna, cable TV, or a satellite box to this jack, then connect audio cables to make an audio connection. ...
TV components 5 TV components Back Front Model DX-L15-10A is used in this manual for audio left). Lights red when your TV in standby mode. ## Component 1 Service port 2 HDMI jack 3 VGA AUDIO/ VGA ... audio jacks. Do not use . For more information, see "Connecting a component video device" on your TV is turned on page 8. Press to increase or decrease the volume. 3 MENU Press to open the on...an audio signal, so you do not need to turn on page 9. Connect an antenna, cable TV, or a satellite box to this jack, then connect audio cables to make an audio connection. ...
User Manual (English)
Page 10
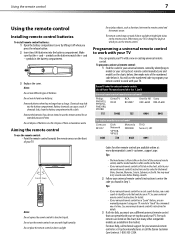
...with a new or existing universal remote control. Battery chemicals can cause a rash. Remove the batteries if you can manually program it using your TV remote to shock or liquids. The remote control may leak into the battery compartment. Notes: Do not mix different ...your universal remote control or set-top box manufacturer, or call technical support for an extended amount of time. Dynex TV codes for universal remote controls (for all Dynex TVs manufactured after Jan. 1, 2007) Universal remote control manufacturer and model Philips PHDVD5, PH5DSS, PMDVR8, PDVR8 DirectTV...
...with a new or existing universal remote control. Battery chemicals can cause a rash. Remove the batteries if you can manually program it using your TV remote to shock or liquids. The remote control may leak into the battery compartment. Notes: Do not mix different ...your universal remote control or set-top box manufacturer, or call technical support for an extended amount of time. Dynex TV codes for universal remote controls (for all Dynex TVs manufactured after Jan. 1, 2007) Universal remote control manufacturer and model Philips PHDVD5, PH5DSS, PMDVR8, PDVR8 DirectTV...

User Manual (English)
Page 11
...turned off. 2 Connect an AV cable to the AV1 IN AUDIO-L and AUDIO-R jacks on your TV. Side of your TV. Connecting an antenna, cable TV, or satellite TV box To connect an antenna, cable TV, or satellite TV box: 1 Connect one end of a 75 ohm cable (not included) to the AV VIDEO ...external audio/video equipment shown in image or color problems. Make sure that all connections are often color-coded to the user manual that your equipment. Notes: Your TV should only be used for position and type before making any connections. Connecting a camcorder or game Tip: Some game consoles have...
...turned off. 2 Connect an AV cable to the AV1 IN AUDIO-L and AUDIO-R jacks on your TV. Side of your TV. Connecting an antenna, cable TV, or satellite TV box To connect an antenna, cable TV, or satellite TV box: 1 Connect one end of a 75 ohm cable (not included) to the AV VIDEO ...external audio/video equipment shown in image or color problems. Make sure that all connections are often color-coded to the user manual that your equipment. Notes: Your TV should only be used for position and type before making any connections. Connecting a camcorder or game Tip: Some game consoles have...
User Manual (English)
Page 14
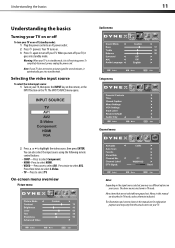
.... • HDMI-Press to select HDMI. • VIDEO-Press once to select AV2. Menus in this manual are shown in the manual are grayed out. Warning: When your TV does not receive an input signal for explanation purposes and may see different options on the signal source selected, ...you turn off your TV. On-screen menu overview Picture menu Notes: Depending on your screen. Selecting the ...
.... • HDMI-Press to select HDMI. • VIDEO-Press once to select AV2. Menus in this manual are shown in the manual are grayed out. Warning: When your TV does not receive an input signal for explanation purposes and may see different options on the signal source selected, ...you turn off your TV. On-screen menu overview Picture menu Notes: Depending on your screen. Selecting the ...
User Manual (English)
Page 27
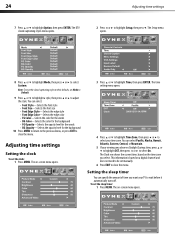
... menu, or press EXIT to close the menu. The time setting menu opens. 4 Press or to highlight Time Zone, then press or to select your TV to wait before it automatically turns off. This information is based on -screen menu opens. 3 Press or to adjust the style. Setting the sleep timer... to Default. 9 Press or to highlight a style, then press or to highlight Time, then press ENTER. The DTV closed captioning styles to their defaults, set manually. 6 Press EXIT to close the menu. The on the time zone you want your time zone. You can specify the amount of time you select...
... menu, or press EXIT to close the menu. The time setting menu opens. 4 Press or to highlight Time Zone, then press or to select your TV to wait before it automatically turns off. This information is based on -screen menu opens. 3 Press or to adjust the style. Setting the sleep timer... to Default. 9 Press or to highlight a style, then press or to highlight Time, then press ENTER. The DTV closed captioning styles to their defaults, set manually. 6 Press EXIT to close the menu. The on the time zone you want your time zone. You can specify the amount of time you select...


