
User Guide 1
Page 2
Copyright © 2011 Sanford, L.P. Trademarks DYMO and LabelManager are the property of Sanford, L.P. All other countries. No part of this document may be reproduced or transmitted in the US and other trademarks are registered marks in any form or by any means or translated into another language without the prior written consent of their respective holders. All rights reserved.
Copyright © 2011 Sanford, L.P. Trademarks DYMO and LabelManager are the property of Sanford, L.P. All other countries. No part of this document may be reproduced or transmitted in the US and other trademarks are registered marks in any form or by any means or translated into another language without the prior written consent of their respective holders. All rights reserved.
User Guide 1
Page 3
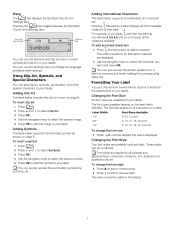
... Power Adapter 5 Inserting and Removing the Label Cassette 5 Using the Label Maker for the First Time 6 Getting to Know the Label Maker 6 Power 6 LCD Display 6 Navigation Keys 6 Cancel 6 Backspace/Clear 6 Caps Mode 6 Menu 7 Using Clip Art, Symbols, and Special Characters 7 Adding Clip Art 7 Adding Symbols 7 Adding International Characters 7 Formatting Your Label 7 Changing the Font Size 7 Changing the Font Style 7 Adding Box and Underline Styles 8 Creating Vertical Labels 8 Creating Two-Line Labels 8 Caring for Your Label Maker 8 Clip Art 9 Symbols 9 Troubleshooting...
... Power Adapter 5 Inserting and Removing the Label Cassette 5 Using the Label Maker for the First Time 6 Getting to Know the Label Maker 6 Power 6 LCD Display 6 Navigation Keys 6 Cancel 6 Backspace/Clear 6 Caps Mode 6 Menu 7 Using Clip Art, Symbols, and Special Characters 7 Adding Clip Art 7 Adding Symbols 7 Adding International Characters 7 Formatting Your Label 7 Changing the Font Size 7 Changing the Font Style 7 Adding Box and Underline Styles 8 Creating Vertical Labels 8 Creating Two-Line Labels 8 Caring for Your Label Maker 8 Clip Art 9 Symbols 9 Troubleshooting...
User Guide 1
Page 4
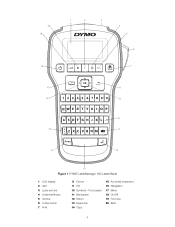
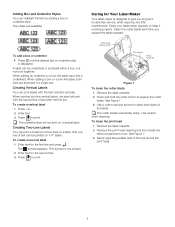
Punctuation 11 Backspace 12 Return 13 Space bar 14 Caps 15 Accented characters 16 Navigation 17 Menu 18 On/Off 19 Font size 20 Bold 4 20 19 18 1 2 3 4 5 6 7 17 8 16 9 10 15 11 14 12 13 Figure 1 DYMO LabelManager 160 Label Maker 1 LCD display 2 Italic 3 Label exit slot 4 Underline/Boxes 5 Vertical 6 Cutter button 7 Print 8 Cancel 9 OK 10 Symbols -
Punctuation 11 Backspace 12 Return 13 Space bar 14 Caps 15 Accented characters 16 Navigation 17 Menu 18 On/Off 19 Font size 20 Bold 4 20 19 18 1 2 3 4 5 6 7 17 8 16 9 10 15 11 14 12 13 Figure 1 DYMO LabelManager 160 Label Maker 1 LCD display 2 Italic 3 Label exit slot 4 Underline/Boxes 5 Vertical 6 Cutter button 7 Print 8 Cancel 9 OK 10 Symbols -
User Guide 1
Page 5
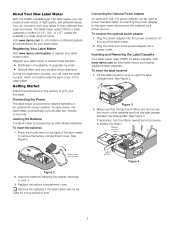
...the label maker to print your label maker online. Connecting the power adapter to open the label compartment. Label guides Figure 4 5 Connecting the Optional Power Adapter An optional 9 Volt, 2 A power adapter can create a wide variety of high-quality, self-adhesive labels. Figure 3 2 Make sure that the label passes between the label guides. Inserting the Batteries The label maker is powered by six AAA alkaline batteries. The label maker uses DYMO D1 label cassettes in this section to remove the battery compartment cover. To connect the optional power adapter 1 Plug...
...the label maker to print your label maker online. Connecting the power adapter to open the label compartment. Label guides Figure 4 5 Connecting the Optional Power Adapter An optional 9 Volt, 2 A power adapter can create a wide variety of high-quality, self-adhesive labels. Figure 3 2 Make sure that the label passes between the label guides. Inserting the Batteries The label maker is powered by six AAA alkaline batteries. The label maker uses DYMO D1 label cassettes in this section to remove the battery compartment cover. To connect the optional power adapter 1 Plug...

User Guide 1
Page 6
... select the language and label width settings. Each time you add is visible instantly. 1 23 4 5 6 7 8 1 Uppercase 5 Bold 2 Lowercase 6 Italic 3 Accented characters 7 Underline/Boxes 4 Font size 8 Vertical Feature indicators along the top and bottom of the printer. 2 Remove the label cassette. 3 Insert a new label cassette as printing. Power The key turns the label maker on . 6 When CAPS mode is CAPS mode on and off . LCD Display With DYMO's exclusive graphical display, most of the formatting you change these selections using...
... select the language and label width settings. Each time you add is visible instantly. 1 23 4 5 6 7 8 1 Uppercase 5 Bold 2 Lowercase 6 Italic 3 Accented characters 7 Underline/Boxes 4 Font size 8 Vertical Feature indicators along the top and bottom of the printer. 2 Remove the label cassette. 3 Insert a new label cassette as printing. Power The key turns the label maker on . 6 When CAPS mode is CAPS mode on and off . LCD Display With DYMO's exclusive graphical display, most of the formatting you change these selections using...
User Guide 1
Page 7
.... Adding International Characters The label maker supports the extended Latin character set shown on the label width selected. You can use the Settings menu to change the font size Press until the desired font size is instantly visible in the display. 7 Changing the Font Size Six font sizes are available: bold and italic. Changing the Font Style Two font styles are available for your labels. To change the font style Press to add or remove bold. ...
.... Adding International Characters The label maker supports the extended Latin character set shown on the label width selected. You can use the Settings menu to change the font size Press until the desired font size is instantly visible in the display. 7 Changing the Font Size Six font sizes are available: bold and italic. Changing the Font Style Two font styles are available for your labels. To change the font style Press to add or remove bold. ...
User Guide 1
Page 8
... printing two-line vertical labels, the label will not print on 1/4" labels. Clean your label maker regularly to give you replace the label cassette. See Figure 7. 3 Use a cotton ball and alcohol to expose the cutter blade. The cutter blade is displayed. Adding Box and Underline Styles You can print labels with the second line of text after the first line. Print head cleaning tool Print head Press and hold Figure 7 To clean the cutter blade 1 Remove the label cassette. 2 Press and hold the cutter button to clean both lines...
... printing two-line vertical labels, the label will not print on 1/4" labels. Clean your label maker regularly to give you replace the label cassette. See Figure 7. 3 Use a cotton ball and alcohol to expose the cutter blade. The cutter blade is displayed. Adding Box and Underline Styles You can print labels with the second line of text after the first line. Print head cleaning tool Print head Press and hold Figure 7 To clean the cutter blade 1 Remove the label cassette. 2 Press and hold the cutter button to clean both lines...
User Guide 1
Page 10
Problem/Error Message Solution No display Ensure the label maker is inserted. Poor cutter performance Clean the cutter blade. Replace batteries or connect the optional power adapter. replace label cassette. Clean the cutter blade. DYMO labels have an easy-to two lines of text are allowed on . Replace batteries or connect the optional power adapter. See Caring for Your Label Maker. Replace the label cassette. Battery low Insert cassette! No action required. No label cassette is turned on 3/8" and 1/2" labels. ...
Problem/Error Message Solution No display Ensure the label maker is inserted. Poor cutter performance Clean the cutter blade. Replace batteries or connect the optional power adapter. replace label cassette. Clean the cutter blade. DYMO labels have an easy-to two lines of text are allowed on . Replace batteries or connect the optional power adapter. See Caring for Your Label Maker. Replace the label cassette. Battery low Insert cassette! No action required. No label cassette is turned on 3/8" and 1/2" labels. ...
User Guide 1
Page 11
...messages to: documentation@dymo.com Keep in mind that this product, please contact your end-of-life equipment in accordance with the EMC directive and the low voltage directive and is CE marked in an environmentally sound way. This product is designed to conform with the following information with your suggestions about our user guides...We are constantly working to produce the highest quality documentation for more information on We also welcome your feedback: Product name, model number, and User Guide page number Brief description of instructions that are ...
...messages to: documentation@dymo.com Keep in mind that this product, please contact your end-of-life equipment in accordance with the EMC directive and the low voltage directive and is CE marked in an environmentally sound way. This product is designed to conform with the following information with your suggestions about our user guides...We are constantly working to produce the highest quality documentation for more information on We also welcome your feedback: Product name, model number, and User Guide page number Brief description of instructions that are ...


