User Guide 1
Page 4
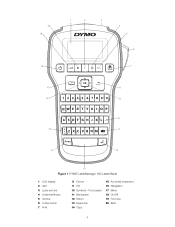
20 19 18 1 2 3 4 5 6 7 17 8 16 9 10 15 11 14 12 13 Figure 1 DYMO LabelManager 160 Label Maker 1 LCD display 2 Italic 3 Label exit slot 4 Underline/Boxes 5 Vertical 6 Cutter button 7 Print 8 Cancel 9 OK 10 Symbols - Punctuation 11 Backspace 12 Return 13 Space bar 14 Caps 15 Accented characters 16 Navigation 17 Menu 18 On/Off 19 Font size 20 Bold 4
20 19 18 1 2 3 4 5 6 7 17 8 16 9 10 15 11 14 12 13 Figure 1 DYMO LabelManager 160 Label Maker 1 LCD display 2 Italic 3 Label exit slot 4 Underline/Boxes 5 Vertical 6 Cutter button 7 Print 8 Cancel 9 OK 10 Symbols - Punctuation 11 Backspace 12 Return 13 Space bar 14 Caps 15 Accented characters 16 Navigation 17 Menu 18 On/Off 19 Font size 20 Bold 4
User Guide 1
Page 5
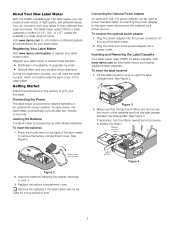
...a power outlet. To save power, the label maker automatically turns off after two minutes of colors. About Your New Label Maker With the DYMO LabelManager 160 label maker, you will not be used for a long period of time. Connecting the power adapter to open Figure 2 2 Insert the ...batteries following the polarity markings (+ and -). 3 Replace the battery compartment cover. The label maker uses DYMO D1 label cassettes in a wide range of inactivity. To insert the label cassette 1 Lift the label cassette cover to the label maker disconnects the...
...a power outlet. To save power, the label maker automatically turns off after two minutes of colors. About Your New Label Maker With the DYMO LabelManager 160 label maker, you will not be used for a long period of time. Connecting the power adapter to open Figure 2 2 Insert the ...batteries following the polarity markings (+ and -). 3 Replace the battery compartment cover. The label maker uses DYMO D1 label cassettes in a wide range of inactivity. To insert the label cassette 1 Lift the label cassette cover to the label maker disconnects the...


