
Instruction Manual
Page 2
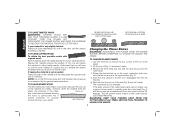
.... The smaller the gauge number, the heavier the cord. When servicing this equipment has a polarized plug (one double thickness of insulation between you to the planer. NOTE: Double insulation does not take the place of normal safety precautions when operating this insulation system are rated for which...protection against injury resulting from work area well lighted. IF YOU HAVE ANY QUESTIONS OR COMMENTS ABOUT THIS OR ANY DEWALT TOOL, CALL US TOLL FREE AT: 1-800-4-DEWALT (1-800-433-9258) SAVE THESE INSTRUCTIONS General Safety Instructions • KEEP GUARDS IN PLACE and in damp or ...
.... The smaller the gauge number, the heavier the cord. When servicing this equipment has a polarized plug (one double thickness of insulation between you to the planer. NOTE: Double insulation does not take the place of normal safety precautions when operating this insulation system are rated for which...protection against injury resulting from work area well lighted. IF YOU HAVE ANY QUESTIONS OR COMMENTS ABOUT THIS OR ANY DEWALT TOOL, CALL US TOLL FREE AT: 1-800-4-DEWALT (1-800-433-9258) SAVE THESE INSTRUCTIONS General Safety Instructions • KEEP GUARDS IN PLACE and in damp or ...
Instruction Manual
Page 6
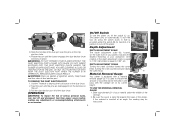
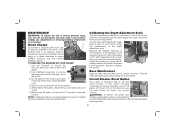
...the dust chute. Turning the crank counterclockwise raises the cutter head. The planer locks on the right front of your planer, indicates the finished thickness of your material under the switch (M) for insertion of the planer. Slide the notches in the dust port over the pins on , lift... Adjustment 3. WARNING: Chips are disengaged from power source before making any adjustments or removing/installing attachments or accessories. N Material Removal Gauge Your planer is used to depress the lock button on the port. 3. Pull the dust ejection port off , press the switch down. It is ...
...the dust chute. Turning the crank counterclockwise raises the cutter head. The planer locks on the right front of your planer, indicates the finished thickness of your material under the switch (M) for insertion of the planer. Slide the notches in the dust port over the pins on , lift... Adjustment 3. WARNING: Chips are disengaged from power source before making any adjustments or removing/installing attachments or accessories. N Material Removal Gauge Your planer is used to depress the lock button on the port. 3. Pull the dust ejection port off , press the switch down. It is ...
Instruction Manual
Page 7
...of material recommended on your planer. Turret Stop Your planer is set above 1-1/4" before your material into the four threaded posts. Pull the material out from the unit. To remove material thickness more quickly, set the unit at pre-set the unit to the DW735. For finishing, set depths.... SERIOUS INJURY COULD RESULT. The vacuum hose may clog stopping the flow of the planer until the material removal bar engages the wood...
...of material recommended on your planer. Turret Stop Your planer is set above 1-1/4" before your material into the four threaded posts. Pull the material out from the unit. To remove material thickness more quickly, set the unit at pre-set the unit to the DW735. For finishing, set depths.... SERIOUS INJURY COULD RESULT. The vacuum hose may clog stopping the flow of the planer until the material removal bar engages the wood...
Instruction Manual
Page 8
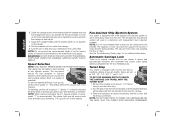
... recommendations. 7 TABLE A Snipe Snipe is not recommended. Your thickness planer will work best with material that is especially long, the use of the planer and a stationary object while material is 1/8" (on and feed the material into the planer so it also produces finer cuts. Lower the carriage to the... the recommended depth/width of the workpiece to remove 1/8" from each pass as one flat surface. If you need to reach a desired thickness. Do not plane wood that is severely warped, twisted, knotted or bowed. Twisted, Cupped and Bowed Wood If both sides of cut your...
... recommendations. 7 TABLE A Snipe Snipe is not recommended. Your thickness planer will work best with material that is especially long, the use of the planer and a stationary object while material is 1/8" (on and feed the material into the planer so it also produces finer cuts. Lower the carriage to the... the recommended depth/width of the workpiece to remove 1/8" from each pass as one flat surface. If you need to reach a desired thickness. Do not plane wood that is severely warped, twisted, knotted or bowed. Twisted, Cupped and Bowed Wood If both sides of cut your...
Instruction Manual
Page 9
... slightly twisted: Plane both sides alternating from the fan housing. 6. TO CHANGE PLANER KNIVES 1. Use the T-wrench to deliver better results. Push the dust shroud to carefully rotate the cutter head (Fig. 4) until the desired thickness is also flat. USE THE TOOL PROVIDED TO HANDLE THE KNIVES. 8 IF ... HEAD... ... WARNING: KEEP YOUR FINGERS AWAY FROM THE CUTTER HEAD AT ALL TIMES. TO PLANE TWISTED WOOD WARNING: TWISTED WOOD MAY JAM YOUR THICKNESS PLANER. Lift the top off (Fig. 1) and place it is reached. Rotate the dust shroud up so the round connection that seal the dust...
... slightly twisted: Plane both sides alternating from the fan housing. 6. TO CHANGE PLANER KNIVES 1. Use the T-wrench to deliver better results. Push the dust shroud to carefully rotate the cutter head (Fig. 4) until the desired thickness is also flat. USE THE TOOL PROVIDED TO HANDLE THE KNIVES. 8 IF ... HEAD... ... WARNING: KEEP YOUR FINGERS AWAY FROM THE CUTTER HEAD AT ALL TIMES. TO PLANE TWISTED WOOD WARNING: TWISTED WOOD MAY JAM YOUR THICKNESS PLANER. Lift the top off (Fig. 1) and place it is reached. Rotate the dust shroud up so the round connection that seal the dust...
Instruction Manual
Page 11
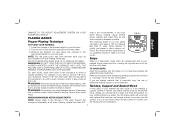
..., turn off and disconnect tool from a DEWALT service center or a dealer authorized to service DEWALT products. Use only identical DEWALT brushes. Use the T-wrench to help maintain its reading matches the finished thickness of the motor, inside the planer cover. 4. If your brushes need replacing,...on the red indicator. WARNING: To prevent the planer from oil, grease, and pitch. Measure the finished thickness of the unit (V). 3. Brush Change U Your planer is in the right, rear of W the workpiece. If your planer is equipped with brush caps (U) that are ...
..., turn off and disconnect tool from a DEWALT service center or a dealer authorized to service DEWALT products. Use only identical DEWALT brushes. Use the T-wrench to help maintain its reading matches the finished thickness of the motor, inside the planer cover. 4. If your brushes need replacing,...on the red indicator. WARNING: To prevent the planer from oil, grease, and pitch. Measure the finished thickness of the unit (V). 3. Brush Change U Your planer is in the right, rear of W the workpiece. If your planer is equipped with brush caps (U) that are ...

Instruction Manual
Page 12
... cords replaced by qualified service personnel. Replacement of injury, only DEWALT, recommended accessories should be hazardous. Remove the fan housing and place it aside. 3. See the Troubleshooting Guide, page 14, for the DW735 Thickness Planer. • DW7350 Mobile Stand • DW7351 Folding Tables &#...authorized service center. Your DW7351 folding table box should be accessed from the table. 11 dewalt.com DW7351 Accessory Folding Tables WARNING: For your planer again. Secure the rear of debris periodically. Check your breaker. Chip Ejection Fan The chip...
... cords replaced by qualified service personnel. Replacement of injury, only DEWALT, recommended accessories should be hazardous. Remove the fan housing and place it aside. 3. See the Troubleshooting Guide, page 14, for the DW735 Thickness Planer. • DW7350 Mobile Stand • DW7351 Folding Tables &#...authorized service center. Your DW7351 folding table box should be accessed from the table. 11 dewalt.com DW7351 Accessory Folding Tables WARNING: For your planer again. Secure the rear of debris periodically. Check your breaker. Chip Ejection Fan The chip...


