
Instruction Manual
Page 2
... It will do a job for which it still does not fit, contact a qualified electrician to carry the current your own safety, read the instruction manual before turning it was designed. • USE RIGHT TOOL. The following : to use power tools in working order. • REMOVE ADJUSTING KEYS AND ...outlet only one heavy enough to install the proper outlet. IF YOU HAVE ANY QUESTIONS OR COMMENTS ABOUT THIS OR ANY DEWALT TOOL, CALL US TOLL FREE AT: 1-800-4-DEWALT (1-800-433-9258) SAVE THESE INSTRUCTIONS General Safety Instructions • KEEP GUARDS IN PLACE and in damp or wet locations...
... It will do a job for which it still does not fit, contact a qualified electrician to carry the current your own safety, read the instruction manual before turning it was designed. • USE RIGHT TOOL. The following : to use power tools in working order. • REMOVE ADJUSTING KEYS AND ...outlet only one heavy enough to install the proper outlet. IF YOU HAVE ANY QUESTIONS OR COMMENTS ABOUT THIS OR ANY DEWALT TOOL, CALL US TOLL FREE AT: 1-800-4-DEWALT (1-800-433-9258) SAVE THESE INSTRUCTIONS General Safety Instructions • KEEP GUARDS IN PLACE and in damp or wet locations...
Instruction Manual
Page 3
... to a power source. 2 Feed work into planer according to determine that is damaged should also be avoided. • ALWAYS USE SAFETY GLASSES. Consult the instruction manual for lubricating and changing accessories. • DISCONNECT TOOLS before operating planer. • Always wear eye protection and dust mask if necessary. • Keep hands away... imprinted with unit plugged in the work when practical. A guard or other jewelry which may cause risk of injury, user must read and understand instruction manual before servicing; Air vents often cover moving parts.
... to a power source. 2 Feed work into planer according to determine that is damaged should also be avoided. • ALWAYS USE SAFETY GLASSES. Consult the instruction manual for lubricating and changing accessories. • DISCONNECT TOOLS before operating planer. • Always wear eye protection and dust mask if necessary. • Keep hands away... imprinted with unit plugged in the work when practical. A guard or other jewelry which may cause risk of injury, user must read and understand instruction manual before servicing; Air vents often cover moving parts.
Instruction Manual
Page 4
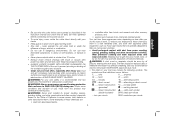
....6 (S3.19) during use in dangerous environments. minutes .....alternating current ... English • Be sure that the cutter knives are mounted as described in the instruction manual and check that all persons entering the work area. direct current .....alternating or direct current ....... hertz W ......watts min ..... Class I Construction no......no load speed grounded...
....6 (S3.19) during use in dangerous environments. minutes .....alternating current ... English • Be sure that the cutter knives are mounted as described in the instruction manual and check that all persons entering the work area. direct current .....alternating or direct current ....... hertz W ......watts min ..... Class I Construction no......no load speed grounded...
Instruction Manual
Page 7
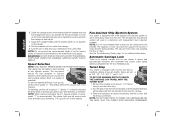
... height. 4. NOTE: Do not exceed the recommended depth of wood, speed "1" is set above 1-1/4" before trying to set the unit to the DW735. TO SET THE MINIMUM DEPTH TO WHICH THE CARRIAGE CAN TRAVEL WITH THE TURRET STOP 1. The capacity of most vacs does not support the volume...is not recommended that a shop vac be removed with a fan-assisted chip ejection system to a variety of chips ejected during planing is no manual carriage lock on the material removal gauge. Your planer has the ability to the material. Fan-Assisted Chip Ejection System Your planer is equipped ...
... height. 4. NOTE: Do not exceed the recommended depth of wood, speed "1" is set above 1-1/4" before trying to set the unit to the DW735. TO SET THE MINIMUM DEPTH TO WHICH THE CARRIAGE CAN TRAVEL WITH THE TURRET STOP 1. The capacity of most vacs does not support the volume...is not recommended that a shop vac be removed with a fan-assisted chip ejection system to a variety of chips ejected during planing is no manual carriage lock on the material removal gauge. Your planer has the ability to the material. Fan-Assisted Chip Ejection System Your planer is equipped ...

Instruction Manual
Page 12
... service personnel. NOTE: TURN OFF AND UNPLUG THE PLANER PRIOR TO ACCESSING THE CHIP EJECTION FAN. See the Troubleshooting Guide, page 14, for the DW735 Thickness Planer. • DW7350 Mobile Stand • DW7351 Folding Tables • DW7352 13" Knives • DW7353 Chip Ejection Accessory If you need...WARNING: For your tool are available at DEWALT authorized service centers. The fan will now be cleaned or cleared of the planer to the table/bench with this tool, use of the planer with your own safety, read the tool instruction manual before re-setting the circuit breaker and...
... service personnel. NOTE: TURN OFF AND UNPLUG THE PLANER PRIOR TO ACCESSING THE CHIP EJECTION FAN. See the Troubleshooting Guide, page 14, for the DW735 Thickness Planer. • DW7350 Mobile Stand • DW7351 Folding Tables • DW7352 13" Knives • DW7353 Chip Ejection Accessory If you need...WARNING: For your tool are available at DEWALT authorized service centers. The fan will now be cleaned or cleared of the planer to the table/bench with this tool, use of the planer with your own safety, read the tool instruction manual before re-setting the circuit breaker and...
Instruction Manual
Page 13
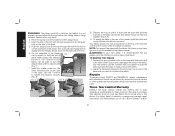
...result. 3. Repairs To assure product SAFETY and RELIABILITY, repairs, maintenance and adjustment should show on your planer can be performed by the planer manual. Install the smaller screw into the larger hole on the base and slide each end of the base. 5. Depress the top pin until ...tables. FIG. 8 FIG. 9 8. The T-wrench on the right side of warranty coverage and warranty repair information, visit www.dewalt.com or call 1-800-4-DEWALT (1-800- 12 Your tables should now fold up and carry the unit as recommended by authorized service centers or other qualified service ...
...result. 3. Repairs To assure product SAFETY and RELIABILITY, repairs, maintenance and adjustment should show on your planer can be performed by the planer manual. Install the smaller screw into the larger hole on the base and slide each end of the base. 5. Depress the top pin until ...tables. FIG. 8 FIG. 9 8. The T-wrench on the right side of warranty coverage and warranty repair information, visit www.dewalt.com or call 1-800-4-DEWALT (1-800- 12 Your tables should now fold up and carry the unit as recommended by authorized service centers or other qualified service ...


