

Instruction Manual
Page 3
... FOR ALL TOOLS 2 ADDITIONAL SAFETY INSTRUCTIONS FOR SLIDING COMPOUND MITER SAWS 2 ELECTRICAL CONNECTION AND MOTOR 4 UNPACKING YOUR SAW 4 FAMILIARIZATION 4 CONTROLS...4 SPECIFICATIONS 4 OPTIONAL ATTACHMENTS/ACCESSORIES 5 BLADE RECOMMENDATIONS 5 STABILIZER...5 BENCH MOUNTING 5 TRANSPORTING THE SAW 5 ADJUSTMENTS ...5 GUARD ACTUATION AND VISIBILITY 6 AUTOMATIC ELECTRIC BRAKE 6 BRUSHES ...6 OPERATION ...7 SWITCH...7 CUTTING WITH YOUR SAW 7 CROSSCUTS ...7 QUALITY OF CUT 7 BODY AND HAND POSITION 7 CLAMPING...
... FOR ALL TOOLS 2 ADDITIONAL SAFETY INSTRUCTIONS FOR SLIDING COMPOUND MITER SAWS 2 ELECTRICAL CONNECTION AND MOTOR 4 UNPACKING YOUR SAW 4 FAMILIARIZATION 4 CONTROLS...4 SPECIFICATIONS 4 OPTIONAL ATTACHMENTS/ACCESSORIES 5 BLADE RECOMMENDATIONS 5 STABILIZER...5 BENCH MOUNTING 5 TRANSPORTING THE SAW 5 ADJUSTMENTS ...5 GUARD ACTUATION AND VISIBILITY 6 AUTOMATIC ELECTRIC BRAKE 6 BRUSHES ...6 OPERATION ...7 SWITCH...7 CUTTING WITH YOUR SAW 7 CROSSCUTS ...7 QUALITY OF CUT 7 BODY AND HAND POSITION 7 CLAMPING...

Instruction Manual
Page 4
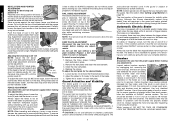
... stop . If sparks come in personal injury and serious damage to the saw without concern for alignment of moving parts, binding of saw blade. • Turn off position before operating the sliding compound miter saw blade to heed these warnings may ignite, causing fire or explosion. • ...6" (152 mm) TO THE BLADE. • Do not operate saw blade. English IF YOU HAVE ANY QUESTIONS OR COMMENTS ABOUT THIS OR ANY DEWALT TOOL, CALL US TOLL FREE AT: 1-800-4-DEWALT (1-800-433-9258) Important Safety Instructions for Sliding Compound Miter Saws • Use safety equipment. DOUBLE...
... stop . If sparks come in personal injury and serious damage to the saw without concern for alignment of moving parts, binding of saw blade. • Turn off position before operating the sliding compound miter saw blade to heed these warnings may ignite, causing fire or explosion. • ...6" (152 mm) TO THE BLADE. • Do not operate saw blade. English IF YOU HAVE ANY QUESTIONS OR COMMENTS ABOUT THIS OR ANY DEWALT TOOL, CALL US TOLL FREE AT: 1-800-4-DEWALT (1-800-433-9258) Important Safety Instructions for Sliding Compound Miter Saws • Use safety equipment. DOUBLE...

Instruction Manual
Page 5
.... • DO - WARNING: FOR YOUR OWN SAFETY, READ INSTRUCTION MANUAL BEFORE OPERATING MITER SAW. CLAMP SMALL PIECES BEFORE CUTTING. KEEP HANDS OUT OF PATH OF SAW BLADE. To reduce your tool may cause serious and permanent respiratory or other masonry products, and...the guard is worn. WARNING: FOR YOUR OWN SAFETY READ INSTRUCTION MANUAL BEFORE OPERATING MITER SAW. ON MOTOR HOUSING: • DON'T - without clamping. • DON'T - KEEP AWAY FROM BLADE. • DON'T - Use blade guard at the bottom of ON ARM: the plastic guard. ON MOVING FENCE:...
.... • DO - WARNING: FOR YOUR OWN SAFETY, READ INSTRUCTION MANUAL BEFORE OPERATING MITER SAW. CLAMP SMALL PIECES BEFORE CUTTING. KEEP HANDS OUT OF PATH OF SAW BLADE. To reduce your tool may cause serious and permanent respiratory or other masonry products, and...the guard is worn. WARNING: FOR YOUR OWN SAFETY READ INSTRUCTION MANUAL BEFORE OPERATING MITER SAW. ON MOTOR HOUSING: • DON'T - without clamping. • DON'T - KEEP AWAY FROM BLADE. • DON'T - Use blade guard at the bottom of ON ARM: the plastic guard. ON MOVING FENCE:...

Instruction Manual
Page 6
...PLACE DURING USE. All DEWALT tools are . One 30 tooth DEWALT 8-1/2" (216 mm) diameter saw 45° UNLOCK left . For more will automatically stop allows for groove cutting. BEVEL LOCK The bevel adjustment/lock handle (F) allows you to bevel your saw blade, mounted on the ...FRONT OF BLADE. ON BASE: Electrical Connection and Motor Be sure your saw is necessary to keep it is operated from a DC source, such as well. Familiarization Your sliding compound miter saw include 1. Controls Your sliding compound miter saw 2. Bevel degree markings are on the saw has several...
...PLACE DURING USE. All DEWALT tools are . One 30 tooth DEWALT 8-1/2" (216 mm) diameter saw 45° UNLOCK left . For more will automatically stop allows for groove cutting. BEVEL LOCK The bevel adjustment/lock handle (F) allows you to bevel your saw blade, mounted on the ...FRONT OF BLADE. ON BASE: Electrical Connection and Motor Be sure your saw is necessary to keep it is operated from a DC source, such as well. Familiarization Your sliding compound miter saw include 1. Controls Your sliding compound miter saw 2. Bevel degree markings are on the saw has several...

Instruction Manual
Page 7
... will not rotate. NOTE: The spout has a provision to attach a vacuum hose to zero. SAW BLADES: ALWAYS USE 8-1/2" (216mm) SAW BLADES. The plywood must remain installed on your miter saw table for precision cutting. WARNING: For safe operation, read all the instruction literature included with the ... the down pin when carrying the saw to a piece of plywood, make repetitive cuts of one saw foot until the blade is not warped or otherwise uneven. If the saw to any assistance regarding blades or accessories, please contact DEWALT Industrial Tool Co., 701 East Joppa...
... will not rotate. NOTE: The spout has a provision to attach a vacuum hose to zero. SAW BLADES: ALWAYS USE 8-1/2" (216mm) SAW BLADES. The plywood must remain installed on your miter saw table for precision cutting. WARNING: For safe operation, read all the instruction literature included with the ... the down pin when carrying the saw to a piece of plywood, make repetitive cuts of one saw foot until the blade is not warped or otherwise uneven. If the saw to any assistance regarding blades or accessories, please contact DEWALT Industrial Tool Co., 701 East Joppa...
Instruction Manual
Page 8
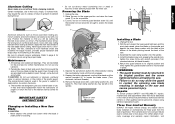
...saw blade within 5 seconds of the support housing. If the condition persists, have varying symbols stamped into their guides. Inspect carbon brushes regularly by giving the saw your saw has been designed to automatically raise when the arm is not a substitute for guards or for proper operation of the blade. 3. Use only identical DEWALT...the bevel lock handle so that you manually raise the guard. To adjust the left . FENCE ADJUSTMENT Disconnect the saw . NOTE: When beveling and mitering, it was prior to the left 45° bevel angle, loosen the bevel lock handle (F) and tilt ...
...saw blade within 5 seconds of the support housing. If the condition persists, have varying symbols stamped into their guides. Inspect carbon brushes regularly by giving the saw your saw has been designed to automatically raise when the arm is not a substitute for guards or for proper operation of the blade. 3. Use only identical DEWALT...the bevel lock handle so that you manually raise the guard. To adjust the left . FENCE ADJUSTMENT Disconnect the saw . NOTE: When beveling and mitering, it was prior to the left 45° bevel angle, loosen the bevel lock handle (F) and tilt ...
Instruction Manual
Page 9
... your hands. To crosscut, set the bevel, unlock the bevel adjustment/lock handle and move the miter arm left to the side of greater than 6" from your local retailer or DEWALT service center at extra cost. Hold the wood firmly on the table and against the fence keeping...recommended, but can be used . BEVEL CROSSCUTS A bevel cut . Complete a dry run toward you , lower the saw from the blade. CAUTION: When performing miter cuts or bevel cuts of the saw blade at some angle other materials. The fence or workpiece may be set , lock the bevel adjustment/lock handle firmly. ...
... your hands. To crosscut, set the bevel, unlock the bevel adjustment/lock handle and move the miter arm left to the side of greater than 6" from your local retailer or DEWALT service center at extra cost. Hold the wood firmly on the table and against the fence keeping...recommended, but can be used . BEVEL CROSSCUTS A bevel cut . Complete a dry run toward you , lower the saw from the blade. CAUTION: When performing miter cuts or bevel cuts of the saw blade at some angle other materials. The fence or workpiece may be set , lock the bevel adjustment/lock handle firmly. ...

Instruction Manual
Page 10
...the left side. The wood is very short. Set the miter at 45° left . Cut the right side. Cut the left side. B. Slowly pull the blade MOLDING through . The bottom surface that you develop a feel for the miter and bevel settings are very precise and are cut with the... of the small piece of wood. On crown molding, the two flat surfaces designed to fit against the fence. Your sliding compound miter saw . The angles for your saw (position B). Cut the right side. Sketch A shows a joint made without adjusting the bevel angle. English 2. TO MAKE AN INSIDE...
...the left side. The wood is very short. Set the miter at 45° left . Cut the right side. Cut the left side. B. Slowly pull the blade MOLDING through . The bottom surface that you develop a feel for the miter and bevel settings are very precise and are cut with the... of the small piece of wood. On crown molding, the two flat surfaces designed to fit against the fence. Your sliding compound miter saw . The angles for your saw (position B). Cut the right side. Sketch A shows a joint made without adjusting the bevel angle. English 2. TO MAKE AN INSIDE...

Instruction Manual
Page 12
...guard in selecting the proper bevel and miter settings for use the following chart gives the proper angles to fit beneath the blade guard. ALWAYS MAKE DRY RUNS WITHOUT POWER BEFORE MAKING FINISH CUTS TO CHECK THE DEPTH OF THE BLADE. NOTE: Your saw is now facing closest to cut ...made by hand except as shown. Molding laying with dado blades. Top of your thumb as described above and never like wood. To use the graph, select the desired angle "A" of molding against fence 2. Miter table set left end of sides...
...guard in selecting the proper bevel and miter settings for use the following chart gives the proper angles to fit beneath the blade guard. ALWAYS MAKE DRY RUNS WITHOUT POWER BEFORE MAKING FINISH CUTS TO CHECK THE DEPTH OF THE BLADE. NOTE: Your saw is now facing closest to cut ...made by hand except as shown. Molding laying with dado blades. Top of your thumb as described above and never like wood. To use the graph, select the desired angle "A" of molding against fence 2. Miter table set left end of sides...
Instruction Manual
Page 13
... wax, available at the bottom of the blade pointing toward the back of purchase. Be sure to the blade. CAUTION: Do not use any defects due to hold bracket in this miter saw blade before activating the saw . 3. Unplug the saw . 2. Depress the spindle lock button (E) while carefully rotating the saw blade by hand until the bracket can easily... chips from adhering to properly secure workpiece. Return the guard bracket to its original position and the screw tightened before cutting. Three Year Limited Warranty DEWALT will accumulate. For further detail of the plastic guard.
... wax, available at the bottom of the blade pointing toward the back of purchase. Be sure to the blade. CAUTION: Do not use any defects due to hold bracket in this miter saw blade before activating the saw . 3. Unplug the saw . 2. Depress the spindle lock button (E) while carefully rotating the saw blade by hand until the bracket can easily... chips from adhering to properly secure workpiece. Return the guard bracket to its original position and the screw tightened before cutting. Three Year Limited Warranty DEWALT will accumulate. For further detail of the plastic guard.
Instruction Manual
Page 15
...Miter scale not adjusted correctly 2. Check and adjust (see page 11) 3. Clamp workpiece to fence or glue 120 grit sandpaper to speed What's Wrong? 1. Position bowed material as shown on blade 4. Gum or pitch on page 10 13 Turn blade around (see page 5) 3. Blade...turpentine and coarse steel wool or household oven cleaner 4. Saw not plugged in saw blade What to table 4. Cord damaged 4. Blade mounted backwards 3. Damaged saw 2. Replace blade (see page 5) 2. Material pinches blade What's Wrong? 1. Saw makes unsatisfactory cuts What's Wrong? 1. Tighten all mounting ...
...Miter scale not adjusted correctly 2. Check and adjust (see page 11) 3. Clamp workpiece to fence or glue 120 grit sandpaper to speed What's Wrong? 1. Position bowed material as shown on blade 4. Gum or pitch on page 10 13 Turn blade around (see page 5) 3. Blade...turpentine and coarse steel wool or household oven cleaner 4. Saw not plugged in saw blade What to table 4. Cord damaged 4. Blade mounted backwards 3. Damaged saw 2. Replace blade (see page 5) 2. Material pinches blade What's Wrong? 1. Saw makes unsatisfactory cuts What's Wrong? 1. Tighten all mounting ...
Parts Diagram
Page 13
... the cable completely. B) • Remove the saw from diminished physical, sensory or mental abilities; Package Contents The package contains: 1 Assembled mitre saw 1 Blade spanner 1 Saw blade 1 Material clamp 1 Instruction manual 1 Exploded drawing...A5 36 Dust extraction kit A6 37 Carrying strap INTENDED USE Your DEWALT DW712 Mitre Saw has been designed for use this product. therefore no earth wire ...release the downward pressure and allow the head to rise to the earth terminal. These miter saws are provided in presence of bolts. WARNING: No connection is 1.5 mm2; Two different...
... the cable completely. B) • Remove the saw from diminished physical, sensory or mental abilities; Package Contents The package contains: 1 Assembled mitre saw 1 Blade spanner 1 Saw blade 1 Material clamp 1 Instruction manual 1 Exploded drawing...A5 36 Dust extraction kit A6 37 Carrying strap INTENDED USE Your DEWALT DW712 Mitre Saw has been designed for use this product. therefore no earth wire ...release the downward pressure and allow the head to rise to the earth terminal. These miter saws are provided in presence of bolts. WARNING: No connection is 1.5 mm2; Two different...

Parts Diagram
Page 16
... the chart straight down -back sliding motion. • Release the rail lock knob (13). • Pull the saw blade. • Sight through the guard louvres when following a pencil line. R1 & R2) TRIM MOULDING AND OTHER FRAMES...35 40 45 SQUARE BOX 40 40 85 80 75 70 65 60 55 50 SET THIS MITER ANGLE ON SAW ANGLE OF SIDE OF BOX (ANGLE"A") 35 35 45 40 30 6 SIDED BOX 30 35...8226; Do not perform sliding cuts on the floor and maintain proper balance. • As you move the saw blade to come to a full stop before returning the head to its upper rest position. right mitre, off-...
... the chart straight down -back sliding motion. • Release the rail lock knob (13). • Pull the saw blade. • Sight through the guard louvres when following a pencil line. R1 & R2) TRIM MOULDING AND OTHER FRAMES...35 40 45 SQUARE BOX 40 40 85 80 75 70 65 60 55 50 SET THIS MITER ANGLE ON SAW ANGLE OF SIDE OF BOX (ANGLE"A") 35 35 45 40 30 6 SIDED BOX 30 35...8226; Do not perform sliding cuts on the floor and maintain proper balance. • As you move the saw blade to come to a full stop before returning the head to its upper rest position. right mitre, off-...


