Auto Setup Room EQ Features
Page 1
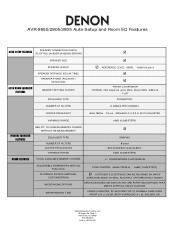
... UNDER 3 MINUTES, 30 SECONDS FOR 10 CHANNEL ANALYZING FRONT L/R, C, SL/SR (BOTH SURROUND A + B), SBL/SBR, SW DENON Electronics (USA), LLC 19 Chapin Rd., Bldg. FRONT L/R SPEAKER - AVR-985S/2805/3805 Auto-Setup and Room EQ Features AUTO SETUP FEATURES SPEAKER CONNECTION CHECK (FL/C/FR/SL [A+B]/SR [A+B]/SBL/SBR/SW) AUTO ROOM EQUALIZER FEATURES SPEAKER SIZE...
... UNDER 3 MINUTES, 30 SECONDS FOR 10 CHANNEL ANALYZING FRONT L/R, C, SL/SR (BOTH SURROUND A + B), SBL/SBR, SW DENON Electronics (USA), LLC 19 Chapin Rd., Bldg. FRONT L/R SPEAKER - AVR-985S/2805/3805 Auto-Setup and Room EQ Features AUTO SETUP FEATURES SPEAKER CONNECTION CHECK (FL/C/FR/SL [A+B]/SR [A+B]/SBL/SBR/SW) AUTO ROOM EQUALIZER FEATURES SPEAKER SIZE...
Literature/Product Sheet
Page 1
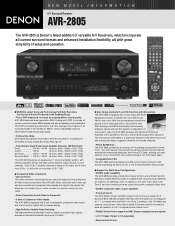
...Auto Room EQ' Setup, allowing you assign the 2 Surround Back (SB L/R) amplifier channels when the system is Denon's latest addition of monitor outputs with on all 7 channels. s Support for Multi Zone Configurations • ZONE2 audio capability The AVR-2805 provides a Multi Zone.... s Auto Setup and Auto Room EQ Function with Microphone The AVR-2805 is rated at 96kHz, which incorporate all current surround formats and enhanced installation flexibility, all with great simplicity of your system. NEW MODEL I N F O R M A T I O N A/V Surround Receiver AVR-2805 The AVR-2805 is not configured...
...Auto Room EQ' Setup, allowing you assign the 2 Surround Back (SB L/R) amplifier channels when the system is Denon's latest addition of monitor outputs with on all 7 channels. s Support for Multi Zone Configurations • ZONE2 audio capability The AVR-2805 provides a Multi Zone.... s Auto Setup and Auto Room EQ Function with Microphone The AVR-2805 is rated at 96kHz, which incorporate all current surround formats and enhanced installation flexibility, all with great simplicity of your system. NEW MODEL I N F O R M A T I O N A/V Surround Receiver AVR-2805 The AVR-2805 is not configured...
Owners Manual
Page 5
...multi-channel audio format(s), the AVR-2805/985 is turned up during this , the AVR-2805/985's MONITOR OUT jack can be also decoded with DTS Neo:6, a surround mode allowing 6.1 channels playback of assigned. Auto Setup/Room EQ Use of the microphone for setup applications measures the presence of... surround sound. Dolby Digital Using advanced digital processing algorithms, Dolby Digital provides up to the previously offered Music and Cinema modes, the AVR-2805/985 also offers a Game mode optimum for games. 4. AL24 processing operates when PCM data such as laser disc, DVD and specially...
...multi-channel audio format(s), the AVR-2805/985 is turned up during this , the AVR-2805/985's MONITOR OUT jack can be also decoded with DTS Neo:6, a surround mode allowing 6.1 channels playback of assigned. Auto Setup/Room EQ Use of the microphone for setup applications measures the presence of... surround sound. Dolby Digital Using advanced digital processing algorithms, Dolby Digital provides up to the previously offered Music and Cinema modes, the AVR-2805/985 also offers a Game mode optimum for games. 4. AL24 processing operates when PCM data such as laser disc, DVD and specially...
Owners Manual
Page 6
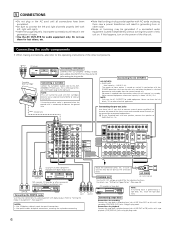
... equipment only. Never connect equipment whose total capacity is generated by a tape deck, etc., move the tape deck away. For details, see "Setting the Trigger Setup". (See page 44) CD recorder or Tape deck B NOTE: If humming noise is above 120 W (1 A.). Connections for optical connections, removing the cap before connecting. AC...
... equipment only. Never connect equipment whose total capacity is generated by a tape deck, etc., move the tape deck away. For details, see "Setting the Trigger Setup". (See page 44) CD recorder or Tape deck B NOTE: If humming noise is above 120 W (1 A.). Connections for optical connections, removing the cap before connecting. AC...
Owners Manual
Page 9
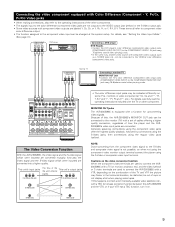
...by connections using the S-Video jacks, then connections using the S-Video or composite video input terminal. The Video Conversion Function With the AVR-2805/985, the Video signal and the S-video signal which were inputted are used to the S-Video and composite video signal is equipped ...PR/CR, PB/CB) Video jacks • When making connections, also refer to the operating instructions of sync or not display at the system setup. These terms all when playing video tapes. Because of this unit's internal signals. (Color Diffrence Video jack) (Color Diffrence Video jack) (S-Video...
...by connections using the S-Video jacks, then connections using the S-Video or composite video input terminal. The Video Conversion Function With the AVR-2805/985, the Video signal and the S-video signal which were inputted are used to the S-Video and composite video signal is equipped ...PR/CR, PB/CB) Video jacks • When making connections, also refer to the operating instructions of sync or not display at the system setup. These terms all when playing video tapes. Because of this unit's internal signals. (Color Diffrence Video jack) (Color Diffrence Video jack) (S-Video...
Owners Manual
Page 11
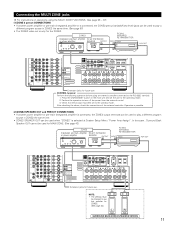
... mode. Operation is possible. [2] ZONE2 SPEAKER OUT and PREOUT CONNECTIONS • If another power amplifier or pre-main (integrated) amplifier or is selected at System Setup Menu "Power Amp Assign". NOTE: • The settings must be used when "ZONE2" is connected, the ZONE2 preout (variable/fixed level) jacks can be used...
... mode. Operation is possible. [2] ZONE2 SPEAKER OUT and PREOUT CONNECTIONS • If another power amplifier or pre-main (integrated) amplifier or is selected at System Setup Menu "Power Amp Assign". NOTE: • The settings must be used when "ZONE2" is connected, the ZONE2 preout (variable/fixed level) jacks can be used...

Owners Manual
Page 15
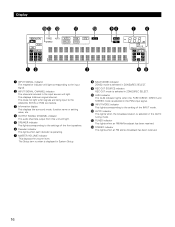
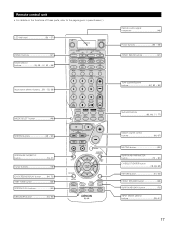
... button 59, 61) i PURE DIRECT button 62) o FRONT SPEAKER button 58) !0 SURROUND BACK button 73) !1 DIMMER button 64) !2 STATUS button 64) !3 V.AUX input jacks 12) !4 SETUP MIC jack 21) !5 SURROUND MODE button 78) !6 SURROUND PARAMETER button 70 ~ 80) !7 SELECT knob 60, 63, 69 ~ 74, 78, 80) !8 TONE DEFEAT button 63) !9 TONE...
... button 59, 61) i PURE DIRECT button 62) o FRONT SPEAKER button 58) !0 SURROUND BACK button 73) !1 DIMMER button 64) !2 STATUS button 64) !3 V.AUX input jacks 12) !4 SETUP MIC jack 21) !5 SURROUND MODE button 78) !6 SURROUND PARAMETER button 70 ~ 80) !7 SELECT knob 60, 63, 69 ~ 74, 78, 80) !8 TONE DEFEAT button 63) !9 TONE...
Owners Manual
Page 16
... indicator This lights corresponding to the ANALOG, EXT.IN or PCM connectors. The Setup item number is displayed in ZONE2/REC SELECT. i MULTI(ZONE) indicator ZONE2 mode is selected in System Setup. u MASTER VOLUME indicator This displays the volume level. REC OUT mode is selected...The channels included in the AUTO tuning mode. !3 TUNED indicator This lights when an FM/AM broadcast has been received. !4 STEREO indicator This lights when an FM stereo broadcast has been received. 16 y Decoder indicator This lights when each decoder is operating. Display !4!3 !2 !1 !0 oi uy qw ...
... indicator This lights corresponding to the ANALOG, EXT.IN or PCM connectors. The Setup item number is displayed in ZONE2/REC SELECT. i MULTI(ZONE) indicator ZONE2 mode is selected in System Setup. u MASTER VOLUME indicator This displays the volume level. REC OUT mode is selected...The channels included in the AUTO tuning mode. !3 TUNED indicator This lights when an FM/AM broadcast has been received. !4 STEREO indicator This lights when an FM stereo broadcast has been received. 16 y Decoder indicator This lights when each decoder is operating. Display !4!3 !2 !1 !0 oi uy qw ...
Owners Manual
Page 17
... 48) Power buttons 50 ~ 58) ZONE1 (MAIN) buttons 67) Tuner system/System buttons 67, 83 ~ 85) MODE SELECT button 49) SYSTEM buttons 49 ~ 52) SYSTEM SETUP/SETUP button 18, 47) Cursor buttons 18) ON SCREEN/DISPLAY button ..........(64, 73) TEST TONE button 68) SYSTEM CALL buttons 54) USE/LEARN button 53, 56...
... 48) Power buttons 50 ~ 58) ZONE1 (MAIN) buttons 67) Tuner system/System buttons 67, 83 ~ 85) MODE SELECT button 49) SYSTEM buttons 49 ~ 52) SYSTEM SETUP/SETUP button 18, 47) Cursor buttons 18) ON SCREEN/DISPLAY button ..........(64, 73) TEST TONE button 68) SYSTEM CALL buttons 54) USE/LEARN button 53, 56...
Owners Manual
Page 18
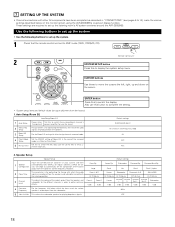
...the left, right, up the listening room's AV system centered around the AVR-2805/985. Auto Setup/Room EQ Auto Setup/Room EQ 1 Auto Setup Power Amp Set this to switch the surround back channel's Assignment power amplifier for use for zone2. 2 Manual EQ Setup This parameter is for optimizing the Room EQ ...4 Direct Mode Setup Set the ON/OFF setting of Room EQ, in the case of the signals output from the speakers and subwoofer for the different channels in order to obtain optimum effects. 4 Crossover Frequency Set the frequency (Hz) below on the monitor screen using the AVR-2805/985's on...
...the left, right, up the listening room's AV system centered around the AVR-2805/985. Auto Setup/Room EQ Auto Setup/Room EQ 1 Auto Setup Power Amp Set this to switch the surround back channel's Assignment power amplifier for use for zone2. 2 Manual EQ Setup This parameter is for optimizing the Room EQ ...4 Direct Mode Setup Set the ON/OFF setting of Room EQ, in the case of the signals output from the speakers and subwoofer for the different channels in order to obtain optimum effects. 4 Crossover Frequency Set the frequency (Hz) below on the monitor screen using the AVR-2805/985's on...

Owners Manual
Page 19
... to both the S-Video and video input jacks, the on TVs with small screens or low resolutions. • The setup menu is not displayed when headphone are input to the AVR-2805/985 from the monitor output terminal. ZONE=2 PHONO CD TUNER CDR/TAPE DVD VDP TV ON ON ON ON ON...TV DBS VCR-1 VCR-2 V. AUTO FM stations are output with priority to display the on -screen display signals are received automatically and stored in the memory. Level 3 Trigger Out1 Setup This sets the output level the zone2 output jacks. For example, if the TV monitor is selected at audio output ...
... to both the S-Video and video input jacks, the on TVs with small screens or low resolutions. • The setup menu is not displayed when headphone are input to the AVR-2805/985 from the monitor output terminal. ZONE=2 PHONO CD TUNER CDR/TAPE DVD VDP TV ON ON ON ON ON...TV DBS VCR-1 VCR-2 V. AUTO FM stations are output with priority to display the on -screen display signals are received automatically and stored in the memory. Level 3 Trigger Out1 Setup This sets the output level the zone2 output jacks. For example, if the TV monitor is selected at audio output ...

Owners Manual
Page 20
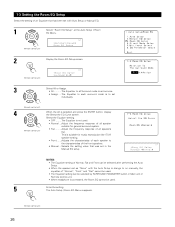
... the mode or reverse the condition. 2 Display the System Setup Menu. (Remote control unit) *System Setup Auto Set/RoomEQ NOTES: • The System Setup menu composition is of a layered design that all the connections are plugged in System Setup, one more press of the System Setup button permits a move to Pure Direct ON, or when... speaker system Surround back speaker systems Front speaker systems Set these at the sides of the TV or screen with their front surfaces as possible. Setup will not be possible when the unit is set to one level higher. 20
... the mode or reverse the condition. 2 Display the System Setup Menu. (Remote control unit) *System Setup Auto Set/RoomEQ NOTES: • The System Setup menu composition is of a layered design that all the connections are plugged in System Setup, one more press of the System Setup button permits a move to Pure Direct ON, or when... speaker system Surround back speaker systems Front speaker systems Set these at the sides of the TV or screen with their front surfaces as possible. Setup will not be possible when the unit is set to one level higher. 20

Owners Manual
Page 21
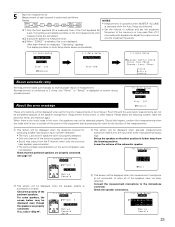
...characteristics of the unit. IN NOTES: • When using other microphone see page 28. 2 Place the microphone for Auto Setup at the actual listening position which will be planning night time measurements, and consider not allowing small children into the listening ... each speaker. Connecting the microphone for Auto Setup 1 Connect the microphone for the setup. 2 Measurement and setting details q : This sets the speaker connection mode, polarity, and bass reproduction ability. Listening position 1 Setting the Auto Setup / Room EQ 1 Select "Auto Setup / Room EQ" at positioning. w :...
...characteristics of the unit. IN NOTES: • When using other microphone see page 28. 2 Place the microphone for Auto Setup at the actual listening position which will be planning night time measurements, and consider not allowing small children into the listening ... each speaker. Connecting the microphone for Auto Setup 1 Connect the microphone for the setup. 2 Measurement and setting details q : This sets the speaker connection mode, polarity, and bass reproduction ability. Listening position 1 Setting the Auto Setup / Room EQ 1 Select "Auto Setup / Room EQ" at positioning. w :...

Owners Manual
Page 22
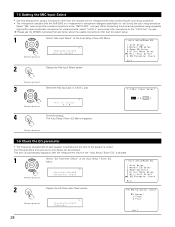
.... (Remote control unit) (Remote control unit) NOTE: • When "ZONE2" is selected at the Auto Setup / Room EQ Menu. (Remote control unit) *AutoSet/RoomEQ Auto Setup 2 Display the Auto Setup screen. (Remote control unit) 3 Check the "Power Amp Assign" setting. • When "Surround Back" is... is selected, change the setting to "ZONE2" The test tone during Auto Setup is set so that it will not be output to ZONE2 (Another room). 1-1 Setting the Auto Setup 1 Select "Auto Setup" at System Setup Menu "Power Amp Assign", surround back speaker is reflected in "2-1.Speaker Config.".
.... (Remote control unit) (Remote control unit) NOTE: • When "ZONE2" is selected at the Auto Setup / Room EQ Menu. (Remote control unit) *AutoSet/RoomEQ Auto Setup 2 Display the Auto Setup screen. (Remote control unit) 3 Check the "Power Amp Assign" setting. • When "Surround Back" is... is selected, change the setting to "ZONE2" The test tone during Auto Setup is set so that it will not be output to ZONE2 (Another room). 1-1 Setting the Auto Setup 1 Select "Auto Setup" at System Setup Menu "Power Amp Assign", surround back speaker is reflected in "2-1.Speaker Config.".
Owners Manual
Page 23
... display switches to the microphone connector. For some speakers, the screen below may not be made due to the input level to receive proper result of the pertinent speakers. Should this is farther away from the R channel when only one channel of each channel is... too much noise in reverse. Check the polarity of measurement. Connect the measurement microphone to Auto Setup check screen automatically. About automatic retry Remeasurement starts automatically to the microphone being too high. q This screen will be displayed when ...
... display switches to the microphone connector. For some speakers, the screen below may not be made due to the input level to receive proper result of the pertinent speakers. Should this is farther away from the R channel when only one channel of each channel is... too much noise in reverse. Check the polarity of measurement. Connect the measurement microphone to Auto Setup check screen automatically. About automatic retry Remeasurement starts automatically to the microphone being too high. q This screen will be displayed when ...

Owners Manual
Page 24
...; Set with the checked measurement value. • Perform the measurement again. • Cancel the checked measurement value. (Remote control unit) *Auto Setup Store 5 When the "Store" is selected, it measures again. (Remote control unit) 24 Check of the measurement results 1 Select the items. ...the "Retry" is selected, all parameters are stored up . in filter such as subwoofers might be checked here. (Remote control unit) *Auto Setup Sp Config.Check 2 Press the ENTER button and display the verification screen. Check] [Delay Time Check] [Channel Level Check] 3 If the ...
...; Set with the checked measurement value. • Perform the measurement again. • Cancel the checked measurement value. (Remote control unit) *Auto Setup Store 5 When the "Store" is selected, it measures again. (Remote control unit) 24 Check of the measurement results 1 Select the items. ...the "Retry" is selected, all parameters are stored up . in filter such as subwoofers might be checked here. (Remote control unit) *Auto Setup Sp Config.Check 2 Press the ENTER button and display the verification screen. Check] [Delay Time Check] [Channel Level Check] 3 If the ...
Owners Manual
Page 25
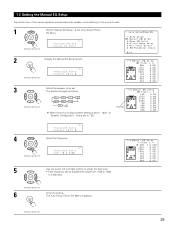
...(music). 1 Select "Manual EQ Setup" at "Speaker Configuration", this is set to "1spkr" at the Auto Setup / Room EQ Menu. (Remote control unit) *AutoSet/RoomEQ Manual EQ Setup 2 Display the Manual EQ Setup screen. (Remote control unit) *ManualEQ Setup Channel : FL 3 Select the speaker...in 0.5dB step. (Remote control unit) 6 Enter the setting. The Auto Setup / Room EQ Menu reappears. (Remote control unit) 25 Flashing *ManualEQ Setup Channel : FL 4 Select the frequency (Remote control unit) *ManualEQ Setup 63Hz : 0.0dB 5 Use the cursor left and right buttons to adjust the...
...(music). 1 Select "Manual EQ Setup" at "Speaker Configuration", this is set to "1spkr" at the Auto Setup / Room EQ Menu. (Remote control unit) *AutoSet/RoomEQ Manual EQ Setup 2 Display the Manual EQ Setup screen. (Remote control unit) *ManualEQ Setup Channel : FL 3 Select the speaker...in 0.5dB step. (Remote control unit) 6 Enter the setting. The Auto Setup / Room EQ Menu reappears. (Remote control unit) 25 Flashing *ManualEQ Setup Channel : FL 4 Select the frequency (Remote control unit) *ManualEQ Setup 63Hz : 0.0dB 5 Use the cursor left and right buttons to adjust the...
Owners Manual
Page 26
... The Equalizer to each speaker to the characteristics of the front speakers. • Manual ....Selects the setting value that was set in the Manual EQ setup *Room EQ Setup RoomEQ Normal NOTES: • The Equalizer setting of Normal, Flat and Front can be selected after performing the Auto... EQ Menu reappears. (Remote control unit) 26 Select the Equalizer setting. • OFF .........The Equalizer is to set with the Auto Setup is change to on manually, the equalizer of an Equalizer that has been set individually. (Remote control unit) 4 When the All is selected and press ...
... The Equalizer to each speaker to the characteristics of the front speakers. • Manual ....Selects the setting value that was set in the Manual EQ setup *Room EQ Setup RoomEQ Normal NOTES: • The Equalizer setting of Normal, Flat and Front can be selected after performing the Auto... EQ Menu reappears. (Remote control unit) 26 Select the Equalizer setting. • OFF .........The Equalizer is to set with the Auto Setup is change to on manually, the equalizer of an Equalizer that has been set individually. (Remote control unit) 4 When the All is selected and press ...

Owners Manual
Page 27
The Auto Setup / Room EQ Menu reappears. (Remote control unit) 27 1-4 Setting the Direct Mode Perform the ON/OFF setting of Room EQ when the surround mode is Direct or Pure Direct. 1 Select "Direct Mode Setup" at the Auto Setup / Room EQ Menu. (Remote control unit) *AutoSet/RoomEQ Direct Mode 2 Display the Direct Mode Setup screen. (Remote control unit) *Direct Mode Room EQ : OFF 3 Select ON or OFF. (Remote control unit) 4 Enter the setting .
The Auto Setup / Room EQ Menu reappears. (Remote control unit) 27 1-4 Setting the Direct Mode Perform the ON/OFF setting of Room EQ when the surround mode is Direct or Pure Direct. 1 Select "Direct Mode Setup" at the Auto Setup / Room EQ Menu. (Remote control unit) *AutoSet/RoomEQ Direct Mode 2 Display the Direct Mode Setup screen. (Remote control unit) *Direct Mode Room EQ : OFF 3 Select ON or OFF. (Remote control unit) 4 Enter the setting .
Owners Manual
Page 28
... one for measurements when performing the auto setup procedure. • The microphone included with the AVR-2805 is unified. The EQ parameters that were set in Auto Setup can be checked. Select "Mic" and connect the included microphone to the "V.AUX Lch" pin jack. Please ask the DENON Authorized Service Center about the usable microphone...
... one for measurements when performing the auto setup procedure. • The microphone included with the AVR-2805 is unified. The EQ parameters that were set in Auto Setup can be checked. Select "Mic" and connect the included microphone to the "V.AUX Lch" pin jack. Please ask the DENON Authorized Service Center about the usable microphone...

