Owners Manual - English
Page 4
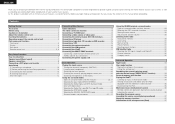
... of this product is provided with an immense array of features, we recommend that before proceeding. As this manual before you begin hookup and operation that you for iPods equipped with the slideshow / video function 35 Disconnecting ...control 30 Adjusting the speaker volume 30 Listening to the radio Auto preset memory 30 Auto tuning 31 Manual tuning 31 Preset memory 31 Recalling preset stations 31 XM Satellite Radio 32 Checking the XM signal strength... music in the Browse mode 34 Viewing still pictures and videos (only for choosing the DENON AVR-1707 AV Surround Receiver.
... of this product is provided with an immense array of features, we recommend that before proceeding. As this manual before you begin hookup and operation that you for iPods equipped with the slideshow / video function 35 Disconnecting ...control 30 Adjusting the speaker volume 30 Listening to the radio Auto preset memory 30 Auto tuning 31 Manual tuning 31 Preset memory 31 Recalling preset stations 31 XM Satellite Radio 32 Checking the XM signal strength... music in the Browse mode 34 Viewing still pictures and videos (only for choosing the DENON AVR-1707 AV Surround Receiver.
Owners Manual - English
Page 10
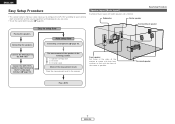
.... Surround speaker Play a DVD. 7 ENGLISH ENGLISH Easy Setup Procedure • This section contains the basic steps necessary to configure the AVR-1707 according to the TV's video input terminal ( page 10). Store the measurement result in the listening position. 1) Speaker Configuration 2) Distance...your listening room environment and the source equipment and loudspeakers you are using. • To set the sound field manually ( page 45). Easy to the AVR-1707. Connecting a microphone ( page 10). Connect the DVD player to setup flow Speaker layout [Basic layout] Example...
.... Surround speaker Play a DVD. 7 ENGLISH ENGLISH Easy Setup Procedure • This section contains the basic steps necessary to configure the AVR-1707 according to the TV's video input terminal ( page 10). Store the measurement result in the listening position. 1) Speaker Configuration 2) Distance...your listening room environment and the source equipment and loudspeakers you are using. • To set the sound field manually ( page 45). Easy to the AVR-1707. Connecting a microphone ( page 10). Connect the DVD player to setup flow Speaker layout [Basic layout] Example...
Owners Manual - English
Page 12
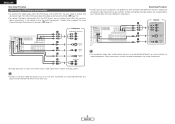
... your monitor. If you choose to use the coaxial connection, it needs to be labelled differently on some monitors or video components. Check the owner's manuals for other high definition sources), choose the component video connection to your monitor does not have component video inputs. For more information about Digital Input... coaxial or optical connections. ENGLISH Easy Setup Procedure Connecting a DVD player and monitor • To connect the video output from the DVD player to the AVR-1707, you can choose from the DVD player, you only need to choose one connection type.
... your monitor. If you choose to use the coaxial connection, it needs to be labelled differently on some monitors or video components. Check the owner's manuals for other high definition sources), choose the component video connection to your monitor does not have component video inputs. For more information about Digital Input... coaxial or optical connections. ENGLISH Easy Setup Procedure Connecting a DVD player and monitor • To connect the video output from the DVD player to the AVR-1707, you can choose from the DVD player, you only need to choose one connection type.

Owners Manual - English
Page 13
... Procedure D H F G [ON/SOURCE] [MODE SELECTOR 1] D H F G ENGLISH Easy Setup Procedure Auto Setup w Before performing the Auto Setup procedure The AVR-1707's auto setup use the attached microphone to turn this explanation < > : Buttons on the main unit [ ] : Buttons on the remote control unit Button name ...mode. Be sure to measure the acoustic properties in the room and automatically make the optimum settings. • To make the sound field settings manually ( page 45). 1 Turn on the main unit and remote control unit • Auto Setup mode is off and the indicator is not ...
... Procedure D H F G [ON/SOURCE] [MODE SELECTOR 1] D H F G ENGLISH Easy Setup Procedure Auto Setup w Before performing the Auto Setup procedure The AVR-1707's auto setup use the attached microphone to turn this explanation < > : Buttons on the main unit [ ] : Buttons on the remote control unit Button name ...mode. Be sure to measure the acoustic properties in the room and automatically make the optimum settings. • To make the sound field settings manually ( page 45). 1 Turn on the main unit and remote control unit • Auto Setup mode is off and the indicator is not ...
Owners Manual - English
Page 22
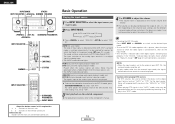
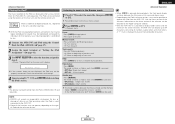
...adjust the volume to 18 dB. • Canceling the EXT. AUTO (All auto mode): The type of input signal is detected and the AVR-1707's surround mode is displayed on the channel level settings and the different surround mode settings and when in the "AUTO" mode, noise may ...signal is set the input mode. • The "DIGITAL" indicator lights when digital signals are played. For operating instructions, refer to the component's manual. 4 Use VOLUME to adjust the volume. • The volume level is switched automatically. The input switches to the analog input terminals is connected ...
...adjust the volume to 18 dB. • Canceling the EXT. AUTO (All auto mode): The type of input signal is detected and the AVR-1707's surround mode is displayed on the channel level settings and the different surround mode settings and when in the "AUTO" mode, noise may ...signal is set the input mode. • The "DIGITAL" indicator lights when digital signals are played. For operating instructions, refer to the component's manual. 4 Use VOLUME to adjust the volume. • The volume level is switched automatically. The input switches to the analog input terminals is connected ...
Owners Manual - English
Page 37
... track shuffle • SFL Albums: Album shuffle Advanced Operation • When STATUS is pressed for at least 2 seconds. NOTE: • DENON will accept no responsibility whatsoever for loss or damage of non-compatible characters. • The optional standard Control Dock for iPod is pressed. &#... iPod can be reproduced and played by law. 1 Connect the AVR-1707 and iPod using the buttons on the Apple Computer website. • With the AVR-1707 it may not be used connected to select the function assigned in the U.S. Manual search: Press and hold in [D H] during playback. •...
... track shuffle • SFL Albums: Album shuffle Advanced Operation • When STATUS is pressed for at least 2 seconds. NOTE: • DENON will accept no responsibility whatsoever for loss or damage of non-compatible characters. • The optional standard Control Dock for iPod is pressed. &#... iPod can be reproduced and played by law. 1 Connect the AVR-1707 and iPod using the buttons on the Apple Computer website. • With the AVR-1707 it may not be used connected to select the function assigned in the U.S. Manual search: Press and hold in [D H] during playback. •...
Owners Manual - English
Page 46
AVR-1707 Speaker [R] Speaker [L] NOTE: • When making bi-amp connections, be sure to remove the short-circuiting bar included with a range wider than that of your preference, a surround back channel's power amplifier can be preset automatically due to poor reception, use the "Manual tuning" ...front speakers, replicating the front A or front B amplifier channel's outputs. 3 Press ENTER or H to enter the setting and switch to the AVR-1707. Op", then press ENTER. 2 Press F G to provide ZONE2 speaker-level outputs from the surround back speaker terminals. Part 1 Front Bi...
AVR-1707 Speaker [R] Speaker [L] NOTE: • When making bi-amp connections, be sure to remove the short-circuiting bar included with a range wider than that of your preference, a surround back channel's power amplifier can be preset automatically due to poor reception, use the "Manual tuning" ...front speakers, replicating the front A or front B amplifier channel's outputs. 3 Press ENTER or H to enter the setting and switch to the AVR-1707. Op", then press ENTER. 2 Press F G to provide ZONE2 speaker-level outputs from the surround back speaker terminals. Part 1 Front Bi...


