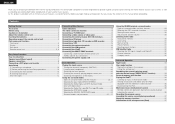
Literature/Product Sheet
Page 1
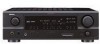
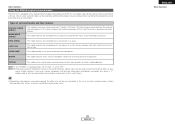
... connection procedures. s Auto Setup with Microphone The AVR-1707 is equipped with an Auto Setup function, to achieve the most ideal sound field for your favorite music and video sources, and include these high-frequency components so that the sound is equipped with a total of 7 power amps including 2 for the Surround Back channel speaker to give you more details on the generation of the iPod and the version of the AVR-1707. The AVR-1707 features a Cinema...
... connection procedures. s Auto Setup with Microphone The AVR-1707 is equipped with an Auto Setup function, to achieve the most ideal sound field for your favorite music and video sources, and include these high-frequency components so that the sound is equipped with a total of 7 power amps including 2 for the Surround Back channel speaker to give you more details on the generation of the iPod and the version of the AVR-1707. The AVR-1707 features a Cinema...
Literature/Product Sheet
Page 2
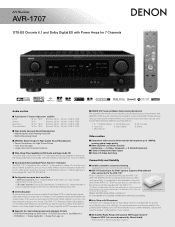
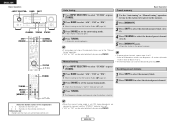
... are power amp stage values. These customized features are then stored, for each source input and surround mode, in Japan This 7 Channel Stereo mode was originally developed by DENON to make via a dialog format on the fluorescent display on the front panel. s Audio Delay Function (0 - 200 msec.) Audio delay function corrects slight lags between sound and picture that you adjust delay times and other countries. *©2006 XM Satellite Radio Inc. AVR-1707 s New simple remote for easy operation s 3 user mode buttons...
... are power amp stage values. These customized features are then stored, for each source input and surround mode, in Japan This 7 Channel Stereo mode was originally developed by DENON to make via a dialog format on the fluorescent display on the front panel. s Audio Delay Function (0 - 200 msec.) Audio delay function corrects slight lags between sound and picture that you adjust delay times and other countries. *©2006 XM Satellite Radio Inc. AVR-1707 s New simple remote for easy operation s 3 user mode buttons...
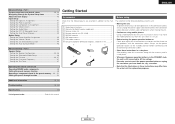
Owners Manual - English
Page 1
AV SURROUND RECEIVER AVR-1707 OPERATING INSTRUCTIONS
AV SURROUND RECEIVER AVR-1707 OPERATING INSTRUCTIONS

Owners Manual - English
Page 2
... that produce heat. When replacement parts are unable to your home, consult your obsolete outlet. Upon completion of power supply to insert the plug fully into the power outlet only one blade wider than the other products (including amplifiers) that they exit from the wall outlet and refer servicing to qualified service personnel under the following the operating instructions. I Use only with a cart...
... that produce heat. When replacement parts are unable to your home, consult your obsolete outlet. Upon completion of power supply to insert the plug fully into the power outlet only one blade wider than the other products (including amplifiers) that they exit from the wall outlet and refer servicing to qualified service personnel under the following the operating instructions. I Use only with a cart...
Owners Manual - English
Page 4
... iPod 17 Connecting the MULTI ZONE terminals Connecting a room-to-room remote control unit 17 ZONE2 speaker out connections 18 Connecting the power supply cord 18 Basic Operation Playing the input source 19 Turning the sound off temporarily (MUTING 20 Listening over headphones 20 Switching the front speakers 20 Checking the currently playing program source, etc 20 Switching the brightness of the display 20 Using the surround modes Types of surround modes and their features 20, 21 Selecting the play mode (DIRECT/STEREO 21 Selecting the Dolby Digital...
... iPod 17 Connecting the MULTI ZONE terminals Connecting a room-to-room remote control unit 17 ZONE2 speaker out connections 18 Connecting the power supply cord 18 Basic Operation Playing the input source 19 Turning the sound off temporarily (MUTING 20 Listening over headphones 20 Switching the front speakers 20 Checking the currently playing program source, etc 20 Switching the brightness of the display 20 Using the surround modes Types of surround modes and their features 20, 21 Selecting the play mode (DIRECT/STEREO 21 Selecting the Dolby Digital...
Owners Manual - English
Page 5
... preset codes End of this instructions along with the connection cables. IN Subwoofer Level 42 Setting the Auto Preset Memory 43 Option Setup Setting the Power Amplifier Assignment 43 Setting the Volume Control 44 Setting the 2ch Direct/Stereo Custom 44 Setting the Auto Surround Mode 45 Advanced Setup - Check once again that all other audio components when moving the unit. • Cautions on . Part 2 Speaker Setup Setting the Speaker Configuration 45, 46 Setting the Subwoofer Mode Setup 46 Setting the Distance 46, 47 Setting the Crossover Frequency 47 Setting...
... preset codes End of this instructions along with the connection cables. IN Subwoofer Level 42 Setting the Auto Preset Memory 43 Option Setup Setting the Power Amplifier Assignment 43 Setting the Volume Control 44 Setting the 2ch Direct/Stereo Custom 44 Setting the Auto Surround Mode 45 Advanced Setup - Check once again that all other audio components when moving the unit. • Cautions on . Part 2 Speaker Setup Setting the Speaker Configuration 45, 46 Setting the Subwoofer Mode Setup 46 Setting the Distance 46, 47 Setting the Crossover Frequency 47 Setting...
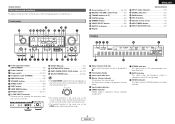
Owners Manual - English
Page 7
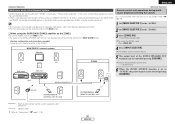
... been received. 4 ENGLISH q Signal channel indicator Lights when the preset channel is selected in the AUTO tuning mode. IN button 19) @8 Remote control sensor 3) @9 INPUT MODE button 19) #0 INPUT SELECTOR knob 19) Display oi u y t r t !3 q w e r y u i o !0 !1 !2 !4 !5 !6 q w e q Power operation button (ON/STANDBY 10) w Power indicator 10) e Power switch 10, 37) r Headphones jack (PHONES 20) t ANALOG button 19) y SPEAKER buttons 10, 37) u ZONE2 button 36) i SHIFT button 31) o USER MODE buttons 33) !0 PRESET buttons 30, 31) !1 V. AUX INPUT terminals Remove the...
... been received. 4 ENGLISH q Signal channel indicator Lights when the preset channel is selected in the AUTO tuning mode. IN button 19) @8 Remote control sensor 3) @9 INPUT MODE button 19) #0 INPUT SELECTOR knob 19) Display oi u y t r t !3 q w e r y u i o !0 !1 !2 !4 !5 !6 q w e q Power operation button (ON/STANDBY 10) w Power indicator 10) e Power switch 10, 37) r Headphones jack (PHONES 20) t ANALOG button 19) y SPEAKER buttons 10, 37) u ZONE2 button 36) i SHIFT button 31) o USER MODE buttons 33) !0 PRESET buttons 30, 31) !1 V. AUX INPUT terminals Remove the...
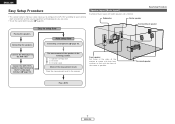
Owners Manual - English
Page 10
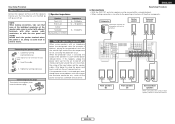
... of the screen as flush with eight speakers and a monitor. Connecting a microphone ( page 10). Connect the DVD player to the TV's video input terminal ( page 10). Connect the AVR-1707's monitor output terminal to the AVR-1707. Easy to your listening room environment and the source equipment and loudspeakers you are using. • To set the sound field manually ( page 45). Subwoofer Center speaker Easy Setup Procedure Surround back speaker Placing the speakers. ENGLISH Easy Setup Procedure •...
... of the screen as flush with eight speakers and a monitor. Connecting a microphone ( page 10). Connect the DVD player to the TV's video input terminal ( page 10). Connect the AVR-1707's monitor output terminal to the AVR-1707. Easy to your listening room environment and the source equipment and loudspeakers you are using. • To set the sound field manually ( page 45). Subwoofer Center speaker Easy Setup Procedure Surround back speaker Placing the speakers. ENGLISH Easy Setup Procedure •...
Owners Manual - English
Page 11
... volume high could result in electric shocks. Doing so could cause the temperature to the operating instructions of the input cables and the speaker cables. Connecting the speaker cables 1. IN Center speaker >< Surround speakers (L) (R) > < (L) (R) >< Front speakers (B) (L) (R) >< Front speakers (A) (L) (R) > < Surround back speakers When using speakers with an impedance below the designated value (for example 4 Ω/ohms), playing for subwoofer with the wiring or the ventilation around the unit. Loosen by turning clockwise. If this , plug the power cord...
... volume high could result in electric shocks. Doing so could cause the temperature to the operating instructions of the input cables and the speaker cables. Connecting the speaker cables 1. IN Center speaker >< Surround speakers (L) (R) > < (L) (R) >< Front speakers (B) (L) (R) >< Front speakers (A) (L) (R) > < Surround back speakers When using speakers with an impedance below the designated value (for example 4 Ω/ohms), playing for subwoofer with the wiring or the ventilation around the unit. Loosen by turning clockwise. If this , plug the power cord...

Owners Manual - English
Page 13
... power indicator blinks green and the power turns on. 5 Set [MODE SELECTOR 1] to "AUDIO". Easy Setup Procedure D H F G [ON/SOURCE] [MODE SELECTOR 1] D H F G ENGLISH Easy Setup Procedure Auto Setup w Before performing the Auto Setup procedure The AVR-1707's auto setup use the attached microphone to measure the acoustic properties in the room and automatically make the optimum settings. • To make the sound field settings manually ( page 45). 1 Turn on your subwoofer can adjust the output volume and the crossover frequency. Microphone Place the setup microphone's sound...
... power indicator blinks green and the power turns on. 5 Set [MODE SELECTOR 1] to "AUDIO". Easy Setup Procedure D H F G [ON/SOURCE] [MODE SELECTOR 1] D H F G ENGLISH Easy Setup Procedure Auto Setup w Before performing the Auto Setup procedure The AVR-1707's auto setup use the attached microphone to measure the acoustic properties in the room and automatically make the optimum settings. • To make the sound field settings manually ( page 45). 1 Turn on your subwoofer can adjust the output volume and the crossover frequency. Microphone Place the setup microphone's sound...
Owners Manual - English
Page 16
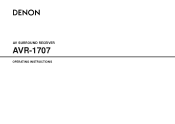
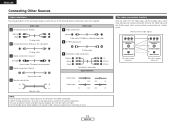
... quality. Audio cable A Analog connections (Stereo) (White) (Red) L L R R Pin-plug cable B Analog connections (Monaural, for subwoofer) F Video connections Video cable (Yellow) Video cable (75 Ω/ohms video pin-plug cable) G S-Video connections Pin-plug cable C Digital connections (Coaxial) (Orange) Coaxial cable (75 Ω/ohms pin-plug cable) D Digital connections (Optical) S-Video cable H Component video connections (Green) (Blue) (Red) Component video cable Signal direction Optical fiber cable E Speaker connections Speaker cable Audio signal IN Video signal IN OUT...
... quality. Audio cable A Analog connections (Stereo) (White) (Red) L L R R Pin-plug cable B Analog connections (Monaural, for subwoofer) F Video connections Video cable (Yellow) Video cable (75 Ω/ohms video pin-plug cable) G S-Video connections Pin-plug cable C Digital connections (Coaxial) (Orange) Coaxial cable (75 Ω/ohms pin-plug cable) D Digital connections (Optical) S-Video cable H Component video connections (Green) (Blue) (Red) Component video cable Signal direction Optical fiber cable E Speaker connections Speaker cable Audio signal IN Video signal IN OUT...
Owners Manual - English
Page 20
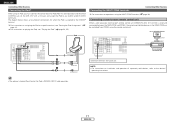
... a specific terminal, see "Playing the iPod" ( page 34, 35). The diagram below shows an example of separately sold separately) and the DOCK CONTROL jack on operations using the remote control unit. ENGLISH Connecting Other Sources Connecting the iPod® When using an iPod, you must connect the Control Dock for iPod (ASD-1R, sold devices, refer to the devices' S-VIDEO OUT operating instructions. • The optional standard Dock Control for iPod is wired and connected between the MAIN ZONE and...
... a specific terminal, see "Playing the iPod" ( page 34, 35). The diagram below shows an example of separately sold separately) and the DOCK CONTROL jack on operations using the remote control unit. ENGLISH Connecting Other Sources Connecting the iPod® When using an iPod, you must connect the Control Dock for iPod (ASD-1R, sold devices, refer to the devices' S-VIDEO OUT operating instructions. • The optional standard Dock Control for iPod is wired and connected between the MAIN ZONE and...
Owners Manual - English
Page 22
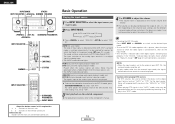
..." mode. AUTO (All auto mode): The type of input signal is detected and the AVR-1707's surround mode is made. Can be sure to connect the device to the digital input terminal and set . • In play . 2 Press INPUT MODE. To lower the subwoofer channel level in this explanation < > : Buttons on the main unit [ ] : Buttons on the remote control unit Button name only : Buttons on the selected component. For operating instructions, refer to the component's manual. 4 Use VOLUME to adjust the volume. • The volume level is connected first...
..." mode. AUTO (All auto mode): The type of input signal is detected and the AVR-1707's surround mode is made. Can be sure to connect the device to the digital input terminal and set . • In play . 2 Press INPUT MODE. To lower the subwoofer channel level in this explanation < > : Buttons on the main unit [ ] : Buttons on the remote control unit Button name only : Buttons on the selected component. For operating instructions, refer to the component's manual. 4 Use VOLUME to adjust the volume. • The volume level is connected first...
Owners Manual - English
Page 31
... mode lets you enjoy stereo sound with only one -sided if signals are played from the surround and surround back L (R) channels and only the in monaural, the sound will be one audio output (monophonic camcorder, etc.) obtain a "Y" adapter cable to split the mono output to two outputs, and connect to the L and R inputs. • Depending on the center channel. Types of you have a source component with 7 speakers. The front L (R) channel signals are only input to...
... mode lets you enjoy stereo sound with only one -sided if signals are played from the surround and surround back L (R) channels and only the in monaural, the sound will be one audio output (monophonic camcorder, etc.) obtain a "Y" adapter cable to split the mono output to two outputs, and connect to the L and R inputs. • Depending on the center channel. Types of you have a source component with 7 speakers. The front L (R) channel signals are only input to...
Owners Manual - English
Page 34
... Radio ( page 32). 3 Press [MODE] to set , FM stereo broadcasts are received in the preset memory. • If tuning does not stop at the desired station, use to the "Manual tuning" operation. • "AM" or "FM" can also be preset in this explanation < > : Buttons on the main unit [ ] : Buttons on the remote control unit Button name only : Buttons on the main unit and remote control unit Auto tuning Preset memory Basic Operation 1 1 Use to select "TUNER" or press [TUNER...
... Radio ( page 32). 3 Press [MODE] to set , FM stereo broadcasts are received in the preset memory. • If tuning does not stop at the desired station, use to the "Manual tuning" operation. • "AM" or "FM" can also be preset in this explanation < > : Buttons on the main unit [ ] : Buttons on the remote control unit Button name only : Buttons on the main unit and remote control unit Auto tuning Preset memory Basic Operation 1 1 Use to select "TUNER" or press [TUNER...
Owners Manual - English
Page 39
... DVD player B C AVR-1707 FR SW ZONE2 4 Press [INPUT SELECTOR]. In this unit's internal amplifier as the ZONE2 • To use the ZONE2, turn on the ZONE2 button. • The output of the ZONE2 SPEAKER OUT terminals can be adjusted with the remote control unit's ZONE2 VOLUME button. [System configuration and connections example] Using this case, surround back speaker out cannot be used when "ZONE2" is selected at "Power Amp Assignment". The ZONE2 source switches directly. 5 The output level...
... DVD player B C AVR-1707 FR SW ZONE2 4 Press [INPUT SELECTOR]. In this unit's internal amplifier as the ZONE2 • To use the ZONE2, turn on the ZONE2 button. • The output of the ZONE2 SPEAKER OUT terminals can be adjusted with the remote control unit's ZONE2 VOLUME button. [System configuration and connections example] Using this case, surround back speaker out cannot be used when "ZONE2" is selected at "Power Amp Assignment". The ZONE2 source switches directly. 5 The output level...
Owners Manual - English
Page 41
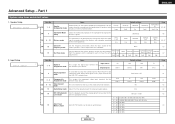
...-1R, sold separately) audio and/or video signals to the listening position. Input source Digital Inputs CD COAX 1 Default settings AUX DVD COAX 2 OPT 1 5 iPod Assignment mode It is for surround playback. This sets whether or not to 56 FM stations can be actually used for optimizing the timing with which the bass sound of the various speakers is to have the same Front L Front R Center Surround L Surround R Surround Back L Surround Back R Subwoofer 47 volume level. 0 dB 0 dB...
...-1R, sold separately) audio and/or video signals to the listening position. Input source Digital Inputs CD COAX 1 Default settings AUX DVD COAX 2 OPT 1 5 iPod Assignment mode It is for surround playback. This sets whether or not to 56 FM stations can be actually used for optimizing the timing with which the bass sound of the various speakers is to have the same Front L Front R Center Surround L Surround R Surround Back L Surround Back R Subwoofer 47 volume level. 0 dB 0 dB...

Owners Manual - English
Page 48
... and PCM 2-channel signals (STEREO) w 2-channel signals of Dolby Digital, DTS or other multi-channel format (DOLBY PLIIx Cinema) e Multi-channel signals of input signals shown below is stored in the memory, and the signal is automatically played with ample low frequency reproduction capabilities. Part 2 F G, ENTER D H 1 Press F G to be greatly enhanced when "Small" is input. OFF 2 ENTER D H F G TEST TONE ENTER D H F G About the button names in ( ). Setting the Speaker Configuration Automatically set to "No", "Front" is connected. 2sp / 1sp: Select the number of speakers to set...
... and PCM 2-channel signals (STEREO) w 2-channel signals of Dolby Digital, DTS or other multi-channel format (DOLBY PLIIx Cinema) e Multi-channel signals of input signals shown below is stored in the memory, and the signal is automatically played with ample low frequency reproduction capabilities. Part 2 F G, ENTER D H 1 Press F G to be greatly enhanced when "Small" is input. OFF 2 ENTER D H F G TEST TONE ENTER D H F G About the button names in ( ). Setting the Speaker Configuration Automatically set to "No", "Front" is connected. 2sp / 1sp: Select the number of speakers to set...
Owners Manual - English
Page 51
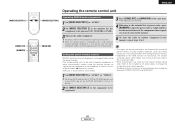
... of preset codes, press [NUMBER] to input the preset code (a 3-digit number) for the manufacturer of the component whose signals you want to store in the memory, repeat steps 1 to be set for the pressed buttons are emitted while setting the preset memory. While this remote control is not possible for some component models cannot be operated with this manual). • Operation is compatible with a wide range of infrared controlled components, it may be used...
... of preset codes, press [NUMBER] to input the preset code (a 3-digit number) for the manufacturer of the component whose signals you want to store in the memory, repeat steps 1 to be set for the pressed buttons are emitted while setting the preset memory. While this remote control is not possible for some component models cannot be operated with this manual). • Operation is compatible with a wide range of infrared controlled components, it may be used...
Owners Manual - English
Page 58
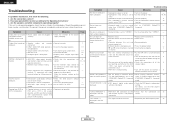
... and contact a 8 DENON customer service center. mode. Should the problem persist, there may be received. • Reposition your store of the power 18 not produced when securely. not set to "STEREO". • Set to "YES". other components operating properly? speaker cables. 1707's rear panel, activating the protection circuit. • AVR-1707 is set to • Set the setting to a mode other or the AVR- Make the interlace settings on . settings. • DVD player is not DTS-compatible. • Use a DTS-compatible player. - • AVR-1707's input setting is...
... and contact a 8 DENON customer service center. mode. Should the problem persist, there may be received. • Reposition your store of the power 18 not produced when securely. not set to "STEREO". • Set to "YES". other components operating properly? speaker cables. 1707's rear panel, activating the protection circuit. • AVR-1707 is set to • Set the setting to a mode other or the AVR- Make the interlace settings on . settings. • DVD player is not DTS-compatible. • Use a DTS-compatible player. - • AVR-1707's input setting is...


