Operating Instructions
Page 1
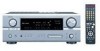
... SIGNAL DIGITAL BAND SHIFT AUTO INPUT PCM ª PRESET • DTS OUTPUT SURROUND BACK ZONE 2 ª TUNING • VIDEO SELECT DIMMER STATUS PHONES SPEAKER A B SURROUND BACK 5CH / 7CH DIRECT / STANDARD STEREO STEREO V.AUX INPUT S-VIDEO VIDEO L AUDIO R OPTICAL SETUP MIC SURROUND MODE SELECT TONE CONTROL SURROUND PARAMETER TONE DEFEAT AV SURROUND RECEIVER AVR-2105 FOR ENGLISH READERS PAGE 2 ~ PAGE 73, 144 ~ 148 2 We greatly appreciate your purchase of this unit. 2 To be sure you take maximum advantage of all the features this unit has to keep this manual...
... SIGNAL DIGITAL BAND SHIFT AUTO INPUT PCM ª PRESET • DTS OUTPUT SURROUND BACK ZONE 2 ª TUNING • VIDEO SELECT DIMMER STATUS PHONES SPEAKER A B SURROUND BACK 5CH / 7CH DIRECT / STANDARD STEREO STEREO V.AUX INPUT S-VIDEO VIDEO L AUDIO R OPTICAL SETUP MIC SURROUND MODE SELECT TONE CONTROL SURROUND PARAMETER TONE DEFEAT AV SURROUND RECEIVER AVR-2105 FOR ENGLISH READERS PAGE 2 ~ PAGE 73, 144 ~ 148 2 We greatly appreciate your purchase of this unit. 2 To be sure you take maximum advantage of all the features this unit has to keep this manual...

Operating Instructions
Page 2
..., to distribute this manual, meets FCC requirements. Tenir la prise lors du débranchement du cordon. 2 * (For sets with the instructions, may be determined by turning the product OFF and ON, the user is connected. • Consult the local retailer authorized to use the product. 3. The lightning flash with Part 15 of important operating and maintenance (servicing) instructions in accordance with ventilation...
..., to distribute this manual, meets FCC requirements. Tenir la prise lors du débranchement du cordon. 2 * (For sets with the instructions, may be determined by turning the product OFF and ON, the user is connected. • Consult the local retailer authorized to use the product. 3. The lightning flash with Part 15 of important operating and maintenance (servicing) instructions in accordance with ventilation...
Operating Instructions
Page 3
... operating instructions. Ventilation - Power Sources - This is operated. 2. FIGURE A EXAMPLE OF ANTENNA GROUNDING AS PER NATIONAL ELECTRICAL CODE GROUND CLAMP ELECTRIC SERVICE EQUIPMENT NEC - Power-supply cords should be adhered to cords at plugs, convenience receptacles, and the point where they are unable to a wall or ceiling only as the original part. Outdoor Antenna Grounding - If an outside antenna or cable system is grounded so as opening or removing...
... operating instructions. Ventilation - Power Sources - This is operated. 2. FIGURE A EXAMPLE OF ANTENNA GROUNDING AS PER NATIONAL ELECTRICAL CODE GROUND CLAMP ELECTRIC SERVICE EQUIPMENT NEC - Power-supply cords should be adhered to cords at plugs, convenience receptacles, and the point where they are unable to a wall or ceiling only as the original part. Outdoor Antenna Grounding - If an outside antenna or cable system is grounded so as opening or removing...
Operating Instructions
Page 4
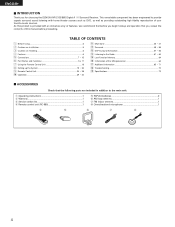
...;9 Specifications 73 2 ACCESSORIES Check that you review the contents of this product is provided with home theater sources such as DVD, as well as providing outstanding high fidelity reproduction of features, we recommend that before you for choosing the DENON AVR-2105/885 Digital A / V Surround Receiver. TABLE OF CONTENTS z Before Using 5 x Cautions on Installation 5 c Cautions on Handling 5 v Features ...6 b Connections 7 ~ 15 n Part Names and Functions 16, 17 m Using the Remote Control...
...;9 Specifications 73 2 ACCESSORIES Check that you review the contents of this product is provided with home theater sources such as DVD, as well as providing outstanding high fidelity reproduction of features, we recommend that before you for choosing the DENON AVR-2105/885 Digital A / V Surround Receiver. TABLE OF CONTENTS z Before Using 5 x Cautions on Installation 5 c Cautions on Handling 5 v Features ...6 b Connections 7 ~ 15 n Part Names and Functions 16, 17 m Using the Remote Control...
Operating Instructions
Page 5
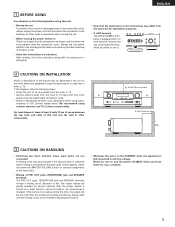
... you want to use it. V.AUX INPUT S-VIDEO VIDEO L AUDIO R OPTICAL SETUP MIC SURROUND MODE SELECT TONE CONTROL SURROUND PARAMETER TONE DEFEAT AV SURROUND RECEIVER AVR-2105 2 CAUTIONS ON INSTALLATION Noise or disturbance of this, the output signals are greatly reduced for several seconds after the power switch is changed. If this happens, either turn the power off (£off before connecting and disconnecting connection cords. • Store this instructions in a safe place. AUX terminal. Always set the power switch to the standby position before adjusting the volume. •...
... you want to use it. V.AUX INPUT S-VIDEO VIDEO L AUDIO R OPTICAL SETUP MIC SURROUND MODE SELECT TONE CONTROL SURROUND PARAMETER TONE DEFEAT AV SURROUND RECEIVER AVR-2105 2 CAUTIONS ON INSTALLATION Noise or disturbance of this, the output signals are greatly reduced for several seconds after the power switch is changed. If this happens, either turn the power off (£off before connecting and disconnecting connection cords. • Store this instructions in a safe place. AUX terminal. Always set the power switch to the standby position before adjusting the volume. •...

Operating Instructions
Page 6
... stereo sources. 6. Dolby Digital is best suited for playing music,the Cinema mode for playing movies, and the Game mode for an input signal in the main room (MAIN) and the subroom (ZONE2) simultaneously. 9. Multi Zone Music Entertainment System Multi Source Function: This unit's Multi Source function lets you select different audio sources for the convenient connection of speakers, the distance to 7.1 playback channels, including the surround back channel. Future Sound Format Upgrade Capability via Eight Channel Outputs For future multi-channel audio format(s), the AVR...
... stereo sources. 6. Dolby Digital is best suited for playing music,the Cinema mode for playing movies, and the Game mode for an input signal in the main room (MAIN) and the subroom (ZONE2) simultaneously. 9. Multi Zone Music Entertainment System Multi Source Function: This unit's Multi Source function lets you select different audio sources for the convenient connection of speakers, the distance to 7.1 playback channels, including the surround back channel. Future Sound Format Upgrade Capability via Eight Channel Outputs For future multi-channel audio format(s), the AVR...

Operating Instructions
Page 12
... 6-channel analog output For instructions on playback using a 75 Ω/ohms video signal cable cord. AUX INPUT jacks. 12 VOLUME LEVEL MASTER VOLUME DTS OUTPUT SURROUND BACK ZONE 2 ESET • ª TUNING • VIDEO SELECT DIMMER STATUS DIRECT / STEREO V.AUX INPUT S-VIDEO VIDEO L R L AUDIO R OPTICAL SETUP MIC SURROUND MODE SELECT TONE CONTROL SURROUND PARAMETER TONE DEFEAT AV SURROUND RECEIVER AVR-2105 LINE OUT DIGITAL OUT VIDEO OUT S-VIDEO OUT Video game OUTPUT R L OPTICAL VIDEO OUT S-VIDEO OUT RL Connecting a Video game component • Connect the Video...
... 6-channel analog output For instructions on playback using a 75 Ω/ohms video signal cable cord. AUX INPUT jacks. 12 VOLUME LEVEL MASTER VOLUME DTS OUTPUT SURROUND BACK ZONE 2 ESET • ª TUNING • VIDEO SELECT DIMMER STATUS DIRECT / STEREO V.AUX INPUT S-VIDEO VIDEO L R L AUDIO R OPTICAL SETUP MIC SURROUND MODE SELECT TONE CONTROL SURROUND PARAMETER TONE DEFEAT AV SURROUND RECEIVER AVR-2105 LINE OUT DIGITAL OUT VIDEO OUT S-VIDEO OUT Video game OUTPUT R L OPTICAL VIDEO OUT S-VIDEO OUT RL Connecting a Video game component • Connect the Video...

Operating Instructions
Page 14
... rear panel. Connecting the speaker cords 2. Tighten by turning counterclockwise. When the protection circuit is activated, the speaker output is used at high volumes when speakers with an impedance lower than the specified impedance (for long periods of lower than the specified impedance are no problems with the wiring or the ventilation around the unit, switch off and the power supply indicator LED flashes. Speaker Impedance • When speaker...
... rear panel. Connecting the speaker cords 2. Tighten by turning counterclockwise. When the protection circuit is activated, the speaker output is used at high volumes when speakers with an impedance lower than the specified impedance (for long periods of lower than the specified impedance are no problems with the wiring or the ventilation around the unit, switch off and the power supply indicator LED flashes. Speaker Impedance • When speaker...

Operating Instructions
Page 16
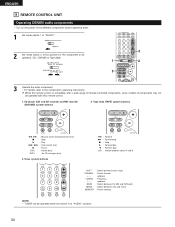
...SIGNAL DIGITAL BAND SHIFT AUTO INPUT PCM ª PRESET • DTS OUTPUT SURROUND BACK ZONE 2 ª TUNING • VIDEO SELECT DIMMER STATUS PHONES SPEAKER A B SURROUND BACK 5CH / 7CH DIRECT / STANDARD STEREO STEREO V.AUX INPUT S-VIDEO VIDEO L AUDIO R OPTICAL SETUP MIC SURROUND MODE SELECT TONE CONTROL SURROUND PARAMETER TONE DEFEAT AV SURROUND RECEIVER AVR-2105 t u o !1 q w e r y i !0 !4 !2 !3 !5 !6 !7 !8 q Power ON/STANDBY switch 21, 39, 61) w Power indicator 21, 39) e Power switch 21, 39) r Headphones jack (PHONES 43) t ANALOG button 40, 42) y SPEAKER...
...SIGNAL DIGITAL BAND SHIFT AUTO INPUT PCM ª PRESET • DTS OUTPUT SURROUND BACK ZONE 2 ª TUNING • VIDEO SELECT DIMMER STATUS PHONES SPEAKER A B SURROUND BACK 5CH / 7CH DIRECT / STANDARD STEREO STEREO V.AUX INPUT S-VIDEO VIDEO L AUDIO R OPTICAL SETUP MIC SURROUND MODE SELECT TONE CONTROL SURROUND PARAMETER TONE DEFEAT AV SURROUND RECEIVER AVR-2105 t u o !1 q w e r y i !0 !4 !2 !3 !5 !6 !7 !8 q Power ON/STANDBY switch 21, 39, 61) w Power indicator 21, 39) e Power switch 21, 39) r Headphones jack (PHONES 43) t ANALOG button 40, 42) y SPEAKER...
Operating Instructions
Page 19
... input sources. Component In This assigns the component video input jacks for playing deep bass signals. Ext. CURSOR buttons (•, ª, 0, 1) Press this to switch the display. In Subwoofer channel playback level. These settings are required to set upon shipment from the factory) Auto Setup Speaker Configuration Delay Time Subwoofer Mode Crossover Frequency Test Tone System setup Power Amp Assignment Set this to switch the surround back channel's power amplifier for use for zone2. Use the following buttons to set up the system 1 Set the slide switch to "AUDIO...
... input sources. Component In This assigns the component video input jacks for playing deep bass signals. Ext. CURSOR buttons (•, ª, 0, 1) Press this to switch the display. In Subwoofer channel playback level. These settings are required to set upon shipment from the factory) Auto Setup Speaker Configuration Delay Time Subwoofer Mode Crossover Frequency Test Tone System setup Power Amp Assignment Set this to switch the surround back channel's power amplifier for use for zone2. Use the following buttons to set up the system 1 Set the slide switch to "AUDIO...
Operating Instructions
Page 22
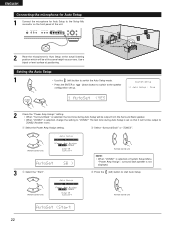
... Setup Menu "Power Amp Assign", surround back speaker is not displayed. w Press the (left ) button to switch the Auto Setup mode. • Press the ENTER or configuration set up. (down) button to switch to the speaker 1 AutoSet (Remote control unit) NOTE: • When "ZONE2" is selected at positioning. Setting the Auto Setup 1 • Use the (left ) button to the Setup Mic connector on the front panel of the unit. PHONES SPEAKER A B SURROUND BACK 5CH / 7CH DIRECT / STANDARD STEREO STEREO V.AUX INPUT S-VIDEO VIDEO L AUDIO R OPTICAL SETUP MIC SURROUND MODE SELECT...
... Setup Menu "Power Amp Assign", surround back speaker is not displayed. w Press the (left ) button to switch the Auto Setup mode. • Press the ENTER or configuration set up. (down) button to switch to the speaker 1 AutoSet (Remote control unit) NOTE: • When "ZONE2" is selected at positioning. Setting the Auto Setup 1 • Use the (left ) button to the Setup Mic connector on the front panel of the unit. PHONES SPEAKER A B SURROUND BACK 5CH / 7CH DIRECT / STANDARD STEREO STEREO V.AUX INPUT S-VIDEO VIDEO L AUDIO R OPTICAL SETUP MIC SURROUND MODE SELECT...

Operating Instructions
Page 23
... canceled when MASTER VOLUME is operated while the Auto Setup is performed. • Set the volume to halfway and set the crossover frequency to the front speakers (A) once measurements are completed. 2 Subwoofer speaker is measured twice. 3 When "ZONE2" is selected, this happen, perform the measurements when the noise level is low, or switch off if your subwoofer speaker can not be displayed when the measurement microphone is set, the setting automatically switches to...
... canceled when MASTER VOLUME is operated while the Auto Setup is performed. • Set the volume to halfway and set the crossover frequency to the front speakers (A) once measurements are completed. 2 Subwoofer speaker is measured twice. 3 When "ZONE2" is selected, this happen, perform the measurements when the noise level is low, or switch off if your subwoofer speaker can not be displayed when the measurement microphone is set, the setting automatically switches to...
Operating Instructions
Page 33
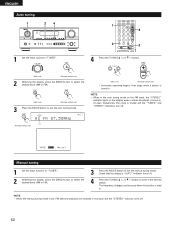
The display automatically switches to 8. "Search" flashes on the screen and searching begins. ENGLISH Auto Tuner Presets Use this to automatically search for FM broadcasts and store up to 56 stations at preset channels A1 to 8, B1 to 8, C1 to 8, D1 to 8, E1 to 8, F1 to 8 and G1 to screen. 36 PRESET "Completed" appears once searching is completed. NOTE: • If an FM station cannot...
The display automatically switches to 8. "Search" flashes on the screen and searching begins. ENGLISH Auto Tuner Presets Use this to automatically search for FM broadcasts and store up to 56 stations at preset channels A1 to 8, B1 to 8, C1 to 8, D1 to 8, E1 to 8, F1 to 8 and G1 to screen. 36 PRESET "Completed" appears once searching is completed. NOTE: • If an FM station cannot...
Operating Instructions
Page 34
...and B SHIFT : Switch preset channel range CHANNEL : Preset channel +, - Tuner system buttons 6 : Rewind 7 : Fast-forward 2 : Stop 1 : Forward play 0 : Reverse play A/B : Switch between auto and mono MEMORY : Preset memory NOTE: • TUNER can be operated when the switch is compatible with a wide range of infrared controlled components, some models of the different components before operating them. 1 Set mode switch 1 to "AUDIO". 2 Set mode switch 2 to the component's operating instructions. Tape deck (TAPE) system buttons 6, 7 2 1 8, 9 3 DISC SKIP+ : Manual search (forward...
...and B SHIFT : Switch preset channel range CHANNEL : Preset channel +, - Tuner system buttons 6 : Rewind 7 : Fast-forward 2 : Stop 1 : Forward play 0 : Reverse play A/B : Switch between auto and mono MEMORY : Preset memory NOTE: • TUNER can be operated when the switch is compatible with a wide range of infrared controlled components, some models of the different components before operating them. 1 Set mode switch 1 to "AUDIO". 2 Set mode switch 2 to the component's operating instructions. Tape deck (TAPE) system buttons 6, 7 2 1 8, 9 3 DISC SKIP+ : Manual search (forward...

Operating Instructions
Page 41
... DIGITAL indicator will light when playing CD-ROMs containing data other than audio signals, but no sound will be sure to connect the source component to the digital input jacks (OPTICAL/COAXIAL) and set at +0.5 dB or greater, the volume cannot be heard. 41 Press the SURROUND MODE button, then turn the SELECT knob. Example: Stereo SURROUND MODE SELECT (Main unit) To select the surround mode while adjusting the surround parameters, tone defeat or tone control, press the surround mode button then operate the selector. (Remote control unit) SURROUND MODE...
... DIGITAL indicator will light when playing CD-ROMs containing data other than audio signals, but no sound will be sure to connect the source component to the digital input jacks (OPTICAL/COAXIAL) and set at +0.5 dB or greater, the volume cannot be heard. 41 Press the SURROUND MODE button, then turn the SELECT knob. Example: Stereo SURROUND MODE SELECT (Main unit) To select the surround mode while adjusting the surround parameters, tone defeat or tone control, press the surround mode button then operate the selector. (Remote control unit) SURROUND MODE...

Operating Instructions
Page 56
... music software is played, it is turned off " "SURROUND" is performed with the subwoofer peak limit level setting (system setup menu), adjust the level as a discrete 6.1-channel source is conducted without using digital matrix processing. "PL IIx Cinema" ..Processing is performed with reduced dynamic range). (This only works when playing program sources recorded in Dolby Digital or DTS.) Select one of the PL IIx decoder and the Surround Back channel is lower than Pure direct and direct mode. FLAG: Displays...
... music software is played, it is turned off " "SURROUND" is performed with the subwoofer peak limit level setting (system setup menu), adjust the level as a discrete 6.1-channel source is conducted without using digital matrix processing. "PL IIx Cinema" ..Processing is performed with reduced dynamic range). (This only works when playing program sources recorded in Dolby Digital or DTS.) Select one of the PL IIx decoder and the Surround Back channel is lower than Pure direct and direct mode. FLAG: Displays...
Operating Instructions
Page 62
... "STEREO" indicators turn off. Lit (Remote control unit) Manual tuning 1 Set the input function to "TUNER". 2 Watching the display, press the BAND button to select the desired band (AM or FM). 3 Press the MODE button to tune in the desired station. At open frequencies, the noise is tuned in monaural and the "STEREO" indicator turns off . 4 Press the TUNING • (+) or ª (-) button to set , FM stereo broadcasts are received in . The frequency changes continuously when the button is set the manual tuning mode...
... "STEREO" indicators turn off. Lit (Remote control unit) Manual tuning 1 Set the input function to "TUNER". 2 Watching the display, press the BAND button to select the desired band (AM or FM). 3 Press the MODE button to tune in the desired station. At open frequencies, the noise is tuned in monaural and the "STEREO" indicator turns off . 4 Press the TUNING • (+) or ª (-) button to set , FM stereo broadcasts are received in . The frequency changes continuously when the button is set the manual tuning mode...
Operating Instructions
Page 68
... the surround mode to 7.1 channels. Dolby Digital consists of Dolby Pro Logic II to decode audio signals recorded on the AVR-2105/885, switch the DVD player's output mode to 7.1 playback channels, including the surround back channel. In some cases players are equipped with a digital signal processing circuit that lets you play program sources in Dolby Surround ( ) but Dolby Pro Logic II they are general examples. The Music mode is a new multi-channel playback format developed by Dolby Laboratories. channel, also called the ".1" channel, containing bass frequencies...
... the surround mode to 7.1 channels. Dolby Digital consists of Dolby Pro Logic II to decode audio signals recorded on the AVR-2105/885, switch the DVD player's output mode to 7.1 playback channels, including the surround back channel. In some cases players are equipped with a digital signal processing circuit that lets you play program sources in Dolby Surround ( ) but Dolby Pro Logic II they are general examples. The Music mode is a new multi-channel playback format developed by Dolby Laboratories. channel, also called the ".1" channel, containing bass frequencies...
Operating Instructions
Page 69
... this noise is played with the amplifier set the mode to "ANALOG" or "PCM". 1 Set the input mode to "AUTO" or "DTS" before turning up the master volume. 3 A DVD player with digital outputs (PCM type digital output required). Decoding these signals is input to achieve multi-channel surround playback. "Dolby", "Pro Logic" and the double-D symbol are equipped with DTS-compatible digital output is of FM radio, TV, satellite broadcasts and cable TV. They do not include picture data, but they...
... this noise is played with the amplifier set the mode to "ANALOG" or "PCM". 1 Set the input mode to "AUTO" or "DTS" before turning up the master volume. 3 A DVD player with digital outputs (PCM type digital output required). Decoding these signals is input to achieve multi-channel surround playback. "Dolby", "Pro Logic" and the double-D symbol are equipped with DTS-compatible digital output is of FM radio, TV, satellite broadcasts and cable TV. They do not include picture data, but they...
Operating Instructions
Page 72
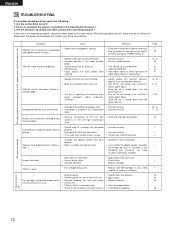
... input Digital input selected. • Connect securely. • Set to a suitable position. • Turn volume up transformer. cords. Sound is not operating properly, check the items listed in the table below. DISPLAY not lit and power indicator is playing. • Ground wire of turntable not connected properly. • Incomplete PHONO jack connection. • TV or radio transmission antenna nearby. • Connect securely. • Connect securely. • Contact your store of the audio function button. • Volume control set...
... input Digital input selected. • Connect securely. • Set to a suitable position. • Turn volume up transformer. cords. Sound is not operating properly, check the items listed in the table below. DISPLAY not lit and power indicator is playing. • Ground wire of turntable not connected properly. • Incomplete PHONO jack connection. • TV or radio transmission antenna nearby. • Connect securely. • Connect securely. • Contact your store of the audio function button. • Volume control set...


