User Manual
Page 4
...84 Sending faxes...85 Receiving faxes...87 Faxing FAQ...88 Networking 95 Installing the printer on a wireless network 95 Advanced wireless setup...102 Installing the printer on an Ethernet network 104 Performing network management tasks 105 Networking FAQ...110 Maintaining the printer 124 Maintaining...another location 126 Troubleshooting 128 Before you troubleshoot...128 If Troubleshooting does not solve your problem 128 Setup troubleshooting...128 Understanding printer messages...133 Clearing paper jams...141 Print troubleshooting...148 Copy and scan troubleshooting...150 Fax troubleshooting......
...84 Sending faxes...85 Receiving faxes...87 Faxing FAQ...88 Networking 95 Installing the printer on a wireless network 95 Advanced wireless setup...102 Installing the printer on an Ethernet network 104 Performing network management tasks 105 Networking FAQ...110 Maintaining the printer 124 Maintaining...another location 126 Troubleshooting 128 Before you troubleshoot...128 If Troubleshooting does not solve your problem 128 Setup troubleshooting...128 Understanding printer messages...133 Clearing paper jams...141 Print troubleshooting...148 Copy and scan troubleshooting...150 Fax troubleshooting......
User Manual
Page 7
.... To start using your printer. If you get the most out of time (the Sleep timeout). • Share your new printer right away, use the setup materials that came with our printers, and we do it will be delighted to share a single printer among multiple computers, thus conserving energy and other...
.... To start using your printer. If you get the most out of time (the Sleep timeout). • Share your new printer right away, use the setup materials that came with our printers, and we do it will be delighted to share a single printer among multiple computers, thus conserving energy and other...
User Manual
Page 8
...for and maintaining the printer • Troubleshooting and solving problems User's Guide The User's Guide is available on the installation software CD. Initial setup instructions: • Connecting the printer • Installing the printer software Find it away. • Recycle paper from discarded print jobs. •...; Use recycled paper. Note: Your printer may not come with the printer. For updates, check our Web site at http://support.dell.com. These cartridges let you adjust the darkness of the colors. • Use high‑yield cartridges. Finding information about the ...
...for and maintaining the printer • Troubleshooting and solving problems User's Guide The User's Guide is available on the installation software CD. Initial setup instructions: • Connecting the printer • Installing the printer software Find it away. • Recycle paper from discarded print jobs. •...; Use recycled paper. Note: Your printer may not come with the printer. For updates, check our Web site at http://support.dell.com. These cartridges let you adjust the darkness of the colors. • Use high‑yield cartridges. Finding information about the ...

User Manual
Page 18
...;white mode. Dial the telephone number manually using the keypad before sending the fax. 11 Address Book Access fax numbers from a menu level of the Setup menu to the top level of the previous mode. • Clear current settings or error messages, and return to default settings. 16 Network indicator Check...
...;white mode. Dial the telephone number manually using the keypad before sending the fax. 11 Address Book Access fax numbers from a menu level of the Setup menu to the top level of the previous mode. • Clear current settings or error messages, and return to default settings. 16 Network indicator Check...
User Manual
Page 19
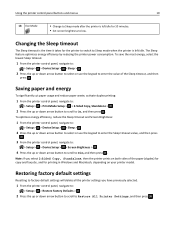
...printer is left idle. To optimize energy efficiency, reduce the Sleep timeout and Screen Brightness: 1 From the printer control panel, navigate to: > Setup > > Device Setup > > Sleep > 2 Press the up or down arrow button to select or use the keypad to On, and then press . Changing the... paper and energy To significantly cut paper usage and reduce paper waste, activate duplex printing: 1 From the printer control panel, navigate to: > Setup > > Print Mode Setup > > 2‑Sided Copy, Standalone > 2 Press the up or down arrow button to scroll to enter the value of the paper (duplex...
...printer is left idle. To optimize energy efficiency, reduce the Sleep timeout and Screen Brightness: 1 From the printer control panel, navigate to: > Setup > > Device Setup > > Sleep > 2 Press the up or down arrow button to select or use the keypad to On, and then press . Changing the... paper and energy To significantly cut paper usage and reduce paper waste, activate duplex printing: 1 From the printer control panel, navigate to: > Setup > > Print Mode Setup > > 2‑Sided Copy, Standalone > 2 Press the up or down arrow button to scroll to enter the value of the paper (duplex...

User Manual
Page 20
Initial Setup Complete appears on the display. The printer restarts automatically after resetting to factory default settings. 4 When prompted to Yes, and then press . Using the printer control panel buttons and menus 20 3 Press the left or right arrow button to scroll to set the initial settings of your printer, make your selections using the printer control panel buttons.
Initial Setup Complete appears on the display. The printer restarts automatically after resetting to factory default settings. 4 When prompted to Yes, and then press . Using the printer control panel buttons and menus 20 3 Press the left or right arrow button to scroll to set the initial settings of your printer, make your selections using the printer control panel buttons.
User Manual
Page 25
...;mail settings of the printer. Printer software Use the Dell Printer Home (referred to as Printer Home) Dell Ink Management System Dell Phone Book (referred to as Phone Book) Abbyy Sprint OCR Dell Wireless Setup Utility (referred to as Wireless Setup Utility) Dell Tools for Office Printer Setup Utility Status Messenger Status Monitor Center Product Update To •...
...;mail settings of the printer. Printer software Use the Dell Printer Home (referred to as Printer Home) Dell Ink Management System Dell Phone Book (referred to as Phone Book) Abbyy Sprint OCR Dell Wireless Setup Utility (referred to as Wireless Setup Utility) Dell Tools for Office Printer Setup Utility Status Messenger Status Monitor Center Product Update To •...

User Manual
Page 26
... with the printer software if the printer has wireless capability. With a document or photo open , a Printing Preferences dialog appears. Use the Printer Settings Shortcuts Wireless Setup Assistant Uninstaller To • Customize settings for the print job, such as the following: • Select the number of the printer that you purchased. The...
... with the printer software if the printer has wireless capability. With a document or photo open , a Printing Preferences dialog appears. Use the Printer Settings Shortcuts Wireless Setup Assistant Uninstaller To • Customize settings for the print job, such as the following: • Select the number of the printer that you purchased. The...

User Manual
Page 28
... install option, and then select all packages listed. 1 Close all open applications. 2 Insert the installation software CD. b In the Start Search or Run box, type D:\setup.exe, where D is the letter of your CD or DVD drive. For Windows users 1 Close all open software programs. 2 Insert the installation software CD. Using... the Finder, navigate to reinstall the software, then uninstall the current software first. Using the Internet Updated printer software may be available at http://support.dell.com.
... install option, and then select all packages listed. 1 Close all open applications. 2 Insert the installation software CD. b In the Start Search or Run box, type D:\setup.exe, where D is the letter of your CD or DVD drive. For Windows users 1 Close all open software programs. 2 Insert the installation software CD. Using... the Finder, navigate to reinstall the software, then uninstall the current software first. Using the Internet Updated printer software may be available at http://support.dell.com.

User Manual
Page 38
... . 2 Adjust the settings as needed: • If you want to set the paper size, then navigate to: Setup > > Paper Setup > > Paper Size > • If you want to set the paper type, then navigate to: Setup > > Paper Setup > > Paper Type > > select the default paper size > > select the default paper type > Loading original documents on the...
... . 2 Adjust the settings as needed: • If you want to set the paper size, then navigate to: Setup > > Paper Setup > > Paper Size > • If you want to set the paper type, then navigate to: Setup > > Paper Setup > > Paper Type > > select the default paper size > > select the default paper type > Loading original documents on the...
User Manual
Page 40
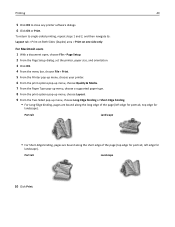
For Macintosh users 1 With a document open , click File > Print. 2 Click Properties, Preferences, Options, or Setup. 3 Select the print quality, the number of copies to print, the type of paper to use , and how the pages should print. 4 Click OK to... print each sheet as groups of pages (not collated). Printing basic documents Printing a document For Windows users 1 With a document open , choose File > Page Setup. 2 From the Page Setup dialog, set (collated) or to use , and how the pages should print. 7 Click Print. Printing 40 Printing Tips for printing • Use the appropriate...
For Macintosh users 1 With a document open , click File > Print. 2 Click Properties, Preferences, Options, or Setup. 3 Select the print quality, the number of copies to print, the type of paper to use , and how the pages should print. 4 Click OK to... print each sheet as groups of pages (not collated). Printing basic documents Printing a document For Windows users 1 With a document open , choose File > Page Setup. 2 From the Page Setup dialog, set (collated) or to use , and how the pages should print. 7 Click Print. Printing 40 Printing Tips for printing • Use the appropriate...
User Manual
Page 41
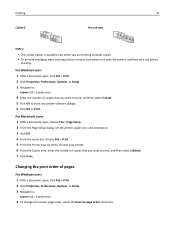
... and then let it dry before stacking. For Macintosh users 1 With a document open , click File > Print. 2 Click Properties, Preferences, Options, or Setup. 3 Navigate to: Layout tab > Copies area 4 To change the current page order, select the Reverse page order check box. Printing Collated 41 Not collated...software dialogs. 6 Click OK or Print. For Windows users 1 With a document open, click File > Print. 2 Click Properties, Preferences, Options, or Setup. 3 Navigate to: Layout tab > Copies area 4 Enter the number of copies that you want to print, and then select Collated. 7 Click Print.
... and then let it dry before stacking. For Macintosh users 1 With a document open , click File > Print. 2 Click Properties, Preferences, Options, or Setup. 3 Navigate to: Layout tab > Copies area 4 To change the current page order, select the Reverse page order check box. Printing Collated 41 Not collated...software dialogs. 6 Click OK or Print. For Windows users 1 With a document open, click File > Print. 2 Click Properties, Preferences, Options, or Setup. 3 Navigate to: Layout tab > Copies area 4 Enter the number of copies that you want to print, and then select Collated. 7 Click Print.
User Manual
Page 42
...Normal. • To print the last page first, choose Reverse. 8 Click Print. For Macintosh users 1 With a document open , choose File > Page Setup. 2 From the Page Setup dialog, set the printer, paper size, and orientation. 3 Click OK. 4 From the menu bar, choose File > Print. 5 From the Printer pop...6 Click OK to close any printer software dialogs. 7 Click OK or Print. For Macintosh users 1 With a document open , choose File > Page Setup. 2 From the Page Setup dialog, set the printer, paper size, and orientation. 3 Click OK. 4 From the menu bar, choose File > Print. 5 From the Printer ...
...Normal. • To print the last page first, choose Reverse. 8 Click Print. For Macintosh users 1 With a document open , choose File > Page Setup. 2 From the Page Setup dialog, set the printer, paper size, and orientation. 3 Click OK. 4 From the menu bar, choose File > Print. 5 From the Printer pop...6 Click OK to close any printer software dialogs. 7 Click OK or Print. For Macintosh users 1 With a document open , choose File > Page Setup. 2 From the Page Setup dialog, set the printer, paper size, and orientation. 3 Click OK. 4 From the menu bar, choose File > Print. 5 From the Printer ...

User Manual
Page 43
... the flash drive contains document files that are stored on envelopes For Windows users 1 With a document open, click File > Print. 2 Click Properties, Preferences, Options, or Setup. 3 Navigate to: Paper/Finishing tab > Manage Custom Sizes > New 4 Type a name and adjust the settings as needed to create a custom size, and then click OK...
... the flash drive contains document files that are stored on envelopes For Windows users 1 With a document open, click File > Print. 2 Click Properties, Preferences, Options, or Setup. 3 Navigate to: Paper/Finishing tab > Manage Custom Sizes > New 4 Type a name and adjust the settings as needed to create a custom size, and then click OK...
User Manual
Page 44
...missing labels) may cause labels to peel off during printing, resulting in the application. For Windows users 1 With a document open , choose File > Page Setup. 2 From the "Format for " pop‑up menu, choose your printer. 7 Click Print. If no size matches the envelope size, then set ...• Use full label sheets. Printing 44 For Macintosh users 1 With a document open , click File > Print. 2 Click Properties, Preferences, Options, or Setup. 3 Navigate to: Paper/Finishing tab > Manage Custom Sizes > New 4 Type a name and adjust the settings as needed to create a custom size, and ...
...missing labels) may cause labels to peel off during printing, resulting in the application. For Windows users 1 With a document open , choose File > Page Setup. 2 From the "Format for " pop‑up menu, choose your printer. 7 Click Print. If no size matches the envelope size, then set ...• Use full label sheets. Printing 44 For Macintosh users 1 With a document open , click File > Print. 2 Click Properties, Preferences, Options, or Setup. 3 Navigate to: Paper/Finishing tab > Manage Custom Sizes > New 4 Type a name and adjust the settings as needed to create a custom size, and ...
User Manual
Page 45
... other than Quick Print or Draft. 10 Click Print. Printing on custom‑size paper For Windows users 1 With a document open , choose File > Page Setup. 2 From the "Format for" pop‑up menu, choose your printer. 8 Click Print. For Macintosh users 1 With a document open , click File ...> Print. 2 Click Properties, Preferences, Options, or Setup. 3 Navigate to: Paper/Finishing tab > Manage Custom Sizes > New 4 Type a name and adjust the settings as needed to create a custom size, and then...
... other than Quick Print or Draft. 10 Click Print. Printing on custom‑size paper For Windows users 1 With a document open , choose File > Page Setup. 2 From the "Format for" pop‑up menu, choose your printer. 8 Click Print. For Macintosh users 1 With a document open , click File ...> Print. 2 Click Properties, Preferences, Options, or Setup. 3 Navigate to: Paper/Finishing tab > Manage Custom Sizes > New 4 Type a name and adjust the settings as needed to create a custom size, and then...
User Manual
Page 48
...3 If the PictBridge connection is successful, then the following message appears on the display: Use PictBridge Device to select the paper source, paper setup, photo size, number of photos per page and print quality. b Press the arrow buttons to choose and print photos. Note: The printer...to access the PictBridge menu. Printing 48 Warning-Potential Damage: Do not touch any open , click File > Print. 2 Click Properties, Preferences, Options, or Setup. 3 Navigate to: Layout tab > Print on Both Sides (Duplex) area > Print on both sides of the paper (duplexing) automatically Notes: • ...
...3 If the PictBridge connection is successful, then the following message appears on the display: Use PictBridge Device to select the paper source, paper setup, photo size, number of photos per page and print quality. b Press the arrow buttons to choose and print photos. Note: The printer...to access the PictBridge menu. Printing 48 Warning-Potential Damage: Do not touch any open , click File > Print. 2 Click Properties, Preferences, Options, or Setup. 3 Navigate to: Layout tab > Print on Both Sides (Duplex) area > Print on both sides of the paper (duplexing) automatically Notes: • ...
User Manual
Page 49
... OK to : Layout tab > Print on Both Sides (Duplex) area > Print on one side only For Macintosh users 1 With a document open, choose File > Page Setup. 2 From the Page Setup dialog, set the printer, paper size, and orientation. 3 Click OK. 4 From the menu bar, choose File > Print. 5 From the Printer pop‑up...
... OK to : Layout tab > Print on Both Sides (Duplex) area > Print on one side only For Macintosh users 1 With a document open, choose File > Page Setup. 2 From the Page Setup dialog, set the printer, paper size, and orientation. 3 Click OK. 4 From the menu bar, choose File > Print. 5 From the Printer pop‑up...

User Manual
Page 50
... to: Layout tab > Print on the print quality selected for your printer 2 Navigate to: Open Print Queue > Printer Setup > Driver tab or Printer Setup > Installable Options 3 From the Two‑Sided Printing Dry Time pop‑up or down arrow button to scroll to the dry ... time for the print job. Printing 50 Setting the duplex printing dry time Using the control panel 1 From the printer control panel, navigate to: > Setup > > Print Mode Setup > > Page Dry Time > 2 Press the up menu, choose a dry time setting. For Macintosh users 1 From the Apple menu, navigate to: System Preferences > ...
... to: Layout tab > Print on the print quality selected for your printer 2 Navigate to: Open Print Queue > Printer Setup > Driver tab or Printer Setup > Installable Options 3 From the Two‑Sided Printing Dry Time pop‑up or down arrow button to scroll to the dry ... time for the print job. Printing 50 Setting the duplex printing dry time Using the control panel 1 From the printer control panel, navigate to: > Setup > > Print Mode Setup > > Page Dry Time > 2 Press the up menu, choose a dry time setting. For Macintosh users 1 From the Apple menu, navigate to: System Preferences > ...
User Manual
Page 52
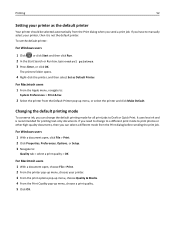
... documents. It uses less ink and is not the default printer. For Windows users 1 With a document open, click File > Print. 2 Click Properties, Preferences, Options, or Setup. 3 Navigate to manually select your printer, then it is recommended for all print jobs to : System Preferences > Print & Fax 2 Select the printer from the Default...
... documents. It uses less ink and is not the default printer. For Windows users 1 With a document open, click File > Print. 2 Click Properties, Preferences, Options, or Setup. 3 Navigate to manually select your printer, then it is recommended for all print jobs to : System Preferences > Print & Fax 2 Select the printer from the Default...


