
X Monitor Users Guide
Page 3
Contents About your monitor 5 Package contents 5 Product features 6 Identifying features and controls 7 Monitor sepcifiactions 10 Plug and play capability 16 LCD monitor quality and pixel policy 16 Maintenance guidelines 16 Setting up the monitor 17 Connecting the stand 17 Connecting your monitor 19 Organizing cables 20 Removing the stand 20 Operating your monitor 22 Turning on the monitor 22 Using the front panel controls 22 Using the On-Screen Display (OSD) menu 24 Setting up your monitor 40 Using tilt 42 Contents │ 3
Contents About your monitor 5 Package contents 5 Product features 6 Identifying features and controls 7 Monitor sepcifiactions 10 Plug and play capability 16 LCD monitor quality and pixel policy 16 Maintenance guidelines 16 Setting up the monitor 17 Connecting the stand 17 Connecting your monitor 19 Organizing cables 20 Removing the stand 20 Operating your monitor 22 Turning on the monitor 22 Using the front panel controls 22 Using the On-Screen Display (OSD) menu 24 Setting up your monitor 40 Using tilt 42 Contents │ 3

X Monitor Users Guide
Page 5
NOTE: To set up with the components indicated in certain countries. Monitor Stand riser Stand base Power cable (varies by country) VGA cable (SE2219H) About your monitor Package contents Your monitor ships with any other stand, see Contacting Dell if anything is missing. Some features may not ship with the stand. Ensure that you have received all the components and see the documentation that shipped with your monitor. NOTE: Some items may be optional and may not be available in the table. About your monitor | 5
NOTE: To set up with the components indicated in certain countries. Monitor Stand riser Stand base Power cable (varies by country) VGA cable (SE2219H) About your monitor Package contents Your monitor ships with any other stand, see Contacting Dell if anything is missing. Some features may not ship with the stand. Ensure that you have received all the components and see the documentation that shipped with your monitor. NOTE: Some items may be optional and may not be available in the table. About your monitor | 5

X Monitor Users Guide
Page 6
...BFR/PVC-Reduced (the circuit boards inside your monitor RoHS Compliant. 6 | About your monitor are made using BFR/ PVC-free laminates). HDMI cable (SE2219HX) Quick Setup Guide Safety and Regulatory Information Product features The Dell SE2219H/SE2219HX at panel display has an active matrix,... Thin-Film Transistor (TFT), Liquid Crystal Display (LCD), anti-static,and LED backlight. The monitor features include: SE2219H/SE2219HX : 54.61 cm (21.5 inch) diagonal...
...BFR/PVC-Reduced (the circuit boards inside your monitor RoHS Compliant. 6 | About your monitor are made using BFR/ PVC-free laminates). HDMI cable (SE2219HX) Quick Setup Guide Safety and Regulatory Information Product features The Dell SE2219H/SE2219HX at panel display has an active matrix,... Thin-Film Transistor (TFT), Liquid Crystal Display (LCD), anti-static,and LED backlight. The monitor features include: SE2219H/SE2219HX : 54.61 cm (21.5 inch) diagonal...

X Monitor Users Guide
Page 7
Identifying features and controls Front view 1 2 Label Description 1 Function buttons 2 Power On/Off button (with LED indicator) Use To access the OSD menu and change the settings if required. (For more information, see Using the front panel controls) To turn the monitor On or Off. About your monitor | 7
Identifying features and controls Front view 1 2 Label Description 1 Function buttons 2 Power On/Off button (with LED indicator) Use To access the OSD menu and change the settings if required. (For more information, see Using the front panel controls) To turn the monitor On or Off. About your monitor | 7

X Monitor Users Guide
Page 8
... information (engraved) List the regulatory approvals. 4 Cable-management slot To organize cables. 5 Stand release button Release stand from monitor. The Service Tag is a unique alphanumeric identifier that enables Dell service technicians to contact Dell for technical support. List the regulatory approvals. See this label if you need to identify the hardware components in...
... information (engraved) List the regulatory approvals. 4 Cable-management slot To organize cables. 5 Stand release button Release stand from monitor. The Service Tag is a unique alphanumeric identifier that enables Dell service technicians to contact Dell for technical support. List the regulatory approvals. See this label if you need to identify the hardware components in...
X Monitor Users Guide
Page 9
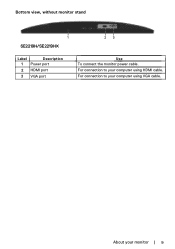
For connection to your computer using VGA cable. For connection to your monitor | 9 About your computer using HDMI cable. Bottom view, without monitor stand SE2219H/SE2219HX Label Description 1 Power port 2 HDMI port 3 VGA port Use To connect the monitor power cable.
For connection to your computer using VGA cable. For connection to your monitor | 9 About your computer using HDMI cable. Bottom view, without monitor stand SE2219H/SE2219HX Label Description 1 Power port 2 HDMI port 3 VGA port Use To connect the monitor power cable.
X Monitor Users Guide
Page 10
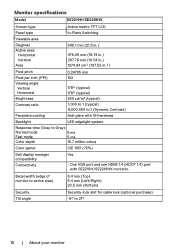
...° (typical) 250 cd/m2 (typical) 1,000 to 1 (typical) 8,000,000 to 1 (Dynamic Contrast) Faceplate coating Anti-glare with SE2219H/SE2219HX monitors. Bezel width (edge of monitor to active area) 6.4 mm (Top) 6.4 mm (Left/Right) 20.5 mm (Bottom) Security Tilt angle Security-lock slot for cable lock (...optional purchase) -5° to Gray): Normal mode 8 ms Fast mode 5 ms Color depth 16.7 million colors Color gamut CIE 1931 (72%) Dell display...
...° (typical) 250 cd/m2 (typical) 1,000 to 1 (typical) 8,000,000 to 1 (Dynamic Contrast) Faceplate coating Anti-glare with SE2219H/SE2219HX monitors. Bezel width (edge of monitor to active area) 6.4 mm (Top) 6.4 mm (Left/Right) 20.5 mm (Bottom) Security Tilt angle Security-lock slot for cable lock (...optional purchase) -5° to Gray): Normal mode 8 ms Fast mode 5 ms Color depth 16.7 million colors Color gamut CIE 1931 (72%) Dell display...
X Monitor Users Guide
Page 12
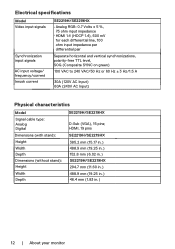
Electrical speci cations Model Video input signals Synchronization input signals AC input voltage/ frequency/current Inrush current SE2219H/SE2219HX Analog RGB: 0.7 Volts ± 5 %, 75 ohm input impedance HDMI 1.4 (HDCP 1.4), 600 mV for each differential line, 100 ohm input impedance per ... Analog Digital Dimensions (with stand): Height Width Depth Dimensions (without stand): Height Width Depth SE2219H/SE2219HX D-Sub (VGA), 15 pins; HDMI, 19 pins SE2219H/SE2219HX 385.2 mm (15.17 in. ) 488.9 mm (19.25 in. ) 152.8 mm (6.02 in. ) SE2219H/SE2219HX 294.7 mm (11.60 in. ) 488.9 mm (19.25 in. )...
Electrical speci cations Model Video input signals Synchronization input signals AC input voltage/ frequency/current Inrush current SE2219H/SE2219HX Analog RGB: 0.7 Volts ± 5 %, 75 ohm input impedance HDMI 1.4 (HDCP 1.4), 600 mV for each differential line, 100 ohm input impedance per ... Analog Digital Dimensions (with stand): Height Width Depth Dimensions (without stand): Height Width Depth SE2219H/SE2219HX D-Sub (VGA), 15 pins; HDMI, 19 pins SE2219H/SE2219HX 385.2 mm (15.17 in. ) 488.9 mm (19.25 in. ) 152.8 mm (6.02 in. ) SE2219H/SE2219HX 294.7 mm (11.60 in. ) 488.9 mm (19.25 in. )...
X Monitor Users Guide
Page 13
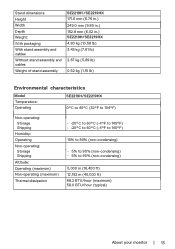
...packaging With stand assembly and cables Without stand assembly and cables Weight of stand assembly SE2219H /SE2219HX 171.6 mm (6.76 in.) 249.0 mm (9.80 in.) 152.8 mm (6.02 in.) SE2219H/SE2219HX 4.80 kg (10.58 lb) 3.45 kg (7.61 lb) 2.67... kg (5.89 lb) 0.52 kg (1.15 lb) Environmental characteristics Model Temperature: Operating SE2219H/SE2219HX 0°C to 40°C (32°F to 104°F) Non-operating: Storage Shipping Humidity: Operating Non-operating: Storage ...,400 ft) 12,192 m (40,000 ft) 68.2 BTU/hour (maximum) 58.0 BTU/hour (typical) About your monitor | 13
...packaging With stand assembly and cables Without stand assembly and cables Weight of stand assembly SE2219H /SE2219HX 171.6 mm (6.76 in.) 249.0 mm (9.80 in.) 152.8 mm (6.02 in.) SE2219H/SE2219HX 4.80 kg (10.58 lb) 3.45 kg (7.61 lb) 2.67... kg (5.89 lb) 0.52 kg (1.15 lb) Environmental characteristics Model Temperature: Operating SE2219H/SE2219HX 0°C to 40°C (32°F to 104°F) Non-operating: Storage Shipping Humidity: Operating Non-operating: Storage ...,400 ft) 12,192 m (40,000 ft) 68.2 BTU/hour (maximum) 58.0 BTU/hour (typical) About your monitor | 13

X Monitor Users Guide
Page 15
www.dell.com/SE2219HX SE2219HX Activate the computer and the monitor to gain access to the OSD. No VGA Cable The display will go into Power Save Mode in 4 minutes. No HDMI cable The display will go into Power Save Mode in 4 minutes. About your monitor | 15 www.dell.com/SE2219H SE2219H SE2219HX Dell 22 Monitor ? The OSD functions only in the Active-off mode, one of the following messages will be displayed: SE2219H Dell 22 Monitor ? When any button is pressed in the normal operation mode.
www.dell.com/SE2219HX SE2219HX Activate the computer and the monitor to gain access to the OSD. No VGA Cable The display will go into Power Save Mode in 4 minutes. No HDMI cable The display will go into Power Save Mode in 4 minutes. About your monitor | 15 www.dell.com/SE2219H SE2219H SE2219HX Dell 22 Monitor ? The OSD functions only in the Active-off mode, one of the following messages will be displayed: SE2219H Dell 22 Monitor ? When any button is pressed in the normal operation mode.

X Monitor Users Guide
Page 16
...the instructions in the list below while unpacking, cleaning or handling your monitor: To clean your screen, lightly dampen a soft, clean cloth with care as some detergents leave a milky film on Dell Monitor Quality and Pixel Policy, see and do not affect the display quality ... or compressed air. Use a lightly-dampened cloth to see Dell Support site at www.dell.com/support/monitors. Plug and play capability You can install the monitor in use. 16 | About your monitor Maintenance guidelines Cleaning your monitor. If you notice white powder when you can select different ...
...the instructions in the list below while unpacking, cleaning or handling your monitor: To clean your screen, lightly dampen a soft, clean cloth with care as some detergents leave a milky film on Dell Monitor Quality and Pixel Policy, see and do not affect the display quality ... or compressed air. Use a lightly-dampened cloth to see Dell Support site at www.dell.com/support/monitors. Plug and play capability You can install the monitor in use. 16 | About your monitor Maintenance guidelines Cleaning your monitor. If you notice white powder when you can select different ...

X Monitor Users Guide
Page 17
To attach the monitor stand: 1. Connect the stand riser to the stand base, and then tighten the screw on the stand base. 2. Setting up the monitor | 17 Setting up the monitor Connecting the stand NOTE: The stand is not attached when the monitor is applicable for the stand that shipped with the grooves at the back of the monitor. Align the stand-riser bracket with your monitor. NOTE: The following procedure is shipped from the factory.
To attach the monitor stand: 1. Connect the stand riser to the stand base, and then tighten the screw on the stand base. 2. Setting up the monitor | 17 Setting up the monitor Connecting the stand NOTE: The stand is not attached when the monitor is applicable for the stand that shipped with the grooves at the back of the monitor. Align the stand-riser bracket with your monitor. NOTE: The following procedure is shipped from the factory.

X Monitor Users Guide
Page 18
Slide the stand assembly until it snaps into place. 18 | Setting up the monitor 3.
Slide the stand assembly until it snaps into place. 18 | Setting up the monitor 3.

X Monitor Users Guide
Page 19
To connect your monitor to the computer: 1. Connect VGA or HDMI cable from your monitor to the computer. Connecting VGA cable Connecting HDMI cable Setting up the monitor | 19 Connecting your computer and disconnect the power cable. 2. It is recommended to route the cables through the cablemanagement slot before you begin any of the procedures in this section, follow the Safety Instructions. Turn o your monitor WARNING: Before you connect them to the computer at the same time. NOTE: Do not connect all cables to the monitor.
To connect your monitor to the computer: 1. Connect VGA or HDMI cable from your monitor to the computer. Connecting VGA cable Connecting HDMI cable Setting up the monitor | 19 Connecting your computer and disconnect the power cable. 2. It is recommended to route the cables through the cablemanagement slot before you begin any of the procedures in this section, follow the Safety Instructions. Turn o your monitor WARNING: Before you connect them to the computer at the same time. NOTE: Do not connect all cables to the monitor.

X Monitor Users Guide
Page 20
Organizing cables Use the cable-management slot to route the cables connected to the release button. 20 | Setting up the monitor Removing the stand NOTE: To prevent scratches on the screen when removing the stand, ensure that the monitor is applicable for the stand that shipped with your monitor. Place the monitor on a soft and clean surface. NOTE: The following procedure is placed on a soft cloth or cushion along the desk. 2. To remove the stand: 1. Tilt the stand downwards to access to your monitor.
Organizing cables Use the cable-management slot to route the cables connected to the release button. 20 | Setting up the monitor Removing the stand NOTE: To prevent scratches on the screen when removing the stand, ensure that the monitor is applicable for the stand that shipped with your monitor. Place the monitor on a soft and clean surface. NOTE: The following procedure is placed on a soft cloth or cushion along the desk. 2. To remove the stand: 1. Tilt the stand downwards to access to your monitor.

X Monitor Users Guide
Page 21
Using a long screwdriver to press the release button. 4. While keeping the release button pressed, pull the stand out. Setting up the monitor | 21 3.
Using a long screwdriver to press the release button. 4. While keeping the release button pressed, pull the stand out. Setting up the monitor | 21 3.

X Monitor Users Guide
Page 22
Operating your monitor Preset mode 22 | Operating your monitor Turning on the monitor. Using the front panel controls Use the control buttons at the bottom edge of the monitor to adjust the image being displayed. 1 234 5 The following table describes the control buttons: Control Buttons Description 1 Use this button to turn on the monitor Press the button to choose from a list of preset modes.
Operating your monitor Preset mode 22 | Operating your monitor Turning on the monitor. Using the front panel controls Use the control buttons at the bottom edge of the monitor to adjust the image being displayed. 1 234 5 The following table describes the control buttons: Control Buttons Description 1 Use this button to turn on the monitor Press the button to choose from a list of preset modes.

X Monitor Users Guide
Page 23
... Power button and functioning normally. Solid white light indicates the monitor is in a menu. Blinking white light indicates (with power-status light) the monitor is turned on or off. OSD controls Use the buttons on the bottom edge of a menu item. Brightness/Contrast 3 To launch the On...-Screen Display (OSD) menu, or to access the list of items/options of the monitor to adjust the image settings. 1 2 34 Control Buttons Description 1 Use the Up button to confirm your monitor | 23 Down 3 Use the OK button to increase values or move down in a menu. Up...
... Power button and functioning normally. Solid white light indicates the monitor is in a menu. Blinking white light indicates (with power-status light) the monitor is turned on or off. OSD controls Use the buttons on the bottom edge of a menu item. Brightness/Contrast 3 To launch the On...-Screen Display (OSD) menu, or to access the list of items/options of the monitor to adjust the image settings. 1 2 34 Control Buttons Description 1 Use the Up button to confirm your monitor | 23 Down 3 Use the OK button to increase values or move down in a menu. Up...

X Monitor Users Guide
Page 24
...the button to return to close automatically. 1. Using the On-Screen Display (OSD) menu Accessing the OSD menu NOTE: Any changes you make your monitor Press the and buttons to move from one icon to another , the option name is highlighted. 3. Press and then use the and menu, to... make are automatically saved when you move to another menu, exit the OSD menu, or wait for HDMI input Dell 22 Monitor Brightness / Contrast Auto Adjust 75% Input Source 75% Color Display Menu Personalize Others 2. Press the button to select the desired parameter. 5.
...the button to return to close automatically. 1. Using the On-Screen Display (OSD) menu Accessing the OSD menu NOTE: Any changes you make your monitor Press the and buttons to move from one icon to another , the option name is highlighted. 3. Press and then use the and menu, to... make are automatically saved when you move to another menu, exit the OSD menu, or wait for HDMI input Dell 22 Monitor Brightness / Contrast Auto Adjust 75% Input Source 75% Color Display Menu Personalize Others 2. Press the button to select the desired parameter. 5.

X Monitor Users Guide
Page 25
...0; Press the button to increase the brightness and press the button to decrease the contrast (min. 0; max. 100). Operating your monitor | 25 Adjust the brightness first, and then adjust the contrast only if further adjustment is switched on the screen. Icon Menu and ...Submenus Brightness/ Contrast Description Use this option to activate brightness/contrast adjustment. Dell 22 Monitor Brightness / Contrast Auto Adjust Input Source Color Display Menu Personalize Others 75% 75% Brightness Contrast Brightness adjusts the luminance of...
...0; Press the button to increase the brightness and press the button to decrease the contrast (min. 0; max. 100). Operating your monitor | 25 Adjust the brightness first, and then adjust the contrast only if further adjustment is switched on the screen. Icon Menu and ...Submenus Brightness/ Contrast Description Use this option to activate brightness/contrast adjustment. Dell 22 Monitor Brightness / Contrast Auto Adjust Input Source Color Display Menu Personalize Others 75% 75% Brightness Contrast Brightness adjusts the luminance of...


