
X Monitor Users Guide
Page 3
Contents About your monitor 5 Package contents 5 Product features 6 Identifying features and controls 7 Monitor sepcifiactions 10 Plug and play capability 16 LCD monitor quality and pixel policy 16 Maintenance guidelines 16 Setting up the monitor 17 Connecting the stand 17 Connecting your monitor 19 Organizing cables 20 Removing the stand 20 Operating your monitor 22 Turning on the monitor 22 Using the front panel controls 22 Using the On-Screen Display (OSD) menu 24 Setting up your monitor 40 Using tilt 42 Contents │ 3
Contents About your monitor 5 Package contents 5 Product features 6 Identifying features and controls 7 Monitor sepcifiactions 10 Plug and play capability 16 LCD monitor quality and pixel policy 16 Maintenance guidelines 16 Setting up the monitor 17 Connecting the stand 17 Connecting your monitor 19 Organizing cables 20 Removing the stand 20 Operating your monitor 22 Turning on the monitor 22 Using the front panel controls 22 Using the On-Screen Display (OSD) menu 24 Setting up your monitor 40 Using tilt 42 Contents │ 3

X Monitor Users Guide
Page 5
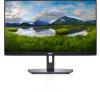
NOTE: Some items may be optional and may not be available in the table. About your monitor Package contents Your monitor ships with the components indicated in certain countries. Monitor Stand riser Stand base Power cable (varies by country) VGA cable (SE2219H) About your monitor. Some features may not ship with your monitor | 5 NOTE: To set up with the stand. Ensure that you have received all the components and see the documentation that shipped with any other stand, see Contacting Dell if anything is missing.
NOTE: Some items may be optional and may not be available in the table. About your monitor Package contents Your monitor ships with the components indicated in certain countries. Monitor Stand riser Stand base Power cable (varies by country) VGA cable (SE2219H) About your monitor. Some features may not ship with your monitor | 5 NOTE: To set up with the stand. Ensure that you have received all the components and see the documentation that shipped with any other stand, see Contacting Dell if anything is missing.

X Monitor Users Guide
Page 6
... the sleep mode. Optimize eye comfort with full-screen support for lower resolutions. Security-lock slot. HDMI cable (SE2219HX) Quick Setup Guide Safety and Regulatory Information Product features The Dell SE2219H/SE2219HX at panel display has an active matrix, Thin-Film Transistor (TFT), Liquid Crystal Display (LCD), anti-static,and LED backlight. HDMI connectivity makes it simple and easy to connect with legacy and new systems. Plug and play capable if supported by your computer On-Screen Display (OSD) adjustments is...
... the sleep mode. Optimize eye comfort with full-screen support for lower resolutions. Security-lock slot. HDMI cable (SE2219HX) Quick Setup Guide Safety and Regulatory Information Product features The Dell SE2219H/SE2219HX at panel display has an active matrix, Thin-Film Transistor (TFT), Liquid Crystal Display (LCD), anti-static,and LED backlight. HDMI connectivity makes it simple and easy to connect with legacy and new systems. Plug and play capable if supported by your computer On-Screen Display (OSD) adjustments is...
X Monitor Users Guide
Page 9
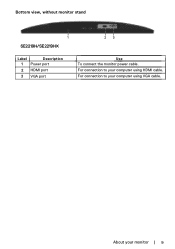
Bottom view, without monitor stand SE2219H/SE2219HX Label Description 1 Power port 2 HDMI port 3 VGA port Use To connect the monitor power cable. About your computer using VGA cable. For connection to your computer using HDMI cable. For connection to your monitor | 9
Bottom view, without monitor stand SE2219H/SE2219HX Label Description 1 Power port 2 HDMI port 3 VGA port Use To connect the monitor power cable. About your computer using VGA cable. For connection to your computer using HDMI cable. For connection to your monitor | 9
X Monitor Users Guide
Page 10
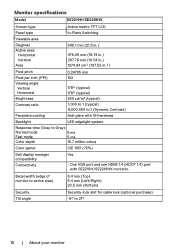
...-glare with SE2219H/SE2219HX monitors. Bezel width (edge of monitor to active area) 6.4 mm (Top) 6.4 mm (Left/Right) 20.5 mm (Bottom) Security Tilt angle Security-lock slot for cable lock (optional purchase) -5° to Gray): Normal mode 8 ms Fast mode 5 ms Color depth 16.7 million colors Color gamut CIE 1931 (72%) Dell display manager compatibility Connectivity Yes One VGA port and one HDMI 1.4 (HDCP 1.4) port with 3H hardness Backlight LED edgelight system...
...-glare with SE2219H/SE2219HX monitors. Bezel width (edge of monitor to active area) 6.4 mm (Top) 6.4 mm (Left/Right) 20.5 mm (Bottom) Security Tilt angle Security-lock slot for cable lock (optional purchase) -5° to Gray): Normal mode 8 ms Fast mode 5 ms Color depth 16.7 million colors Color gamut CIE 1931 (72%) Dell display manager compatibility Connectivity Yes One VGA port and one HDMI 1.4 (HDCP 1.4) port with 3H hardness Backlight LED edgelight system...

X Monitor Users Guide
Page 16
... instructions in use a dynamically changing screen saver and turn off with its Extended Display Identification Data (EDID) using detergent of any Plug and Play-compatible system. For more pixels to become fixed in any kind as the black-colored monitor may get scratched To help maintain the best image quality on your monitor, use . 16 | About your screen, lightly dampen a soft, clean cloth with care as some detergents leave a milky film on Dell Monitor...
... instructions in use a dynamically changing screen saver and turn off with its Extended Display Identification Data (EDID) using detergent of any Plug and Play-compatible system. For more pixels to become fixed in any kind as the black-colored monitor may get scratched To help maintain the best image quality on your monitor, use . 16 | About your screen, lightly dampen a soft, clean cloth with care as some detergents leave a milky film on Dell Monitor...

X Monitor Users Guide
Page 23
... Back Operating your selection in power save mode. Blinking white light indicates (with power-status light) the monitor is turned on Power button and functioning normally. Brightness/Contrast 3 To launch the On-Screen Display (OSD) menu, or to decrease values or move up in a menu. Up 2 Use the Down button to access the list of items/options of the monitor to adjust the image settings. 1 2 34 Control Buttons Description 1 Use the Up button to increase values or move down...
... Back Operating your selection in power save mode. Blinking white light indicates (with power-status light) the monitor is turned on Power button and functioning normally. Brightness/Contrast 3 To launch the On-Screen Display (OSD) menu, or to decrease values or move up in a menu. Up 2 Use the Down button to access the list of items/options of the monitor to adjust the image settings. 1 2 34 Control Buttons Description 1 Use the Up button to increase values or move down...
X Monitor Users Guide
Page 27
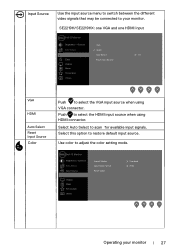
.... Use color to restore default input source. Select Auto Select to scan for available input signals. SE2219H/SE2219HX: one VGA and one HDMI input Dell 22 Monitor Brightness / Contrast VGA Auto Adjust HDMI Input Source Auto Select On Color Display Menu Reset Input Source Personalize Others VGA HDMI Auto Select Reset Input Source Color Push to select the VGA input source when using HDMI connector. Push to select the HDMI input source when using VGA connector. Input Source Use the input source menu to switch between the different video signals that may be connected to...
.... Use color to restore default input source. Select Auto Select to scan for available input signals. SE2219H/SE2219HX: one VGA and one HDMI input Dell 22 Monitor Brightness / Contrast VGA Auto Adjust HDMI Input Source Auto Select On Color Display Menu Reset Input Source Personalize Others VGA HDMI Auto Select Reset Input Source Color Push to select the VGA input source when using HDMI connector. Push to select the HDMI input source when using VGA connector. Input Source Use the input source menu to switch between the different video signals that may be connected to...
X Monitor Users Guide
Page 28
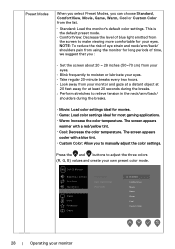
.../arm/back/ shoulders during the breaks. Standard: Load the monitor's default color settings. Press the and buttons to moisten or lubricate your own preset color mode. Preset Modes When you select Preset Modes, you can choose Standard, ComfortView, Movie, Game, Warm, Cool or Custom Color from your eyes. Dell 22 Monitor Brightness / Contrast Auto Adjust Input Source Color Display Menu Personalize Others Preset Modes Input Color Format Reset Color Standard ComfortView Movie Game Warm Cool Custom...
.../arm/back/ shoulders during the breaks. Standard: Load the monitor's default color settings. Press the and buttons to moisten or lubricate your own preset color mode. Preset Modes When you select Preset Modes, you can choose Standard, ComfortView, Movie, Game, Warm, Cool or Custom Color from your eyes. Dell 22 Monitor Brightness / Contrast Auto Adjust Input Source Color Display Menu Personalize Others Preset Modes Input Color Format Reset Color Standard ComfortView Movie Game Warm Cool Custom...

X Monitor Users Guide
Page 29
... using the HDMI cable. This is connected to adjust the desired skin tone color. This feature can shift the color of the video image. NOTE: Saturation adjustment is available only when you select Movie or Game preset mode. Press to green or purple. Use or to adjust the saturation from 0 to 100. Dell 22 Monitor Brightness / Contrast Auto Adjust Input Source Color Display Menu Personalize Others Preset Modes Input Color Format Reset Color RGB YPbPr Hue Saturation Reset Color This feature can adjust the color...
... using the HDMI cable. This is connected to adjust the desired skin tone color. This feature can shift the color of the video image. NOTE: Saturation adjustment is available only when you select Movie or Game preset mode. Press to green or purple. Use or to adjust the saturation from 0 to 100. Dell 22 Monitor Brightness / Contrast Auto Adjust Input Source Color Display Menu Personalize Others Preset Modes Input Color Format Reset Color RGB YPbPr Hue Saturation Reset Color This feature can adjust the color...

X Monitor Users Guide
Page 30
... buttons to adjust for best image quality. 30 | Operating your preference. Minimum is '100' (+). Use or to adjust the sharpness from 0 to adjust image. The Pixel Clock feature enables you to adjust image quality on your monitor to move image up and down. Display Use the display to 100. Use or to your monitor Use the or to Wide 16:9, 4:3 or 5:4. Dell 22 Monitor Brightness / Contrast Auto Adjust Input Source Color Display Menu Personalize Others Aspect Ratio Horizontal Position Vertical Position Sharpness Pixel Clock Phase Dymanic Contrast Wide...
... buttons to adjust for best image quality. 30 | Operating your preference. Minimum is '100' (+). Use or to adjust the sharpness from 0 to adjust image. The Pixel Clock feature enables you to adjust image quality on your monitor to move image up and down. Display Use the display to 100. Use or to your monitor Use the or to Wide 16:9, 4:3 or 5:4. Dell 22 Monitor Brightness / Contrast Auto Adjust Input Source Color Display Menu Personalize Others Aspect Ratio Horizontal Position Vertical Position Sharpness Pixel Clock Phase Dymanic Contrast Wide...

X Monitor Users Guide
Page 32
... Modes or Brightness/Contrast and set it as a shortcut key. Personalize Allow you to set the shortcut key 1. Dell 22 Monitor Brightness / Contrast Auto Adjust Input Source Color Display Menu Personalize Others Shortcut Key 1 Shortcut Key 2 Power Button LED Reset Personalization Preset Modes Brightness/Contrast On During Active Shortcut Key 1 Shortcut Key 2 Power Button LED Reset Personalization Allow you to restore shortcut key to the default setting. Allow you to select one of the following : Preset Modes, Brightness/Contrast, Auto Adjust, Input Source, Aspect Ratio, to save...
... Modes or Brightness/Contrast and set it as a shortcut key. Personalize Allow you to set the shortcut key 1. Dell 22 Monitor Brightness / Contrast Auto Adjust Input Source Color Display Menu Personalize Others Shortcut Key 1 Shortcut Key 2 Power Button LED Reset Personalization Preset Modes Brightness/Contrast On During Active Shortcut Key 1 Shortcut Key 2 Power Button LED Reset Personalization Allow you to restore shortcut key to the default setting. Allow you to select one of the following : Preset Modes, Brightness/Contrast, Auto Adjust, Input Source, Aspect Ratio, to save...
X Monitor Users Guide
Page 33
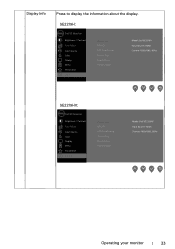
...SE2219H: Dell 22 Monitor Brightness / Contrast Auto Adjust Input Source Color Display Menu Personalize Others Display Info DDC/CI LCD Conditioning Service Tag Reset Others Factory Reset Model: Dell SE2219H Input Source: HDMI Current: 1920x1080, 60Hz SE2219HX: Dell 22 Monitor Brightness / Contrast Auto Adjust Input Source Color Display Menu Personalize Others Display Info DDC/CI LCD Conditioning Service Tag Reset Others Factory Reset Model: Dell SE2219HX Input Source: HDMI Current: 1920x1080, 60Hz Operating your monitor | 33 Display Info Press to display the information about the display...
...SE2219H: Dell 22 Monitor Brightness / Contrast Auto Adjust Input Source Color Display Menu Personalize Others Display Info DDC/CI LCD Conditioning Service Tag Reset Others Factory Reset Model: Dell SE2219H Input Source: HDMI Current: 1920x1080, 60Hz SE2219HX: Dell 22 Monitor Brightness / Contrast Auto Adjust Input Source Color Display Menu Personalize Others Display Info DDC/CI LCD Conditioning Service Tag Reset Others Factory Reset Model: Dell SE2219HX Input Source: HDMI Current: 1920x1080, 60Hz Operating your monitor | 33 Display Info Press to display the information about the display...

X Monitor Users Guide
Page 34
Dell 22 Monitor Brightness / Contrast Display Info Auto Adjust DDC/CI On Input Source LCD Conditioning Off Color Service Tag Display Reset Others Menu Factory Reset Personalize Others 34 | Operating your monitor Select Off to adjust the monitor settings using software on your computer. Enable this feature. DDC/CI DDC/CI (Display Data Channel/Command Interface) allows you to turn off this feature for best user experience and optimum performance of your monitor.
Dell 22 Monitor Brightness / Contrast Display Info Auto Adjust DDC/CI On Input Source LCD Conditioning Off Color Service Tag Display Reset Others Menu Factory Reset Personalize Others 34 | Operating your monitor Select Off to adjust the monitor settings using software on your computer. Enable this feature. DDC/CI DDC/CI (Display Data Channel/Command Interface) allows you to turn off this feature for best user experience and optimum performance of your monitor.

X Monitor Users Guide
Page 35
... Help reduce minor cases of the monitor. Dell 22 Monitor Brightness / Contrast Display Info Auto Adjust DDC/CI Input Source LCD Conditioning On Color Service Tag Off Display Reset Others Menu Factory Reset Personalize Others Service Tag Display the Service Tag number of image retention. Reset all settings under the Others setting menu to the factory default. Depending on the degree of image retention, the program may take some time to the factory default. To start LCD Conditioning,select On. Operating your monitor | 35 Dell 22 Monitor Brightness / Contrast...
... Help reduce minor cases of the monitor. Dell 22 Monitor Brightness / Contrast Display Info Auto Adjust DDC/CI Input Source LCD Conditioning On Color Service Tag Off Display Reset Others Menu Factory Reset Personalize Others Service Tag Display the Service Tag number of image retention. Reset all settings under the Others setting menu to the factory default. Depending on the degree of image retention, the program may take some time to the factory default. To start LCD Conditioning,select On. Operating your monitor | 35 Dell 22 Monitor Brightness / Contrast...

X Monitor Users Guide
Page 40
...: In Windows 7: 1. After installing the drivers for your graphics driver. Click the Drop-down menu under Resolution and select 1920 x 1080. 4. In Windows 8 or Windows 8.1: 1. Select the Desktop tile to switch to www.dell.com/support, enter your service tag, and download the latest driver for your monitor Setting Display Resolution to 1920 x 1080 For best performance, set the display resolution to 1920 x 1080 pixels by performing the following methods to update your graphics card...
...: In Windows 7: 1. After installing the drivers for your graphics driver. Click the Drop-down menu under Resolution and select 1920 x 1080. 4. In Windows 8 or Windows 8.1: 1. Select the Desktop tile to switch to www.dell.com/support, enter your service tag, and download the latest driver for your monitor Setting Display Resolution to 1920 x 1080 For best performance, set the display resolution to 1920 x 1080 pixels by performing the following methods to update your graphics card...
X Monitor Users Guide
Page 41
... at the top of the window (e.g. After installing the drivers for your graphics adapter, attempt to set the resolution to the graphic card provider website for updated driver (for example, www.AMD.com or www.NVIDIA.com). 7. Operating Your Monitor | 41 Click Advanced Settings. 4. After installing the drivers for your graphics adapter, attempt to set the resolution to 1920 x 1080 again. Click Change Display Settings. 4. NVIDIA, AMD, Intel etc...
... at the top of the window (e.g. After installing the drivers for your graphics adapter, attempt to set the resolution to the graphic card provider website for updated driver (for example, www.AMD.com or www.NVIDIA.com). 7. Operating Your Monitor | 41 Click Advanced Settings. 4. After installing the drivers for your graphics adapter, attempt to set the resolution to 1920 x 1080 again. Click Change Display Settings. 4. NVIDIA, AMD, Intel etc...

X Monitor Users Guide
Page 46
... Symptoms No Video/Power LED on Poor focus Shaky/Jittery video Missing pixels Stuck-on Dell Monitor Quality and Pixel Policy, see Dell Support site at : www.dell.com/support/monitors. ∞ Reset the monitor to Factory Settings (Factory Reset). ∞ Adjust brightness & contrast controls via OSD. ∞ Reset the monitor to Factory Settings (Factory Reset). ∞ Adjust horizontal & vertical controls via the Input Source menu. ∞ Eliminate video extension cables. ∞ Reset the monitor to Factory Settings (Factory Reset). ∞ Change the video resolution to the correct...
... Symptoms No Video/Power LED on Poor focus Shaky/Jittery video Missing pixels Stuck-on Dell Monitor Quality and Pixel Policy, see Dell Support site at : www.dell.com/support/monitors. ∞ Reset the monitor to Factory Settings (Factory Reset). ∞ Adjust brightness & contrast controls via OSD. ∞ Reset the monitor to Factory Settings (Factory Reset). ∞ Adjust horizontal & vertical controls via the Input Source menu. ∞ Eliminate video extension cables. ∞ Reset the monitor to Factory Settings (Factory Reset). ∞ Change the video resolution to the correct...

X Monitor Users Guide
Page 47
...; Change the Color Setting Mode in the Color Settings OSD to the computer is connected properly and is secure. ∞∞ Reset the monitor to Factory Settings (Factory Reset). ∞∞ Perform monitor self-test feature check to Fast or Normal depending on the all times when not in use a dynamically changing screensaver. time ∞∞ Alternatively, use (for more information, see Power monitor for bent or broken pins in the video cable connector...
...; Change the Color Setting Mode in the Color Settings OSD to the computer is connected properly and is secure. ∞∞ Reset the monitor to Factory Settings (Factory Reset). ∞∞ Perform monitor self-test feature check to Fast or Normal depending on the all times when not in use a dynamically changing screensaver. time ∞∞ Alternatively, use (for more information, see Power monitor for bent or broken pins in the video cable connector...

X Monitor Users Guide
Page 48
No input signal when user controls are pressed The picture does not fill the entire screen ∞ Check the signal source. Ensure the computer is not in properly. Disconnect and reconnect the video cable if necessary. ∞ Reset the computer or video player. ∞ Due to different video formats (aspect ratio) of the panel ∞ Turn off the monitor, unplug the power cord, plug it back, and then turn on the keyboard...
No input signal when user controls are pressed The picture does not fill the entire screen ∞ Check the signal source. Ensure the computer is not in properly. Disconnect and reconnect the video cable if necessary. ∞ Reset the computer or video player. ∞ Due to different video formats (aspect ratio) of the panel ∞ Turn off the monitor, unplug the power cord, plug it back, and then turn on the keyboard...


