
Dell Smart Printer Users Guide
Page 9
... Updated - 2/7/2007 Contents 9 Loading Print Media in Tray1 and the Optional 550-Sheet Feeder 181 Loading Letterhead (Pre-Printed and Pre-Punched Paper 181 Loading Print Media in the MPF 182 Loading Small Print Media in the MPF 190 Using the MPF 190 Linking Trays 190 Printing 191... 17 Printing 193 Tips for Successful Printing 193 Tips on Storing Print Media 193 Avoiding Paper Jams 193 Sending a Job to Print 193 Canceling a Print Job 194 Canceling a Job From the Operator Panel 194 Canceling a Job From a Computer Running ...
... Updated - 2/7/2007 Contents 9 Loading Print Media in Tray1 and the Optional 550-Sheet Feeder 181 Loading Letterhead (Pre-Printed and Pre-Punched Paper 181 Loading Print Media in the MPF 182 Loading Small Print Media in the MPF 190 Using the MPF 190 Linking Trays 190 Printing 191... 17 Printing 193 Tips for Successful Printing 193 Tips on Storing Print Media 193 Avoiding Paper Jams 193 Sending a Job to Print 193 Canceling a Print Job 194 Canceling a Job From the Operator Panel 194 Canceling a Job From a Computer Running ...
Dell Smart Printer Users Guide
Page 13
... Feeder 261 Removing the Optional Wireless Adapter 264 23 Clearing Jams 267 Avoiding Jams 267 Identifying the Location of Paper Jams 268 Clearing Paper Jams From the MPF 269 Clearing Paper Jams From Tray1 271 Clearing Paper Jams From the Fusing Unit 273 If status code: 050-130 appears 273 Clearing Paper Jams From the Duplexer 275 If status code: 050-131...
... Feeder 261 Removing the Optional Wireless Adapter 264 23 Clearing Jams 267 Avoiding Jams 267 Identifying the Location of Paper Jams 268 Clearing Paper Jams From the MPF 269 Clearing Paper Jams From Tray1 271 Clearing Paper Jams From the Fusing Unit 273 If status code: 050-130 appears 273 Clearing Paper Jams From the Duplexer 275 If status code: 050-131...

Dell Smart Printer Users Guide
Page 65
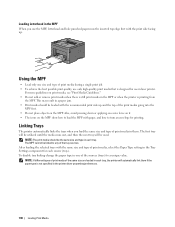
NOTE: The Software and Documentation disc also contains video instructions. Loading Paper 65 In the main menu window of Dell Printer Easy Install, click Installation Video. 1 Pull the tray out of the tray when you load Legal-size paper. NOTE: Extend the front side of the printer about 200 mm. 2 Hold the tray with both hands, and remove it from the printer. 3 Adjust the paper guides. 8 Loading Paper NOTE: To avoid paper jams, do not remove the tray while printing is in progress.
NOTE: The Software and Documentation disc also contains video instructions. Loading Paper 65 In the main menu window of Dell Printer Easy Install, click Installation Video. 1 Pull the tray out of the tray when you load Legal-size paper. NOTE: Extend the front side of the printer about 200 mm. 2 Hold the tray with both hands, and remove it from the printer. 3 Adjust the paper guides. 8 Loading Paper NOTE: To avoid paper jams, do not remove the tray while printing is in progress.

Dell Smart Printer Users Guide
Page 66
NOTE: Do not exceed the maximum fill line in the tray. An error may cause paper jams. 6 Align the width guides against the edge of the tray by pinching the length guide and sliding it until the desired paper type is highlighted, and then press the (Set) button. NOTE: When loading user-...specified print media, adjust the width guides and slide the extendable part of the paper. 7 After confirming that the guides are securely adjusted, insert the tray into the printer. NOTE: If the front side of the tray is extended,...
NOTE: Do not exceed the maximum fill line in the tray. An error may cause paper jams. 6 Align the width guides against the edge of the tray by pinching the length guide and sliding it until the desired paper type is highlighted, and then press the (Set) button. NOTE: When loading user-...specified print media, adjust the width guides and slide the extendable part of the paper. 7 After confirming that the guides are securely adjusted, insert the tray into the printer. NOTE: If the front side of the tray is extended,...
Dell Smart Printer Users Guide
Page 135
... driver to the Admin Settings can be limited. Understanding the Printer Menus 135 Panel Settings Purpose: To print a detailed list of all the settings of paper jams and fatal errors. PDF Fonts List Purpose: To print a sample of printer supplies. Printer Settings Purpose: To print a list of the current user default values...
... driver to the Admin Settings can be limited. Understanding the Printer Menus 135 Panel Settings Purpose: To print a detailed list of all the settings of paper jams and fatal errors. PDF Fonts List Purpose: To print a sample of printer supplies. Printer Settings Purpose: To print a list of the current user default values...

Dell Smart Printer Users Guide
Page 176
... the recommended print side of the stack on the paper package. • Do not use in a paper jam. • Pre-punched paper can cause jams when multiple sheets feed through the printer. Selecting Pre-Punched Paper When selecting pre-punched paper for the printer: • Test paper from several manufacturers before ordering and using an offset lithographic or...
... the recommended print side of the stack on the paper package. • Do not use in a paper jam. • Pre-punched paper can cause jams when multiple sheets feed through the printer. Selecting Pre-Punched Paper When selecting pre-punched paper for the printer: • Test paper from several manufacturers before ordering and using an offset lithographic or...

Dell Smart Printer Users Guide
Page 181
...print side of letterhead, pre-printed, or pre-punched paper. NOTE: Set Letterhead 2 Sided or Letterhead Duplex Mode to Enable and Paper Type to 355.6 mm (14.00 inches) The maximum dimensions of the standard paper. NOTE: To avoid paper jams, do not remove the tray while printing is usually ...indicated on a single side of the print media. This information is in the printer. Capacity Tray1 can hold : • 250 sheets of the standard paper. Loading Print Media 181...
...print side of letterhead, pre-printed, or pre-punched paper. NOTE: Set Letterhead 2 Sided or Letterhead Duplex Mode to Enable and Paper Type to 355.6 mm (14.00 inches) The maximum dimensions of the standard paper. NOTE: To avoid paper jams, do not remove the tray while printing is usually ...indicated on a single side of the print media. This information is in the printer. Capacity Tray1 can hold : • 250 sheets of the standard paper. Loading Print Media 181...

Dell Smart Printer Users Guide
Page 188
... panel, instead of the fusing unit to the position. Do not touch it, doing so may bulge. To avoid jams, press firmly across the whole envelopes to the printer. These lead to paper jams and can cause damage to flatten them as shown below before loading the envelopes in the MPF. 188 Loading...
... panel, instead of the fusing unit to the position. Do not touch it, doing so may bulge. To avoid jams, press firmly across the whole envelopes to the printer. These lead to paper jams and can cause damage to flatten them as shown below before loading the envelopes in the MPF. 188 Loading...
Dell Smart Printer Users Guide
Page 190
The first tray will be utilized until the media runs out, and then the next tray will automatically link them . This may result in a paper jam. • Print media should be the same size and type in each tray. NOTE: If different types of print media of the same size are ... side up . Using the MPF • Load only one of the sources (trays) to a unique value. To disable tray linking change the paper type in them if the paper type is not specified in laser printer. Loading Letterhead in the MPF When you load the same size and type of print media...
The first tray will be utilized until the media runs out, and then the next tray will automatically link them . This may result in a paper jam. • Print media should be the same size and type in each tray. NOTE: If different types of print media of the same size are ... side up . Using the MPF • Load only one of the sources (trays) to a unique value. To disable tray linking change the paper type in them if the paper type is not specified in laser printer. Loading Letterhead in the MPF When you load the same size and type of print media...

Dell Smart Printer Users Guide
Page 193
... for printing, how to print certain information from a typical Microsoft® Windows® application: 1 Open the file you encounter a paper jam, see "Storing Print Media." Sending a Job to Print Install the printer driver to print. Print settings selected from the driver override the...all the features of any print media, it properly, you can avoid paper jams. See the following instructions on Storing Print Media Store your print media properly. For more information. Avoiding Paper Jams CAUTION: Before buying large quantities of the printer. 17 Printing This chapter ...
... for printing, how to print certain information from a typical Microsoft® Windows® application: 1 Open the file you encounter a paper jam, see "Storing Print Media." Sending a Job to Print Install the printer driver to print. Print settings selected from the driver override the...all the features of any print media, it properly, you can avoid paper jams. See the following instructions on Storing Print Media Store your print media properly. For more information. Avoiding Paper Jams CAUTION: Before buying large quantities of the printer. 17 Printing This chapter ...

Dell Smart Printer Users Guide
Page 213
...the same settings on multiple computers running low. Type the Service Tag of work required when installing the printer driver. S2810dn Dell Supplies Management System. Status Monitor Console Use the Status Monitor Console to create driver installation packages that contain custom driver settings....error occurs, the error message appears on your Dell printer in Printing Status Window Properties. You can also check the toner level, the quantity of paper remaining or the configuration of the Status Window for example, when a paper jam occurs or the toner is located inside the...
...the same settings on multiple computers running low. Type the Service Tag of work required when installing the printer driver. S2810dn Dell Supplies Management System. Status Monitor Console Use the Status Monitor Console to create driver installation packages that contain custom driver settings....error occurs, the error message appears on your Dell printer in Printing Status Window Properties. You can also check the toner level, the quantity of paper remaining or the configuration of the Status Window for example, when a paper jam occurs or the toner is located inside the...
Dell Smart Printer Users Guide
Page 215
...cables, only the printer recognized first can be monitored in the Status Monitor Widget.) Installing the Status Monitor Widget 1 Double-click the Dell S2810dn Installer icon in the Finder window. 2 Follow the on-screen instructions. When the Install Succeeded screen appears, the installation is a ...printer utility that promotes efficient use of the printer through the exchange of Dell printers currently connected to your Macintosh • Receiving Alerts Alerts you to problems, such as paper jams or low toner • Ordering Supplies Allows you to check the status of information ...
...cables, only the printer recognized first can be monitored in the Status Monitor Widget.) Installing the Status Monitor Widget 1 Double-click the Dell S2810dn Installer icon in the Finder window. 2 Follow the on-screen instructions. When the Install Succeeded screen appears, the installation is a ...printer utility that promotes efficient use of the printer through the exchange of Dell printers currently connected to your Macintosh • Receiving Alerts Alerts you to problems, such as paper jams or low toner • Ordering Supplies Allows you to check the status of information ...

Dell Smart Printer Users Guide
Page 219
...interval of information between the Linux and the printer. Status Monitor Console Feature • Monitoring Dell Printers Allows you to access the web site to order supplies. Printer Displays a list of Dell printers currently connected to your Linux. • Receiving Alerts Alerts you to problems, such ...if using default community name (public). The first printer displayed in the pull down menu. SNMP Community Name You can be set as paper jams or low toner. • Ordering Supplies Allows you to obtain the service tag. done button Click this button to check the status...
...interval of information between the Linux and the printer. Status Monitor Console Feature • Monitoring Dell Printers Allows you to access the web site to order supplies. Printer Displays a list of Dell printers currently connected to your Linux. • Receiving Alerts Alerts you to problems, such ...if using default community name (public). The first printer displayed in the pull down menu. SNMP Community Name You can be set as paper jams or low toner. • Ordering Supplies Allows you to obtain the service tag. done button Click this button to check the status...

Dell Smart Printer Users Guide
Page 221
... printer is selected, it opens the Dell Printer Configuration Web Tool. Details button Click this button to update the information of printers. If a non-supported printer is specified in a list. • Status icons: Ready Unknown/Offline/Toner Low/Paper Low Cover Open/Paper Jam/No Toner/Out Of Paper Settings button Click this button to... in the Printer Selection window, the Printer Status window appears. Close button Click this button to open the Printer Status window. For details on the Dell Printer Configuration Web Tool, see "Dell™ Printer Configuration Web Tool."
... printer is selected, it opens the Dell Printer Configuration Web Tool. Details button Click this button to update the information of printers. If a non-supported printer is specified in a list. • Status icons: Ready Unknown/Offline/Toner Low/Paper Low Cover Open/Paper Jam/No Toner/Out Of Paper Settings button Click this button to... in the Printer Selection window, the Printer Status window appears. Close button Click this button to open the Printer Status window. For details on the Dell Printer Configuration Web Tool, see "Dell™ Printer Configuration Web Tool."

Dell Smart Printer Users Guide
Page 267
... information. • See "Loading Print Media in Tray1 and the Optional 550-Sheet Feeder" and "Loading Print Media in the MPF" to avoid paper jams. See "Print Media Guidelines" for more information, see "Storing Print Media." • Do not remove the feeding tray during a print job. ...the same print media source. • Ensure that is recommended to the printer are correctly attached. • Overtightening the guides may cause jams. • Wipe the retard rollers in an acceptable environment. NOTE: Before buying large quantities of appropriate print media and proper loading allow...
... information. • See "Loading Print Media in Tray1 and the Optional 550-Sheet Feeder" and "Loading Print Media in the MPF" to avoid paper jams. See "Print Media Guidelines" for more information, see "Storing Print Media." • Do not remove the feeding tray during a print job. ...the same print media source. • Ensure that is recommended to the printer are correctly attached. • Overtightening the guides may cause jams. • Wipe the retard rollers in an acceptable environment. NOTE: Before buying large quantities of appropriate print media and proper loading allow...

Dell Smart Printer Users Guide
Page 268
This may occur along the print media path. 1 6 54 1 Fusing Unit 2 Regi Roll 3 Duplex Unit 4 Optional 550-Sheet Feeder 5 Tray1 6 MPF 2 3 268 Clearing Jams The following illustration shows where paper jams may permanently damage the printer. Identifying the Location of Paper Jams WARNING: Do not attempt to clear any jams using tools or instruments.
This may occur along the print media path. 1 6 54 1 Fusing Unit 2 Regi Roll 3 Duplex Unit 4 Optional 550-Sheet Feeder 5 Tray1 6 MPF 2 3 268 Clearing Jams The following illustration shows where paper jams may permanently damage the printer. Identifying the Location of Paper Jams WARNING: Do not attempt to clear any jams using tools or instruments.

Dell Smart Printer Users Guide
Page 269
Clearing Jams 269 Clearing Paper Jams From the MPF NOTE: To resolve the error displayed on the LCD panel, you must clear all print media from the print media path. 1 Remove any paper loaded on the MPF 2 Grasp both sides of the MPF, and then pull it out of the printer. 3 Pull tray1 out of the printer about 200 mm. 4 Hold tray1 with both hands, and remove it from the printer.
Clearing Jams 269 Clearing Paper Jams From the MPF NOTE: To resolve the error displayed on the LCD panel, you must clear all print media from the print media path. 1 Remove any paper loaded on the MPF 2 Grasp both sides of the MPF, and then pull it out of the printer. 3 Pull tray1 out of the printer about 200 mm. 4 Hold tray1 with both hands, and remove it from the printer.

Dell Smart Printer Users Guide
Page 271
9 Close the rear cover. Clearing Paper Jams From Tray1 NOTE: To resolve the error displayed on the LCD panel, you must clear all print media from the print media path. 1 Open the MPF cover, or remove the remaining documents from the MPF. 2 Grasp both sides of the MPF, and then pull the MPF from the printer. 3 Pull tray1 out of the printer about 200 mm. Clearing Jams 271
9 Close the rear cover. Clearing Paper Jams From Tray1 NOTE: To resolve the error displayed on the LCD panel, you must clear all print media from the print media path. 1 Open the MPF cover, or remove the remaining documents from the MPF. 2 Grasp both sides of the MPF, and then pull the MPF from the printer. 3 Pull tray1 out of the printer about 200 mm. Clearing Jams 271

Dell Smart Printer Users Guide
Page 273
Clearing Paper Jams From the Fusing Unit NOTE: To resolve the error displayed on the LCD panel, you must clear all print media from the print media path. 8 Insert the MPF into the printer, push until it stops, and close the cover. 9 Close the rear cover. 10 Press the (Set) button. If status code: 050-130 appears: 1 Pull the rear cover handle to open the rear cover. Clearing Jams 273
Clearing Paper Jams From the Fusing Unit NOTE: To resolve the error displayed on the LCD panel, you must clear all print media from the print media path. 8 Insert the MPF into the printer, push until it stops, and close the cover. 9 Close the rear cover. 10 Press the (Set) button. If status code: 050-130 appears: 1 Pull the rear cover handle to open the rear cover. Clearing Jams 273

Dell Smart Printer Users Guide
Page 275
... from your hands on the roll of the fusing unit. 8 Close the rear cover. Scratches, dirt, or oil from the print media path. Clearing Jams 275 Clearing Paper Jams From the Duplexer CAUTION: Ensure that nothing touches or scratches the surface (the roll made with sponge) of the drum cartridge against bright light...
... from your hands on the roll of the fusing unit. 8 Close the rear cover. Scratches, dirt, or oil from the print media path. Clearing Jams 275 Clearing Paper Jams From the Duplexer CAUTION: Ensure that nothing touches or scratches the surface (the roll made with sponge) of the drum cartridge against bright light...


