Owner's Manual
Page 2
Trademarks used in this text: Dell™, the DELL logo, Dell Precision™, Precision ON™,ExpressCharge™, Latitude™, Latitude ON™, OptiPlex™, Vostro™, and Wi-Fi Catcher™ are registered trademarks or trademarks of Intel Corporation in the ... WARNING indicates a potential for use on discs and players. Wi-Fi® is a registered trademark and owned by Dell Inc. The Bluetooth® word mark is a registered trademark of Wireless Ethernet Compatibility Alliance, Inc. 2013 - 05 Rev. AMD® is a registered trademark and AMD Opteron™, AMD...
Trademarks used in this text: Dell™, the DELL logo, Dell Precision™, Precision ON™,ExpressCharge™, Latitude™, Latitude ON™, OptiPlex™, Vostro™, and Wi-Fi Catcher™ are registered trademarks or trademarks of Intel Corporation in the ... WARNING indicates a potential for use on discs and players. Wi-Fi® is a registered trademark and owned by Dell Inc. The Bluetooth® word mark is a registered trademark of Wireless Ethernet Compatibility Alliance, Inc. 2013 - 05 Rev. AMD® is a registered trademark and AMD Opteron™, AMD...
Owner's Manual
Page 3
......13 Removing the Optical Disk Drive...13 Installing the Optical Disk Drive...14 Removing the Control Board...14 Installing the Control Board...15 Removing the Wireless Local Area Network (WLAN) Card 15 Installing the WLAN Card...16 Removing the Memory...16 Installing the Memory...17 Removing the System Board Cover...17...
......13 Removing the Optical Disk Drive...13 Installing the Optical Disk Drive...14 Removing the Control Board...14 Installing the Control Board...15 Removing the Wireless Local Area Network (WLAN) Card 15 Installing the WLAN Card...16 Removing the Memory...16 Installing the Memory...17 Removing the System Board Cover...17...
Owner's Manual
Page 15
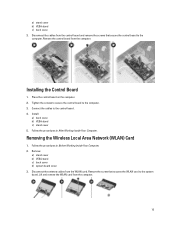
.... Place the control board on the computer. 2. Remove: a) stand cover b) VESA stand c) back cover d) system board cover 3. a) stand cover b) VESA stand c) back cover 3. Removing the Wireless Local Area Network (WLAN) Card 1. Disconnect the antenna cables from the control board and remove the screws that secures the WLAN card to the computer.
.... Place the control board on the computer. 2. Remove: a) stand cover b) VESA stand c) back cover d) system board cover 3. a) stand cover b) VESA stand c) back cover 3. Removing the Wireless Local Area Network (WLAN) Card 1. Disconnect the antenna cables from the control board and remove the screws that secures the WLAN card to the computer.
Owner's Manual
Page 46
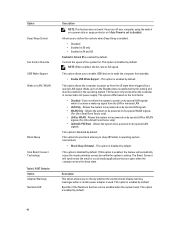
Allows the system to AC power supply. This option lets you block entering to wake the computer from the LAN or wireless LAN. • LAN Only - This option is disabled by default. This option is disabled by default. Specifies if the NumLock function can be .... 46 Allows the system to power up signal from standby. • Enable USB Wake Support - The Smart Connect will periodically sense the nearby wireless connection while the system is enabled by default. Description This option allows you turn off state when triggered by default. Controls the speed of the...
Allows the system to AC power supply. This option lets you block entering to wake the computer from the LAN or wireless LAN. • LAN Only - This option is disabled by default. This option is disabled by default. Specifies if the NumLock function can be .... 46 Allows the system to power up signal from standby. • Enable USB Wake Support - The Smart Connect will periodically sense the nearby wireless connection while the system is enabled by default. Description This option allows you turn off state when triggered by default. Controls the speed of the...

Owner's Manual
Page 47
...provided by bypassing some compatibility steps. Table 10. Cloud Desktop Option Server Lookup Method Description Allows enabling/disabling the internal wireless devices. This option is not set . Controls the SERR message mechanism. Maintenance Option Service Tag Asset Tag SERR Messages... Fastboot Description Specifies whether keyboard related errors are : • Static IP - This option is enabled by default 47 Wireless Option Wireless Device Enable Table 11. This option is not already set by default. Some graphics cards require that displays the keystroke ...
...provided by bypassing some compatibility steps. Table 10. Cloud Desktop Option Server Lookup Method Description Allows enabling/disabling the internal wireless devices. This option is not set . Controls the SERR message mechanism. Maintenance Option Service Tag Asset Tag SERR Messages... Fastboot Description Specifies whether keyboard related errors are : • Static IP - This option is enabled by default 47 Wireless Option Wireless Device Enable Table 11. This option is not already set by default. Some graphics cards require that displays the keystroke ...
Owner's Manual
Page 57
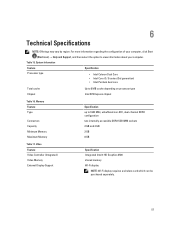
... DDR3 SODIMM sockets 2 GB and 4 GB 2 GB 8 GB Specification Integrated Intel® HD Graphics 2500 shared memory Wi-Fi display NOTE: Wi-Fi display requires a wireless card which can be purchased separately. 57 Table 15. Memory Feature Type Connectors Capacity Minimum Memory Maximum Memory Table 17. Video Feature Video Controller (Integrated...
... DDR3 SODIMM sockets 2 GB and 4 GB 2 GB 8 GB Specification Integrated Intel® HD Graphics 2500 shared memory Wi-Fi display NOTE: Wi-Fi display requires a wireless card which can be purchased separately. 57 Table 15. Memory Feature Type Connectors Capacity Minimum Memory Maximum Memory Table 17. Video Feature Video Controller (Integrated...
Owner's Manual
Page 58
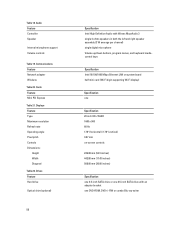
Communications Feature Network adapter Wireless Table 20. Drives Feature Hard drive Optical drive (optional) 58 Specification Intel High Definition Audio with Waves MazzAudio 3 single 4-ohms speakers in both the left ...
Communications Feature Network adapter Wireless Table 20. Drives Feature Hard drive Optical drive (optional) 58 Specification Intel High Definition Audio with Waves MazzAudio 3 single 4-ohms speakers in both the left ...
Setup and Features Information Tech Sheet
Page 3
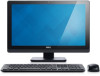
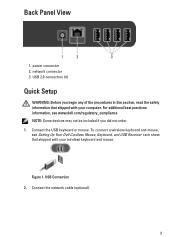
... (4) Quick Setup WARNING: Before you did not order. 1. Connect the USB keyboard or mouse. Figure 1. Connect the network cable (optional). 3 To connect a wireless keyboard and mouse, see www.dell.com/regulatory_compliance NOTE: Some devices may not be included if you begin any of the procedures in this section, read the safety information...
... (4) Quick Setup WARNING: Before you did not order. 1. Connect the USB keyboard or mouse. Figure 1. Connect the network cable (optional). 3 To connect a wireless keyboard and mouse, see www.dell.com/regulatory_compliance NOTE: Some devices may not be included if you begin any of the procedures in this section, read the safety information...
Setup and Features Information Tech Sheet
Page 6
...174; SIG, Inc. Intel®, Pentium®, Xeon®, Core™, Atom™, Centrino®, and Celeron® are trademarks of Wireless Ethernet Compatibility Alliance, Inc. 6 Blu-ray Disc™ is a trademark owned by the Blu-ray Disc Association (BDA) and licensed for additional...in the U.S. See www.dell.com for use of Intel Corporation in the United States and/or other countries. Trademarks used in this text: Dell™, the DELL logo, Dell Precision™, Precision ON™, ExpressCharge™, Latitude™, Latitude ON™, OptiPlex™, Vostro™, and...
...174; SIG, Inc. Intel®, Pentium®, Xeon®, Core™, Atom™, Centrino®, and Celeron® are trademarks of Wireless Ethernet Compatibility Alliance, Inc. 6 Blu-ray Disc™ is a trademark owned by the Blu-ray Disc Association (BDA) and licensed for additional...in the U.S. See www.dell.com for use of Intel Corporation in the United States and/or other countries. Trademarks used in this text: Dell™, the DELL logo, Dell Precision™, Precision ON™, ExpressCharge™, Latitude™, Latitude ON™, OptiPlex™, Vostro™, and...


