
Owner's Manual
Page 1
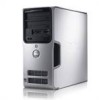
Dell™ Dimension™ E521 Owner's Manual Service Tag CD or DVD eject button CD or DVD activity light FlexBay for optional floppy drive or Media Card Reader microphone connector headphone connector diagnostic lights hard-drive activity light power button/ power activity light USB 2.0 connectors (2) cover latch release Model DCSM www.dell.com | support.dell.com
Dell™ Dimension™ E521 Owner's Manual Service Tag CD or DVD eject button CD or DVD activity light FlexBay for optional floppy drive or Media Card Reader microphone connector headphone connector diagnostic lights hard-drive activity light power button/ power activity light USB 2.0 connectors (2) cover latch release Model DCSM www.dell.com | support.dell.com
Owner's Manual
Page 4
...Properties 27 Enabling Cool 'n' Quiet™ Technology 28 About RAID Configurations 29 RAID Level 1 Configuration 29 Configuring Your Hard Drives for RAID 30 Using the Nvidia MediaShield ROM Utility 30 Using Nvidia MediaShield 31 2 Solving Problems 33 Troubleshooting Tips 33 Battery ...Problems 33 Drive Problems 34 CD and DVD drive problems 34 Hard drive problems 35 E-Mail, Modem, and Internet Problems 35 Error Messages 36 Keyboard Problems 37 Lockups and Software...
...Properties 27 Enabling Cool 'n' Quiet™ Technology 28 About RAID Configurations 29 RAID Level 1 Configuration 29 Configuring Your Hard Drives for RAID 30 Using the Nvidia MediaShield ROM Utility 30 Using Nvidia MediaShield 31 2 Solving Problems 33 Troubleshooting Tips 33 Battery ...Problems 33 Drive Problems 34 CD and DVD drive problems 34 Hard drive problems 35 E-Mail, Modem, and Internet Problems 35 Error Messages 36 Keyboard Problems 37 Lockups and Software...
Owner's Manual
Page 6
... 81 Removing the Drive-Panel Insert 83 Replacing the Drive-Panel Insert 83 Replacing the Drive Panel 84 Drives 85 Recommended Drive Cable Connections 85 Connecting Drive Cables 86 Drive Interface Connectors 86 Connecting and Disconnecting Drive Cables 86 Hard Drives 87 Removing a Hard Drive 87 Installing a Hard Drive 88 Adding a Second Hard Drive 91 Floppy Drive 92 Removing a Floppy Drive 92 Installing a Floppy Drive 94 Media Card Reader...
... 81 Removing the Drive-Panel Insert 83 Replacing the Drive-Panel Insert 83 Replacing the Drive Panel 84 Drives 85 Recommended Drive Cable Connections 85 Connecting Drive Cables 86 Drive Interface Connectors 86 Connecting and Disconnecting Drive Cables 86 Hard Drives 87 Removing a Hard Drive 87 Installing a Hard Drive 88 Adding a Second Hard Drive 91 Floppy Drive 92 Removing a Floppy Drive 92 Installing a Floppy Drive 94 Media Card Reader...
Owner's Manual
Page 10
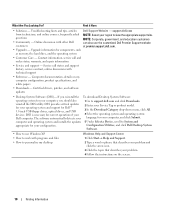
...that describes your problem and click the arrow icon. 3 Click the topic that describes your operating system and support for your Dell computer. The software automatically detects your 1 Go to System and appropriate for your computer, and click Submit. NOTE: Corporate... Software: operating system for Dell™ 3.5-inch USB floppy drives, optical drives, and USB devices. support.dell.com from technicians, and online courses, frequently asked questions • Community - DSS provides critical updates for components, such as memory, the hard drive, and the operating system ...
...that describes your problem and click the arrow icon. 3 Click the topic that describes your operating system and support for your Dell computer. The software automatically detects your 1 Go to System and appropriate for your computer, and click Submit. NOTE: Corporate... Software: operating system for Dell™ 3.5-inch USB floppy drives, optical drives, and USB devices. support.dell.com from technicians, and online courses, frequently asked questions • Community - DSS provides critical updates for components, such as memory, the hard drive, and the operating system ...
Owner's Manual
Page 12
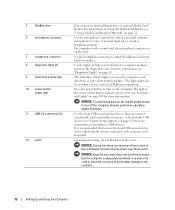
...with a sound card, the microphone connector is on the card. For more information. The hard drive activity light is on when the computer reads data from or writes data to the hard drive. See "Controls and Lights" on page 109 for more information on when a device such...telephony program. Use the headphone connector to the computer. 12 Setting Up and Using Your Computer 5 FlexBay drive 6 microphone connector 7 headphone connector 8 diagnostic lights (4) 9 hard-drive activity light 10 power button, power light 11 USB 2.0 connectors (2) 12 vents Can contain an optional floppy...
...with a sound card, the microphone connector is on the card. For more information. The hard drive activity light is on when the computer reads data from or writes data to the hard drive. See "Controls and Lights" on page 109 for more information on when a device such...telephony program. Use the headphone connector to the computer. 12 Setting Up and Using Your Computer 5 FlexBay drive 6 microphone connector 7 headphone connector 8 diagnostic lights (4) 9 hard-drive activity light 10 power button, power light 11 USB 2.0 connectors (2) 12 vents Can contain an optional floppy...

Owner's Manual
Page 20
... in the upper-right corner of the window. The computer copies the data from audio files stored on your computer hard drive. When prompted, insert a blank CD or DVD into the drive and click OK. • If you have inserted your computer or backing up important data. This section applies only to make... computers that the settings are correct and click the Disc Copy button. For help, open Sonic DigitalMedia and then click the question mark icon in Dell™ computers can write to erase, rewrite, or update data on the Sonic support website at www.sonic.com. How to Copy a CD or DVD...
... in the upper-right corner of the window. The computer copies the data from audio files stored on your computer hard drive. When prompted, insert a blank CD or DVD into the drive and click OK. • If you have inserted your computer or backing up important data. This section applies only to make... computers that the settings are correct and click the Disc Copy button. For help, open Sonic DigitalMedia and then click the question mark icon in Dell™ computers can write to erase, rewrite, or update data on the Sonic support website at www.sonic.com. How to Copy a CD or DVD...

Owner's Manual
Page 26
... standby mode without a period of inactivity, click the Start button, click Turn Off Computer, and then click Stand by turning off the display and the hard drive after a defined period of inactivity: 1 Click the Start button and click Control Panel. 2 Under Pick a category, click Performance and Maintenance. 3 Under or pick a Control... office. 1 Click the Start button, point to security and networking appear in certain windows. You can reduce power to just the monitor or the hard drive, or you can reduce the amount of electricity your computer loses power while in Windows XP Home Edition.
... standby mode without a period of inactivity, click the Start button, click Turn Off Computer, and then click Stand by turning off the display and the hard drive after a defined period of inactivity: 1 Click the Start button and click Control Panel. 2 Under Pick a category, click Performance and Maintenance. 3 Under or pick a Control... office. 1 Click the Start button, point to security and networking appear in certain windows. You can reduce power to just the monitor or the hard drive, or you can reduce the amount of electricity your computer loses power while in Windows XP Home Edition.

Owner's Manual
Page 27
... Your Computer 27 Pressing a key on the keyboard or moving the mouse does not bring the computer out of the computer memory, Dell creates an appropriately sized hibernate mode file before it was in before shipping the computer to use your standby mode settings, hibernate mode ... conservation. • Max Battery - Hibernate Mode Hibernate mode conserves power by copying system data to a reserved area on the hard drive and then completely turning off the hard drive. If you . If you want to you want your computer to run your computer from hibernate mode, the desktop is a...
... Your Computer 27 Pressing a key on the keyboard or moving the mouse does not bring the computer out of the computer memory, Dell creates an appropriately sized hibernate mode file before it was in before shipping the computer to use your standby mode settings, hibernate mode ... conservation. • Max Battery - Hibernate Mode Hibernate mode conserves power by copying system data to a reserved area on the hard drive and then completely turning off the hard drive. If you . If you want to you want your computer to run your computer from hibernate mode, the desktop is a...

Owner's Manual
Page 28
NOTICE: If you set the monitor to time-out before the hard drive. To recover, press any key on the Start→ Settings→ Control ...Hibernate Tab The Hibernate tab allows you to the task at hand. To avoid this problem, always set the hard drive (hard disk) to time-out before the computer exits from standby mode or hibernate mode. • Program the ...power button to activate standby mode, activate hibernate mode, or turn off hard disks, System stand by, or System hibernates field, and then select a time-out from the corresponding drop-...
NOTICE: If you set the monitor to time-out before the hard drive. To recover, press any key on the Start→ Settings→ Control ...Hibernate Tab The Hibernate tab allows you to the task at hand. To avoid this problem, always set the hard drive (hard disk) to time-out before the computer exits from standby mode or hibernate mode. • Program the ...power button to activate standby mode, activate hibernate mode, or turn off hard disks, System stand by, or System hibernates field, and then select a time-out from the corresponding drop-...

Owner's Manual
Page 29
... configuration should be rebuilt using the data from the surviving drive. A RAID level 1 configuration sacrifices high data-access rates for RAID level 1 segment 1 segment 2 segment 3 segment 4 segment 5 segment 6 hard drive 1 segment 1 duplicated segment 2 duplicated segment 3 duplicated segment 4 duplicated segment 5 duplicated segment 6 duplicated hard drive 2 If a drive failure occurs, subsequent read and write operations are directed to...
... configuration should be rebuilt using the data from the surviving drive. A RAID level 1 configuration sacrifices high data-access rates for RAID level 1 segment 1 segment 2 segment 3 segment 4 segment 5 segment 6 hard drive 1 segment 1 duplicated segment 2 duplicated segment 3 duplicated segment 4 duplicated segment 5 duplicated segment 6 duplicated hard drive 2 If a drive failure occurs, subsequent read and write operations are directed to...

Owner's Manual
Page 30
...when the computer was purchased. For information on how to highlight RAID On, and then press . and right-arrow keys to install a hard drive, see "Hard Drives" on page 87. Back up - and down -arrow keys to highlight the SATA operation, then press . 4 Press the left ... Configurations" on page 29. and down -arrow keys to highlight Drives, then press . 3 Press the up- Hard drives of all data on your hard drive(s). Configuring Your Hard Drives for RAID Your computer can be configured for each applicable hard drive on your computer (see "Setting Your Computer to RAIDEnabled Mode" ...
...when the computer was purchased. For information on how to highlight RAID On, and then press . and right-arrow keys to install a hard drive, see "Hard Drives" on page 87. Back up - and down -arrow keys to highlight the SATA operation, then press . 4 Press the left ... Configurations" on page 29. and down -arrow keys to highlight Drives, then press . 3 Press the up- Hard drives of all data on your hard drive(s). Configuring Your Hard Drives for RAID Your computer can be configured for each applicable hard drive on your computer (see "Setting Your Computer to RAIDEnabled Mode" ...
Owner's Manual
Page 31
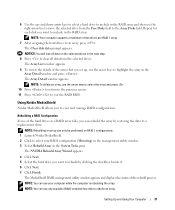
...RAID Configuration If one of two drives per RAID 1 array. 7 After assigning the hard drives to exit the RAID BIOS. Setting Up and Using Your Computer 31 NOTE: To delete an array, use the right-arrow key to move the selected drive from the selected drives. The MediaShield RAID management utility ...the checkbox beside it. 6 Click Next. 7 Click Finish. The NVIDIA Rebuild Array Wizard appears. 4 Click Next. 5 Select the hard drive you want to a replacement drive. NOTE: You can use any available (RAID-enabled) free disk to include in the RAID array and then use the arrow keys to...
...RAID Configuration If one of two drives per RAID 1 array. 7 After assigning the hard drives to exit the RAID BIOS. Setting Up and Using Your Computer 31 NOTE: To delete an array, use the right-arrow key to move the selected drive from the selected drives. The MediaShield RAID management utility ...the checkbox beside it. 6 Click Next. 7 Click Finish. The NVIDIA Rebuild Array Wizard appears. 4 Click Next. 5 Select the hard drive you want to a replacement drive. NOTE: You can use any available (RAID-enabled) free disk to include in the RAID array and then use the arrow keys to...
Owner's Manual
Page 35
Solving Problems 35 If the stream is connected to a digital telephone network. Hard drive problems RUN CHECK DISK - 1 Click the Start button and click My Computer. 2 Right-click Local Disk C:. 3 Click Properties. 4 Click the Tools tab. 5 Under Error-checking, ..., click Performance and Maintenance. 3 Under or pick a Control Panel icon, click Power Options. 4 From the Power Schemes tab, select Always On. The CD/DVD-RW drive must receive a steady stream of bad sectors. 7 Click Start. Try closing all programs before you begin any of the procedures in this section, follow the...
Solving Problems 35 If the stream is connected to a digital telephone network. Hard drive problems RUN CHECK DISK - 1 Click the Start button and click My Computer. 2 Right-click Local Disk C:. 3 Click Properties. 4 Click the Tools tab. 5 Under Error-checking, ..., click Performance and Maintenance. 3 Under or pick a Control Panel icon, click Power Options. 4 From the Power Schemes tab, select Always On. The CD/DVD-RW drive must receive a steady stream of bad sectors. 7 Click Start. Try closing all programs before you begin any of the procedures in this section, follow the...
Owner's Manual
Page 39
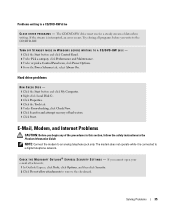
... conflict with the operating system installed on your keyboard or moving your computer. BACK UP YOUR FILES IMMEDIATELY USE A VIRUS-SCANNING PROGRAM TO CHECK THE HARD DRIVE, FLOPPY DISKS, OR CDS Solving Problems 39 If necessary, uninstall and then reinstall the program. C H E C K T H E S O F T W A R E D O C U M E N T A T I O N - The Program Compatibility Wizard configures a program so it runs in...
... conflict with the operating system installed on your keyboard or moving your computer. BACK UP YOUR FILES IMMEDIATELY USE A VIRUS-SCANNING PROGRAM TO CHECK THE HARD DRIVE, FLOPPY DISKS, OR CDS Solving Problems 39 If necessary, uninstall and then reinstall the program. C H E C K T H E S O F T W A R E D O C U M E N T A T I O N - The Program Compatibility Wizard configures a program so it runs in...

Owner's Manual
Page 50
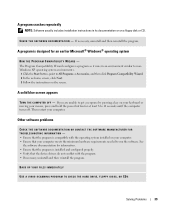
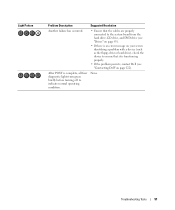
... installing are compatible with your computer (see "Installing Memory" on page 68). • If the problem persists, contact Dell (see "Contacting Dell" on page 122). • Ensure that no special memory module/memory connector placement requirements exist (see "Memory Installation Guidelines...computer. • If the problem persists or the computer has integrated graphics, contact Dell (see "Contacting Dell" on page 122). 50 Troubleshooting Tools Light Pattern Problem Description A possible graphics card failure has occurred. A possible floppy or hard drive failure has occurred.
... installing are compatible with your computer (see "Installing Memory" on page 68). • If the problem persists, contact Dell (see "Contacting Dell" on page 122). • Ensure that no special memory module/memory connector placement requirements exist (see "Memory Installation Guidelines...computer. • If the problem persists or the computer has integrated graphics, contact Dell (see "Contacting Dell" on page 122). 50 Troubleshooting Tools Light Pattern Problem Description A possible graphics card failure has occurred. A possible floppy or hard drive failure has occurred.
Owner's Manual
Page 51
...Ensure that it is complete, all four diagnostic lights turn green briefly before turning off to the system board from the hard drive, CD drive, and DVD drive (see "Drives" on page 85). • If there is an error message on page 122). None. Troubleshooting Tools 51 After... POST is functioning properly. • If the problem persists, contact Dell (see "Contacting Dell" on your screen identifying a problem with a device (such as the floppy drive or hard drive), check the device to ensure that the cables are properly connected to indicate normal operating...
...Ensure that it is complete, all four diagnostic lights turn green briefly before turning off to the system board from the hard drive, CD drive, and DVD drive (see "Drives" on page 85). • If there is an error message on page 122). None. Troubleshooting Tools 51 After... POST is functioning properly. • If the problem persists, contact Dell (see "Contacting Dell" on your screen identifying a problem with a device (such as the floppy drive or hard drive), check the device to ensure that the cables are properly connected to indicate normal operating...

Owner's Manual
Page 54
...Windows XP Device Driver Rollback to replace the driver with a [!]) on your computer after you install drivers obtained from other sources, your hard drive, click the Start button and right-click My Computer. 2 Click Properties. 3 Click the Hardware tab and click Device Manager. 4... Drivers 1 After copying the required driver files to your computer might not work correctly. Reinstalling Drivers NOTICE: The Dell Support website at support.dell.com provides approved drivers for Dell™ computers. Windows XP 1 Click the Start button and click Control Panel. 2 Under Pick a Category,...
...Windows XP Device Driver Rollback to replace the driver with a [!]) on your computer after you install drivers obtained from other sources, your hard drive, click the Start button and right-click My Computer. 2 Click Properties. 3 Click the Hardware tab and click Device Manager. 4... Drivers 1 After copying the required driver files to your computer might not work correctly. Reinstalling Drivers NOTICE: The Dell Support website at support.dell.com provides approved drivers for Dell™ computers. Windows XP 1 Click the Start button and click Control Panel. 2 Under Pick a Category,...

Owner's Manual
Page 55
...system in the Search Results list. 4 In the Hardware Troubleshooter list, click I need to resolve a hardware conflict on the hard drive and removes any applications installed after you can use the Hardware Troubleshooter to resolve the incompatibility. Troubleshooting Tools 55 Use System Restore as... the first solution for restoring your operating system and preserving data files. • Dell PC Restore by Symantec restores your hard drive to the operating state it to an earlier operating state without affecting data files. 5 Double-click the name ...
...system in the Search Results list. 4 In the Hardware Troubleshooter list, click I need to resolve a hardware conflict on the hard drive and removes any applications installed after you can use the Hardware Troubleshooter to resolve the incompatibility. Troubleshooting Tools 55 Use System Restore as... the first solution for restoring your operating system and preserving data files. • Dell PC Restore by Symantec restores your hard drive to the operating state it to an earlier operating state without affecting data files. 5 Double-click the name ...

Owner's Manual
Page 57
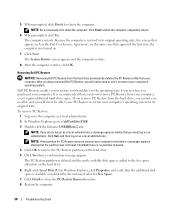
...To use PC Restore: 1 Turn on . Troubleshooting Tools 57 NOTE: Dell PC Restore is complete. 1 Click the Start button, point to complete. NOTICE: If you do not press in all countries or on the hard drive and removes any files or programs until the system restoration is not available ...again. Use PC Restore only if System Restore did not resolve your computer-including data files-are permanently deleted from the hard drive. PC Restore restores your hard drive to proceed with PC Restore, click Reboot in when you purchased the computer. Any programs or files added since you ...
...To use PC Restore: 1 Turn on . Troubleshooting Tools 57 NOTE: Dell PC Restore is complete. 1 Click the Start button, point to complete. NOTICE: If you do not press in all countries or on the hard drive and removes any files or programs until the system restoration is not available ...again. Use PC Restore only if System Restore did not resolve your computer-including data files-are permanently deleted from the hard drive. PC Restore restores your hard drive to proceed with PC Restore, click Reboot in when you purchased the computer. Any programs or files added since you ...
Owner's Manual
Page 58
... Restore partition is deleted and the newly available disk space is added to c:\dell\utilities\DSR. 3 Double-click the filename DSRIRRemv2.exe. Removing Dell PC Restore NOTICE: Removing Dell PC Restore from the hard drive permanently deletes the PC Restore utility from the hard drive, you cannot ever recall it, and you do not remove PC Restore...
... Restore partition is deleted and the newly available disk space is added to c:\dell\utilities\DSR. 3 Double-click the filename DSRIRRemv2.exe. Removing Dell PC Restore NOTICE: Removing Dell PC Restore from the hard drive permanently deletes the PC Restore utility from the hard drive, you cannot ever recall it, and you do not remove PC Restore...


