Owner's Manual
Page 5
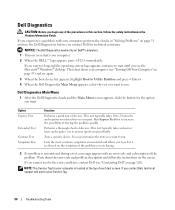
...and Monitor Problems 44 If the screen is blank 44 If the screen is difficult to read 45 3 Troubleshooting Tools Diagnostic Lights 47 Dell Diagnostics 50 Dell Diagnostics Main Menu 50 Drivers 51 What Is a Driver 51 Identifying Drivers 52 Reinstalling Drivers 52 Resolving Software and Hardware Incompatibilities 53 ... Restore by Symantec 55 Using the Operating System CD 57 4 Removing and Installing Parts Before You Begin 59 Recommended Tools 59 Turning Off Your Computer 59 Before Working Inside Your Computer 60 Front View of the Computer 61 Back View of the Computer 63 ...
...and Monitor Problems 44 If the screen is blank 44 If the screen is difficult to read 45 3 Troubleshooting Tools Diagnostic Lights 47 Dell Diagnostics 50 Dell Diagnostics Main Menu 50 Drivers 51 What Is a Driver 51 Identifying Drivers 52 Reinstalling Drivers 52 Resolving Software and Hardware Incompatibilities 53 ... Restore by Symantec 55 Using the Operating System CD 57 4 Removing and Installing Parts Before You Begin 59 Recommended Tools 59 Turning Off Your Computer 59 Before Working Inside Your Computer 60 Front View of the Computer 61 Back View of the Computer 63 ...
Owner's Manual
Page 13
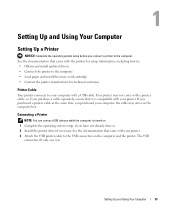
... to the computer. Connecting a Printer NOTE: You can connect USB devices while the computer is compatible with a USB cable. See the documentation that it is turned on the computer and the printer. See the documentation that came with a printer cable, so if you purchase a cable separately, ensure that came with the...
... to the computer. Connecting a Printer NOTE: You can connect USB devices while the computer is compatible with a USB cable. See the documentation that it is turned on the computer and the printer. See the documentation that came with a printer cable, so if you purchase a cable separately, ensure that came with the...

Owner's Manual
Page 23
... in the display settings. • In clone mode, both monitors display the same image. • In extended desktop mode, you connect the monitor(s) or TV, turn on the computer. Do not plug the network cable into the network adapter connector on the computer. Do not plug a network cable into place, and...
... in the display settings. • In clone mode, both monitors display the same image. • In extended desktop mode, you connect the monitor(s) or TV, turn on the computer. Do not plug the network cable into the network adapter connector on the computer. Do not plug a network cable into place, and...
Owner's Manual
Page 25
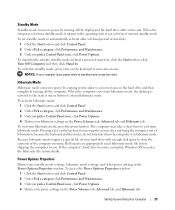
To set standby mode to you. To immediately activate standby mode without a period of the computer memory, Dell creates an appropriately sized hibernate mode file before shipping the computer to automatically activate after a time-out. Hibernate Mode Hibernate mode conserves power by... 3 Under or pick a Control Panel icon, click Power Options. 4 Define your power settings on your hibernate settings on the hard drive and then completely turning off the display and the hard drive after a defined period of hibernation, because the keyboard and the mouse do not function when the computer is...
To set standby mode to you. To immediately activate standby mode without a period of the computer memory, Dell creates an appropriately sized hibernate mode file before shipping the computer to automatically activate after a time-out. Hibernate Mode Hibernate mode conserves power by... 3 Under or pick a Control Panel icon, click Power Options. 4 Define your power settings on your hibernate settings on the hard drive and then completely turning off the display and the hard drive after a defined period of hibernation, because the keyboard and the mouse do not function when the computer is...
Owner's Manual
Page 26
...run with no power conservation). • Minimal Power Management - Each scheme has different settings for starting standby mode or hibernate mode, turning off the monitor, and turning off the hard drive. If you use the hibernate settings you defined on the Power Schemes tab, click the Enable hibernate support ... the displayed list. The Power schemes drop-down menu and click OK. If you want to activate standby mode, activate hibernate mode, or turn off hard disks, System stand by, or System hibernates field, and then select a time-out from the Power schemes drop-down menu in the...
...run with no power conservation). • Minimal Power Management - Each scheme has different settings for starting standby mode or hibernate mode, turning off the monitor, and turning off the hard drive. If you use the hibernate settings you defined on the Power Schemes tab, click the Enable hibernate support ... the displayed list. The Power schemes drop-down menu and click OK. If you want to activate standby mode, activate hibernate mode, or turn off hard disks, System stand by, or System hibernates field, and then select a time-out from the Power schemes drop-down menu in the...

Owner's Manual
Page 31
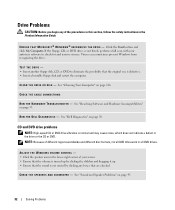
... recommended by the manufacturer. Discard used batteries according to repeatedly reset time and date information after turning on the computer, or if an incorrect time or date displays during start-up, replace the battery (see "Contacting Dell" on page 100). Solving Problems 31 R E P L A C E T H E B A T T E R ...review the installation procedures and ensure that the part is correctly installed. • If a peripheral device does not work properly, contact Dell (see "Replacing the Battery" on page 120). CAUTION: Before you begin any of a new battery exploding if it is properly ...
... recommended by the manufacturer. Discard used batteries according to repeatedly reset time and date information after turning on the computer, or if an incorrect time or date displays during start-up, replace the battery (see "Contacting Dell" on page 100). Solving Problems 31 R E P L A C E T H E B A T T E R ...review the installation procedures and ensure that the part is correctly installed. • If a peripheral device does not work properly, contact Dell (see "Replacing the Battery" on page 120). CAUTION: Before you begin any of a new battery exploding if it is properly ...
Owner's Manual
Page 32
...floppy, CD, or DVD drive, is not listed, perform a full scan with your screen. • Ensure that the volume is turned up by clicking the slidebar and dragging it up. • Ensure that the original one is defective. • Insert a bootable ... which does not indicate a defect in all DVD drives. C H E C K T H E S P E A K E R S A N D S U B W O O F E R - See "Cleaning Your Computer" on page 50. See "Dell Diagnostics" on page 116. Click the Start button and click My Computer. R U N T H E D E L L D I A G N O S T I C S - TEST THE DRIVE - • Insert another floppy disk, CD, or DVD ...
...floppy, CD, or DVD drive, is not listed, perform a full scan with your screen. • Ensure that the volume is turned up by clicking the slidebar and dragging it up. • Ensure that the original one is defective. • Insert a bootable ... which does not indicate a defect in all DVD drives. C H E C K T H E S P E A K E R S A N D S U B W O O F E R - See "Cleaning Your Computer" on page 50. See "Dell Diagnostics" on page 116. Click the Start button and click My Computer. R U N T H E D E L L D I A G N O S T I C S - TEST THE DRIVE - • Insert another floppy disk, CD, or DVD ...
Owner's Manual
Page 36
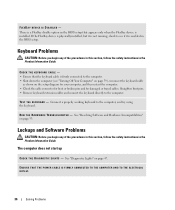
... THAT THE POWER CABLE IS FIRMLY CONNECTED TO THE COMPUTER AND TO THE ELECTRICAL OUTLET. 36 Solving Problems R U N T H E H A R D W A R E TR O U B L E S H O O T E R - Connect a properly working keyboard to see "Turning Off Your Computer" on page 59), reconnect the keyboard cable as shown on the setup diagram for your computer, and then restart the computer. •...
... THAT THE POWER CABLE IS FIRMLY CONNECTED TO THE COMPUTER AND TO THE ELECTRICAL OUTLET. 36 Solving Problems R U N T H E H A R D W A R E TR O U B L E S H O O T E R - Connect a properly working keyboard to see "Turning Off Your Computer" on page 59), reconnect the keyboard cable as shown on the setup diagram for your computer, and then restart the computer. •...
Owner's Manual
Page 37
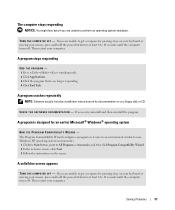
.... 3 Follow the instructions on the screen. The computer stops responding NOTICE: You might lose data if you are unable to 10 seconds until the computer turns off . Solving Problems 37 A program crashes repeatedly NOTE: Software usually includes installation instructions in an environment similar to nonWindows XP operating system environments. 1 Click the...
.... 3 Follow the instructions on the screen. The computer stops responding NOTICE: You might lose data if you are unable to 10 seconds until the computer turns off . Solving Problems 37 A program crashes repeatedly NOTE: Software usually includes installation instructions in an environment similar to nonWindows XP operating system environments. 1 Click the...
Owner's Manual
Page 39
.... RESTART THE COMPUTER - 1 Simultaneously press to display the Start menu. 2 Type u, press the keyboard arrow keys to highlight Shut down or Turn Off, and then press . 3 After the computer turns off, reconnect the mouse cable as shown on the setup diagram for your computer. See "Reinstalling Drivers" on page 50). See "Mouse... successfully communicating with the memory. • Ensure that you begin any of memory supported by your computer, see "Memory" on page 103. • Run the Dell Diagnostics (see "Dell Diagnostics" on page 52. C L E A N T H E M O U S E -
.... RESTART THE COMPUTER - 1 Simultaneously press to display the Start menu. 2 Type u, press the keyboard arrow keys to highlight Shut down or Turn Off, and then press . 3 After the computer turns off, reconnect the mouse cable as shown on the setup diagram for your computer. See "Reinstalling Drivers" on page 50). See "Mouse... successfully communicating with the memory. • Ensure that you begin any of memory supported by your computer, see "Memory" on page 103. • Run the Dell Diagnostics (see "Dell Diagnostics" on page 52. C L E A N T H E M O U S E -
Owner's Manual
Page 41
... to the system board (see "System Board Components" on . See the printer documentation for your location (if applicable). • Ensure that the electrical outlet is turned on page 67). I F T H E P O W E R L I G H T I S B L I N K I S S T E A D Y A M B E R - Also bypass power protection devices, power strips, and ...the processor power cable is securely connected to the system board (see "System Board Components" on page 76). The computer is either turned off or is not receiving power. • Reseat the power cable into both the power connector on the back of interference are ...
... to the system board (see "System Board Components" on . See the printer documentation for your location (if applicable). • Ensure that the electrical outlet is turned on page 67). I F T H E P O W E R L I G H T I S B L I N K I S S T E A D Y A M B E R - Also bypass power protection devices, power strips, and ...the processor power cable is securely connected to the system board (see "System Board Components" on page 76). The computer is either turned off or is not receiving power. • Reseat the power cable into both the power connector on the back of interference are ...

Owner's Manual
Page 43
... any of the procedures in this section, follow the safety instructions in some MP3 players overrides the Windows volume setting. Ensure that the volume is turned up and that the electrical outlet is not muted. TE S T T H E E L E C T R I O N S - E L I M I N A T E P O S S I B L E I N D O W S V O L U M E C O N T R O L - Ensure that ...shown on the setup diagram supplied with the speakers. Sound and Speaker Problems CAUTION: Before you did not turn the player volume down or off nearby fans, fluorescent lights, or halogen lamps to eliminate distortion. See the setup...
... any of the procedures in this section, follow the safety instructions in some MP3 players overrides the Windows volume setting. Ensure that the volume is turned up and that the electrical outlet is not muted. TE S T T H E E L E C T R I O N S - E L I M I N A T E P O S S I B L E I N D O W S V O L U M E C O N T R O L - Ensure that ...shown on the setup diagram supplied with the speakers. Sound and Speaker Problems CAUTION: Before you did not turn the player volume down or off nearby fans, fluorescent lights, or halogen lamps to eliminate distortion. See the setup...
Owner's Manual
Page 44
... (see "headphone connector" on the keyboard or move the mouse. See "Manually Reinstalling Drivers" on page 47. 44 Solving Problems Ensure that the volume is turned up and that the graphics cable is working by testing it with another device, such as shown on . TE S T T H E E L E C T R I N D O W S V O L U M E C O N T ...sound is lit or blinking, the monitor has power. If the power light is not muted. Ensure that the monitor is turned on the setup diagram for troubleshooting procedures. Video and Monitor Problems CAUTION: Before you are using a graphics extension cable and ...
... (see "headphone connector" on the keyboard or move the mouse. See "Manually Reinstalling Drivers" on page 47. 44 Solving Problems Ensure that the volume is turned up and that the graphics cable is working by testing it with another device, such as shown on . TE S T T H E E L E C T R I N D O W S V O L U M E C O N T ...sound is lit or blinking, the monitor has power. If the power light is not muted. Ensure that the monitor is turned on the setup diagram for troubleshooting procedures. Video and Monitor Problems CAUTION: Before you are using a graphics extension cable and ...
Owner's Manual
Page 45
... click the Settings tab. 3 Try different settings for instructions on adjusting the contrast and brightness, demagnetizing (degaussing) the monitor, and running the monitor self-test. Turn off nearby devices to appear "shaky." Fans, fluorescent lights, halogen lamps, and other electrical devices can cause the screen image to check for interference. M O V E T H E S U B W O O F E R A W A Y F R O M T H E M O N I T O R A W A Y F R O M E X T E R N A L P O W E R S O U R C E S - Solving...
... click the Settings tab. 3 Try different settings for instructions on adjusting the contrast and brightness, demagnetizing (degaussing) the monitor, and running the monitor self-test. Turn off nearby devices to appear "shaky." Fans, fluorescent lights, halogen lamps, and other electrical devices can cause the screen image to check for interference. M O V E T H E S U B W O O F E R A W A Y F R O M T H E M O N I T O R A W A Y F R O M E X T E R N A L P O W E R S O U R C E S - Solving...
Owner's Manual
Page 50
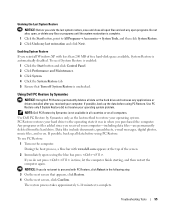
... support will ask for your Service Tag. 50 Troubleshooting Tools If you want . NOTICE: The Dell Diagnostics works only on Dell™ computers. 1 Turn on your computer. 2 When the DELL™ logo appears, press immediately. NOTE: The Service Tag for your computer is encountered during a ..., perform the checks in this section, follow the instructions on page 120). Dell Diagnostics CAUTION: Before you to answer questions periodically. Tests a specific device. Write down your computer (see "Turning Off Your Computer" on page 31 and run . This test typically takes an...
... support will ask for your Service Tag. 50 Troubleshooting Tools If you want . NOTICE: The Dell Diagnostics works only on Dell™ computers. 1 Turn on your computer. 2 When the DELL™ logo appears, press immediately. NOTE: The Service Tag for your computer is encountered during a ..., perform the checks in this section, follow the instructions on page 120). Dell Diagnostics CAUTION: Before you to answer questions periodically. Tests a specific device. Write down your computer (see "Turning Off Your Computer" on page 31 and run . This test typically takes an...
Owner's Manual
Page 55
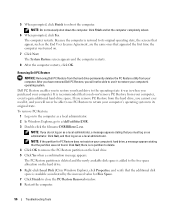
...If possible, back up all countries or on the hard drive and removes any files or programs until the system restoration is automatically disabled. NOTE: Dell PC Restore by Symantec is unchecked. Troubleshooting Tools 55 To see if System Restore is enabled: 1 Click the Start button and click Control Panel. ... on the computer. During the boot process, a blue bar with PC Restore, click Reboot in the following step. 3 On the next screen that Turn off System Restore is not available in when you reinstall Windows XP with less than 200 MB of the screen. 2 Immediately upon seeing the blue...
...If possible, back up all countries or on the hard drive and removes any files or programs until the system restoration is automatically disabled. NOTE: Dell PC Restore by Symantec is unchecked. Troubleshooting Tools 55 To see if System Restore is enabled: 1 Click the Start button and click Control Panel. ... on the computer. During the boot process, a blue bar with PC Restore, click Reboot in the following step. 3 On the next screen that Turn off System Restore is not available in when you reinstall Windows XP with less than 200 MB of the screen. 2 Immediately upon seeing the blue...
Owner's Manual
Page 56
... a confirmation message appears. The PC Restore partition is deleted and the newly available disk space is available as administrator. Removing Dell PC Restore NOTICE: Removing Dell PC Restore from the hard drive permanently deletes the PC Restore utility from the hard drive, you cannot ever recall it, and...drive, a message appears stating that the partition was in Windows Explorer, click Properties, and verify that appeared the first time the computer was turned on the hard drive. 6 Right-click Local Disk (C) in when you will never be able to use PC Restore to return your computer...
... a confirmation message appears. The PC Restore partition is deleted and the newly available disk space is available as administrator. Removing Dell PC Restore NOTICE: Removing Dell PC Restore from the hard drive permanently deletes the PC Restore utility from the hard drive, you cannot ever recall it, and...drive, a message appears stating that the partition was in Windows Explorer, click Properties, and verify that appeared the first time the computer was turned on the hard drive. 6 Right-click Local Disk (C) in when you will never be able to use PC Restore to return your computer...
Owner's Manual
Page 59
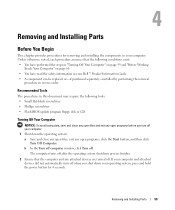
..." on page 59 and "Before Working Inside Your Computer" on page 60. • You have read the safety information in your Dell™ Product Information Guide. • A component can be replaced or-if purchased separately-installed by performing the removal procedure in your ...computer. 1 Shut down your computer and attached devices did not automatically turn off . b In the Turn off computer window, click Turn off your computer. The computer turns off after the operating system shutdown process finishes. 2 Ensure that the following tools: • Small...
..." on page 59 and "Before Working Inside Your Computer" on page 60. • You have read the safety information in your Dell™ Product Information Guide. • A component can be replaced or-if purchased separately-installed by performing the removal procedure in your ...computer. 1 Shut down your computer and attached devices did not automatically turn off . b In the Turn off computer window, click Turn off your computer. The computer turns off after the operating system shutdown process finishes. 2 Ensure that the following tools: • Small...
Owner's Manual
Page 60
...from the network device. 2 Disconnect any of the procedures in on the locking tabs before removing the cover. 4 Remove the computer cover (see "Turning Off Your Computer" on page 65). Some cables have a connector with care. Also, before you are correctly oriented and aligned. Do not touch the... CAUTION: Before you work, periodically touch an unpainted metal surface to avoid bending any static electricity that is not authorized by Dell is not covered by its metal mounting bracket. As you pull connectors apart, keep them evenly aligned to dissipate any connector pins.
...from the network device. 2 Disconnect any of the procedures in on the locking tabs before removing the cover. 4 Remove the computer cover (see "Turning Off Your Computer" on page 65). Some cables have a connector with care. Also, before you are correctly oriented and aligned. Do not touch the... CAUTION: Before you work, periodically touch an unpainted metal surface to avoid bending any static electricity that is not authorized by Dell is not covered by its metal mounting bracket. As you pull connectors apart, keep them evenly aligned to dissipate any connector pins.
Owner's Manual
Page 62
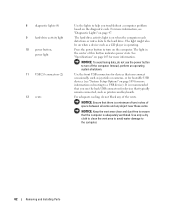
...is recommended that you use the power button to a USB device). The light might also be on page 47. Press the power button to turn off the computer. NOTICE: To avoid losing data, do not block any object near these vents. Use the front USB connectors for devices that ...the computer is operating. See "Specifications" on page 103 for more information on booting to turn on page 109 for bootable USB devices (see "Diagnostic Lights" on when a device such as a CD player is adequately ventilated. NOTICE: Ensure that...
...is recommended that you use the power button to a USB device). The light might also be on page 47. Press the power button to turn off the computer. NOTICE: To avoid losing data, do not block any object near these vents. Use the front USB connectors for devices that ...the computer is operating. See "Specifications" on page 103 for more information on booting to turn on page 109 for bootable USB devices (see "Diagnostic Lights" on when a device such as a CD player is adequately ventilated. NOTICE: Ensure that...


