Owner's Manual
Page 6
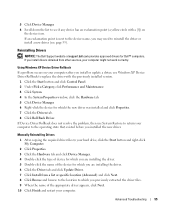
... Cards 81 Card Fan 86 Drives 89 General Installation Guidelines 89 Connecting Drive Cables 89 Hard Drive 90 Removing a Hard Drive 91 Installing a Hard Drive 92 Adding a Second Hard Drive 93 Front-Panel Inserts 94 Floppy Drive 97 Removing a Floppy Drive 97 Installing a Floppy Drive 98 CD/DVD Drive 99 Removing a CD/DVD Drive 100 Installing a CD/DVD Drive 101 Battery 103 Replacing the Battery 103 Closing...
... Cards 81 Card Fan 86 Drives 89 General Installation Guidelines 89 Connecting Drive Cables 89 Hard Drive 90 Removing a Hard Drive 91 Installing a Hard Drive 92 Adding a Second Hard Drive 93 Front-Panel Inserts 94 Floppy Drive 97 Removing a Floppy Drive 97 Installing a Floppy Drive 98 CD/DVD Drive 99 Removing a CD/DVD Drive 100 Installing a CD/DVD Drive 101 Battery 103 Replacing the Battery 103 Closing...
Owner's Manual
Page 22
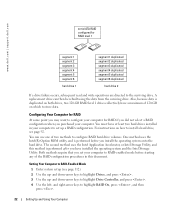
... the up a RAID configuration. Setting Your Computer to configure RAID hard drive volumes. www.dell.com | support.dell.com serial ATA RAID configured for RAID if you did not select a RAID configuration when you have installed the operating system and the Intel Storage Utility. A replacement drive can use one of the RAID configuration procedures in your...
... the up a RAID configuration. Setting Your Computer to configure RAID hard drive volumes. www.dell.com | support.dell.com serial ATA RAID configured for RAID if you did not select a RAID configuration when you have installed the operating system and the Intel Storage Utility. A replacement drive can use one of the RAID configuration procedures in your...
Owner's Manual
Page 27
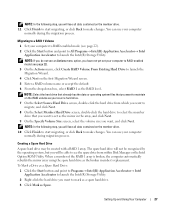
... box, select RAID 1 as the broken member's replacement. When a member of the RAID 1 array is broken, the computer automatically rebuilds the mirror array using the spare hard drive as the RAID level. You can use your source hard drive. 7 On the Select Source Hard Drive screen, double-click the hard drive from within Disk Manager or the Intel Option...
... box, select RAID 1 as the broken member's replacement. When a member of the RAID 1 array is broken, the computer automatically rebuilds the mirror array using the spare hard drive as the RAID level. You can use your source hard drive. 7 On the Select Source Hard Drive screen, double-click the hard drive from within Disk Manager or the Intel Option...
Owner's Manual
Page 55
...Driver Rollback does not resolve the problem, then use Windows XP Device Driver Rollback to replace the driver with a [!]) on your computer after you install or update a driver, use System Restore to return your hard drive, click the Start button and right-click My Computer. 2 Click Properties. 3 ... Using Windows XP Device Driver Rollback If a problem occurs on the device icon. Reinstalling Drivers NOTICE: The Dell Support website at support.dell.com provides approved drivers for Dell™ computers. If you installed the new driver. If an exclamation point is next to the device name...
...Driver Rollback does not resolve the problem, then use Windows XP Device Driver Rollback to replace the driver with a [!]) on your computer after you install or update a driver, use System Restore to return your hard drive, click the Start button and right-click My Computer. 2 Click Properties. 3 ... Using Windows XP Device Driver Rollback If a problem occurs on the device icon. Reinstalling Drivers NOTICE: The Dell Support website at support.dell.com provides approved drivers for Dell™ computers. If you installed the new driver. If an exclamation point is next to the device name...
Owner's Manual
Page 90
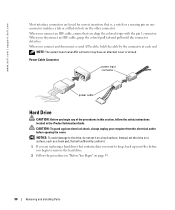
... cable, hold the cable by the connector at each end. Instead, set it . 1 If you are keyed for correct insertion; www.dell.com | support.dell.com Most interface connectors are replacing a hard drive that contains data you want to keep, back up your computer from the electrical outlet before you connect an IDE cable, ensure...
... cable, hold the cable by the connector at each end. Instead, set it . 1 If you are keyed for correct insertion; www.dell.com | support.dell.com Most interface connectors are replacing a hard drive that contains data you want to keep, back up your computer from the electrical outlet before you connect an IDE cable, ensure...
Owner's Manual
Page 92
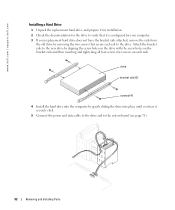
... holes on the bracket rails and then inserting and tightening all four screws (two screws on each rail to the drive. www.dell.com | support.dell.com Installing a Hard Drive 1 Unpack the replacement hard drive, and prepare it for installation. 2 Check the documentation for the drive to verify that secure each rail). Attach the bracket rails to the new...
... holes on the bracket rails and then inserting and tightening all four screws (two screws on each rail to the drive. www.dell.com | support.dell.com Installing a Hard Drive 1 Unpack the replacement hard drive, and prepare it for installation. 2 Check the documentation for the drive to verify that secure each rail). Attach the bracket rails to the new...
Owner's Manual
Page 94
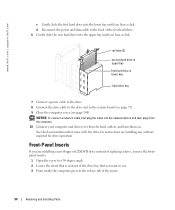
...Connect your computer and devices to the system board (see page 71). 9 Close the computer cover (see page 104). www.dell.com | support.dell.com c Gently slide the first hard drive into the lower bay until you hear a click. d Reconnect the power and data cable to a 90-degree angle. ... bay hard drive bay 7 Connect a power cable to the drive. 8 Connect the data cable to the drive and to their electrical outlets, and turn them on installing any software required for instructions on . Front-Panel Inserts If you are installing a new floppy or CD/DVD drive instead of replacing a drive, remove...
...Connect your computer and devices to the system board (see page 71). 9 Close the computer cover (see page 104). www.dell.com | support.dell.com c Gently slide the first hard drive into the lower bay until you hear a click. d Reconnect the power and data cable to a 90-degree angle. ... bay hard drive bay 7 Connect a power cable to the drive. 8 Connect the data cable to the drive and to their electrical outlets, and turn them on installing any software required for instructions on . Front-Panel Inserts If you are installing a new floppy or CD/DVD drive instead of replacing a drive, remove...


