Owner's Manual
Page 1
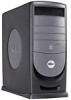
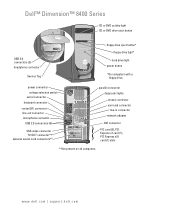
Dell™ Dimension™ 8400 Series CD or DVD activity light CD or DVD drive eject button USB 2.0 connectors (2) headphone connector Service Tag floppy drive eject button* floppy drive light* hard drive light power button *On computers with a floppy drive. www.dell.com | support.dell.com power connector voltage selection switch serial connector keyboard connector center/LFE connector...
Dell™ Dimension™ 8400 Series CD or DVD activity light CD or DVD drive eject button USB 2.0 connectors (2) headphone connector Service Tag floppy drive eject button* floppy drive light* hard drive light power button *On computers with a floppy drive. www.dell.com | support.dell.com power connector voltage selection switch serial connector keyboard connector center/LFE connector...
Owner's Manual
Page 4
... Overview 29 Standby Mode 29 Hibernate Mode 30 Power Options Properties 30 Hyper-Threading 31 2 Solving Problems Troubleshooting Tips 33 Battery Problems 33 Card Fan Problems 33 Drive Problems 34 CD and DVD drive ... for an earlier Windows operating system. . . . . 39 A solid blue screen appears 39 Other software problems 40 Memory Problems 40 Mouse Problems 41 Network Problems 42 Power Problems 42 Printer Problems 43 4 Contents
... Overview 29 Standby Mode 29 Hibernate Mode 30 Power Options Properties 30 Hyper-Threading 31 2 Solving Problems Troubleshooting Tips 33 Battery Problems 33 Card Fan Problems 33 Drive Problems 34 CD and DVD drive ... for an earlier Windows operating system. . . . . 39 A solid blue screen appears 39 Other software problems 40 Memory Problems 40 Mouse Problems 41 Network Problems 42 Power Problems 42 Printer Problems 43 4 Contents
Owner's Manual
Page 29
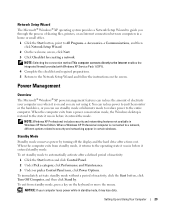
...Off Computer, and then click Stand by turning off the display and the hard drive after a defined period of electricity your computer loses power while in certain windows. NOTE: Windows XP Professional includes security and networking features not available in before it . To set standby mode ..., and then click Network Setup Wizard. 2 On the welcome screen, click Next. 3 Click Checklist for creating a network. You can reduce power to the Network Setup Wizard and follow the instructions on the keyboard or move the mouse. To exit from standby mode, it returns to the...
...Off Computer, and then click Stand by turning off the display and the hard drive after a defined period of electricity your computer loses power while in certain windows. NOTE: Windows XP Professional includes security and networking features not available in before it . To set standby mode ..., and then click Network Setup Wizard. 2 On the welcome screen, click Next. 3 Click Checklist for creating a network. You can reduce power to the Network Setup Wizard and follow the instructions on the keyboard or move the mouse. To exit from standby mode, it returns to the...
Owner's Manual
Page 30
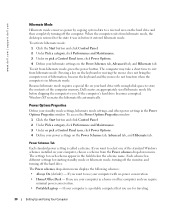
...as a home or office computer and you want to select one of the computer memory, Dell creates an appropriately sized hibernate mode file before it entered hibernate mode. When the computer exits from the Power schemes drop-down menu displays the following schemes: • Always On (default) - ... below the scheme name. The computer may take a short time to exit from hibernate mode, press the power button. www.dell.com | support.dell.com Hibernate Mode Hibernate mode conserves power by copying system data to a reserved area on the hard drive and then completely turning off the hard ...
...as a home or office computer and you want to select one of the computer memory, Dell creates an appropriately sized hibernate mode file before it entered hibernate mode. When the computer exits from the Power schemes drop-down menu displays the following schemes: • Always On (default) - ... below the scheme name. The computer may take a short time to exit from hibernate mode, press the power button. www.dell.com | support.dell.com Hibernate Mode Hibernate mode conserves power by copying system data to a reserved area on the hard drive and then completely turning off the hard ...

Owner's Manual
Page 31
...the corresponding drop-down menu in the Windows taskbar for quick access. • Set the computer to run without interruption (using no power conservation). • Minimal Power Management - • Presentation - If your computer is an Intel® technology that scheme, unless you for a scheme, click ...Up and Using Your Computer 31 To program these functions, click an option from standby mode or hibernate mode. • Program the power button to activate standby mode, activate hibernate mode, or turn off hard disks, System stand by allowing one physical processor to enable ...
...the corresponding drop-down menu in the Windows taskbar for quick access. • Set the computer to run without interruption (using no power conservation). • Minimal Power Management - • Presentation - If your computer is an Intel® technology that scheme, unless you for a scheme, click ...Up and Using Your Computer 31 To program these functions, click an option from standby mode or hibernate mode. • Program the power button to activate standby mode, activate hibernate mode, or turn off hard disks, System stand by allowing one physical processor to enable ...
Owner's Manual
Page 35
... Product Information Guide. E-Mail, Modem, and Internet Problems CAUTION: Before you write to the CD/DVD-RW. Solving Problems 35 C H E C K T H E M I C R O S O F T O U T L O O K ® E X P R E S S S E C U R I T Y S E T T I S C - See "Standby Mode" on power management modes. NOTE: Connect the modem to a digital telephone network. The CD/DVD-RW drive must receive a steady stream of bad sectors. 7 Click Start. The...
... Product Information Guide. E-Mail, Modem, and Internet Problems CAUTION: Before you write to the CD/DVD-RW. Solving Problems 35 C H E C K T H E M I C R O S O F T O U T L O O K ® E X P R E S S S E C U R I T Y S E T T I S C - See "Standby Mode" on power management modes. NOTE: Connect the modem to a digital telephone network. The CD/DVD-RW drive must receive a steady stream of bad sectors. 7 Click Start. The...
Owner's Manual
Page 38
... of the procedures in this section, follow the safety instructions located in the Product Information Guide. ENSURE THAT THE POWER CABLE IS FIRMLY CONNECTED TO THE COMPUTER AND TO THE ELECTRICAL OUTLET 38 Solving Problems See page 49. D E... L L I E E E 1 3 9 4 D E V I C E - CHECK THE KEYBOARD CABLE - • Ensure that the keyboard cable is firmly connected to the computer. • Shut down the computer (see page 123). www.dell.com | support.dell.com I F Y O U H A V E P R O B L E M S W I T H A D E L L I E E E 1 3 9 4 D E V I C E - Straighten bent pins. • Remove...
... of the procedures in this section, follow the safety instructions located in the Product Information Guide. ENSURE THAT THE POWER CABLE IS FIRMLY CONNECTED TO THE COMPUTER AND TO THE ELECTRICAL OUTLET 38 Solving Problems See page 49. D E... L L I E E E 1 3 9 4 D E V I C E - CHECK THE KEYBOARD CABLE - • Ensure that the keyboard cable is firmly connected to the computer. • Shut down the computer (see page 123). www.dell.com | support.dell.com I F Y O U H A V E P R O B L E M S W I T H A D E L L I E E E 1 3 9 4 D E V I C E - Straighten bent pins. • Remove...
Owner's Manual
Page 39
... then click Program Compatibility Wizard. 2 In the welcome screen, click Next. 3 Follow the instructions on your keyboard or moving your mouse, press and hold the power button for at least 8 to 10 seconds until the computer turns off . C H E C K T H E S O F T W A R E D O C U M E N T A T I O N - If you are unable ... configures a program so it runs in its documentation or on your keyboard or moving your mouse, press and hold the power button for an earlier Windows operating system RUN THE PROGRAM COMPATIBILITY WIZARD - The computer stops responding NOTICE: You might lose data...
... then click Program Compatibility Wizard. 2 In the welcome screen, click Next. 3 Follow the instructions on your keyboard or moving your mouse, press and hold the power button for at least 8 to 10 seconds until the computer turns off . C H E C K T H E S O F T W A R E D O C U M E N T A T I O N - If you are unable ... configures a program so it runs in its documentation or on your keyboard or moving your mouse, press and hold the power button for an earlier Windows operating system RUN THE PROGRAM COMPATIBILITY WIZARD - The computer stops responding NOTICE: You might lose data...
Owner's Manual
Page 42
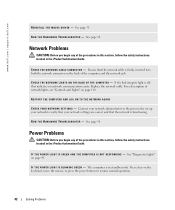
...O U R N E T W O R K S E T T I N G - For a description of the procedures in this section, follow the safety instructions located in the Product Information Guide. Power Problems CAUTION: Before you begin any of network lights, see "Controls and Lights" on page 49. Replace the network cable. R U N T H E H A R D W A R E TR...the computer and the network jack. See page 58. I F T H E P O W E R L I G H T I S B L I N K I V E R - www.dell.com | support.dell.com R E I N S T A L L T H E M O U S E D R I N G G R E E N - See "Diagnostic Lights" on page 110. See page 58....
...O U R N E T W O R K S E T T I N G - For a description of the procedures in this section, follow the safety instructions located in the Product Information Guide. Power Problems CAUTION: Before you begin any of network lights, see "Controls and Lights" on page 49. Replace the network cable. R U N T H E H A R D W A R E TR...the computer and the network jack. See page 58. I F T H E P O W E R L I G H T I S B L I N K I V E R - www.dell.com | support.dell.com R E I N S T A L L T H E M O U S E D R I N G G R E E N - See "Diagnostic Lights" on page 110. See page 58....

Owner's Manual
Page 43
... of interference are securely connected to the system board (see page 81). ENSURE THAT THE PRINTER IS TURNED ON Solving Problems 43 Ensure that the power strip is securely connected to the system board (see page 71). I F T H E P O W E R L I G H T I S B L I N K I S S T E A D Y A M B E...applicable (see page 71). E L I M I N A T E I N T E R F E R E N C E - The computer is receiving electrical power, but an internal power problem might be malfunctioning or incorrectly installed. • Remove and then reinstall the memory modules (see page 73). • Remove and then reinstall any...
... of interference are securely connected to the system board (see page 81). ENSURE THAT THE PRINTER IS TURNED ON Solving Problems 43 Ensure that the power strip is securely connected to the system board (see page 71). I F T H E P O W E R L I G H T I S B L I N K I S S T E A D Y A M B E...applicable (see page 71). E L I M I N A T E I N T E R F E R E N C E - The computer is receiving electrical power, but an internal power problem might be malfunctioning or incorrectly installed. • Remove and then reinstall the memory modules (see page 73). • Remove and then reinstall any...
Owner's Manual
Page 46
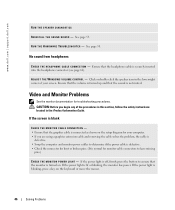
... monitor is connected as shown on the keyboard or move the mouse. 46 Solving Problems If the power light is securely inserted into the headphone connector (see page 61). See page 58. A D J U S T T H E W I V E R - www.dell.com | support.dell.com RUN THE SPEAKER DIAGNOSTICS R E I N S T A L L T H E S O U N D D R I N D O W S V O L U M E C O N T R O L - No sound from headphones C H E C K T H E H E A D P H O N E C A B L E C O N N E C T I G H T - CAUTION: Before you begin any of your...
... monitor is connected as shown on the keyboard or move the mouse. 46 Solving Problems If the power light is securely inserted into the headphone connector (see page 61). See page 58. A D J U S T T H E W I V E R - www.dell.com | support.dell.com RUN THE SPEAKER DIAGNOSTICS R E I N S T A L L T H E S O U N D D R I N D O W S V O L U M E C O N T R O L - No sound from headphones C H E C K T H E H E A D P H O N E C A B L E C O N N E C T I G H T - CAUTION: Before you begin any of your...
Owner's Manual
Page 49
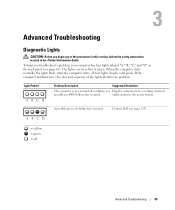
The lights can be yellow or green. Contact Dell (see page 63). To help you begin any of the lights identify the problem. After the computer starts, all four lights display solid green. When the computer starts normally, the lights flash. outlet and press the power button. A possible processor failure has occurred. ABCD...
The lights can be yellow or green. Contact Dell (see page 63). To help you begin any of the lights identify the problem. After the computer starts, all four lights display solid green. When the computer starts normally, the lights flash. outlet and press the power button. A possible processor failure has occurred. ABCD...
Owner's Manual
Page 50
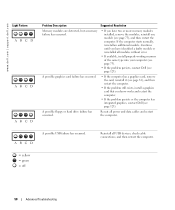
...know works and restart the computer. • If the problem persists or the computer has integrated graphics, contact Dell (see page 123). ABCD A possible USB failure has occurred. Reinstall all modules without error. • If ...properly working memory of the same type into your computer (see page 73). • If the problem persists, contact Dell (see page 73), and then restart the computer. A possible graphics card failure has occurred. • If the ... A possible floppy or hard drive failure has occurred. Reseat all power and data cables and restart the computer.
...know works and restart the computer. • If the problem persists or the computer has integrated graphics, contact Dell (see page 123). ABCD A possible USB failure has occurred. Reinstall all modules without error. • If ...properly working memory of the same type into your computer (see page 73). • If the problem persists, contact Dell (see page 73), and then restart the computer. A possible graphics card failure has occurred. • If the ... A possible floppy or hard drive failure has occurred. Reseat all power and data cables and restart the computer.
Owner's Manual
Page 59
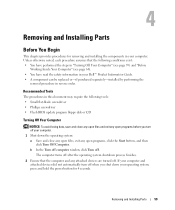
...: a Save and close any open files, exit any open programs before you turn off your operating system, press and hold the power button for removing and installing the components in your Dell™ Product Information Guide. • A component can be replaced or-if purchased separately-installed by performing the removal procedure in...
...: a Save and close any open files, exit any open programs before you turn off your operating system, press and hold the power button for removing and installing the components in your Dell™ Product Information Guide. • A component can be replaced or-if purchased separately-installed by performing the removal procedure in...
Owner's Manual
Page 60
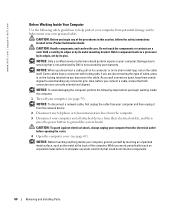
...press in the Product Information Guide. While you connect a cable, ensure that is not authorized by Dell is not covered by its metal mounting bracket. www.dell.com | support.dell.com Before Working Inside Your Computer Use the following steps before you are correctly oriented and aligned....To disconnect a network cable, first unplug the cable from your computer and then unplug it from their electrical outlets, and then press the power button to ground the system board. CAUTION: Handle components and cards with locking tabs; NOTICE: To avoid damaging the computer, perform the...
...press in the Product Information Guide. While you connect a cable, ensure that is not authorized by Dell is not covered by its metal mounting bracket. www.dell.com | support.dell.com Before Working Inside Your Computer Use the following steps before you are correctly oriented and aligned....To disconnect a network cable, first unplug the cable from your computer and then unplug it from their electrical outlets, and then press the power button to ground the system board. CAUTION: Handle components and cards with locking tabs; NOTICE: To avoid damaging the computer, perform the...
Owner's Manual
Page 62
...knock it snaps back in place. Use the headphone connector to identify your computer when you connect occasionally, such as printers and keyboards. www.dell.com | support.dell.com 6 power button 7 Service Tag 8 headphone connector 9 USB 2.0 connectors (2) 10 front-panel door Press to turn off its hinges, it off the... 62 Removing and Installing Parts NOTICE: To avoid losing data, do not use the front-panel connectors. Open the door to use the power button to turn on booting to a USB device). Used to attach headphones and most kinds of speakers. if you use the back USB...
...knock it snaps back in place. Use the headphone connector to identify your computer when you connect occasionally, such as printers and keyboards. www.dell.com | support.dell.com 6 power button 7 Service Tag 8 headphone connector 9 USB 2.0 connectors (2) 10 front-panel door Press to turn off its hinges, it off the... 62 Removing and Installing Parts NOTICE: To avoid losing data, do not use the front-panel connectors. Open the door to use the power button to turn on booting to a USB device). Used to attach headphones and most kinds of speakers. if you use the back USB...
Owner's Manual
Page 63
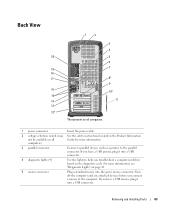
... as a printer, to the computer. Back View 20 19 18 17 16 15 14 13 12* 1 2 3 4 5 6 7 8* 9 10* 11 *Not present on all computers. 1 power connector Insert the power cable. 2 voltage selection switch (may See the safety instructions located in the Product Information not be available on all Guide for more information, see...
... as a printer, to the computer. Back View 20 19 18 17 16 15 14 13 12* 1 2 3 4 5 6 7 8* 9 10* 11 *Not present on all computers. 1 power connector Insert the power cable. 2 voltage selection switch (may See the safety instructions located in the Product Information not be available on all Guide for more information, see...
Owner's Manual
Page 65
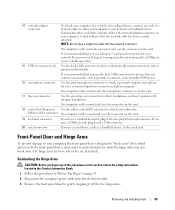
... this section, follow the safety instructions located in the Product Information Guide. 1 Follow the procedures in "Before You Begin" on page 59. 2 Disconnect the computer power cable from the electrical outlet. 3 Remove the front-panel door by gently snapping it into the network connector. If the front-panel door is open...
... this section, follow the safety instructions located in the Product Information Guide. 1 Follow the procedures in "Before You Begin" on page 59. 2 Disconnect the computer power cable from the electrical outlet. 3 Remove the front-panel door by gently snapping it into the network connector. If the front-panel door is open...
Owner's Manual
Page 67
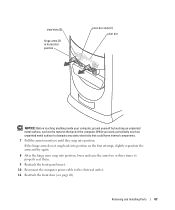
... snap into position, lower and raise the arms two or three times to properly seat them. 9 Reattach the front-panel insert. 10 Reconnect the computer power cable to the electrical outlet. 11 Reattach the front door (see page 68). Removing and Installing Parts 67 view slots (2) hinge arms (2) in horizontal position...
... snap into position, lower and raise the arms two or three times to properly seat them. 9 Reattach the front-panel insert. 10 Reconnect the computer power cable to the electrical outlet. 11 Reattach the front door (see page 68). Removing and Installing Parts 67 view slots (2) hinge arms (2) in horizontal position...
Owner's Manual
Page 68
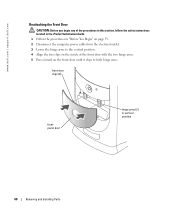
www.dell.com | support.dell.com Reattaching the Front Door CAUTION: Before you begin any of the procedures in this section, follow the safety instructions located in the Product Information Guide. 1 Follow the procedures in "Before You Begin" on page 59. 2 Disconnect the computer power cable from the electrical outlet. 3 Lower the hinge arms...
www.dell.com | support.dell.com Reattaching the Front Door CAUTION: Before you begin any of the procedures in this section, follow the safety instructions located in the Product Information Guide. 1 Follow the procedures in "Before You Begin" on page 59. 2 Disconnect the computer power cable from the electrical outlet. 3 Lower the hinge arms...


