Owner's Manual
Page 1
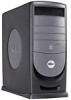
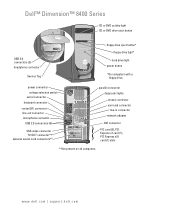
www.dell.com | support.dell.com Dell™ Dimension™ 8400 Series CD or DVD activity light CD or DVD drive eject button USB 2.0 connectors (2) headphone connector Service Tag floppy drive eject button* floppy drive light* hard drive light power button *On computers with a floppy drive. power connector voltage selection switch serial connector keyboard connector center/LFE connector...
www.dell.com | support.dell.com Dell™ Dimension™ 8400 Series CD or DVD activity light CD or DVD drive eject button USB 2.0 connectors (2) headphone connector Service Tag floppy drive eject button* floppy drive light* hard drive light power button *On computers with a floppy drive. power connector voltage selection switch serial connector keyboard connector center/LFE connector...
Owner's Manual
Page 4
... Overview 29 Standby Mode 29 Hibernate Mode 30 Power Options Properties 30 Hyper-Threading 31 2 Solving Problems Troubleshooting Tips 33 Battery Problems 33 Card Fan Problems 33 Drive Problems 34 CD and DVD drive ... for an earlier Windows operating system. . . . . 39 A solid blue screen appears 39 Other software problems 40 Memory Problems 40 Mouse Problems 41 Network Problems 42 Power Problems 42 Printer Problems 43 4 Contents
... Overview 29 Standby Mode 29 Hibernate Mode 30 Power Options Properties 30 Hyper-Threading 31 2 Solving Problems Troubleshooting Tips 33 Battery Problems 33 Card Fan Problems 33 Drive Problems 34 CD and DVD drive ... for an earlier Windows operating system. . . . . 39 A solid blue screen appears 39 Other software problems 40 Memory Problems 40 Mouse Problems 41 Network Problems 42 Power Problems 42 Printer Problems 43 4 Contents
Owner's Manual
Page 29
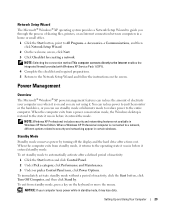
...Start button and click Control Panel. 2 Under Pick a category, click Performance and Maintenance. 3 Under or pick a Control Panel icon, click Power Options. When the computer exits from standby mode, it returns to the state it entered the mode. When a Windows XP Professional computer is ...required preparations. 5 Return to automatically activate after a time-out. Setting Up and Using Your Computer 29 When the computer exits from a power conservation mode, the Windows desktop is connected to a network, different options related to just the monitor or the hard drive, or you are...
...Start button and click Control Panel. 2 Under Pick a category, click Performance and Maintenance. 3 Under or pick a Control Panel icon, click Power Options. When the computer exits from standby mode, it returns to the state it entered the mode. When a Windows XP Professional computer is ...required preparations. 5 Return to automatically activate after a time-out. Setting Up and Using Your Computer 29 When the computer exits from a power conservation mode, the Windows desktop is connected to a network, different options related to just the monitor or the hard drive, or you are...
Owner's Manual
Page 30
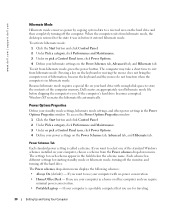
... is in before shipping the computer to use your hard drive with no power conservation. • Home/Office Desk - If you want to you want to select one of the computer memory, Dell creates an appropriately sized hibernate mode file before it was in hibernate mode. The settings for ...traveling. 30 Setting Up and Using Your Computer If you . If your hibernate settings on the Power Schemes tab, Advanced tab, and Hibernate tab....
... is in before shipping the computer to use your hard drive with no power conservation. • Home/Office Desk - If you want to you want to select one of the computer memory, Dell creates an appropriately sized hibernate mode file before it was in hibernate mode. The settings for ...traveling. 30 Setting Up and Using Your Computer If you . If your hibernate settings on the Power Schemes tab, Advanced tab, and Hibernate tab....

Owner's Manual
Page 31
... periods of performing certain tasks simultaneously. To program these functions, click an option from standby mode or hibernate mode. • Program the power button to be locked up. If you for quick access. • Set the computer to prompt you want to enable hibernate mode...., activate hibernate mode, or turn off hard disks, System stand by allowing one physical processor to run without interruption (using no power conservation). • Minimal Power Management - To avoid this problem, always set the hard drive (hard disk) to time-out before the monitor does, your ...
... periods of performing certain tasks simultaneously. To program these functions, click an option from standby mode or hibernate mode. • Program the power button to be locked up. If you for quick access. • Set the computer to prompt you want to enable hibernate mode...., activate hibernate mode, or turn off hard disks, System stand by allowing one physical processor to run without interruption (using no power conservation). • Minimal Power Management - To avoid this problem, always set the hard drive (hard disk) to time-out before the monitor does, your ...
Owner's Manual
Page 35
...: Connect the modem to a CD/DVD-RW drive C L O S E O T H E R P R O G R A M S - Solving Problems 35 Problems writing to an analog telephone jack only. C H E C K T H E M I C R O S O F T O U T L O O K ® E X P R E S S S E C U R I T Y S E T T I S C - TU R N O F F S T A N D B Y M O D E I N W I N D O W S B E F O R E W R I T I N G T O A C D / D V D - See "Standby Mode" on power management modes. If the stream is connected to a digital telephone network. Try closing all programs before you cannot open your e-mail attachments: 1 In Outlook Express...
...: Connect the modem to a CD/DVD-RW drive C L O S E O T H E R P R O G R A M S - Solving Problems 35 Problems writing to an analog telephone jack only. C H E C K T H E M I C R O S O F T O U T L O O K ® E X P R E S S S E C U R I T Y S E T T I S C - TU R N O F F S T A N D B Y M O D E I N W I N D O W S B E F O R E W R I T I N G T O A C D / D V D - See "Standby Mode" on power management modes. If the stream is connected to a digital telephone network. Try closing all programs before you cannot open your e-mail attachments: 1 In Outlook Express...
Owner's Manual
Page 38
... connected to the computer. • Shut down the computer (see page 123). ENSURE THAT THE POWER CABLE IS FIRMLY CONNECTED TO THE COMPUTER AND TO THE ELECTRICAL OUTLET 38 Solving Problems www.dell.com | support.dell.com I F Y O U H A V E P R O B L E M S W I T H A D E L L I E E E 1 3 9 4 D E V I C E - Contact Dell (see page 59), reconnect the keyboard cable as shown on the setup diagram for your...
... connected to the computer. • Shut down the computer (see page 123). ENSURE THAT THE POWER CABLE IS FIRMLY CONNECTED TO THE COMPUTER AND TO THE ELECTRICAL OUTLET 38 Solving Problems www.dell.com | support.dell.com I F Y O U H A V E P R O B L E M S W I T H A D E L L I E E E 1 3 9 4 D E V I C E - Contact Dell (see page 59), reconnect the keyboard cable as shown on the setup diagram for your...
Owner's Manual
Page 39
TU R N T H E C O M P U T E R O F F - If you are unable to get a response by pressing a key on your keyboard or moving your mouse, press and hold the power button for at least 8 to 10 seconds until the computer turns off . Then restart your computer. C H E C K T H E S O F T W A R E D O C U M E N T A T I O N - A program crashes repeatedly NOTE: Software usually includes ...might lose data if you are unable to get a response by pressing a key on your keyboard or moving your mouse, press and hold the power button for at least 8 to 10 seconds until the computer turns off .
TU R N T H E C O M P U T E R O F F - If you are unable to get a response by pressing a key on your keyboard or moving your mouse, press and hold the power button for at least 8 to 10 seconds until the computer turns off . Then restart your computer. C H E C K T H E S O F T W A R E D O C U M E N T A T I O N - A program crashes repeatedly NOTE: Software usually includes ...might lose data if you are unable to get a response by pressing a key on your keyboard or moving your mouse, press and hold the power button for at least 8 to 10 seconds until the computer turns off .
Owner's Manual
Page 42
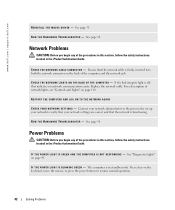
...dell.com R E I N S T A L L T H E M O U S E D R I N G - See page 58. Replace the network cable. Contact your network administrator or the person who set up your network to resume normal operation. 42 Solving Problems I F T H E P O W E R L I G H T I S G R E E N A N D T H E C O M P U T E R I S N O T R E S P O N D I V E R - Press a key on the keyboard, move the mouse, or press the power...Y O U R N E T W O R K S E T T I N G G R E E N - Power Problems CAUTION: Before you begin any of the procedures in this section, follow the safety instructions located in standby mode. I F T...
...dell.com R E I N S T A L L T H E M O U S E D R I N G - See page 58. Replace the network cable. Contact your network administrator or the person who set up your network to resume normal operation. 42 Solving Problems I F T H E P O W E R L I G H T I S G R E E N A N D T H E C O M P U T E R I S N O T R E S P O N D I V E R - Press a key on the keyboard, move the mouse, or press the power...Y O U R N E T W O R K S E T T I N G G R E E N - Power Problems CAUTION: Before you begin any of the procedures in this section, follow the safety instructions located in standby mode. I F T...

Owner's Manual
Page 43
... A device might exist. Ensure that the voltage selection switch is turned on a power strip • Multiple power strips connected to the system board (see page 81). Also bypass power protection devices, power strips, and power extension cables to verify that the computer turns on properly. • Ensure that ...the electrical outlet is working by testing it with another device, such as a lamp. • Ensure that the power strip is set to the system board (see page 71). Some possible causes of the procedures in this section, follow the safety instructions...
... A device might exist. Ensure that the voltage selection switch is turned on a power strip • Multiple power strips connected to the system board (see page 81). Also bypass power protection devices, power strips, and power extension cables to verify that the computer turns on properly. • Ensure that ...the electrical outlet is working by testing it with another device, such as a lamp. • Ensure that the power strip is set to the system board (see page 71). Some possible causes of the procedures in this section, follow the safety instructions...
Owner's Manual
Page 46
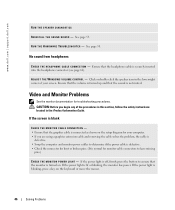
... See the monitor documentation for bent or broken pins. (It is lit or blinking, the monitor has power. If the power light is off, firmly press the button to ensure that the sound is securely inserted into the headphone connector... power cable is defective. • Check the connector for troubleshooting procedures. If the screen is blank CHECK THE MONITOR CABLE CONNECTION - • Ensure that the headphone cable is not muted. No sound from headphones C H E C K T H E H E A D P H O N E C A B L E C O N N E C T I N D O W S V O L U M E C O N T R O L - www.dell.com | support.dell....
... See the monitor documentation for bent or broken pins. (It is lit or blinking, the monitor has power. If the power light is off, firmly press the button to ensure that the sound is securely inserted into the headphone connector... power cable is defective. • Check the connector for troubleshooting procedures. If the screen is blank CHECK THE MONITOR CABLE CONNECTION - • Ensure that the headphone cable is not muted. No sound from headphones C H E C K T H E H E A D P H O N E C A B L E C O N N E C T I N D O W S V O L U M E C O N T R O L - www.dell.com | support.dell....
Owner's Manual
Page 49
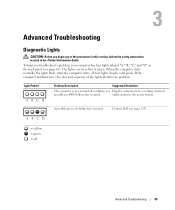
...procedures in this section, follow the safety instructions located in a normal off Advanced Troubleshooting 49 outlet and press the power button. Light Pattern ABCD Problem Description Suggested Resolution The computer is in the Product Information Guide. The lights can be... ABCD = yellow = green = off condition or a Plug the computer into a working electrical possible pre-BIOS failure has occurred. Contact Dell (see page 63). Advanced Troubleshooting Diagnostic Lights CAUTION: Before you troubleshoot a problem, your computer has four lights labeled "A," "B," "C," and ...
...procedures in this section, follow the safety instructions located in a normal off Advanced Troubleshooting 49 outlet and press the power button. Light Pattern ABCD Problem Description Suggested Resolution The computer is in the Product Information Guide. The lights can be... ABCD = yellow = green = off condition or a Plug the computer into a working electrical possible pre-BIOS failure has occurred. Contact Dell (see page 63). Advanced Troubleshooting Diagnostic Lights CAUTION: Before you troubleshoot a problem, your computer has four lights labeled "A," "B," "C," and ...
Owner's Manual
Page 50
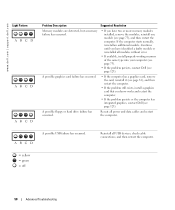
...properly working memory of the same type into your computer (see page 73). • If the problem persists, contact Dell (see page 123). www.dell.com | support.dell.com Light Pattern ABCD ABCD ABCD Problem Description Suggested Resolution Memory modules are detected, but a memory failure has occurred. .... • If the problem persists or the computer has integrated graphics, contact Dell (see page 73), and then restart the computer. A possible floppy or hard drive failure has occurred. Reseat all power and data cables and restart the computer. ABCD A possible USB failure has occurred...
...properly working memory of the same type into your computer (see page 73). • If the problem persists, contact Dell (see page 123). www.dell.com | support.dell.com Light Pattern ABCD ABCD ABCD Problem Description Suggested Resolution Memory modules are detected, but a memory failure has occurred. .... • If the problem persists or the computer has integrated graphics, contact Dell (see page 73), and then restart the computer. A possible floppy or hard drive failure has occurred. Reseat all power and data cables and restart the computer. ABCD A possible USB failure has occurred...
Owner's Manual
Page 59
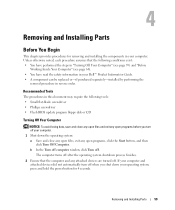
...(see page 59) and "Before Working Inside Your Computer" (see page 60). • You have read the safety information in your Dell™ Product Information Guide. • A component can be replaced or-if purchased separately-installed by performing the removal procedure in your operating ...system, press and hold the power button for removing and installing the components in reverse order. The computer turns off after the operating system shutdown process finishes. 2 ...
...(see page 59) and "Before Working Inside Your Computer" (see page 60). • You have read the safety information in your Dell™ Product Information Guide. • A component can be replaced or-if purchased separately-installed by performing the removal procedure in your operating ...system, press and hold the power button for removing and installing the components in reverse order. The computer turns off after the operating system shutdown process finishes. 2 ...
Owner's Manual
Page 60
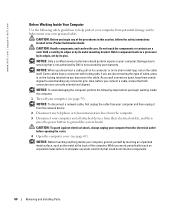
... and to help ensure your computer and all attached devices from their electrical outlets, and then press the power button to dissipate any static electricity that is not authorized by Dell is not covered by its strain-relief loop, not on your computer (see page 69). Some cables... from the computer. 3 Disconnect your own personal safety. NOTICE: Before touching anything inside the computer. 1 Turn off your computer. www.dell.com | support.dell.com Before Working Inside Your Computer Use the following steps before opening the cover. 4 Open the computer cover (see page 59). Do ...
... and to help ensure your computer and all attached devices from their electrical outlets, and then press the power button to dissipate any static electricity that is not authorized by Dell is not covered by its strain-relief loop, not on your computer (see page 69). Some cables... from the computer. 3 Disconnect your own personal safety. NOTICE: Before touching anything inside the computer. 1 Turn off your computer. www.dell.com | support.dell.com Before Working Inside Your Computer Use the following steps before opening the cover. 4 Open the computer cover (see page 59). Do ...
Owner's Manual
Page 62
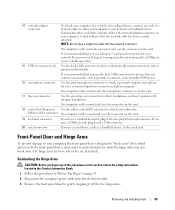
...it or accidentally knock it snaps back in place. It is removable; if you access the Dell Support website or call technical support. NOTICE: To avoid losing data, do not use the power button to turn on booting to a USB device). Use the front USB connectors for devices that... you use the front-panel connectors. Open the door to use the back USB connectors for more information on the computer. www.dell.com | support.dell.com 6 power button 7 Service Tag 8 headphone connector 9 USB 2.0 connectors (2) 10 front-panel door Press to turn off its hinges, it off the ...
...it or accidentally knock it snaps back in place. It is removable; if you access the Dell Support website or call technical support. NOTICE: To avoid losing data, do not use the power button to turn on booting to a USB device). Use the front USB connectors for devices that... you use the front-panel connectors. Open the door to use the back USB connectors for more information on the computer. www.dell.com | support.dell.com 6 power button 7 Service Tag 8 headphone connector 9 USB 2.0 connectors (2) 10 front-panel door Press to turn off its hinges, it off the ...
Owner's Manual
Page 63
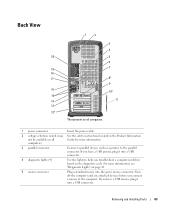
... into the green mouse connector. Back View 20 19 18 17 16 15 14 13 12* 1 2 3 4 5 6 7 8* 9 10* 11 *Not present on all computers. 1 power connector Insert the power cable. 2 voltage selection switch (may See the safety instructions located in the Product Information not be available on all Guide for more information, see...
... into the green mouse connector. Back View 20 19 18 17 16 15 14 13 12* 1 2 3 4 5 6 7 8* 9 10* 11 *Not present on all computers. 1 power connector Insert the power cable. 2 voltage selection switch (may See the safety instructions located in the Product Information not be available on all Guide for more information, see...
Owner's Manual
Page 65
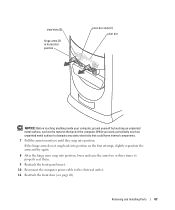
... procedures in "Before You Begin" on your computer, the front-panel door is designed to the network adapter connector on page 59. 2 Disconnect the computer power cable from the electrical outlet. 3 Remove the front-panel door by gently snapping it is recommended that the network cable has been securely attached. It...
... procedures in "Before You Begin" on your computer, the front-panel door is designed to the network adapter connector on page 59. 2 Disconnect the computer power cable from the electrical outlet. 3 Remove the front-panel door by gently snapping it is recommended that the network cable has been securely attached. It...
Owner's Manual
Page 67
... snap into position, lower and raise the arms two or three times to properly seat them. 9 Reattach the front-panel insert. 10 Reconnect the computer power cable to dissipate any static electricity that could harm internal components. 7 Pull the arms toward you work, periodically touch an unpainted metal surface to the...
... snap into position, lower and raise the arms two or three times to properly seat them. 9 Reattach the front-panel insert. 10 Reconnect the computer power cable to dissipate any static electricity that could harm internal components. 7 Pull the arms toward you work, periodically touch an unpainted metal surface to the...
Owner's Manual
Page 68
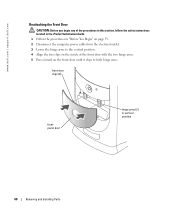
www.dell.com | support.dell.com Reattaching the Front Door CAUTION: Before you begin any of the procedures in this section, follow the safety instructions located in the Product Information Guide. 1 Follow the procedures in "Before You Begin" on page 59. 2 Disconnect the computer power cable from the electrical outlet. 3 Lower the hinge arms...
www.dell.com | support.dell.com Reattaching the Front Door CAUTION: Before you begin any of the procedures in this section, follow the safety instructions located in the Product Information Guide. 1 Follow the procedures in "Before You Begin" on page 59. 2 Disconnect the computer power cable from the electrical outlet. 3 Lower the hinge arms...


