Dell Dimension 2100 Solutions Guide
Page 3
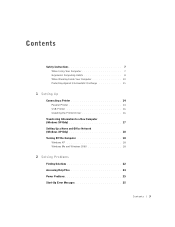
Safety Instructions 7 When Using Your Computer 7 Ergonomic Computing Habits 8 When Working Inside Your Computer 10 Protecting Against Electrostatic Discharge 11 1 Setting Up Connecting a Printer 14 Parallel Printer 14 USB Printer 16 Installing the Printer Driver 16 Transferring Information to a New Computer (Windows XP Only 17 Setting Up a Home and Office Network (Windows XP Only 18 Turning Off the Computer 18 Windows XP 18 Windows Me and Windows 2000 18 2 Solving Problems Finding Solutions 22 Accessing Help Files 24 Power Problems 25 Start-Up Error Messages 25 Contents 3
Safety Instructions 7 When Using Your Computer 7 Ergonomic Computing Habits 8 When Working Inside Your Computer 10 Protecting Against Electrostatic Discharge 11 1 Setting Up Connecting a Printer 14 Parallel Printer 14 USB Printer 16 Installing the Printer Driver 16 Transferring Information to a New Computer (Windows XP Only 17 Setting Up a Home and Office Network (Windows XP Only 18 Turning Off the Computer 18 Windows XP 18 Windows Me and Windows 2000 18 2 Solving Problems Finding Solutions 22 Accessing Help Files 24 Power Problems 25 Start-Up Error Messages 25 Contents 3

Dell Dimension 2100 Solutions Guide
Page 7
... the computer cover, filler brackets, front-panel inserts, and so on) removed. • To help avoid possible damage to the system board, wait 5 seconds after turning off the computer before disconnecting or connecting a non-USB device from the network jack.
... the computer cover, filler brackets, front-panel inserts, and so on) removed. • To help avoid possible damage to the system board, wait 5 seconds after turning off the computer before disconnecting or connecting a non-USB device from the network jack.
Dell Dimension 2100 Solutions Guide
Page 10
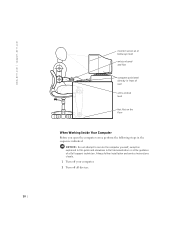
....dell.com | support.dell.com monitor screen at or below eye level wrists relaxed and flat computer positioned directly in front of user arms at desk level feet flat on the floor When Working Inside Your Computer Before you open the computer cover, perform the following steps in Dell ...documentation or at the guidance of a Dell support technician. NOTICE: Do not attempt to service the computer yourself, except as explained in this guide and elsewhere in...
....dell.com | support.dell.com monitor screen at or below eye level wrists relaxed and flat computer positioned directly in front of user arms at desk level feet flat on the floor When Working Inside Your Computer Before you open the computer cover, perform the following steps in Dell ...documentation or at the guidance of a Dell support technician. NOTICE: Do not attempt to service the computer yourself, except as explained in this guide and elsewhere in...

Dell Dimension 2100 Solutions Guide
Page 13
SECTION 1 Connecting a Printer Transferring Information to a New Computer (Windows XP Only) Setting Up a Home and Office Network (Windows XP Only) Turning Off the Computer www.dell.com | support.dell.com
SECTION 1 Connecting a Printer Transferring Information to a New Computer (Windows XP Only) Setting Up a Home and Office Network (Windows XP Only) Turning Off the Computer www.dell.com | support.dell.com

Dell Dimension 2100 Solutions Guide
Page 14
If no information is provided, see page 18). www.dell.com | support.dell.com See the documentation that came with the printer for any recommended preparation procedures, such as: • Removing the packaging • Installing the toner or ... follow the instructions that came with the printer to connect it to the parallel connector on the computer and tighten the two screws. Parallel Printer 1 Turn off the computer (see the following sections. Attach the cable to the computer. Use of a nonstandard cable may prevent the printer from working. 2 Attach the...
If no information is provided, see page 18). www.dell.com | support.dell.com See the documentation that came with the printer for any recommended preparation procedures, such as: • Removing the packaging • Installing the toner or ... follow the instructions that came with the printer to connect it to the parallel connector on the computer and tighten the two screws. Parallel Printer 1 Turn off the computer (see the following sections. Attach the cable to the computer. Use of a nonstandard cable may prevent the printer from working. 2 Attach the...
Dell Dimension 2100 Solutions Guide
Page 15
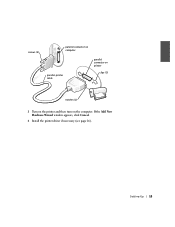
If the Add New Hardware Wizard window appears, click Cancel. 4 Install the printer driver if necessary (see page 16). Setting Up 15 screws (2) parallel connector on computer parallel printer cable parallel connector on printer clips (2) notches (2) 3 Turn on the printer and then turn on the computer.
If the Add New Hardware Wizard window appears, click Cancel. 4 Install the printer driver if necessary (see page 16). Setting Up 15 screws (2) parallel connector on computer parallel printer cable parallel connector on printer clips (2) notches (2) 3 Turn on the printer and then turn on the computer.
Dell Dimension 2100 Solutions Guide
Page 16
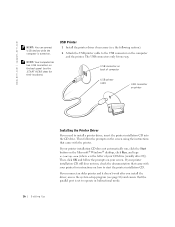
...CD still does not run , click the Start button on the Microsoft® Windows® desktop, click Run, and type x:\setup.exe (where x is turned on the computer and the printer. HINT: Your computer has two USB connectors on the back panel (see the following section). 2 Attach the USB printer... Driver If you install the driver, access the system setup program (see page 86) and ensure that came with the printer. www.dell.com | support.dell.com HINT: You can connect USB devices while the computer is the letter of computer USB printer cable USB connector on the screen using...
...CD still does not run , click the Start button on the Microsoft® Windows® desktop, click Run, and type x:\setup.exe (where x is turned on the computer and the printer. HINT: Your computer has two USB connectors on the back panel (see the following section). 2 Attach the USB printer... Driver If you install the driver, access the system setup program (see page 86) and ensure that came with the printer. www.dell.com | support.dell.com HINT: You can connect USB devices while the computer is the letter of computer USB printer cable USB connector on the screen using...

Dell Dimension 2100 Solutions Guide
Page 18
HINT: If you are having difficulty turning off your computer, see "General Program Problems" on the screen. www.dell.com | support.dell.com HINT: Selecting the connection method This computer connects directly to the Network Setup Wizard. 5 Follow the instructions on page 40. NOTICE: To ... click Shut Down. 3 Click the pull-down menu under What do ?. 18 Setting Up Windows XP provides a Network Setup Wizard to guide you must turn off your computer through the process of sharing files, printers, or an Internet connection between computers in a home or small office. 1 Click the Start...
HINT: If you are having difficulty turning off your computer, see "General Program Problems" on the screen. www.dell.com | support.dell.com HINT: Selecting the connection method This computer connects directly to the Network Setup Wizard. 5 Follow the instructions on page 40. NOTICE: To ... click Shut Down. 3 Click the pull-down menu under What do ?. 18 Setting Up Windows XP provides a Network Setup Wizard to guide you must turn off your computer through the process of sharing files, printers, or an Internet connection between computers in a home or small office. 1 Click the Start...

Dell Dimension 2100 Solutions Guide
Page 19
The computer automatically turns off after the shutdown process finishes. 5 Turn off your monitor and any other devices connected to power. Setting Up 19 4 Click Shut down and then click OK.
The computer automatically turns off after the shutdown process finishes. 5 Turn off your monitor and any other devices connected to power. Setting Up 19 4 Click Shut down and then click OK.
Dell Dimension 2100 Solutions Guide
Page 25
...power extension cables, keyboard and mouse extension cables, too many devices on a power strip, or multiple power strips connected to verify that the computer turns on the standby mode. HINT: See the Tell Me How help files, see page 92). Ensure that the power cable is lit or blinking..., the computer has power. Be sure that the electrical outlet is defective. To access help file for information on . Call Dell for the keyword standby in standby mode-press a key on the same circuit or operating near the computer can cause interference. Bypass power ...
...power extension cables, keyboard and mouse extension cables, too many devices on a power strip, or multiple power strips connected to verify that the computer turns on the standby mode. HINT: See the Tell Me How help files, see page 92). Ensure that the power cable is lit or blinking..., the computer has power. Be sure that the electrical outlet is defective. To access help file for information on . Call Dell for the keyword standby in standby mode-press a key on the same circuit or operating near the computer can cause interference. Bypass power ...
Dell Dimension 2100 Solutions Guide
Page 27
... below the serial port are not green, call Dell for interference. E L I M I N A T E P O S S I B L E I E S - See the monitor documentation. C H E C K T H E PO W E R P R O P E R T I N T E R F E R E N C E - To access help file or search for instructions on adjusting the contrast and brightness. Restore the original resolution and refresh rate settings. C H E C K F O R A D D I T I N G S - If your monitor may require. Turn off nearby fans, fluorescent lights, or halogen lamps...
... below the serial port are not green, call Dell for interference. E L I M I N A T E P O S S I B L E I E S - See the monitor documentation. C H E C K T H E PO W E R P R O P E R T I N T E R F E R E N C E - To access help file or search for instructions on adjusting the contrast and brightness. Restore the original resolution and refresh rate settings. C H E C K F O R A D D I T I N G S - If your monitor may require. Turn off nearby fans, fluorescent lights, or halogen lamps...

Dell Dimension 2100 Solutions Guide
Page 28
...P E A K E R C A B L E C O N N E C T I C A L O U T L E T - www.dell.com | support.dell.com ADJUST THE WINDOWS DISPLAY SETTINGS Windows XP 1 Click the Start button, and then click Control Panel. 2 Click Appearance and Themes. 3 Click Display, and... then click the Settings tab. 4 Try different settings for your computer and the setup diagram supplied with the speakers. TE S T T H E S P E A K E R S - Ensure that the sound is turned...
...P E A K E R C A B L E C O N N E C T I C A L O U T L E T - www.dell.com | support.dell.com ADJUST THE WINDOWS DISPLAY SETTINGS Windows XP 1 Click the Start button, and then click Control Panel. 2 Click Appearance and Themes. 3 Click Display, and... then click the Settings tab. 4 Try different settings for your computer and the setup diagram supplied with the speakers. TE S T T H E S P E A K E R S - Ensure that the sound is turned...

Dell Dimension 2100 Solutions Guide
Page 29
R U N T H E S P E A K E R D I A G N O S T I C A L O U T L E T - Turn off nearby fans, fluorescent lights, or halogen lamps to a parallel port printer VE R I F Y T H E P R I N T E R C A B L E C O N N E C T I N T E R F E R E N C E - If you need technical assistance for your printer, call the printer's manufacturer. TE S T T H E E L E C T R I C S - Dell does not cover the printer's warranty. Solving Problems 29 See page 44. See the speaker documentation for interference. Some speaker systems have selfcontained diagnostics. See...
R U N T H E S P E A K E R D I A G N O S T I C A L O U T L E T - Turn off nearby fans, fluorescent lights, or halogen lamps to a parallel port printer VE R I F Y T H E P R I N T E R C A B L E C O N N E C T I N T E R F E R E N C E - If you need technical assistance for your printer, call the printer's manufacturer. TE S T T H E E L E C T R I C S - Dell does not cover the printer's warranty. Solving Problems 29 See page 44. See the speaker documentation for interference. Some speaker systems have selfcontained diagnostics. See...
Dell Dimension 2100 Solutions Guide
Page 31
... Properties, and then click the Ports tab. Ensure that the scanner cable is firmly connected to the computer and to the following port(s): setting is turned on. C H E C K T H E S C A N N E R C A B L E C O N N E C T I O N - Dell does not cover the scanner's warranty. See page 16. C H E C K T H E P O W E R C A B L E C O N N E C T I O N - RE I N S T A L L T H E S C A N N E R D R I V E R - Ensure that the Print to Settings, and then click Printers. Reinstall the scanner driver...
... Properties, and then click the Ports tab. Ensure that the scanner cable is firmly connected to the computer and to the following port(s): setting is turned on. C H E C K T H E S C A N N E R C A B L E C O N N E C T I O N - Dell does not cover the scanner's warranty. See page 16. C H E C K T H E P O W E R C A B L E C O N N E C T I O N - RE I N S T A L L T H E S C A N N E R D R I V E R - Ensure that the Print to Settings, and then click Printers. Reinstall the scanner driver...
Dell Dimension 2100 Solutions Guide
Page 34
... properly: 1 While your computer is turned on your computer. 4 Start the computer. www.dell.com | support.dell.com IF YOU CONNECTED THE MOUSE BEFORE TURNING ON THE C O M P U T E R, R E C O N N E C T T H E M O U S E C A B L E 1 Press to highlight Shut Down, and then press . 3 After the computer turns off, reconnect the mouse cable as ...the power cable from the back of the computer. 2 Connect the mouse to the computer. 3 Reconnect the power cable. 4 Turn on , the mouse will appear to be nonfunctional. Pressing the power button does not clear the computer's settings and does not restore...
... properly: 1 While your computer is turned on your computer. 4 Start the computer. www.dell.com | support.dell.com IF YOU CONNECTED THE MOUSE BEFORE TURNING ON THE C O M P U T E R, R E C O N N E C T T H E M O U S E C A B L E 1 Press to highlight Shut Down, and then press . 3 After the computer turns off, reconnect the mouse cable as ...the power cable from the back of the computer. 2 Connect the mouse to the computer. 3 Reconnect the power cable. 4 Turn on , the mouse will appear to be nonfunctional. Pressing the power button does not clear the computer's settings and does not restore...

Dell Dimension 2100 Solutions Guide
Page 37
... Windows desktop. If the floppy drive is defective. See the Tell Me How help file for and remove viruses. Be sure that the volume is turned up and that the sound is defective. Insert another CD to check for instructions. C L E A N T H E D I T H A N O T H E R D V D - To access help file for instructions. Solving Problems 37 Viruses can...
... Windows desktop. If the floppy drive is defective. See the Tell Me How help file for and remove viruses. Be sure that the volume is turned up and that the sound is defective. Insert another CD to check for instructions. C L E A N T H E D I T H A N O T H E R D V D - To access help file for instructions. Solving Problems 37 Viruses can...

Dell Dimension 2100 Solutions Guide
Page 38
... to the CD-RW may also alleviate the problem. See the Tell Me How help files, see page 24. www.dell.com | support.dell.com If the CD-RW drive stops writing TURN OFF STANDBY IN WINDOWS BEFORE WRITING TO A CD -RW D I T E S P E E D T O A S L O W E R R A T E - C H A N G E T H E W R I S C- The CD-RW drive must receive a steady stream of data when...
... to the CD-RW may also alleviate the problem. See the Tell Me How help files, see page 24. www.dell.com | support.dell.com If the CD-RW drive stops writing TURN OFF STANDBY IN WINDOWS BEFORE WRITING TO A CD -RW D I T E S P E E D T O A S L O W E R R A T E - C H A N G E T H E W R I S C- The CD-RW drive must receive a steady stream of data when...

Dell Dimension 2100 Solutions Guide
Page 41
A solid blue screen appears TU R N T H E C O M P U T E R O F F - Press the power button again to a keystroke or a proper shutdown (see page 18), press the power button until the computer turns off. See page 32. Solving Problems 41 ScanDisk will automatically run in an environment more similar to older Windows operating system environments. 1 Click the Start ...
A solid blue screen appears TU R N T H E C O M P U T E R O F F - Press the power button again to a keystroke or a proper shutdown (see page 18), press the power button until the computer turns off. See page 32. Solving Problems 41 ScanDisk will automatically run in an environment more similar to older Windows operating system environments. 1 Click the Start ...
Dell Dimension 2100 Solutions Guide
Page 49
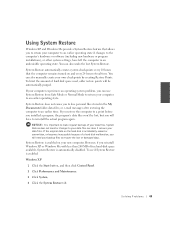
... lost , but you will be lost or damaged data. Solving Problems 49 Windows XP and Windows Me provide a System Restore feature that the computer remains turned on your new computer. However, if you reinstall Windows XP or Windows Me with less than 200 MB of your data files. You can also...
... lost , but you will be lost or damaged data. Solving Problems 49 Windows XP and Windows Me provide a System Restore feature that the computer remains turned on your new computer. However, if you reinstall Windows XP or Windows Me with less than 200 MB of your data files. You can also...

Dell Dimension 2100 Solutions Guide
Page 50
...->System Restore, and follow the instructions on as the computer administrator or a user with any System Restore function, Dell recommends that Disable System Restore is unchecked. www.dell.com | support.dell.com 5 Make sure that Turn off System Restore is unchecked. Windows Me 1 Click the Start button, point to Settings, and then click Control...
...->System Restore, and follow the instructions on as the computer administrator or a user with any System Restore function, Dell recommends that Disable System Restore is unchecked. www.dell.com | support.dell.com 5 Make sure that Turn off System Restore is unchecked. Windows Me 1 Click the Start button, point to Settings, and then click Control...

