User's Guide
Page 1
All rights reserved. Reproduction of this material in this text: Dell, the DELL logo, Inspiron, Dell Precision, Dimension, OptiPlex, Latitude, PowerEdge, PowerVault, PowerApp, and Dell OpenManage are trademarks of Dell Inc.; Trademarks used in this document is strictly forbidden. Dell B3460dn Laser Printer User's Guide June 2012 www.dell.com | support.dell.com Trademarks Information in trademarks and trade names other...
All rights reserved. Reproduction of this material in this text: Dell, the DELL logo, Inspiron, Dell Precision, Dimension, OptiPlex, Latitude, PowerEdge, PowerVault, PowerApp, and Dell OpenManage are trademarks of Dell Inc.; Trademarks used in this document is strictly forbidden. Dell B3460dn Laser Printer User's Guide June 2012 www.dell.com | support.dell.com Trademarks Information in trademarks and trade names other...
User's Guide
Page 2
... 13 Installing internal options...13 Installing hardware options...17 Attaching cables...19 Setting up the printer software...20 Networking...22 Connecting the printer to a wireless network using the Embedded Web Server 25 Verifying printer setup...26 Loading paper and specialty media 27 Setting the paper size and type...27 Configuring Universal paper settings...
... 13 Installing internal options...13 Installing hardware options...17 Attaching cables...19 Setting up the printer software...20 Networking...22 Connecting the printer to a wireless network using the Embedded Web Server 25 Verifying printer setup...26 Loading paper and specialty media 27 Setting the paper size and type...27 Configuring Universal paper settings...
User's Guide
Page 3
... sample list ...50 Printing a directory list...50 Canceling a print job...50 Canceling a print job from the printer control panel 50 Canceling a print job from the computer ...51 Understanding the printer menus 52 Menus list...52 Paper menu...53 Reports menu...61 Network/Ports menu...62 Security menu...70 Settings...72 Help menu...85 Saving money and the environment 87 Saving paper and toner...87 Saving energy...87 Recycling...90 Securing the printer 91 Using the security lock feature...91 Statement of Volatility...91 Erasing volatile memory...92 Erasing non‑volatile memory...92 Finding...
... sample list ...50 Printing a directory list...50 Canceling a print job...50 Canceling a print job from the printer control panel 50 Canceling a print job from the computer ...51 Understanding the printer menus 52 Menus list...52 Paper menu...53 Reports menu...61 Network/Ports menu...62 Security menu...70 Settings...72 Help menu...85 Saving money and the environment 87 Saving paper and toner...87 Saving energy...87 Recycling...90 Securing the printer 91 Using the security lock feature...91 Statement of Volatility...91 Erasing volatile memory...92 Erasing non‑volatile memory...92 Finding...

User's Guide
Page 4
... number of remaining pages 94 Ordering supplies...94 Storing supplies...95 Replacing supplies...95 Moving the printer...99 Managing the printer 101 Managing printer messages...101 Accessing Status Monitor Center...101 Checking the virtual display...101 Viewing reports...102 Configuring ...supply notifications from the Embedded Web Server 102 Modifying confidential print settings...103 Copying printer settings to other printers 103 Restoring factory default settings...104 Clearing jams 105 Avoiding jams...105 Understanding jam messages and locations 106...
... number of remaining pages 94 Ordering supplies...94 Storing supplies...95 Replacing supplies...95 Moving the printer...99 Managing the printer 101 Managing printer messages...101 Accessing Status Monitor Center...101 Checking the virtual display...101 Viewing reports...102 Configuring ...supply notifications from the Embedded Web Server 102 Modifying confidential print settings...103 Copying printer settings to other printers 103 Restoring factory default settings...104 Clearing jams 105 Avoiding jams...105 Understanding jam messages and locations 106...
User's Guide
Page 6
...Do not recharge, disassemble, or incinerate a lithium battery. This product is incorrectly replaced. CAUTION-HOT SURFACE: The inside of the printer might be replaced. The manufacturer is near water or wet locations. Safety information 6 Safety information Connect the power cord to a properly... or use this product is installed, then remove it . Use of controls or adjustments or performance of injury from the printer before touching. CAUTION-POTENTIAL INJURY: The lithium battery in hazardous radiation exposure. Discard used lithium batteries according to abrasion or ...
...Do not recharge, disassemble, or incinerate a lithium battery. This product is incorrectly replaced. CAUTION-HOT SURFACE: The inside of the printer might be replaced. The manufacturer is near water or wet locations. Safety information 6 Safety information Connect the power cord to a properly... or use this product is installed, then remove it . Use of controls or adjustments or performance of injury from the printer before touching. CAUTION-POTENTIAL INJURY: The lithium battery in hazardous radiation exposure. Discard used lithium batteries according to abrasion or ...
User's Guide
Page 8
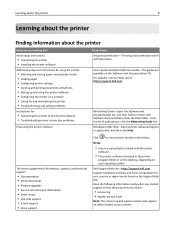
... Support Web site. Notes: • Help is located in the printer program folder or on the desktop, depending on your operating system. Windows or Mac Help-Open a printer software program or application, and then click Help. ? Dell Support Web site-http://support.dell.com Support telephone numbers and hours of publications, click the Networking...
... Support Web site. Notes: • Help is located in the printer program folder or on the desktop, depending on your operating system. Windows or Mac Help-Open a printer software program or application, and then click Help. ? Dell Support Web site-http://support.dell.com Support telephone numbers and hours of publications, click the Networking...

User's Guide
Page 9
... region. Clean, dry, and free of air conditioners, heaters, or ventilators. - If you looking for? • Software and Drivers-Certified drivers for my printer and installers for Dell printer software • Readme files-Last‑minute technical changes, or advanced technical reference materials for experienced users or technicians • Supplies and accessories for...
... region. Clean, dry, and free of air conditioners, heaters, or ventilators. - If you looking for? • Software and Drivers-Certified drivers for my printer and installers for Dell printer software • Readme files-Last‑minute technical changes, or advanced technical reference materials for experienced users or technicians • Supplies and accessories for...
User's Guide
Page 10
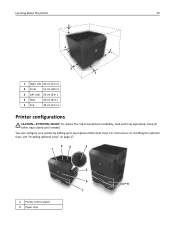
Keep all other trays closed until needed. For instructions on installing the optional trays, see "Installing optional trays" on page 17. 1 Printer control panel 2 Paper stop Learning about the printer 10 1 Right side 30 cm (12 in.) 2 Front 51 cm (20 in.) 3 Left side 20 cm (8 in.) 4 Rear 20 cm (8 in.) 5 Top 30 cm (12 in.) Printer configurations CAUTION-POTENTIAL INJURY: To reduce the risk of equipment instability, load each tray separately. You can configure your printer by adding up to two optional 550‑sheet trays.
Keep all other trays closed until needed. For instructions on installing the optional trays, see "Installing optional trays" on page 17. 1 Printer control panel 2 Paper stop Learning about the printer 10 1 Right side 30 cm (12 in.) 2 Front 51 cm (20 in.) 3 Left side 20 cm (8 in.) 4 Rear 20 cm (8 in.) 5 Top 30 cm (12 in.) Printer configurations CAUTION-POTENTIAL INJURY: To reduce the risk of equipment instability, load each tray separately. You can configure your printer by adding up to two optional 550‑sheet trays.
User's Guide
Page 11
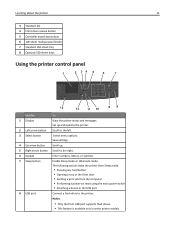
...Scroll to the right. 6 Keypad Enter numbers, letters, or symbols. 7 Sleep button Enable Sleep mode or Hibernate mode. The following actions wake the printer from Sleep mode: • Pressing any hard button • Opening a tray or the front door • Sending a print job from the computer... available only in the USB port 8 USB port Connect a flash drive to the left. 3 Select button Select menu options. Learning about the printer 11 3 Standard bin 4 Front door release button 5 Controller board access door 6 100‑sheet multipurpose feeder 7 Standard 550‑sheet tray ...
...Scroll to the right. 6 Keypad Enter numbers, letters, or symbols. 7 Sleep button Enable Sleep mode or Hibernate mode. The following actions wake the printer from Sleep mode: • Pressing any hard button • Opening a tray or the front door • Sending a print job from the computer... available only in the USB port 8 USB port Connect a flash drive to the left. 3 Select button Select menu options. Learning about the printer 11 3 Standard bin 4 Front door release button 5 Controller board access door 6 100‑sheet multipurpose feeder 7 Standard 550‑sheet tray ...

User's Guide
Page 12
... of the indicator and Sleep button lights The colors of the printer. The printer is warming up, processing data, or printing. The printer is waking from or entering Hibernate mode. Indicator light color and its corresponding printer status Sleep button light Off Printer status The printer is in Ready state. Sleep button light color and its...
... of the indicator and Sleep button lights The colors of the printer. The printer is warming up, processing data, or printing. The printer is waking from or entering Hibernate mode. Indicator light color and its corresponding printer status Sleep button light Off Printer status The printer is in Ready state. Sleep button light color and its...
User's Guide
Page 13
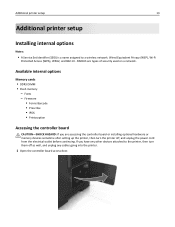
...types of security used on a network. RADIUS are accessing the controller board or installing optional hardware or memory devices sometime after setting up the printer, then turn them off , and unplug the power cord from the electrical outlet before continuing. Firmware • Forms Barcode • Prescribe ...• IPDS • Printcryption Accessing the controller board CAUTION-SHOCK HAZARD: If you have any cables going into the printer. 1 Open the controller board access door. Wired Equivalent Privacy (WEP), Wi-Fi Protected Access (WPA), WPA2, and 802.1X - Additional...
...types of security used on a network. RADIUS are accessing the controller board or installing optional hardware or memory devices sometime after setting up the printer, then turn them off , and unplug the power cord from the electrical outlet before continuing. Firmware • Forms Barcode • Prescribe ...• IPDS • Printcryption Accessing the controller board CAUTION-SHOCK HAZARD: If you have any cables going into the printer. 1 Open the controller board access door. Wired Equivalent Privacy (WEP), Wi-Fi Protected Access (WPA), WPA2, and 802.1X - Additional...
User's Guide
Page 14
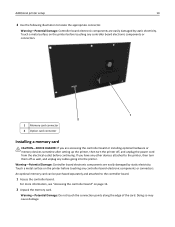
...Potential Damage: Controller board electronic components are accessing the controller board or installing optional hardware or memory devices sometime after setting up the printer, then turn them off , and unplug the power cord from the electrical outlet before touching any other devices attached to the ...1 Access the controller board. If you are easily damaged by static electricity. Doing so may cause damage. Additional printer setup 14 2 Use the following illustration to locate the appropriate connector. For more information, see "Accessing the controller board" on the...
...Potential Damage: Controller board electronic components are accessing the controller board or installing optional hardware or memory devices sometime after setting up the printer, then turn them off , and unplug the power cord from the electrical outlet before touching any other devices attached to the ...1 Access the controller board. If you are easily damaged by static electricity. Doing so may cause damage. Additional printer setup 14 2 Use the following illustration to locate the appropriate connector. For more information, see "Accessing the controller board" on the...
User's Guide
Page 15
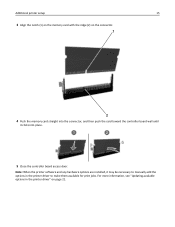
Note: When the printer software and any hardware options are installed, it clicks into the connector, and then push the card toward the controller board wall until it may be necessary to make them available for print jobs. For more information, see "Updating available options in the printer driver to manually add the options in the printer driver" on the connector. 1 2 4 Push the memory card straight into place. 1 2 5 Close the controller board access door. Additional printer setup 15 3 Align the notch (1) on the memory card with the ridge (2) on page 21.
Note: When the printer software and any hardware options are installed, it clicks into the connector, and then push the card toward the controller board wall until it may be necessary to make them available for print jobs. For more information, see "Updating available options in the printer driver to manually add the options in the printer driver" on the connector. 1 2 4 Push the memory card straight into place. 1 2 5 Close the controller board access door. Additional printer setup 15 3 Align the notch (1) on the memory card with the ridge (2) on page 21.
User's Guide
Page 16
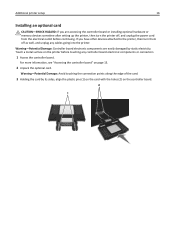
... 16 Installing an optional card CAUTION-SHOCK HAZARD: If you have other devices attached to the printer, then turn the printer off as well, and unplug any controller board electronic components or connectors. 1 Access the controller board. If you are easily damaged by its sides... 2 1 Warning-Potential Damage: Controller board electronic components are accessing the controller board or installing optional hardware or memory devices sometime after setting up the printer, then turn them off , and unplug the power cord from the electrical outlet before touching any cables going into the...
... 16 Installing an optional card CAUTION-SHOCK HAZARD: If you have other devices attached to the printer, then turn the printer off as well, and unplug any controller board electronic components or connectors. 1 Access the controller board. If you are easily damaged by its sides... 2 1 Warning-Potential Damage: Controller board electronic components are accessing the controller board or installing optional hardware or memory devices sometime after setting up the printer, then turn them off , and unplug the power cord from the electrical outlet before touching any cables going into the...

User's Guide
Page 17
... board. Note: The entire length of the card may be necessary to manually add the options in the printer driver to the printer, then turn the printer off as shown in the printer driver" on the card must touch and be flushed against the controller board. 5 Close the controller board...hardware options are accessing the controller board or installing optional hardware or memory devices sometime after setting up the printer, then turn them available for print jobs. Note: When the printer software and any other devices attached to make them off , and unplug the power cord from the ...
... board. Note: The entire length of the card may be necessary to manually add the options in the printer driver to the printer, then turn the printer off as shown in the printer driver" on the card must touch and be flushed against the controller board. 5 Close the controller board...hardware options are accessing the controller board or installing optional hardware or memory devices sometime after setting up the printer, then turn them available for print jobs. Note: When the printer software and any other devices attached to make them off , and unplug the power cord from the ...
User's Guide
Page 18
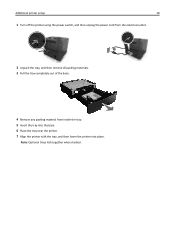
Note: Optional trays lock together when stacked. Additional printer setup 18 1 Turn off the printer using the power switch, and then unplug the power cord from the electrical outlet. 2 Unpack the tray, and then remove all packing materials. 3 Pull the tray completely out of the base. 2 1 2 4 Remove any packing material from inside the tray. 5 Insert the tray into the base. 6 Place the tray near the printer. 7 Align the printer with the tray, and then lower the printer into place.
Note: Optional trays lock together when stacked. Additional printer setup 18 1 Turn off the printer using the power switch, and then unplug the power cord from the electrical outlet. 2 Unpack the tray, and then remove all packing materials. 3 Pull the tray completely out of the base. 2 1 2 4 Remove any packing material from inside the tray. 5 Insert the tray into the base. 6 Place the tray near the printer. 7 Align the printer with the tray, and then lower the printer into place.
User's Guide
Page 19
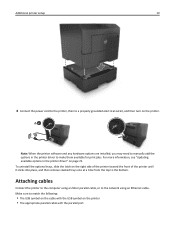
...to match the following: • The USB symbol on the cable with the USB symbol on the right side of the printer toward the front of the printer until it clicks into place, and then remove stacked trays one at a time from the top to the bottom. To ...optional trays, slide the latch on the printer • The appropriate parallel cable with the parallel port Additional printer setup 19 2 8 Connect the power cord to the printer, then to a properly grounded electrical outlet, and then turn on the printer. 1 2 Note: When the printer software and any hardware options are installed,...
...to match the following: • The USB symbol on the cable with the USB symbol on the right side of the printer toward the front of the printer until it clicks into place, and then remove stacked trays one at a time from the top to the bottom. To ...optional trays, slide the latch on the printer • The appropriate parallel cable with the parallel port Additional printer setup 19 2 8 Connect the power cord to the printer, then to a properly grounded electrical outlet, and then turn on the printer. 1 2 Note: When the printer software and any hardware options are installed,...
User's Guide
Page 20
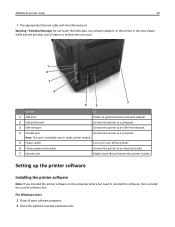
... 7 Security slot Turn on the computer before but need to reinstall the software, then uninstall the current software first. Connect the printer to a computer. Attach a lock that will secure the printer in the area shown while actively printing. Loss of data or a malfunction can occur. 1 2 3 4 7 5 6 Use the To 1 USB port Attach an...
... 7 Security slot Turn on the computer before but need to reinstall the software, then uninstall the current software first. Connect the printer to a computer. Attach a lock that will secure the printer in the area shown while actively printing. Loss of data or a malfunction can occur. 1 2 3 4 7 5 6 Use the To 1 USB port Attach an...
User's Guide
Page 21
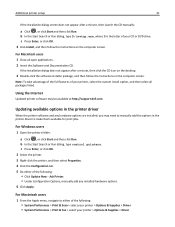
..., where D is the letter of the following : • Click Update Now ‑ Ask Printer. • Under Configuration Options, manually add any hardware options are installed, you may be available at http://support.dell.com. If the installation dialog does not appear after a minute, then launch the CD manually:... a Click , or click Start and then click Run. Using the Internet Updated printer software may need to make them available for print...
..., where D is the letter of the following : • Click Update Now ‑ Ask Printer. • Under Configuration Options, manually add any hardware options are installed, you may be available at http://support.dell.com. If the installation dialog does not appear after a minute, then launch the CD manually:... a Click , or click Start and then click Run. Using the Internet Updated printer software may need to make them available for print...

User's Guide
Page 22
...WEP), Wi-Fi Protected Access (WPA), WPA2, and 802.1X - RADIUS are types of the CD or DVD drive. Note: If the configured printer does not appear in the list, then click Modify Search. 6 Follow the instructions on an Ethernet network For Windows users 1 Insert the Software and...choose to use on the network • The network gateway • The network mask • A nickname for the printer (optional) Note: A printer nickname can make it easier for the printer to use the default printer nickname, or assign a name that came with the adapter. • A Service Set Identifier (SSID) is a ...
...WEP), Wi-Fi Protected Access (WPA), WPA2, and 802.1X - RADIUS are types of the CD or DVD drive. Note: If the configured printer does not appear in the list, then click Modify Search. 6 Follow the instructions on an Ethernet network For Windows users 1 Insert the Software and...choose to use on the network • The network gateway • The network mask • A nickname for the printer (optional) Note: A printer nickname can make it easier for the printer to use the default printer nickname, or assign a name that came with the adapter. • A Service Set Identifier (SSID) is a ...


