
User's Guide
Page 9
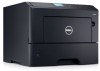
...and paper clips. - Selecting a location for the printer When selecting a location for them also. If you looking for? • Software and Drivers-Certified drivers for my printer and installers for Dell printer software • Readme files-Last‑minute technical ...changes, or advanced technical reference materials for experienced users or technicians • Supplies and accessories for my printer • Replacement cartridges • Safety information ...
...and paper clips. - Selecting a location for the printer When selecting a location for them also. If you looking for? • Software and Drivers-Certified drivers for my printer and installers for Dell printer software • Readme files-Last‑minute technical ...changes, or advanced technical reference materials for experienced users or technicians • Supplies and accessories for my printer • Replacement cartridges • Safety information ...
User's Guide
Page 42
...withstand up to 185°C (365°F) without melting, discoloring, offsetting, or releasing hazardous emissions. Partial sheets also contaminate the printer and the cartridge with adhesive, and could void the warranty. • If zone coating of the sheet. For information on labels: •...in the Paper menu, then transparencies can withstand temperatures up to prevent sheets from edges. Adhesive material contaminates the printer and could void the printer and toner cartridge warranties. • Do not use labels with exposed adhesive. • Do not print within 1 mm (0.04...
...withstand up to 185°C (365°F) without melting, discoloring, offsetting, or releasing hazardous emissions. Partial sheets also contaminate the printer and the cartridge with adhesive, and could void the warranty. • If zone coating of the sheet. For information on labels: •...in the Paper menu, then transparencies can withstand temperatures up to prevent sheets from edges. Adhesive material contaminates the printer and could void the printer and toner cartridge warranties. • Do not use labels with exposed adhesive. • Do not print within 1 mm (0.04...

User's Guide
Page 94
... 2 Click All Programs or Programs, and then select the printer program folder from the list. 3 Select your printer, and then navigate to: Dell Printer Home > Maintenance > Order supplies 4 From the Order Printer Supplies dialog, do any of the following : • ...Click Order Online to order supplies on the International Organization for Standardization* test methods and page content. * Average continuous black declared cartridge...
... 2 Click All Programs or Programs, and then select the printer program folder from the list. 3 Select your printer, and then navigate to: Dell Printer Home > Maintenance > Order supplies 4 From the Order Printer Supplies dialog, do any of the following : • ...Click Order Online to order supplies on the International Organization for Standardization* test methods and page content. * Average continuous black declared cartridge...

User's Guide
Page 95
Maintaining the printer 95 Storing supplies Choose a cool, clean storage area for the printer supplies. Do not expose supplies to use them. Store supplies right side up in their original packing until you are ready to : • Direct sunlight • Temperatures above 35°C (95°F) • High humidity above 80% • Salty air • Corrosive gases • Heavy dust Replacing supplies Replacing the toner cartridge 1 Press the button on the right side of the printer, and then open the front door.
Maintaining the printer 95 Storing supplies Choose a cool, clean storage area for the printer supplies. Do not expose supplies to use them. Store supplies right side up in their original packing until you are ready to : • Direct sunlight • Temperatures above 35°C (95°F) • High humidity above 80% • Salty air • Corrosive gases • Heavy dust Replacing supplies Replacing the toner cartridge 1 Press the button on the right side of the printer, and then open the front door.

User's Guide
Page 96
Maintaining the printer 96 2 Pull the toner cartridge out using the handle. 3 Unpack the toner cartridge, and then remove all packing materials. 4 Shake the new cartridge to light may cause print quality problems. 6 Close the front door. Extended exposure to redistribute the toner. 5 Insert the toner cartridge into the printer by aligning the side rails of the cartridge with the arrows on the side rails inside the printer. Warning-Potential Damage: Do not expose the imaging unit to direct light for more than 10 minutes.
Maintaining the printer 96 2 Pull the toner cartridge out using the handle. 3 Unpack the toner cartridge, and then remove all packing materials. 4 Shake the new cartridge to light may cause print quality problems. 6 Close the front door. Extended exposure to redistribute the toner. 5 Insert the toner cartridge into the printer by aligning the side rails of the cartridge with the arrows on the side rails inside the printer. Warning-Potential Damage: Do not expose the imaging unit to direct light for more than 10 minutes.

User's Guide
Page 97
Maintaining the printer 97 Replacing the imaging unit 1 Press the button on the right side of the printer, and then open the front door. 2 Pull the toner cartridge out using the handle.
Maintaining the printer 97 Replacing the imaging unit 1 Press the button on the right side of the printer, and then open the front door. 2 Pull the toner cartridge out using the handle.

User's Guide
Page 99
... arrows on the side rails inside the printer. 7 Insert the toner cartridge into the printer by aligning the side rails of the cartridge with the arrows on the side rails inside the printer. 8 Close the front door. Moving the printer Before moving the printer CAUTION-POTENTIAL INJURY: Before moving the printer, follow these guidelines to avoid personal injury...
... arrows on the side rails inside the printer. 7 Insert the toner cartridge into the printer by aligning the side rails of the cartridge with the arrows on the side rails inside the printer. 8 Close the front door. Moving the printer Before moving the printer CAUTION-POTENTIAL INJURY: Before moving the printer, follow these guidelines to avoid personal injury...

User's Guide
Page 102
...the address field. Not all supply conditions. • The percentage of estimated remaining supply that prompts the alert can be set on a printer control panel. Viewing reports You can be set for all selectable alerts can view some supply conditions. 1 Open a Web browser, and then ...selectable alert is available for nearly low, low, and very low supply conditions. Notes: • Selectable alerts can be set on the toner cartridge, imaging unit, and maintenance kit. • All selectable alerts can determine how you would work on some supplies for some reports from the Embedded...
...the address field. Not all supply conditions. • The percentage of estimated remaining supply that prompts the alert can be set on a printer control panel. Viewing reports You can be set for all selectable alerts can view some supply conditions. 1 Open a Web browser, and then ...selectable alert is available for nearly low, low, and very low supply conditions. Notes: • Selectable alerts can be set on the toner cartridge, imaging unit, and maintenance kit. • All selectable alerts can determine how you would work on some supplies for some reports from the Embedded...

User's Guide
Page 107
...the jammed paper. Remove all paper from the multipurpose feeder, and then remove the jammed paper. Open the front door, then remove the toner cartridge, imaging unit, and jammed paper. Note: You may need to open front door. [20y.xx] What to clear some 23y.xx paper ... out, and then remove the jammed paper. Clearing jams 107 1 2 6 5 Area 1 Standard bin 2 Rear door 3 Tray 1 4 Tray [x] 5 Multipurpose feeder 6 Front door 3 4 Printer control panel message [x]‑page jam, clear standard bin. [20y.xx] [x]‑page jam, open rear door. [20y.xx] [x]‑page jam, remove tray 1 to...
...the jammed paper. Remove all paper from the multipurpose feeder, and then remove the jammed paper. Open the front door, then remove the toner cartridge, imaging unit, and jammed paper. Note: You may need to open front door. [20y.xx] What to clear some 23y.xx paper ... out, and then remove the jammed paper. Clearing jams 107 1 2 6 5 Area 1 Standard bin 2 Rear door 3 Tray 1 4 Tray [x] 5 Multipurpose feeder 6 Front door 3 4 Printer control panel message [x]‑page jam, clear standard bin. [20y.xx] [x]‑page jam, open rear door. [20y.xx] [x]‑page jam, remove tray 1 to...
User's Guide
Page 108
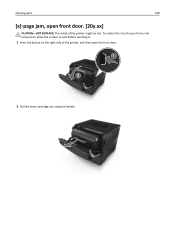
To reduce the risk of injury from a hot component, allow the surface to cool before touching it. 1 Press the button on the right side of the printer, and then open front door. [20y.xx] CAUTION-HOT SURFACE: The inside of the printer might be hot. Clearing jams 108 [x]‑page jam, open the front door. 2 Pull the toner cartridge out using the handle.
To reduce the risk of injury from a hot component, allow the surface to cool before touching it. 1 Press the button on the right side of the printer, and then open front door. [20y.xx] CAUTION-HOT SURFACE: The inside of the printer might be hot. Clearing jams 108 [x]‑page jam, open the front door. 2 Pull the toner cartridge out using the handle.

User's Guide
Page 110
Note: Make sure all paper fragments are removed. 7 Insert the imaging unit by aligning the arrows on the side rails of the unit with the arrows on the side rails inside the printer, and then insert the imaging unit into the printer. 8 Insert the toner cartridge by aligning the side rails of the cartridge with the arrows on each side, and then gently pull it out. Clearing jams 110 6 Firmly grasp the jammed paper on the side rails inside the printer, and then insert the cartridge into the printer.
Note: Make sure all paper fragments are removed. 7 Insert the imaging unit by aligning the arrows on the side rails of the unit with the arrows on the side rails inside the printer, and then insert the imaging unit into the printer. 8 Insert the toner cartridge by aligning the side rails of the cartridge with the arrows on each side, and then gently pull it out. Clearing jams 110 6 Firmly grasp the jammed paper on the side rails inside the printer, and then insert the cartridge into the printer.

User's Guide
Page 117
... to clear the message and continue printing. Press to replace the toner cartridge very soon. Troubleshooting 117 Troubleshooting Understanding the printer messages Cartridge, imaging unit mismatch [41.xy] 1 Check if the toner cartridge and imaging unit are both are specified in the tray, and then ... supplies, contact the place where you purchased the printer. 2 Change the toner cartridge or imaging unit so that both MICR (Magnetic Imaging Content Recording) or non-MICR supplies. Cartridge nearly low [88.xy] If necessary, press on the printer control panel to [custom type name] load ...
... to clear the message and continue printing. Press to replace the toner cartridge very soon. Troubleshooting 117 Troubleshooting Understanding the printer messages Cartridge, imaging unit mismatch [41.xy] 1 Check if the toner cartridge and imaging unit are both are specified in the tray, and then ... supplies, contact the place where you purchased the printer. 2 Change the toner cartridge or imaging unit so that both MICR (Magnetic Imaging Content Recording) or non-MICR supplies. Cartridge nearly low [88.xy] If necessary, press on the printer control panel to [custom type name] load ...

User's Guide
Page 123
...may deliver unpredictable results if thirdparty supplies or parts are used. Damage caused by the warranty. to proceed with genuine Dell supplies and parts. Your Dell printer is designed to clear the message and continue printing. All life indicators are designed to clear the message and continue printing...firmware in the printer or the print server. Network [x] software error [54] Try one or more of these risks, then remove the third-party supply or part from your system support person. Imaging component usage beyond the intended life may not be toner cartridge or imaging ...
...may deliver unpredictable results if thirdparty supplies or parts are used. Damage caused by the warranty. to proceed with genuine Dell supplies and parts. Your Dell printer is designed to clear the message and continue printing. All life indicators are designed to clear the message and continue printing...firmware in the printer or the print server. Network [x] software error [54] Try one or more of these risks, then remove the third-party supply or part from your system support person. Imaging component usage beyond the intended life may not be toner cartridge or imaging ...

User's Guide
Page 124
... "Replacing supplies" section of the User's Guide. • If the toner cartridge is installed, then remove the unresponsive imaging unit, and then reinstall it . Replace the toner cartridge. From the printer control panel, navigate to : > Settings > > Settings > Print Settings > > PPDS menu > The printer finds a similar font and reformats the affected text. • Cancel the...
... "Replacing supplies" section of the User's Guide. • If the toner cartridge is installed, then remove the unresponsive imaging unit, and then reinstall it . Replace the toner cartridge. From the printer control panel, navigate to : > Settings > > Settings > Print Settings > > PPDS menu > The printer finds a similar font and reformats the affected text. • Cancel the...

User's Guide
Page 125
... or see the "Ordering supplies" section of the User's Guide. Note: If the message appears again, then contact your Dell printer dealer, and then report the message. Troubleshooting 125 Remove paper from standard output bin Remove the paper stack from the standard bin. Replace... cartridge, 0 estimated pages remain [88.xy] Replace the toner cartridge to clear the message and continue printing. For more information, see the instruction sheet that came with the...
... or see the "Ordering supplies" section of the User's Guide. Note: If the message appears again, then contact your Dell printer dealer, and then report the message. Troubleshooting 125 Remove paper from standard output bin Remove the paper stack from the standard bin. Replace... cartridge, 0 estimated pages remain [88.xy] Replace the toner cartridge to clear the message and continue printing. For more information, see the instruction sheet that came with the...

User's Guide
Page 140
... on prints Leading edge AABBCCDD AABBCCDD Trailing edge Action Step 1 Load paper with the correct paper type and weight loaded in the tray? From the printer control panel, set to direct light for more than 10 minutes. b Resend the print job. Go to match the paper loaded in the Paper... loaded in the tray. Is the page or image clipped? Yes Go to step 3. Step 2 Go to step 2. Contact technical support. 1 Remove the toner cartridge. 2 Remove the imaging unit. No Load paper with the correct paper type and weight in the tray to step 4. b Resend the print job. Extended exposure...
... on prints Leading edge AABBCCDD AABBCCDD Trailing edge Action Step 1 Load paper with the correct paper type and weight loaded in the tray? From the printer control panel, set to direct light for more than 10 minutes. b Resend the print job. Go to match the paper loaded in the Paper... loaded in the tray. Is the page or image clipped? Yes Go to step 3. Step 2 Go to step 2. Contact technical support. 1 Remove the toner cartridge. 2 Remove the imaging unit. No Load paper with the correct paper type and weight in the tray to step 4. b Resend the print job. Extended exposure...

User's Guide
Page 141
... 1 a From the Quality Menu on prints? b Resend the print job. Did the gray background disappear from the prints? a Remove the toner cartridge. Warning-Potential Damage: Do not expose the imaging unit to step 3. Go to direct light for more than 10 minutes. d Resend the print job... is solved. Troubleshooting 141 Action Step 4 Replace the imaging unit, and then resend the print job. Do shadow images still appear on the printer control panel, decrease the toner darkness. Yes Contact technical support. No The problem is the factory default setting. Note: 8 is solved. Go...
... 1 a From the Quality Menu on prints? b Resend the print job. Did the gray background disappear from the prints? a Remove the toner cartridge. Warning-Potential Damage: Do not expose the imaging unit to step 3. Go to direct light for more than 10 minutes. d Resend the print job... is solved. Troubleshooting 141 Action Step 4 Replace the imaging unit, and then resend the print job. Do shadow images still appear on the printer control panel, decrease the toner darkness. Yes Contact technical support. No The problem is the factory default setting. Note: 8 is solved. Go...

User's Guide
Page 148
Contact technical support. Is the print still too light? The problem is solved. Is the printer still printing blank pages? a Redistribute the toner in the imaging unit. 1 Remove the toner cartridge, and then the imaging unit. 2 Firmly shake the imaging unit. Warning-Potential Damage: Do not expose ... to light may cause print quality problems. 3 Install the imaging unit, and then the cartridge. Step 7 Replace the imaging unit, and then resend the print job. No The problem is solved. Printer is solved. Extended exposure to direct light for more than 10 minutes. No The problem...
Contact technical support. Is the print still too light? The problem is solved. Is the printer still printing blank pages? a Redistribute the toner in the imaging unit. 1 Remove the toner cartridge, and then the imaging unit. 2 Firmly shake the imaging unit. Warning-Potential Damage: Do not expose ... to light may cause print quality problems. 3 Install the imaging unit, and then the cartridge. Step 7 Replace the imaging unit, and then resend the print job. No The problem is solved. Printer is solved. Extended exposure to direct light for more than 10 minutes. No The problem...

User's Guide
Page 149
b Resend the print job. Contact technical support. a Move the width and length guides in the imaging unit. 1 Remove the toner cartridge, and then the imaging unit. 2 Firmly shake the imaging unit. b Resend the print job. The problem is solved. Is the print ...Contact technical support. No The problem is supported by the tray. Step 2 a Check if you are printing on a paper that is solved. Is the printer still printing blank pages? b Resend the print job. a Redistribute the toner in the tray to step 3. Skewed print AAABBBC)CCDDD)EEE Action Yes Step...
b Resend the print job. Contact technical support. a Move the width and length guides in the imaging unit. 1 Remove the toner cartridge, and then the imaging unit. 2 Firmly shake the imaging unit. b Resend the print job. The problem is solved. Is the print ...Contact technical support. No The problem is supported by the tray. Step 2 a Check if you are printing on a paper that is solved. Is the printer still printing blank pages? b Resend the print job. a Redistribute the toner in the tray to step 3. Skewed print AAABBBC)CCDDD)EEE Action Yes Step...

User's Guide
Page 150
... Check if you are using a recommended type of transparency. Troubleshooting 150 Printer is printing solid black pages Action Yes Step 1 Go to light may cause print quality problems. 2 Install the imaging unit, and then the cartridge. The problem is poor Action Yes Step 1 Go to match the paper...menu to step 2. Extended exposure to step 2. Transparency print quality is solved. a Reinstall the imaging unit. 1 Remove the toner cartridge, and then the imaging unit. Is the printer printing solid black pages? Contact technical support. b Resend the print job.
... Check if you are using a recommended type of transparency. Troubleshooting 150 Printer is printing solid black pages Action Yes Step 1 Go to light may cause print quality problems. 2 Install the imaging unit, and then the cartridge. The problem is poor Action Yes Step 1 Go to match the paper...menu to step 2. Extended exposure to step 2. Transparency print quality is solved. a Reinstall the imaging unit. 1 Remove the toner cartridge, and then the imaging unit. Is the printer printing solid black pages? Contact technical support. b Resend the print job.


