

Service Manual
Page 1
... All rights reserved. Trademarks used by Bluetooth SIG, Inc. disclaims any manner whatsoever without notice. © 2004-2005 Dell Inc. Reproduction in any proprietary interest in this document is strictly forbidden. Dell™ Latitude™ D610 Service Manual Before You Begin System Components Internal Card With Bluetooth® Wireless Technology Hard Drive Center...
... All rights reserved. Trademarks used by Bluetooth SIG, Inc. disclaims any manner whatsoever without notice. © 2004-2005 Dell Inc. Reproduction in any proprietary interest in this document is strictly forbidden. Dell™ Latitude™ D610 Service Manual Before You Begin System Components Internal Card With Bluetooth® Wireless Technology Hard Drive Center...
Service Manual
Page 2
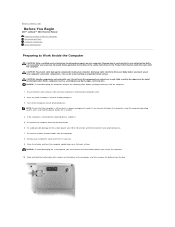
...and clean to prevent scratching the computer cover. 2. Hold a component such as a microprocessor by its pins. Ensure that is not authorized by Dell is connected to a docking device, undock it. 5. To avoid possible damage to the system board, wait 10 to 20 seconds and then ...system, press and hold the battery-bay latch release on the bottom of your computer. Back to Contents Page Before You Begin Dell™ Latitude™ D610 Service Manual Preparing to Work Inside the Computer Recommended Tools Computer Orientation Screw Identification Preparing to Work Inside the Computer ...
...and clean to prevent scratching the computer cover. 2. Hold a component such as a microprocessor by its pins. Ensure that is not authorized by Dell is connected to a docking device, undock it. 5. To avoid possible damage to the system board, wait 10 to 20 seconds and then ...system, press and hold the battery-bay latch release on the bottom of your computer. Back to Contents Page Before You Begin Dell™ Latitude™ D610 Service Manual Preparing to Work Inside the Computer Recommended Tools Computer Orientation Screw Identification Preparing to Work Inside the Computer ...
Service Manual
Page 5
... changes and reboot, and press to enter the system setup program. 4. Back to reset the computer defaults. 5. Press and to Contents Page Flashing the BIOS Dell™ Latitude™ D610 Service Manual 1. Back to boot and updates the new BIOS. The computer continues to Contents Page NOTE: If you use a BIOS update...
... changes and reboot, and press to enter the system setup program. 4. Back to reset the computer defaults. 5. Press and to Contents Page Flashing the BIOS Dell™ Latitude™ D610 Service Manual 1. Back to boot and updates the new BIOS. The computer continues to Contents Page NOTE: If you use a BIOS update...
Service Manual
Page 6
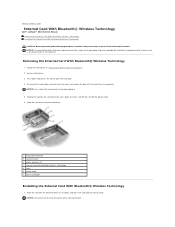
... knob 7 tab on the computer. Follow the instructions in your Product Information Guide. Back to Contents Page Internal Card With Bluetooth® Wireless Technology Dell™ Latitude™ D610 Service Manual Removing the Internal Card With Bluetooth® Wireless Technology Installing the Internal Card With Bluetooth® Wireless Technology CAUTION: Before performing...
... knob 7 tab on the computer. Follow the instructions in your Product Information Guide. Back to Contents Page Internal Card With Bluetooth® Wireless Technology Dell™ Latitude™ D610 Service Manual Removing the Internal Card With Bluetooth® Wireless Technology Installing the Internal Card With Bluetooth® Wireless Technology CAUTION: Before performing...
Service Manual
Page 8
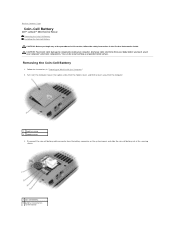
... captive screw from the modem cover, and lift the cover away from the battery connector on system board Back to Contents Page Coin-Cell Battery Dell™ Latitude™ D610 Service Manual Removing the Coin-Cell Battery Installing the Coin-Cell Battery CAUTION: Before you touch any of your body before you...
... captive screw from the modem cover, and lift the cover away from the battery connector on system board Back to Contents Page Coin-Cell Battery Dell™ Latitude™ D610 Service Manual Removing the Coin-Cell Battery Installing the Coin-Cell Battery CAUTION: Before you touch any of your body before you...
Service Manual
Page 10
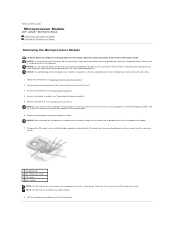
... screw 3 ZIF socket 4 pin-1 corner NOTE: The ZIF-socket cam screw secures the microprocessor to the system board. Back to Contents Page Microprocessor Module Dell™ Latitude™ D610 Service Manual Removing the Microprocessor Module Installing the Microprocessor Module Removing the Microprocessor Module CAUTION: Before you cannot turn the screw any of...
... screw 3 ZIF socket 4 pin-1 corner NOTE: The ZIF-socket cam screw secures the microprocessor to the system board. Back to Contents Page Microprocessor Module Dell™ Latitude™ D610 Service Manual Removing the Microprocessor Module Installing the Microprocessor Module Removing the Microprocessor Module CAUTION: Before you cannot turn the screw any of...
Service Manual
Page 12
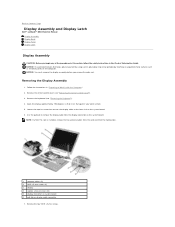
... cover (see "Removing the Keyboard"). 4. Removing the Display Assembly 1. Remove the four M2.5 x 5-mm screws. Back to Contents Page Display Assembly and Display Latch Dell™ Latitude™ D610 Service Manual Display Assembly Display Bezel Display Panel Display Latch Display Assembly CAUTION: Before you remove the palm rest. Remove the keyboard (see...
... cover (see "Removing the Keyboard"). 4. Removing the Display Assembly 1. Remove the four M2.5 x 5-mm screws. Back to Contents Page Display Assembly and Display Latch Dell™ Latitude™ D610 Service Manual Display Assembly Display Bezel Display Panel Display Latch Display Assembly CAUTION: Before you remove the palm rest. Remove the keyboard (see...
Service Manual
Page 18
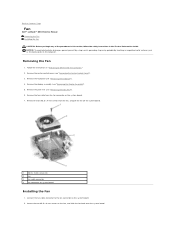
... display assembly (see "Removing the Palm Rest"). 6. Secure the two M2.5 x 8-mm screws on system board Installing the Fan 1. Back to Contents Page Fan Dell™ Latitude™ D610 Service Manual Removing the Fan Installing the Fan CAUTION: Before you begin any of the procedures in this section, follow the safety instructions...
... display assembly (see "Removing the Palm Rest"). 6. Secure the two M2.5 x 8-mm screws on system board Installing the Fan 1. Back to Contents Page Fan Dell™ Latitude™ D610 Service Manual Removing the Fan Installing the Fan CAUTION: Before you begin any of the procedures in this section, follow the safety instructions...
Service Manual
Page 20
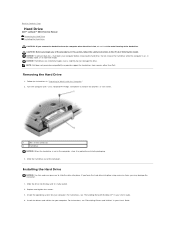
...and tighten the screws. 3. For instructions, see "Reinstalling Microsoft Windows XP" in your User's Guide. Back to Contents Page Hard Drive Dell™ Latitude™ D610 Service Manual Removing the Hard Drive Installing the Hard Drive CAUTION: If you remove the hard drive from sources other than... Dell. NOTICE: To prevent data loss, shut down your computer. even a slight bump can damage the drive. Use a standard #1 Phillips screwdriver ...
...and tighten the screws. 3. For instructions, see "Reinstalling Microsoft Windows XP" in your User's Guide. Back to Contents Page Hard Drive Dell™ Latitude™ D610 Service Manual Removing the Hard Drive Installing the Hard Drive CAUTION: If you remove the hard drive from sources other than... Dell. NOTICE: To prevent data loss, shut down your computer. even a slight bump can damage the drive. Use a standard #1 Phillips screwdriver ...
Service Manual
Page 22
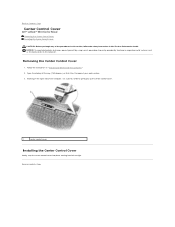
.... 1 center control cover Installing the Center Control Cover Gently snap the center control cover into place starting from left to Contents Page Center Control Cover Dell™ Latitude™ D610 Service Manual Removing the Center Control Cover Installing the Center Control Cover CAUTION: Before you begin any of the procedures in this...
.... 1 center control cover Installing the Center Control Cover Gently snap the center control cover into place starting from left to Contents Page Center Control Cover Dell™ Latitude™ D610 Service Manual Removing the Center Control Cover Installing the Center Control Cover CAUTION: Before you begin any of the procedures in this...
Service Manual
Page 23
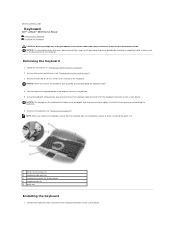
... keyboard tabs are fragile, easily dislodged, and time-consuming to replace. Be careful when removing and handling the keyboard. 6. Back to Contents Page Keyboard Dell™ Latitude™ D610 Service Manual Removing the Keyboard Installing the Keyboard CAUTION: Before you begin any of the keyboard. NOTICE: To avoid electrostatic discharge, ground yourself...
... keyboard tabs are fragile, easily dislodged, and time-consuming to replace. Be careful when removing and handling the keyboard. 6. Back to Contents Page Keyboard Dell™ Latitude™ D610 Service Manual Removing the Keyboard Installing the Keyboard CAUTION: Before you begin any of the keyboard. NOTICE: To avoid electrostatic discharge, ground yourself...
Service Manual
Page 25
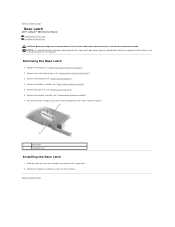
... by periodically touching an unpainted metal surface (such as the back panel) on the computer. Follow the instructions in "Preparing to Contents Page Base Latch Dell™ Latitude™ D610 Service Manual Removing the Base Latch Installing the Base Latch CAUTION: Before you begin any of the system base. 2. Remove the display...
... by periodically touching an unpainted metal surface (such as the back panel) on the computer. Follow the instructions in "Preparing to Contents Page Base Latch Dell™ Latitude™ D610 Service Manual Removing the Base Latch Installing the Base Latch CAUTION: Before you begin any of the system base. 2. Remove the display...
Service Manual
Page 26
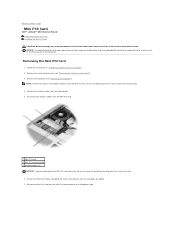
Back to Contents Page Mini PCI Card Dell™ Latitude™ D610 Service Manual Removing the Mini PCI Card Installing the Mini PCI Card CAUTION: Before you are replacing a Mini PCI card, remove the existing ...
Back to Contents Page Mini PCI Card Dell™ Latitude™ D610 Service Manual Removing the Mini PCI Card Installing the Mini PCI Card CAUTION: Before you are replacing a Mini PCI card, remove the existing ...
Service Manual
Page 29
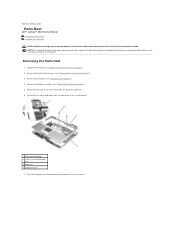
... screws from the connector on the computer. Turn the computer over and remove the thirteen M2.5 x 8-mm screws. Back to Contents Page Palm Rest Dell™ Latitude™ D610 Service Manual Removing the Palm Rest Installing the Palm Rest CAUTION: Before you begin any of the procedures in this section, follow the...
... screws from the connector on the computer. Turn the computer over and remove the thirteen M2.5 x 8-mm screws. Back to Contents Page Palm Rest Dell™ Latitude™ D610 Service Manual Removing the Palm Rest Installing the Palm Rest CAUTION: Before you begin any of the procedures in this section, follow the...
Service Manual
Page 33
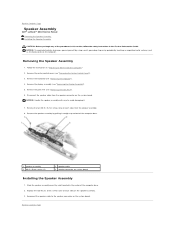
... Computer." 2. Follow the instructions in the Product Information Guide. Remove the display assembly (see "Removing the Palm Rest"). 6. Back to Contents Page Speaker Assembly Dell™ Latitude™ D610 Service Manual Removing the Speaker Assembly Installing the Speaker Assembly CAUTION: Before you begin any of the computer base. 2. Back to Contents Page...
... Computer." 2. Follow the instructions in the Product Information Guide. Remove the display assembly (see "Removing the Palm Rest"). 6. Back to Contents Page Speaker Assembly Dell™ Latitude™ D610 Service Manual Removing the Speaker Assembly Installing the Speaker Assembly CAUTION: Before you begin any of the computer base. 2. Back to Contents Page...
Service Manual
Page 35
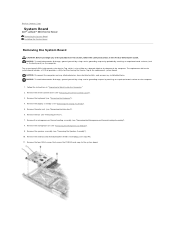
... the fan (see step #4). 11. Remove the internal card with Bluetooth® wireless technology (see "Removing the Fan"). 7. Back to Contents Page System Board Dell™ Latitude™ D610 Service Manual Removing the System Board Installing the System Board Removing the System Board CAUTION: Before you begin any installed batteries. The system...
... the fan (see step #4). 11. Remove the internal card with Bluetooth® wireless technology (see "Removing the Fan"). 7. Back to Contents Page System Board Dell™ Latitude™ D610 Service Manual Removing the System Board Installing the System Board Removing the System Board CAUTION: Before you begin any installed batteries. The system...
Service Manual
Page 38
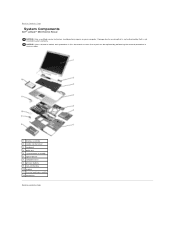
... 8 primary battery 9 coin-cell battery 10 modem 11 thermal cooling assembly 12 hard drive Back to servicing that is not authorized by Dell is not covered by your computer. Back to Contents Page System Components Dell™ Latitude™ D610 Service Manual NOTICE: Only a certified service technician should perform repairs on your warranty.
... 8 primary battery 9 coin-cell battery 10 modem 11 thermal cooling assembly 12 hard drive Back to servicing that is not authorized by Dell is not covered by your computer. Back to Contents Page System Components Dell™ Latitude™ D610 Service Manual NOTICE: Only a certified service technician should perform repairs on your warranty.

Service Manual
Page 39
.... Remove the display assembly (see "Removing the Keyboard"). 4. Remove the keyboard (see "Removing the Display Assembly"). 5. Back to Contents Page Microprocessor Thermal-Cooling Assembly Dell™ Latitude™ D610 Service Manual Removing the Microprocessor Thermal-Cooling Assembly Installing the Microprocessor Thermal-Cooling Assembly Removing the Microprocessor Thermal-Cooling Assembly CAUTION: Before you...
.... Remove the display assembly (see "Removing the Keyboard"). 4. Remove the keyboard (see "Removing the Display Assembly"). 5. Back to Contents Page Microprocessor Thermal-Cooling Assembly Dell™ Latitude™ D610 Service Manual Removing the Microprocessor Thermal-Cooling Assembly Installing the Microprocessor Thermal-Cooling Assembly Removing the Microprocessor Thermal-Cooling Assembly CAUTION: Before you...

Service Manual
Page 41
... property damage, personal injury, or death. Reproduction in any proprietary interest in this text: Dell, the DELL logo, and Latitude are trademarks of Dell Inc. Information in trademarks and trade names other than its own. Dell Inc. Back to Contents Page Dell™ Latitude™ D610 Service Manual NOTE: A NOTE indicates important information that helps you how...
... property damage, personal injury, or death. Reproduction in any proprietary interest in this text: Dell, the DELL logo, and Latitude are trademarks of Dell Inc. Information in trademarks and trade names other than its own. Dell Inc. Back to Contents Page Dell™ Latitude™ D610 Service Manual NOTE: A NOTE indicates important information that helps you how...

Service Manual
Page 42
... NOTE: If you are covered under your computer warranty. CAUTION: To prevent static damage to components inside your computer, discharge static electricity from Dell are replacing a memory module, remove the existing module. 4. Remove the center control cover (see "Removing the Keyboard"). 1 memory module (... Use your fingertips to Work Inside the Computer." 2. Back to Contents Page Memory Module, Modem, and Devices Dell™ Latitude™ D610 Service Manual Memory Module Modem Devices Memory Module CAUTION: Before you begin any of your computer's electronic components.
... NOTE: If you are covered under your computer warranty. CAUTION: To prevent static damage to components inside your computer, discharge static electricity from Dell are replacing a memory module, remove the existing module. 4. Remove the center control cover (see "Removing the Keyboard"). 1 memory module (... Use your fingertips to Work Inside the Computer." 2. Back to Contents Page Memory Module, Modem, and Devices Dell™ Latitude™ D610 Service Manual Memory Module Modem Devices Memory Module CAUTION: Before you begin any of your computer's electronic components.


