
User's Guide
Page 5
... Checking the status of supplies from a network computer 126 Ordering supplies...126 Printer attached to a network ...126 Printer attached locally to a computer ...127 Replacing supplies...127 Replacing the toner cartridge ...127 Replacing the photoconductor kit ...129 Moving the printer...132 Moving the printer to another location...132 Administrative support 133 Using the Embedded Web Server...
... Checking the status of supplies from a network computer 126 Ordering supplies...126 Printer attached to a network ...126 Printer attached locally to a computer ...127 Replacing supplies...127 Replacing the toner cartridge ...127 Replacing the photoconductor kit ...129 Moving the printer...132 Moving the printer to another location...132 Administrative support 133 Using the Embedded Web Server...
User's Guide
Page 12
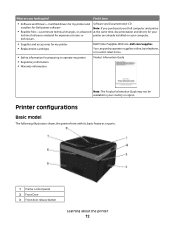
... model The following illustration shows the printer front with its basic features or parts: 1 Printer control panel 2 Front Door 3 Front door release button Learning about the printer 12 technicians • Supplies and accessories for my printer • Replacement cartridges Dell Printer Supplies Web site-dell.com/supplies You can purchase printer supplies online, by telephone, or in select retail...
... model The following illustration shows the printer front with its basic features or parts: 1 Printer control panel 2 Front Door 3 Front door release button Learning about the printer 12 technicians • Supplies and accessories for my printer • Replacement cartridges Dell Printer Supplies Web site-dell.com/supplies You can purchase printer supplies online, by telephone, or in select retail...
User's Guide
Page 53
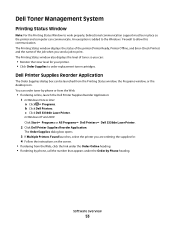
c Click Dell 3330dn Laser Printer. The Order Supplies dialog box opens. 3 If Multiple Printers Found launches, select the printer you are ordering the supplies for your printer. • Click Order Supplies to order replacement toner cartridges. In Windows XP and 2000: Click Start Programs or All Programs Dell Printers Dell 3330dn Laser Printer. 2 Click Dell Printer Supplies Reorder Application. An exception is added to...
c Click Dell 3330dn Laser Printer. The Order Supplies dialog box opens. 3 If Multiple Printers Found launches, select the printer you are ordering the supplies for your printer. • Click Order Supplies to order replacement toner cartridges. In Windows XP and 2000: Click Start Programs or All Programs Dell Printers Dell 3330dn Laser Printer. 2 Click Dell Printer Supplies Reorder Application. An exception is added to...
User's Guide
Page 57
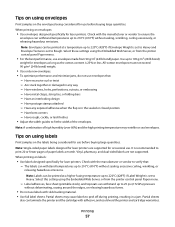
... of paper labels a month. When printing on the labels being considered for occasional use labels with adhesive, and could void the printer and cartridge warranties. Note: Labels can withstand temperatures up to 210°C (410°F) without sealing, excessive curling, wrinkling, or releasing ... from 90 g/m2 (24 lb bond) paper. Tips on using labels Print samples on labels: • Use labels designed specifically for laser printers. Vinyl, pharmacy, and dual-sided labels are supported for use envelopes that : - The labels can be printed at a higher fusing ...
... of paper labels a month. When printing on the labels being considered for occasional use labels with adhesive, and could void the printer and cartridge warranties. Note: Labels can withstand temperatures up to 210°C (410°F) without sealing, excessive curling, wrinkling, or releasing ... from 90 g/m2 (24 lb bond) paper. Tips on using labels Print samples on labels: • Use labels designed specifically for laser printers. Vinyl, pharmacy, and dual-sided labels are supported for use envelopes that : - The labels can be printed at a higher fusing ...
User's Guide
Page 64
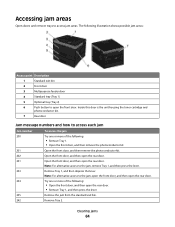
...: For alternative access to the jam, open the front door, and then open the front door. Inside this door is the unit housing the toner cartridge and photoconductor kit. 7 Rear door Jam message numbers and how to open the rear door. Try one or more of the following illustration shows possible...
...: For alternative access to the jam, open the front door, and then open the front door. Inside this door is the unit housing the toner cartridge and photoconductor kit. 7 Rear door Jam message numbers and how to open the rear door. Try one or more of the following illustration shows possible...
User's Guide
Page 65
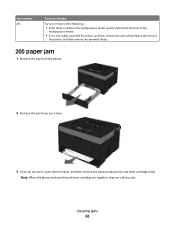
Note: When the photoconductor kit and toner cartridge are together, they are called a unit. Jam number 251 To access the jam Try one or more of the following: • If the sheet is visible in the multipurpose feeder, gently pull it from the front of the printer, and then remove any jammed sheets.... 200 paper jam 1 Remove the tray from the printer. 2 Remove the jam if you see it here. 3 If you do not see it is not visible, open the front door, and then remove the photoconductor kit and toner cartridge (unit). Lift the flap at the front of the multipurpose feeder...
Note: When the photoconductor kit and toner cartridge are together, they are called a unit. Jam number 251 To access the jam Try one or more of the following: • If the sheet is visible in the multipurpose feeder, gently pull it from the front of the printer, and then remove any jammed sheets.... 200 paper jam 1 Remove the tray from the printer. 2 Remove the jam if you see it here. 3 If you do not see it is not visible, open the front door, and then remove the photoconductor kit and toner cartridge (unit). Lift the flap at the front of the multipurpose feeder...
User's Guide
Page 99
... each paper source (tray or feeder) in the Univeral Setup menu and the default size value for Cartridge Alarm. Cartridge low appears on the display. Sets the amount of time in seconds the printer waits before it goes into a reduced power state Notes: • 30 minutes is the factory default... a Ready state Note: 30 seconds is low appears on the display. • Single sounds three quick beeps. 88 Cartridge is the factory default setting. Instructs the printer to produce as little noise as possible. Menu item Quiet Mode Off On Run Initial setup Yes No Paper Sizes US Metric...
... each paper source (tray or feeder) in the Univeral Setup menu and the default size value for Cartridge Alarm. Cartridge low appears on the display. Sets the amount of time in seconds the printer waits before it goes into a reduced power state Notes: • 30 minutes is the factory default... a Ready state Note: 30 seconds is low appears on the display. • Single sounds three quick beeps. 88 Cartridge is the factory default setting. Instructs the printer to produce as little noise as possible. Menu item Quiet Mode Off On Run Initial setup Yes No Paper Sizes US Metric...
User's Guide
Page 111
.... Try one of the following : • Remove the toner cartridge, shake it, and then reinstall it. Understanding printer messages 111 Press to clear. Press to clear the message and continue printing. • Remove the toner cartridge, and then install a new one . Press to clear. Cancel... install a new one . Calibrating Wait for the message to clear. Understanding printer messages When Manual Feeder appears on toner. Canceling Wait for the message to clear. Cartridge Nearly Low The toner cartridge low alarm is activated and the toner is low on the display, it ...
.... Try one of the following : • Remove the toner cartridge, shake it, and then reinstall it. Understanding printer messages 111 Press to clear. Press to clear the message and continue printing. • Remove the toner cartridge, and then install a new one . Press to clear. Cancel... install a new one . Calibrating Wait for the message to clear. Understanding printer messages When Manual Feeder appears on toner. Canceling Wait for the message to clear. Cartridge Nearly Low The toner cartridge low alarm is activated and the toner is low on the display, it ...

User's Guide
Page 112
...toner cartridge, and then install a new one. 2 Press to print on the display. Note: While the menus are disabled, printer settings cannot be changed . • Press the down arrow button until Use Current appears, and then press the down arrow button to clear the message. Understanding printer ...message to clear. Deletion complete Wait for the message to clear. Warning-Potential Damage: Do not turn the printer off while this message appears on the paper currently in the printer. • Cancel the current print job. • For more information, select Show Me. Deletion failed ...
...toner cartridge, and then install a new one. 2 Press to print on the display. Note: While the menus are disabled, printer settings cannot be changed . • Press the down arrow button until Use Current appears, and then press the down arrow button to clear the message. Understanding printer ...message to clear. Deletion complete Wait for the message to clear. Warning-Potential Damage: Do not turn the printer off while this message appears on the paper currently in the printer. • Cancel the current print job. • For more information, select Show Me. Deletion failed ...
User's Guide
Page 115
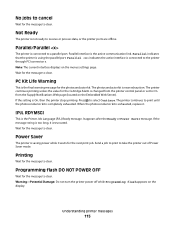
...Wait for the photoconductor kit. Warning-Potential Damage: Do not turn the printer power off while Programming flash appears on the menus settings page. No jobs to cancel Wait for the Cartridge Alarm is changed from the printer control panel or set to On from the Supply Notifications Web page (...located on the Embedded Web Server). The printer continues printing unless the value for the message to clear. The...
...Wait for the photoconductor kit. Warning-Potential Damage: Do not turn the printer power off while Programming flash appears on the menus settings page. No jobs to cancel Wait for the Cartridge Alarm is changed from the printer control panel or set to On from the Supply Notifications Web page (...located on the Embedded Web Server). The printer continues printing unless the value for the message to clear. The...
User's Guide
Page 116
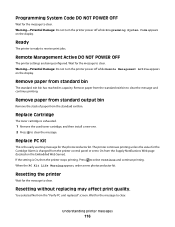
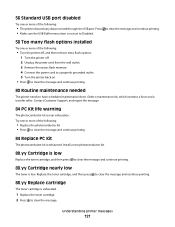
...the setting is ready to receive print jobs. Understanding printer messages 116 Ready The printer is On, then the printer stops printing. Replace Cartridge The toner cartridge is the early warning message for the Cartridge Alarm is changed from the printer control panel or set to On from the standard ... appears, order a new photoconductor kit. Wait for the message to clear. Resetting the printer Wait for the message to clear. Replace PC Kit This is exhausted. 1 Remove the used toner cartridge, and then install a new one. 2 Press to clear the message. Warning-Potential Damage...
...the setting is ready to receive print jobs. Understanding printer messages 116 Ready The printer is On, then the printer stops printing. Replace Cartridge The toner cartridge is the early warning message for the Cartridge Alarm is changed from the printer control panel or set to On from the standard ... appears, order a new photoconductor kit. Wait for the message to clear. Resetting the printer Wait for the message to clear. Replace PC Kit This is exhausted. 1 Remove the used toner cartridge, and then install a new one. 2 Press to clear the message. Warning-Potential Damage...
User's Guide
Page 118
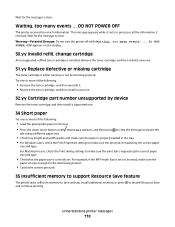
... then install a new one or more of the following: • Remove the toner cartridge, and then reinstall it received. Install additional memory, or press to clear. Understanding printer messages 118 Try one or more of the following: • Load the appropriate paper in the tray. • Press... ... Wait for the message to save settings. DO NOT POWER OFF appears on the display. 30.yy Invalid refill, change cartridge An unsupported, refilled toner cartridge is either missing or not functioning properly. For example, if the MP Feeder Size is set . This message appears while it...
... then install a new one or more of the following: • Remove the toner cartridge, and then reinstall it received. Install additional memory, or press to clear. Understanding printer messages 118 Try one or more of the following: • Load the appropriate paper in the tray. • Press... ... Wait for the message to save settings. DO NOT POWER OFF appears on the display. 30.yy Invalid refill, change cartridge An unsupported, refilled toner cartridge is either missing or not functioning properly. For example, if the MP Feeder Size is set . This message appears while it...
User's Guide
Page 119
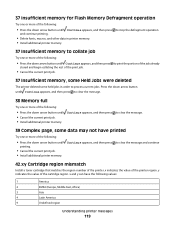
Continue appears, and then press to clear the message and continue 42.xy Cartridge region mismatch Install a toner cartridge that matches the region number of the printer region. x and y can have printed Try one or more of the following: • Press the down arrow button until &#...8226; Cancel the current print job. • Install additional printer memory. Continue appears, and then...
Continue appears, and then press to clear the message and continue 42.xy Cartridge region mismatch Install a toner cartridge that matches the region number of the printer region. x and y can have printed Try one or more of the following: • Press the down arrow button until &#...8226; Cancel the current print job. • Install additional printer memory. Continue appears, and then...
User's Guide
Page 121
... life warning The photoconductor kit is exhausted. Replace the toner cartridge, and then press to clear the message and continue printing. 88.yy Replace cartridge The toner cartridge is low. Understanding printer messages 121 Install a new photoconductor kit. 88.yy Cartridge is low Replace the toner cartridge, and then press to clear the message and continue...
... life warning The photoconductor kit is exhausted. Replace the toner cartridge, and then press to clear the message and continue printing. 88.yy Replace cartridge The toner cartridge is low. Understanding printer messages 121 Install a new photoconductor kit. 88.yy Cartridge is low Replace the toner cartridge, and then press to clear the message and continue...
User's Guide
Page 122
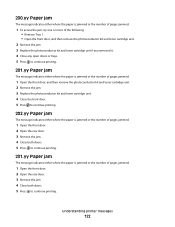
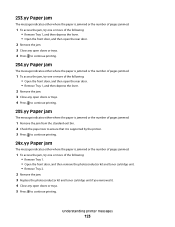
...Tray 1. • Open the front door, and then remove the photoconductor kit and toner cartridge unit. 2 Remove the jam. 3 Replace the photoconductor kit and toner cartridge unit if you removed it. 4 Close any open doors or trays. 5 Press to ... jammed. 1 Open the front door, and then remove the photoconductor kit and toner cartridge unit. 2 Remove the jam. 3 Replace the photoconductor kit and toner cartridge unit. 4 Close the front door. 5 Press to continue printing. 202.yy Paper... rear door. 3 Remove the jam. 4 Close both doors. 5 Press to continue printing. Understanding printer messages 122
...Tray 1. • Open the front door, and then remove the photoconductor kit and toner cartridge unit. 2 Remove the jam. 3 Replace the photoconductor kit and toner cartridge unit if you removed it. 4 Close any open doors or trays. 5 Press to ... jammed. 1 Open the front door, and then remove the photoconductor kit and toner cartridge unit. 2 Remove the jam. 3 Replace the photoconductor kit and toner cartridge unit. 4 Close the front door. 5 Press to continue printing. 202.yy Paper... rear door. 3 Remove the jam. 4 Close both doors. 5 Press to continue printing. Understanding printer messages 122
User's Guide
Page 123
... number of pages jammed. 1 Remove the jam from the standard exit bin. 2 Check the paper size to ensure that it is supported by the printer. 3 Press to continue printing. 24x.yy Paper jam The message indicates either where the paper is jammed or the number of pages jammed. 1 To... more of the following: • Remove Tray 1. • Open the front door, and then remove the photoconductor kit and toner cartridge unit. • Remove Tray 2. 2 Remove the jam. 3 Replace the photoconductor kit and toner cartridge unit if you removed it. 4 Close any open doors or trays. 5 Press to continue printing.
... number of pages jammed. 1 Remove the jam from the standard exit bin. 2 Check the paper size to ensure that it is supported by the printer. 3 Press to continue printing. 24x.yy Paper jam The message indicates either where the paper is jammed or the number of pages jammed. 1 To... more of the following: • Remove Tray 1. • Open the front door, and then remove the photoconductor kit and toner cartridge unit. • Remove Tray 2. 2 Remove the jam. 3 Replace the photoconductor kit and toner cartridge unit if you removed it. 4 Close any open doors or trays. 5 Press to continue printing.
User's Guide
Page 127
...; Programs or All Programs Dell Printers Dell 3330dn Laser Printer. 2 Click Dell Printer Supplies Reorder Application. To replace the toner cartridge: 1 Open the front door by printing a menu settings page. c Click Dell 3330dn Laser Printer. The Order Toner Cartridges window opens. 3 Choose your printer model from the list. 4 Enter your printer. 5 Click Visit Dell's cartridge ordering website. When shaking the cartridge no longer improves the print quality...
...; Programs or All Programs Dell Printers Dell 3330dn Laser Printer. 2 Click Dell Printer Supplies Reorder Application. To replace the toner cartridge: 1 Open the front door by printing a menu settings page. c Click Dell 3330dn Laser Printer. The Order Toner Cartridges window opens. 3 Choose your printer model from the list. 4 Enter your printer. 5 Click Visit Dell's cartridge ordering website. When shaking the cartridge no longer improves the print quality...
User's Guide
Page 128
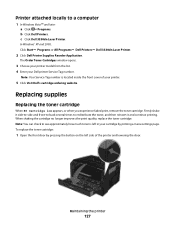
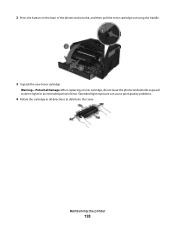
Maintaining the printer 128 Warning-Potential Damage: When replacing a toner cartridge, do not leave the photoconductor kit exposed to distribute the toner. Extended light exposure can cause print quality problems. 4 Rotate the cartridge in all directions to direct light for an extended period of the photoconductor kit, and then pull the toner cartridge out using the handle. 3 Unpack the new toner cartridge. 2 Press the button on the base of time.
Maintaining the printer 128 Warning-Potential Damage: When replacing a toner cartridge, do not leave the photoconductor kit exposed to distribute the toner. Extended light exposure can cause print quality problems. 4 Rotate the cartridge in all directions to direct light for an extended period of the photoconductor kit, and then pull the toner cartridge out using the handle. 3 Unpack the new toner cartridge. 2 Press the button on the base of time.
User's Guide
Page 129
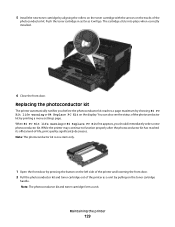
...function properly after the photoconductor kit has reached its official end-of the printer as it will go. 5 Install the new toner cartridge by printing a menu settings page. Note: The photoconductor kit and toner cartridge form a unit. The cartridge clicks into place when correctly installed. 6 Close the front door. Push...by showing 84 PC Kit life warning or 84 Replace PC Kit on the left side of the printer and lowering the front door. 2 Pull the photoconductor kit and toner cartridge out of -life, print quality significantly decreases. When 84 PC Kit life warning or 84 Replace PC...
...function properly after the photoconductor kit has reached its official end-of the printer as it will go. 5 Install the new toner cartridge by printing a menu settings page. Note: The photoconductor kit and toner cartridge form a unit. The cartridge clicks into place when correctly installed. 6 Close the front door. Push...by showing 84 PC Kit life warning or 84 Replace PC Kit on the left side of the printer and lowering the front door. 2 Pull the photoconductor kit and toner cartridge out of -life, print quality significantly decreases. When 84 PC Kit life warning or 84 Replace PC...
User's Guide
Page 130
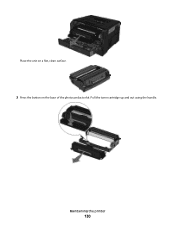
Pull the toner cartridge up and out using the handle. Place the unit on a flat, clean surface. 3 Press the button on the base of the photoconductor kit. Maintaining the printer 130
Pull the toner cartridge up and out using the handle. Place the unit on a flat, clean surface. 3 Press the button on the base of the photoconductor kit. Maintaining the printer 130


