User's Guide
Page 2
... optional drawer ...25 Attaching cables...26 Installing the printer on a wired network...27 Installing printer software...29 Verifying printer setup...30 Printing a menu settings page...30 Printing a network setup page ...30 Loading paper and specialty media 32 Setting the Paper Size and Paper Type...32 Configuring Universal paper settings...32 Loading trays...33 Using the multipurpose feeder...
... optional drawer ...25 Attaching cables...26 Installing the printer on a wired network...27 Installing printer software...29 Verifying printer setup...30 Printing a menu settings page...30 Printing a network setup page ...30 Loading paper and specialty media 32 Setting the Paper Size and Paper Type...32 Configuring Universal paper settings...32 Loading trays...33 Using the multipurpose feeder...
User's Guide
Page 3
... preprinted forms and letterhead...46 Using recycled paper and other office papers ...47 Storing paper...47 Supported paper sizes, types, weights, and capacities 48 Paper sizes supported by the printer ...48 Paper types and weights supported by the printer ...49 Paper capacities...50 Software overview 51 Status Monitor Center...51 Driver Profiler...51 Dell Printer Alert Utility...51 Installing the optional...
... preprinted forms and letterhead...46 Using recycled paper and other office papers ...47 Storing paper...47 Supported paper sizes, types, weights, and capacities 48 Paper sizes supported by the printer ...48 Paper types and weights supported by the printer ...49 Paper capacities...50 Software overview 51 Status Monitor Center...51 Driver Profiler...51 Dell Printer Alert Utility...51 Installing the optional...
User's Guide
Page 4
Accessing jam areas...64 200 paper jam...65 201 paper jam...66 202 paper jam...67 231 paper jam...69 233 paper jam...70 234 paper jam...70 235 paper jam...71 242 paper jam...71 251 paper jam...72 Understanding printer menus 74 Menus list...74 Paper menu...75 Default Source menu...75 Paper Size/Type menu ...75 Configure MP menu...78...
Accessing jam areas...64 200 paper jam...65 201 paper jam...66 202 paper jam...67 231 paper jam...69 233 paper jam...70 234 paper jam...70 235 paper jam...71 242 paper jam...71 251 paper jam...72 Understanding printer menus 74 Menus list...74 Paper menu...75 Default Source menu...75 Paper Size/Type menu ...75 Configure MP menu...78...
User's Guide
Page 6
... the factory default settings...136 Troubleshooting 137 Solving basic printer problems...137 Printer control panel display is blank or displays only diamonds ...it is installed 140 Drawers...141 Flash memory card...141 Memory card ...141 Solving paper feed problems...142 Paper frequently jams ...142 Paper jam message remains after jam is cleared ...142 Page that jammed does not reprint...jagged or uneven edges ...144 Clipped images...144 Gray background ...145 Ghost images...145 Incorrect margins...146 Paper curl...146 Print is too dark...147 Print is too light ...148 Skewed print...149 Toner fog...
... the factory default settings...136 Troubleshooting 137 Solving basic printer problems...137 Printer control panel display is blank or displays only diamonds ...it is installed 140 Drawers...141 Flash memory card...141 Memory card ...141 Solving paper feed problems...142 Paper frequently jams ...142 Paper jam message remains after jam is cleared ...142 Page that jammed does not reprint...jagged or uneven edges ...144 Clipped images...144 Gray background ...145 Ghost images...145 Incorrect margins...146 Paper curl...146 Print is too dark...147 Print is too light ...148 Skewed print...149 Toner fog...

User's Guide
Page 7
Solid black or white streaks appear on transparencies or paper 152 Embedded Web Server does not open...152 Check the network connections ...152 Check the network settings ...152 Appendix 153 Index 155 Contents 7
Solid black or white streaks appear on transparencies or paper 152 Embedded Web Server does not open...152 Check the network connections ...152 Check the network settings ...152 Appendix 153 Index 155 Contents 7
User's Guide
Page 9
...in hazardous radiation exposure. CAUTION-POTENTIAL INJURY: Do not twist, bind, crush, or place heavy objects on the sides of the printer near the product and easily accessible. Do not subject the power cord to the manufacturer's instructions and local regulations. Do not ...you are properly installed in their marked plug-in the user documentation, to cool before removing paper from the wall outlet before continuing. CAUTION-POTENTIAL INJURY: This product uses a laser. This product uses a printing process that all external connections (such as Ethernet and telephone ...
...in hazardous radiation exposure. CAUTION-POTENTIAL INJURY: Do not twist, bind, crush, or place heavy objects on the sides of the printer near the product and easily accessible. Do not subject the power cord to the manufacturer's instructions and local regulations. Do not ...you are properly installed in their marked plug-in the user documentation, to cool before removing paper from the wall outlet before continuing. CAUTION-POTENTIAL INJURY: This product uses a laser. This product uses a printing process that all external connections (such as Ethernet and telephone ...
User's Guide
Page 11
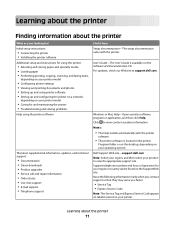
.... Dell Support Web site-support.dell.com Note: Select your region, and then select your printer model • Caring for and maintaining the printer • Troubleshooting and solving problems Help using printer software • Setting up and configuring the printer on... the printer • Installing the printer software Additional setup and instructions for using the printer: • Selecting and storing paper and specialty media • Loading paper • Performing printing, copying, scanning, and faxing tasks, depending on your printer model • Configuring printer settings ...
.... Dell Support Web site-support.dell.com Note: Select your region, and then select your printer model • Caring for and maintaining the printer • Troubleshooting and solving problems Help using printer software • Setting up and configuring the printer on... the printer • Installing the printer software Additional setup and instructions for using the printer: • Selecting and storing paper and specialty media • Loading paper • Performing printing, copying, scanning, and faxing tasks, depending on your printer model • Configuring printer settings ...
User's Guide
Page 13
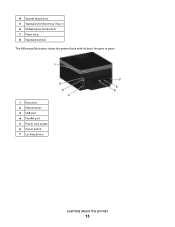
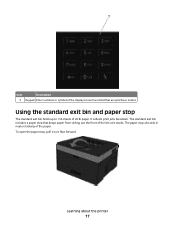
4 System board door 5 Standard 250-sheet tray (Tray 1) 6 Multipurpose feeder door 7 Paper stop 8 Standard exit bin The following illustration shows the printer back with its basic features or parts: 1 Rear door 2 Ethernet port 3 USB port 4 Parallel port 5 Power cord socket 6 Power switch 7 Locking device Learning about the printer 13
4 System board door 5 Standard 250-sheet tray (Tray 1) 6 Multipurpose feeder door 7 Paper stop 8 Standard exit bin The following illustration shows the printer back with its basic features or parts: 1 Rear door 2 Ethernet port 3 USB port 4 Parallel port 5 Power cord socket 6 Power switch 7 Locking device Learning about the printer 13
User's Guide
Page 17
Item Description 1 Keypad Enter numbers or symbols if the display screen has a field that keeps paper from sliding out the front of the paper. The paper stop that accepts these entries. The standard exit bin includes a paper stop also aids in neater stacking of the bin as it flips forward. Learning about the printer 17 Using the standard exit bin and paper stop , pull it so it stacks. To open the paper stop The standard exit bin holds up to 150 sheets of 20 lb paper. It collects print jobs facedown.
Item Description 1 Keypad Enter numbers or symbols if the display screen has a field that keeps paper from sliding out the front of the paper. The paper stop that accepts these entries. The standard exit bin includes a paper stop also aids in neater stacking of the bin as it flips forward. Learning about the printer 17 Using the standard exit bin and paper stop , pull it so it stacks. To open the paper stop The standard exit bin holds up to 150 sheets of 20 lb paper. It collects print jobs facedown.

User's Guide
Page 18
Doing so may cause creases in the transparencies. • When moving the printer to another location, make sure the paper stop in the open position if you are printing on transparencies. Learning about the printer 18 Notes: • Do not leave the paper stop is closed.
Doing so may cause creases in the transparencies. • When moving the printer to another location, make sure the paper stop in the open position if you are printing on transparencies. Learning about the printer 18 Notes: • Do not leave the paper stop is closed.

User's Guide
Page 32
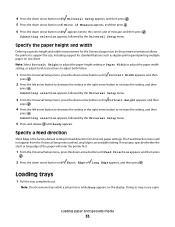
...to change the Paper Size setting. 1 Make sure the printer is on and Ready appears. 2 From the printer control panel, press . Loading paper and specialty media 32 Setting the Paper Size and Paper Type When the Paper Size and Paper Type settings are the same for your paper: • Units... 356 mm (8.5 x 14 in the printer menus. Paper Menu appears. 3 Press . Note: If you load a tray with paper that is the same size as the paper that are automatically linked. It also includes information about paper orientation, setting the Paper Size and Paper Type, and linking and unlinking trays. ...
...to change the Paper Size setting. 1 Make sure the printer is on and Ready appears. 2 From the printer control panel, press . Loading paper and specialty media 32 Setting the Paper Size and Paper Type When the Paper Size and Paper Type settings are the same for your paper: • Units... 356 mm (8.5 x 14 in the printer menus. Paper Menu appears. 3 Press . Note: If you load a tray with paper that is the same size as the paper that are automatically linked. It also includes information about paper orientation, setting the Paper Size and Paper Type, and linking and unlinking trays. ...
User's Guide
Page 33
... and printing multiple pages on the display. Note: Select Portrait Height to adjust the paper height setting or Paper Width to support the size, including support for the Universal paper size (in the portrait orientation) allows the printer to adjust the paper width setting, or adjust both follow. 1 From the Universal Setup menu, press the...
... and printing multiple pages on the display. Note: Select Portrait Height to adjust the paper height setting or Paper Width to support the size, including support for the Universal paper size (in the portrait orientation) allows the printer to adjust the paper width setting, or adjust both follow. 1 From the Universal Setup menu, press the...
User's Guide
Page 34
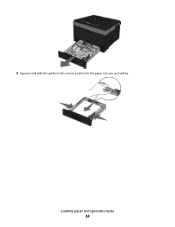
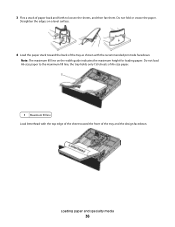
2 Squeeze and slide the guides to the correct position for the paper size you are loading. Loading paper and specialty media 34
2 Squeeze and slide the guides to the correct position for the paper size you are loading. Loading paper and specialty media 34
User's Guide
Page 35
... indicators on the A6 backstop which indicates the maximum height for your country or region. Loading paper and specialty media 35 Notice the maximum fill line on the bottom of A6-size paper. For long paper like A4 or legal, squeeze and slide the length guide backwards to accommodate the length of... paper you are loading. If you are loading A6-size paper: a Squeeze and slide the length guide toward the center of ...
... indicators on the A6 backstop which indicates the maximum height for your country or region. Loading paper and specialty media 35 Notice the maximum fill line on the bottom of A6-size paper. For long paper like A4 or legal, squeeze and slide the length guide backwards to accommodate the length of... paper you are loading. If you are loading A6-size paper: a Squeeze and slide the length guide toward the center of ...
User's Guide
Page 36
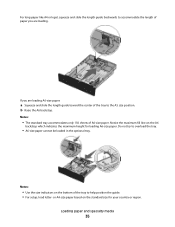
... and forth to the maximum fill line; Note: The maximum fill line on a level surface. 4 Load the paper stack toward the front of the tray as shown with the top edge of the sheet toward the back of the tray and the design ...facedown. the tray holds only 150 sheets of A6-size paper. 1 Maximum fill line Load letterhead with the recommended print side facedown. Loading paper and specialty media 36 Straighten the edges on the width guide indicates the maximum height for loading...
... and forth to the maximum fill line; Note: The maximum fill line on a level surface. 4 Load the paper stack toward the front of the tray as shown with the top edge of the sheet toward the back of the tray and the design ...facedown. the tray holds only 150 sheets of A6-size paper. 1 Maximum fill line Load letterhead with the recommended print side facedown. Loading paper and specialty media 36 Straighten the edges on the width guide indicates the maximum height for loading...
User's Guide
Page 37
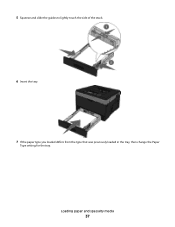
5 Squeeze and slide the guides to lightly touch the side of the stack. 6 Insert the tray. 7 If the paper type you loaded differs from the type that was previously loaded in the tray, then change the Paper Type setting for the tray. Loading paper and specialty media 37
5 Squeeze and slide the guides to lightly touch the side of the stack. 6 Insert the tray. 7 If the paper type you loaded differs from the type that was previously loaded in the tray, then change the Paper Type setting for the tray. Loading paper and specialty media 37
User's Guide
Page 38
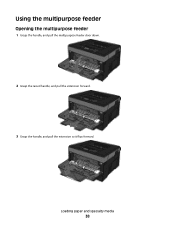
Loading paper and specialty media 38 Using the multipurpose feeder Opening the multipurpose feeder 1 Grasp the handle, and pull the multipurpose feeder door down. 2 Grasp the raised handle, and pull the extension forward. 3 Grasp the handle, and pull the extension so it flips forward.
Loading paper and specialty media 38 Using the multipurpose feeder Opening the multipurpose feeder 1 Grasp the handle, and pull the multipurpose feeder door down. 2 Grasp the raised handle, and pull the extension forward. 3 Grasp the handle, and pull the extension so it flips forward.
User's Guide
Page 39
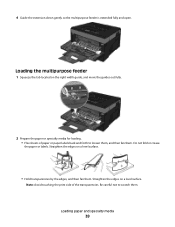
...and then fan them . Do not fold or crease the paper or labels. Note: Avoid touching the print side of paper or paper labels back and forth to scratch them . Straighten the edges on a level surface. Loading paper and specialty media 39 Loading the multipurpose feeder 1 Squeeze the ...tab located on the right width guide, and move the guides out fully. 2 Prepare the paper or specialty media for loading. • Flex sheets of the ...
...and then fan them . Do not fold or crease the paper or labels. Note: Avoid touching the print side of paper or paper labels back and forth to scratch them . Straighten the edges on a level surface. Loading paper and specialty media 39 Loading the multipurpose feeder 1 Squeeze the ...tab located on the right width guide, and move the guides out fully. 2 Prepare the paper or specialty media for loading. • Flex sheets of the ...
User's Guide
Page 40
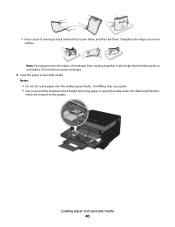
... them, and then fan them feed properly to avoid jams. Do not fold or crease envelopes. 3 Load the paper or specialty media. Notes: • Do not force any paper into the multipurpose feeder. Loading paper and specialty media 40 It also helps them . • Flex a stack of envelopes from sticking together. Straighten the...
... them, and then fan them feed properly to avoid jams. Do not fold or crease envelopes. 3 Load the paper or specialty media. Notes: • Do not force any paper into the multipurpose feeder. Loading paper and specialty media 40 It also helps them . • Flex a stack of envelopes from sticking together. Straighten the...

User's Guide
Page 41
... the recommended print side faceup and the top edge entering the printer first. These envelopes may severely damage the printer. Loading paper and specialty media 41 The stamp and address are shown to illustrate the proper orientation for loading envelopes. • Load paper, transparencies, and card stock with stamps, clasps, snaps, windows, coated linings...
... the recommended print side faceup and the top edge entering the printer first. These envelopes may severely damage the printer. Loading paper and specialty media 41 The stamp and address are shown to illustrate the proper orientation for loading envelopes. • Load paper, transparencies, and card stock with stamps, clasps, snaps, windows, coated linings...


