Setup and Quick Reference Guide
Page 31
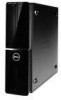
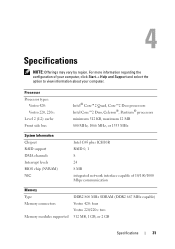
...: Vostro 220, 220s: Level 2 (L2) cache Front side bus Intel® Core™2 Quad, Core™2 Duo processors Intel Core™2 Duo, Celeron®, Pentium® processors minimum 512 KB, maximum 12 MB 800 MHz, 1066 MHz, or 1333 MHz System Information Chipset RAID support DMA channels Interrupt levels BIOS chip (NVRAM) NIC Intel... information regarding the configuration of 10/100/1000 Mbps communication Memory Type Memory connectors Memory modules supported DDR2 800 MHz SDRAM (DDR2 667 MHz capable) Vostro 420: four Vostro 220/220s: two 512 MB, 1 GB, or 2 GB Specifications 31
...: Vostro 220, 220s: Level 2 (L2) cache Front side bus Intel® Core™2 Quad, Core™2 Duo processors Intel Core™2 Duo, Celeron®, Pentium® processors minimum 512 KB, maximum 12 MB 800 MHz, 1066 MHz, or 1333 MHz System Information Chipset RAID support DMA channels Interrupt levels BIOS chip (NVRAM) NIC Intel... information regarding the configuration of 10/100/1000 Mbps communication Memory Type Memory connectors Memory modules supported DDR2 800 MHz SDRAM (DDR2 667 MHz capable) Vostro 420: four Vostro 220/220s: two 512 MB, 1 GB, or 2 GB Specifications 31
Setup and Quick Reference Guide
Page 40
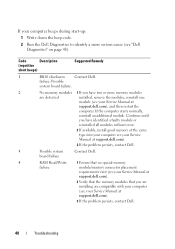
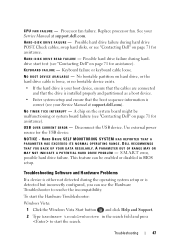
... to identify a more memory modules are compatible with your computer (see your Service Manual at support.dell.com), and then restart the computer. Code Description (repetitive short beeps) Suggested Remedy 1 BIOS checksum Contact Dell. failure. board failure 4 RAM Read/Write 1 Ensure that no special memory failure module/memory connector placement requirements exist (see your...
... to identify a more memory modules are compatible with your computer (see your Service Manual at support.dell.com), and then restart the computer. Code Description (repetitive short beeps) Suggested Remedy 1 BIOS checksum Contact Dell. failure. board failure 4 RAM Read/Write 1 Ensure that no special memory failure module/memory connector placement requirements exist (see your...
Setup and Quick Reference Guide
Page 41
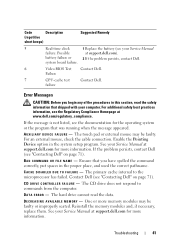
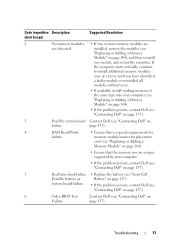
... the program that was running when the message appeared. Reinstall the memory modules and, if necessary, replace them. Possible at support.dell.com for more information. Failure 7 CPU-cache test Contact Dell. C A C H E D I S A B L E D D U E T O F A I L A B L E M E M O R Y - The primary cache internal to commands from the computer.... One or more memory modules may be faulty or improperly seated. Troubleshooting 41 system board failure. 6 Video BIOS Test Contact Dell. If the message is not listed, see "Contacting Dell" on page 71). C D D R I V E C O N T R O L L ...
... the program that was running when the message appeared. Reinstall the memory modules and, if necessary, replace them. Possible at support.dell.com for more information. Failure 7 CPU-cache test Contact Dell. C A C H E D I S A B L E D D U E T O F A I L A B L E M E M O R Y - The primary cache internal to commands from the computer.... One or more memory modules may be faulty or improperly seated. Troubleshooting 41 system board failure. 6 Video BIOS Test Contact Dell. If the message is not listed, see "Contacting Dell" on page 71). C D D R I V E C O N T R O L L ...
Setup and Quick Reference Guide
Page 47
...Vista Start button , and click Help and Support. 2 Type hardware troubleshooter in BIOS setup. Disconnect the USB device. No bootable partition on page 71 for assistance). DELL RECOMMENDS THAT YOU BACK UP YOUR DATA REGULARLY. N O T I M .... Possible hard drive failure during the operating system setup or is detected but incorrectly configured, you can be malfunctioning or system board failure (see "Contacting Dell" on page 71 for assistance). Possible hard drive failure during harddrive start the search. A PARAMETER OUT OF RANGE MAY OR M A Y N O T I N ...
...Vista Start button , and click Help and Support. 2 Type hardware troubleshooter in BIOS setup. Disconnect the USB device. No bootable partition on page 71 for assistance). DELL RECOMMENDS THAT YOU BACK UP YOUR DATA REGULARLY. N O T I M .... Possible hard drive failure during the operating system setup or is detected but incorrectly configured, you can be malfunctioning or system board failure (see "Contacting Dell" on page 71 for assistance). Possible hard drive failure during harddrive start the search. A PARAMETER OUT OF RANGE MAY OR M A Y N O T I N ...

Service Manual
Page 8
Clearing CMOS Settings 135 BIOS 136 Flashing the BIOS From the Hard Drive. . . . . . 136 17 Contacting Dell 137 8 Contents
Clearing CMOS Settings 135 BIOS 136 Flashing the BIOS From the Hard Drive. . . . . . 136 17 Contacting Dell 137 8 Contents

Service Manual
Page 10
.... (see "Replacing or Adding a Memory Module" on a power strip - Code (repetitive Description short beeps) Suggested Resolution 1 BIOS checksum Contact Dell (see "PCI and PCI Express Cards" on page 13). Possible system page 137). Ensure that the computer has encountered a possible... system board failure. If your location, if applicable. - Remove and then reinstall the memory modules (see "Dell Diagnostics" on page 59). • Eliminate interference. Too many devices on page 104). - Some possible causes of interference are: - ...
.... (see "Replacing or Adding a Memory Module" on a power strip - Code (repetitive Description short beeps) Suggested Resolution 1 BIOS checksum Contact Dell (see "PCI and PCI Express Cards" on page 13). Possible system page 137). Ensure that the computer has encountered a possible... system board failure. If your location, if applicable. - Remove and then reinstall the memory modules (see "Dell Diagnostics" on page 59). • Eliminate interference. Too many devices on page 104). - Some possible causes of interference are: - ...
Service Manual
Page 11
system board failure. • If the problem persists, contact Dell (see "Contacting Dell" on page 137). 6 Video BIOS Test Contact Dell (see "Contacting Dell" on page 104), and then reinstall one at a time) until you are detected. Code (repetitive Description short ... board Contact Dell (see "Contacting Dell" on failure. memory module/connector placement exist (see "Replacing or Adding a Memory Module" on page 117). If the computer starts normally, continue to install additional memory modules (one module and restart the computer. page 137). 4 RAM Read/Write ...
system board failure. • If the problem persists, contact Dell (see "Contacting Dell" on page 137). 6 Video BIOS Test Contact Dell (see "Contacting Dell" on page 104), and then reinstall one at a time) until you are detected. Code (repetitive Description short ... board Contact Dell (see "Contacting Dell" on failure. memory module/connector placement exist (see "Replacing or Adding a Memory Module" on page 117). If the computer starts normally, continue to install additional memory modules (one module and restart the computer. page 137). 4 RAM Read/Write ...

Service Manual
Page 12
... that was running when the message appeared. Possible system board failure or RTC battery low. Processor heat sink/fan failure. K E Y B O A R D F A I V E P R O B L E M . - DELL RECOMMENDS THAT YOU BACK UP YOUR DATA REGULARLY. A PARAMETER OUT OF RANGE MAY OR M A Y N O T I N D I C A T E A P O T E N T I A L H A R D... Program" on page 118). Possible hard drive failure during the operating system setup or is detected, but incorrectly configured, you received is not listed in BIOS setup. Windows® XP: 1 Click Start→ Help and Support. 12 Troubleshooting N O B O O T D E V I C ...
... that was running when the message appeared. Possible system board failure or RTC battery low. Processor heat sink/fan failure. K E Y B O A R D F A I V E P R O B L E M . - DELL RECOMMENDS THAT YOU BACK UP YOUR DATA REGULARLY. A PARAMETER OUT OF RANGE MAY OR M A Y N O T I N D I C A T E A P O T E N T I A L H A R D... Program" on page 118). Possible hard drive failure during the operating system setup or is detected, but incorrectly configured, you received is not listed in BIOS setup. Windows® XP: 1 Click Start→ Help and Support. 12 Troubleshooting N O B O O T D E V I C ...
Service Manual
Page 35
...computer, read the safety information that came with your warranty. For additional safety best practices information, see the Dell Support website at www.dell.com/regulatory_compliance. NOTE: The color of your computer and certain computer components may require the following safety guidelines ...tools: • Small flat-blade screwdriver • Phillips screwdriver • Small plastic scribe • Flash BIOS update (see the Regulatory Compliance Homepage at support.dell.com) Before Working on page 35. • You have read the safety information that is not authorized...
...computer, read the safety information that came with your warranty. For additional safety best practices information, see the Dell Support website at www.dell.com/regulatory_compliance. NOTE: The color of your computer and certain computer components may require the following safety guidelines ...tools: • Small flat-blade screwdriver • Phillips screwdriver • Small plastic scribe • Flash BIOS update (see the Regulatory Compliance Homepage at support.dell.com) Before Working on page 35. • You have read the safety information that is not authorized...
Service Manual
Page 131
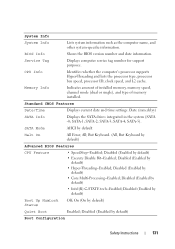
...; Disabled (Enabled by default) • Intel(R) C-STATE tech-Enabled; Standard CMOS Features Date/Time Displays current date and time settings. Disabled (Enabled by default) Advanced BIOS Features CPU Feature • SpeedStep-Enabled; SATA-5). But Keyboard. (All, But Keyboard by default) • Hyper-Threading-Enabled; On (On by default) Quiet Boot Enabled...
...; Disabled (Enabled by default) • Intel(R) C-STATE tech-Enabled; Standard CMOS Features Date/Time Displays current date and time settings. Disabled (Enabled by default) Advanced BIOS Features CPU Feature • SpeedStep-Enabled; SATA-5). But Keyboard. (All, But Keyboard by default) • Hyper-Threading-Enabled; On (On by default) Quiet Boot Enabled...
Service Manual
Page 133
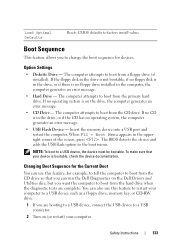
... when the diagnostic tests are booting to a USB device, connect the USB device to a USB connector. 2 Turn on (or restart) your computer. The BIOS detects the device and adds the USB flash option to factory install values. NOTE: To boot to a USB device such as a floppy drive, memory key... The computer attempts to change the boot sequence for the Current Boot You can also use this feature to restart your device is on the Dell Drivers and Utilities disc, but you to boot from the CD drive. Changing Boot Sequence for devices. The computer attempts to boot from the...
... when the diagnostic tests are booting to a USB device, connect the USB device to a USB connector. 2 Turn on (or restart) your computer. The BIOS detects the device and adds the USB flash option to factory install values. NOTE: To boot to a USB device such as a floppy drive, memory key... The computer attempts to change the boot sequence for the Current Boot You can also use this feature to restart your device is on the Dell Drivers and Utilities disc, but you to boot from the CD drive. Changing Boot Sequence for devices. The computer attempts to boot from the...
Service Manual
Page 136
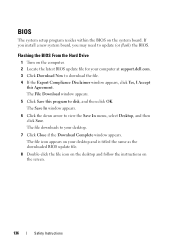
... Yes, I Accept this Agreement. The file icon appears on your computer at support.dell.com. 3 Click Download Now to disk, and then click OK. Flashing the BIOS From the Hard Drive 1 Turn on the computer. 2 Locate the latest BIOS update file for your desktop and is titled the same as the downloaded... BIOS update file. 8 Double-click the file icon on the desktop and follow the instructions on the system board. BIOS The system setup program resides within the BIOS on the screen. 136 Safety Instructions If you install a new system ...
... Yes, I Accept this Agreement. The file icon appears on your computer at support.dell.com. 3 Click Download Now to disk, and then click OK. Flashing the BIOS From the Hard Drive 1 Turn on the computer. 2 Locate the latest BIOS update file for your desktop and is titled the same as the downloaded... BIOS update file. 8 Double-click the file icon on the desktop and follow the instructions on the system board. BIOS The system setup program resides within the BIOS on the screen. 136 Safety Instructions If you install a new system ...


