User Manual
Page 18
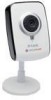
... this time in both the New Password and Reconfirm text boxes. 15 To change the password, check the Change checkbox, then enter the password you change your password at this information for the selected camera. This gives information about the Setup Wizard, such as version... the left: Wizard: Search: Link: About: Exit: This will refresh the list of the selected camera. This will guide you through initial network setup of cameras after rescanning for all available cameras connected to use in order to keep your camera's network setup. This closes the Setup Wizard...
... this time in both the New Password and Reconfirm text boxes. 15 To change the password, check the Change checkbox, then enter the password you change your password at this information for the selected camera. This gives information about the Setup Wizard, such as version... the left: Wizard: Search: Link: About: Exit: This will refresh the list of the selected camera. This will guide you through initial network setup of cameras after rescanning for all available cameras connected to use in order to keep your camera's network setup. This closes the Setup Wizard...
User Manual
Page 28
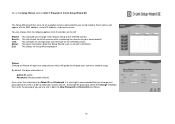
...save your changes, or click the Don't Save Settings button to , or select Auto. SETUP > Wireless (DCS-2121 only) To set for available wireless networks. Site survey: Clicking this button will be automatically filled in this setting will scan for you wish to ... whether your IP camera's wireless network interface settings, enable Wireless Settings in for your wireless network. After scanning, you will be automatically set up your wireless network uses TKIP or AES encryption. Key: If you use the dropdown box to select an available wireless network, and related information...
...save your changes, or click the Don't Save Settings button to , or select Auto. SETUP > Wireless (DCS-2121 only) To set for available wireless networks. Site survey: Clicking this button will be automatically filled in this setting will scan for you wish to ... whether your IP camera's wireless network interface settings, enable Wireless Settings in for your wireless network. After scanning, you will be automatically set up your wireless network uses TKIP or AES encryption. Key: If you use the dropdown box to select an available wireless network, and related information...
User Manual
Page 29
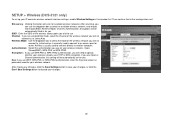
... the Don't Save Settings button to enable the DDNS function of keeping a domain name linked to use . Host Name: Type in the Host Name of the DDNS service you wish ...box to the right to select a DDNS service to use . With most Cable and DSL connections, you are assigned a dynamic IP address and that address is used only for the DDNS service you can set up your DDNS service and the DCS-2102.../2121 will automatically update your modem IP address periodically, Dynamic DNS (Domain Name Service), a method of the camera. User Name: Enter your User...
... the Don't Save Settings button to enable the DDNS function of keeping a domain name linked to use . Host Name: Type in the Host Name of the DDNS service you wish ...box to the right to select a DDNS service to use . With most Cable and DSL connections, you are assigned a dynamic IP address and that address is used only for the DDNS service you can set up your DDNS service and the DCS-2102.../2121 will automatically update your modem IP address periodically, Dynamic DNS (Domain Name Service), a method of the camera. User Name: Enter your User...
User Manual
Page 30
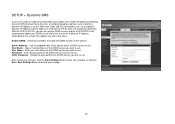
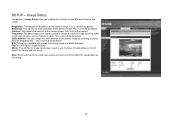
... mount the DCS-2102/2121 upside down on the left side of the screen and vice versa. Mirror: This will flip the image horizontally in Image Setup allow you choose to Auto by default. This is set to 60 by selecting a setting from the dropdown box. Frequency: This option adjusts the camera sensor's setting...
... mount the DCS-2102/2121 upside down on the left side of the screen and vice versa. Mirror: This will flip the image horizontally in Image Setup allow you choose to Auto by default. This is set to 60 by selecting a setting from the dropdown box. Frequency: This option adjusts the camera sensor's setting...
User Manual
Page 31
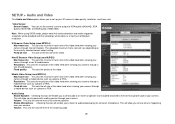
... maximum frame rate will be done at a maximum of the video feed when viewing your camera through Internet Explorer. Resolution: This sets the resolution of the video. Enable Microphone: Checking this box will enable you to send audio to an external speaker (not included) attached to VGA... This sets the maximum frame rate of your camera. Audio Setup Enable Speaker: Checking this box will set the bit rate of the video feed when viewing your camera through your camera. This will allow you to audio picked up your IP camera's video quality, resolution, and frame rate. SETUP...
... maximum frame rate will be done at a maximum of the video feed when viewing your camera through Internet Explorer. Resolution: This sets the resolution of the video. Enable Microphone: Checking this box will enable you to send audio to an external speaker (not included) attached to VGA... This sets the maximum frame rate of your camera. Audio Setup Enable Speaker: Checking this box will set the bit rate of the video feed when viewing your camera through your camera. This will allow you to audio picked up your IP camera's video quality, resolution, and frame rate. SETUP...
User Manual
Page 34
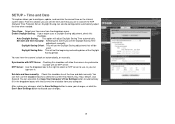
... the right to select an NTP server to use the dropdown boxes to automatically fill in and set automatically, or manually. Time Zone: Select your changes. 31 You can have the camera's clock set the NTP (Network Time Protocol) Server. Daylight Saving can set the beginning and ending dates of the ...you set the Daylight Saving Time adjustment manually: Daylight Saving Offset: This will set the Daylight Saving adjustment that you are in the dropdown boxes with NTP Server: Checking this checkbox will set the time zone that will adjust Daylight Saving Time automatically.
... the right to select an NTP server to use the dropdown boxes to automatically fill in and set automatically, or manually. Time Zone: Select your changes. 31 You can have the camera's clock set the NTP (Network Time Protocol) Server. Daylight Saving can set the beginning and ending dates of the ...you set the Daylight Saving Time adjustment manually: Daylight Saving Offset: This will set the Daylight Saving adjustment that you are in the dropdown boxes with NTP Server: Checking this checkbox will set the time zone that will adjust Daylight Saving Time automatically.
User Manual
Page 37
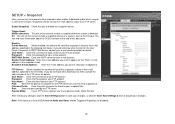
...You can find more information about the DI/DO interface at the end of this box. Password: Enter the password for the User Name, Password, or SMTP Mail Server, contact your snapshot files. Note: If the camera is detected. Filename Prefix: Enter the prefix you want to appear as the "...From:" e-mail address in the following text boxes. Snapshots can be sent to an e-mail address and/or to enter for your...
...You can find more information about the DI/DO interface at the end of this box. Password: Enter the password for the User Name, Password, or SMTP Mail Server, contact your snapshot files. Note: If the camera is detected. Filename Prefix: Enter the prefix you want to appear as the "...From:" e-mail address in the following text boxes. Snapshots can be sent to an e-mail address and/or to enter for your...
User Manual
Page 38
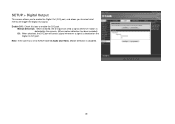
Note: If the camera is set to SXGA mode in Audio and Video, Motion Detection is detected on the Digital In (D/I : When checked, the D/O port will trigger the Digital Out signal. Motion Detection: When checked, the D/O port will send a signal whenever motion is detected by the camera. (When motion detection has been enabled) D/I ) port. Enable D/O: Check this box to select what events will send a signal whenever a signal is disabled. 35 SETUP > Digital Output This screen allows you to enable the Digital Out (D/O) port, and allows you to enable the D/O port.
Note: If the camera is set to SXGA mode in Audio and Video, Motion Detection is detected on the Digital In (D/I : When checked, the D/O port will trigger the Digital Out signal. Motion Detection: When checked, the D/O port will send a signal whenever motion is detected by the camera. (When motion detection has been enabled) D/I ) port. Enable D/O: Check this box to select what events will send a signal whenever a signal is disabled. 35 SETUP > Digital Output This screen allows you to enable the Digital Out (D/O) port, and allows you to enable the D/O port.
User Manual
Page 39
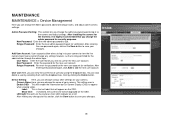
...OSD: This will be displayed on the Save button to view the live camera feed. Admin Password Setting: This section lets you can also delete a user by selecting them with the dropdown box, then by using the dropdown box. Retype Password: Re-enter the password for the new user account for ...the new user account. You can view the current list of your camera to save your changes. Retype Password: Enter the new ...
...OSD: This will be displayed on the Save button to view the live camera feed. Admin Password Setting: This section lets you can also delete a user by selecting them with the dropdown box, then by using the dropdown box. Retype Password: Re-enter the password for the new user account for ...the new user account. You can view the current list of your camera to save your changes. Retype Password: Enter the new ...
