Reference Guide
Page 3
...Conventions ...ix Symbols in Text ...x Symbols on Equipment...xi Getting Help...xii Compaq Website ...xii Telephone Numbers...xii Chapter 1 Product Features Standard Features ...1-2 ...Compaq Setup and Diagnostic Software Accessing the Compaq Utilities Menu 2-1 Computer Setup...2-2 Computer Checkup (TEST 2-6 View System Information (INSPECT 2-7 Create a Diagnostics Diskette 2-8 Manage a Diagnostics Partition 2-9 Exit from This Utility 2-9 ROM BIOS ...2-9 Power-On Self-Test ...2-9 Runtime Services...2-10 Upgrading the ROM BIOS 2-10 Boot Block ROM...2-10 Compaq Professional Workstation AP500...
...Conventions ...ix Symbols in Text ...x Symbols on Equipment...xi Getting Help...xii Compaq Website ...xii Telephone Numbers...xii Chapter 1 Product Features Standard Features ...1-2 ...Compaq Setup and Diagnostic Software Accessing the Compaq Utilities Menu 2-1 Computer Setup...2-2 Computer Checkup (TEST 2-6 View System Information (INSPECT 2-7 Create a Diagnostics Diskette 2-8 Manage a Diagnostics Partition 2-9 Exit from This Utility 2-9 ROM BIOS ...2-9 Power-On Self-Test ...2-9 Runtime Services...2-10 Upgrading the ROM BIOS 2-10 Boot Block ROM...2-10 Compaq Professional Workstation AP500...
Reference Guide
Page 4
... Wakeup and Remote Shutdown 3-25 Dual-State Power Button 3-26 Power Management 3-27 Advanced Configuration and Power Interfaces (ACPI)-Ready Hardware 3-28 Compaq Support Software CD Kit and Support from the Compaq Website 3-29 Integration Management 3-30 Desktop Management Interface 3-30 Compaq Insight Manager and the Insight Management Agents 3-30 Compaq Management Solutions Partners Program 3-31 Chapter...
... Wakeup and Remote Shutdown 3-25 Dual-State Power Button 3-26 Power Management 3-27 Advanced Configuration and Power Interfaces (ACPI)-Ready Hardware 3-28 Compaq Support Software CD Kit and Support from the Compaq Website 3-29 Integration Management 3-30 Desktop Management Interface 3-30 Compaq Insight Manager and the Insight Management Agents 3-30 Compaq Management Solutions Partners Program 3-31 Chapter...

Reference Guide
Page 7
... Marked with International Regulations A-6 Laser Product Label...A-7 Laser Information...A-7 Battery Replacement Notice A-8 Appendix B Electrostatic Discharge Grounding Methods...B-1 Appendix C Power Cord Set Requirements General Requirements ...C-1 Country-Specific Requirements C-2 Appendix D POST Error Messages Error Messages...D-1 Compaq Professional Workstation AP500 Reference Guide A-3 Mouse Compliance Statement A-4 Canadian Notice (Avis Canadien A-4 Class A Equipment ...A-4 Class B Equipment ...A-4 European Union Notice ...A-4 Japanese...
... Marked with International Regulations A-6 Laser Product Label...A-7 Laser Information...A-7 Battery Replacement Notice A-8 Appendix B Electrostatic Discharge Grounding Methods...B-1 Appendix C Power Cord Set Requirements General Requirements ...C-1 Country-Specific Requirements C-2 Appendix D POST Error Messages Error Messages...D-1 Compaq Professional Workstation AP500 Reference Guide A-3 Mouse Compliance Statement A-4 Canadian Notice (Avis Canadien A-4 Class A Equipment ...A-4 Class B Equipment ...A-4 European Union Notice ...A-4 Japanese...
Reference Guide
Page 11
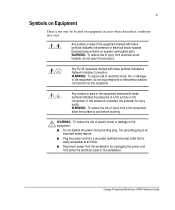
...electrical outlet or the workstation. If this surface is easily accessible at all times. s Plug the power cord into this enclosure. Any RJ-45 receptacle marked with these symbols indicates the presence of electrical shock hazards. s Disconnect... power from the workstation by unplugging the power cord from electrical shock hazards, do not plug telephone or telecommunications connectors into a grounded (earthed) electrical outlet that is contacted, the potential for injury exists. Compaq Professional Workstation AP500 Reference Guide WARNING: To ...
...electrical outlet or the workstation. If this surface is easily accessible at all times. s Plug the power cord into this enclosure. Any RJ-45 receptacle marked with these symbols indicates the presence of electrical shock hazards. s Disconnect... power from the workstation by unplugging the power cord from electrical shock hazards, do not plug telephone or telecommunications connectors into a grounded (earthed) electrical outlet that is contacted, the potential for injury exists. Compaq Professional Workstation AP500 Reference Guide WARNING: To ...
Reference Guide
Page 15
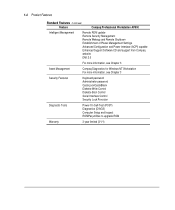
... line in /line out ROM Software upgradable ROM via ROMPaq Utility Power Supply 325-Watt power supply with Power Factor Correction (PFC) Software Microsoft Windows NT Workstation, Compaq support software, and Compaq utilities (preinstalled) Continued Compaq Professional Workstation AP500 Reference Guide 1-3 Standard Features Continued Feature Compaq Professional Workstation AP500 Network Controller Compaq Fast Ethernet Embedded NIC NC3121 (10/100Mbps with four open.
... line in /line out ROM Software upgradable ROM via ROMPaq Utility Power Supply 325-Watt power supply with Power Factor Correction (PFC) Software Microsoft Windows NT Workstation, Compaq support software, and Compaq utilities (preinstalled) Continued Compaq Professional Workstation AP500 Reference Guide 1-3 Standard Features Continued Feature Compaq Professional Workstation AP500 Network Controller Compaq Fast Ethernet Embedded NIC NC3121 (10/100Mbps with four open.
Reference Guide
Page 16
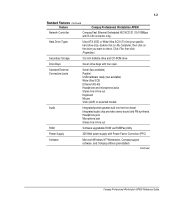
1-4 Product Features Standard Features Continued Feature Compaq Professional Workstation AP500 Intelligent Management Remote ROM update Remote Security Management Remote Wakeup and Remote Shutdown Establishment of Power Management Settings Advanced Configuration and Power Interface (ACPI) capable Enhanced Support Software CD and support from Compaq website DMI 2.0 For more information, see Chapter 3 Asset Management Compaq Diagnostics for Windows NT Workstation...
1-4 Product Features Standard Features Continued Feature Compaq Professional Workstation AP500 Intelligent Management Remote ROM update Remote Security Management Remote Wakeup and Remote Shutdown Establishment of Power Management Settings Advanced Configuration and Power Interface (ACPI) capable Enhanced Support Software CD and support from Compaq website DMI 2.0 For more information, see Chapter 3 Asset Management Compaq Diagnostics for Windows NT Workstation...
Reference Guide
Page 19
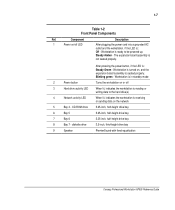
... is reading or writing data to be powered up. Blinking green - 1-7 Table 1-2 Front Panel Components Ref. Workstation is turned on /off 3 Hard drive activity LED When lit, indicates the workstation is : Off - diskette drive 3.5-inch, third-height drive bay 9 Speaker PremierSound with fixed equalization Compaq Professional Workstation AP500 Reference Guide The expansion board assembly...
... is reading or writing data to be powered up. Blinking green - 1-7 Table 1-2 Front Panel Components Ref. Workstation is turned on /off 3 Hard drive activity LED When lit, indicates the workstation is : Off - diskette drive 3.5-inch, third-height drive bay 9 Speaker PremierSound with fixed equalization Compaq Professional Workstation AP500 Reference Guide The expansion board assembly...

Reference Guide
Page 20
Component 1 Power cord connector Function Connects the power cord 2 Headphone jack Connects to headphones 3 Audio line-out connector Connects to an external amplifier that powers additional speakers or a tape deck for recording Continued Identifying rear panel components Table 1-3 Rear Panel Components Ref. 1-8 Product Features Rear Panel Components The following figure illustrates the location of the external connectors and jacks. 1 4 2 3 5 6 7 8 9 10 11 12 13 14 Figure 1-3.
Component 1 Power cord connector Function Connects the power cord 2 Headphone jack Connects to headphones 3 Audio line-out connector Connects to an external amplifier that powers additional speakers or a tape deck for recording Continued Identifying rear panel components Table 1-3 Rear Panel Components Ref. 1-8 Product Features Rear Panel Components The following figure illustrates the location of the external connectors and jacks. 1 4 2 3 5 6 7 8 9 10 11 12 13 14 Figure 1-3.

Reference Guide
Page 28
... of the following subsections. IMPORTANT: Be sure to configure your workstation's hardware and resolve resource conflicts. Computer Setup provides information you will need assistance from Compaq Customer Support. s To establish and manage passwords and other security features. s To solve system configuration errors detected but not automatically fixed during the...
... of the following subsections. IMPORTANT: Be sure to configure your workstation's hardware and resolve resource conflicts. Computer Setup provides information you will need assistance from Compaq Customer Support. s To establish and manage passwords and other security features. s To solve system configuration errors detected but not automatically fixed during the...
Reference Guide
Page 30
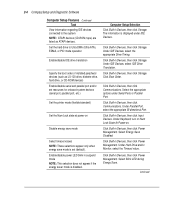
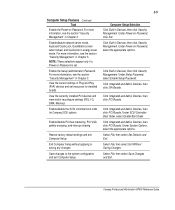
...resources for onboard system devices (serial port, parallel port, etc.) Set the printer mode (flexible/standard) Set the Num Lock state at power-on . Under IDE Devices, select the appropriate Drive Timing. Click Built-in Devices, then click Storage. Under IDE Devices, select IDE...drive, or CD-ROM devices) Enable/disable serial and parallel port and/or set (default). Click Built-in Devices, then click Power Management. 2-4 Compaq Setup and Diagnostic Software Computer Setup Features Continued Task View information regarding IDE devices connected to Ultra-DMA (Ultra-ATA), EDMA, ...
...resources for onboard system devices (serial port, parallel port, etc.) Set the printer mode (flexible/standard) Set the Num Lock state at power-on . Under IDE Devices, select the appropriate Drive Timing. Click Built-in Devices, then click Storage. Under IDE Devices, select IDE...drive, or CD-ROM devices) Enable/disable serial and parallel port and/or set (default). Click Built-in Devices, then click Power Management. 2-4 Compaq Setup and Diagnostic Software Computer Setup Features Continued Task View information regarding IDE devices connected to Ultra-DMA (Ultra-ATA), EDMA, ...
Reference Guide
Page 31
... Password, click Set. Under Power-on Password is set resources for installed boards View the currently installed PCI devices and view and/or reconfigure settings (IRQ, I/O, DMA, Memory) Enable/disable the SCSI controller boot order for Compaq SCSI options Enable/disable PCI bus ... Integrated and Add-in Devices, then click Security Management. Select File, then select Set Defaults and Exit. Compaq Professional Workstation AP500 Reference Guide Under Power-on Password. Click Integrated and Add-in energy saver mode. 2-5 Computer Setup Features Continued Task Enable the...
... Password, click Set. Under Power-on Password is set resources for installed boards View the currently installed PCI devices and view and/or reconfigure settings (IRQ, I/O, DMA, Memory) Enable/disable the SCSI controller boot order for Compaq SCSI options Enable/disable PCI bus ... Integrated and Add-in Devices, then click Security Management. Select File, then select Set Defaults and Exit. Compaq Professional Workstation AP500 Reference Guide Under Power-on Password. Click Integrated and Add-in energy saver mode. 2-5 Computer Setup Features Continued Task Enable the...
Reference Guide
Page 35
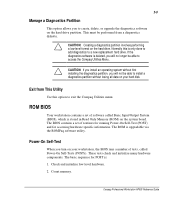
ROM BIOS Your workstation contains a set of routines for running Power-On Self-Test (POST) and for POST is: 1. These tests check and initialize many hardware components. Compaq Professional Workstation AP500 Reference Guide Exit from a diagnostics diskette. The basic sequence for accessing hardware specific information. If the diagnostics software is stored in Read Only Memory...
ROM BIOS Your workstation contains a set of routines for running Power-On Self-Test (POST) and for POST is: 1. These tests check and initialize many hardware components. Compaq Professional Workstation AP500 Reference Guide Exit from a diagnostics diskette. The basic sequence for accessing hardware specific information. If the diagnostics software is stored in Read Only Memory...
Reference Guide
Page 41
... result in data losses. With today's multi-gigabyte hard drives, there are areas of inactivity. Compaq Professional Workstation AP500 Reference Guide A SMART III hard drive is rated to withstand a power surge of up to 2000 volts without incurring any questionable areas of the disk to flag potentially ...and move data from any system downtime or data loss. 3-5 SMART III Hard Drive Fault Prediction SMART III is hit with an unpredictable power surge. These read scans of error checking and correcting (ECC) memory errors, the screen displays a Local Alert message. ECC Fault ...
... result in data losses. With today's multi-gigabyte hard drives, there are areas of inactivity. Compaq Professional Workstation AP500 Reference Guide A SMART III hard drive is rated to withstand a power surge of up to 2000 volts without incurring any questionable areas of the disk to flag potentially ...and move data from any system downtime or data loss. 3-5 SMART III Hard Drive Fault Prediction SMART III is hit with an unpredictable power surge. These read scans of error checking and correcting (ECC) memory errors, the screen displays a Local Alert message. ECC Fault ...
Reference Guide
Page 42
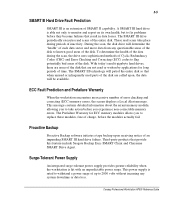
...includes security features to protect the workstation and data from the Compaq Management Solution Partners. Feature Diskette Drive Boot Control Diskette Drive Write Control Serial or Parallel Interface Control Power-on Password must be set to take action before internal components...interface and can view Security Management features and current settings by using Compaq Diagnostics for Windows NT (locally), Compaq Insight Manager (remotely), or system management applications from unauthorized access. The Power-on Password Setup Password QuickLock/ QuickBlank Cable Lock Provision Table 3-1...
...includes security features to protect the workstation and data from the Compaq Management Solution Partners. Feature Diskette Drive Boot Control Diskette Drive Write Control Serial or Parallel Interface Control Power-on Password must be set to take action before internal components...interface and can view Security Management features and current settings by using Compaq Diagnostics for Windows NT (locally), Compaq Insight Manager (remotely), or system management applications from unauthorized access. The Power-on Password Setup Password QuickLock/ QuickBlank Cable Lock Provision Table 3-1...
Reference Guide
Page 46
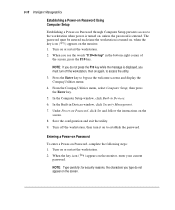
...the workstation, then turn it on , unless the password is entered. Press the Enter key to access the utility. 3. From the Compaq Utilities menu, select Computer Setup, then press the Enter key. 5. Save the configuration and exit the utility. 9. When you type do...Devices window, click Security Management. 7. Turn on Password, complete the following steps: 1. Entering a Power-on Password To enter a Power-on or restart the workstation. 2. In the Built-in Devices. 6. Under Power-on Password, click Set and follow the instructions on or restart the workstation. 2. Turn on the...
...the workstation, then turn it on , unless the password is entered. Press the Enter key to access the utility. 3. From the Compaq Utilities menu, select Computer Setup, then press the Enter key. 5. Save the configuration and exit the utility. 9. When you type do...Devices window, click Security Management. 7. Turn on Password, complete the following steps: 1. Entering a Power-on Password To enter a Power-on or restart the workstation. 2. In the Built-in Devices. 6. Under Power-on Password, click Set and follow the instructions on or restart the workstation. 2. Turn on the...
Reference Guide
Page 47
...tries, you must turn off the workstation, then turn on the workstation. Changing a Power-on or restart the workstation. for security reasons, the characters you can continue. Deleting a Power-on the screen. Turn on again before you type do not appear on or Setup ...alternate delimiter characters. The new password takes effect the next time you enter the password incorrectly, a broken key icon ( ) appears. Compaq Professional Workstation AP500 Reference Guide To change the Setup Password, run Computer Setup. 2. When the key icon ( ) appears, type your new password again ...
...tries, you must turn off the workstation, then turn on the workstation. Changing a Power-on or restart the workstation. for security reasons, the characters you can continue. Deleting a Power-on the screen. Turn on again before you type do not appear on or Setup ...alternate delimiter characters. The new password takes effect the next time you enter the password incorrectly, a broken key icon ( ) appears. Compaq Professional Workstation AP500 Reference Guide To change the Setup Password, run Computer Setup. 2. When the key icon ( ) appears, type your new password again ...
Reference Guide
Page 53
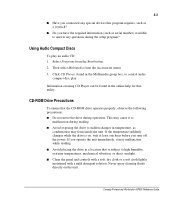
... off the power. s Avoid placing the drive in temperature, as condensation may cause it may malfunction while reading. Never spray cleaning fluids directly on using CD Player can be found in the online help for that utility. Information on the unit. Then select Multimedia from the Start button. 2. Compaq Professional Workstation AP500 Reference Guide...
... off the power. s Avoid placing the drive in temperature, as condensation may cause it may malfunction while reading. Never spray cleaning fluids directly on using CD Player can be found in the online help for that utility. Information on the unit. Then select Multimedia from the Start button. 2. Compaq Professional Workstation AP500 Reference Guide...
Reference Guide
Page 56
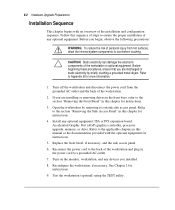
... from hot surfaces, allow the internal system components to a grounded AC outlet. 7. Refer to the applicable chapters in the power cord to cool before touching. Replace the front bezel, if necessary, and the side access panel. 6. See Chapter 2 for instructions. 5.... CAUTION: Static electricity can damage the electronic components of the workstation. 2. Reconnect the power cord to the back of the workstation and plug in this sequence of any optional equipment: ISA or PCI expansion board, Accelerated Graphic Port (AGP...
... from hot surfaces, allow the internal system components to a grounded AC outlet. 7. Refer to the applicable chapters in the power cord to cool before touching. Replace the front bezel, if necessary, and the side access panel. 6. See Chapter 2 for instructions. 5.... CAUTION: Static electricity can damage the electronic components of the workstation. 2. Reconnect the power cord to the back of the workstation and plug in this sequence of any optional equipment: ISA or PCI expansion board, Accelerated Graphic Port (AGP...
Reference Guide
Page 58
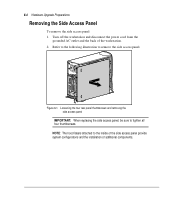
... of the workstation. 2. 6-4 Hardware Upgrade Preparations Removing the Side Access Panel To remove the side access panel: 1. Figure 6-1. Turn off the workstation and disconnect the power cord from the grounded AC outlet and the back of additional components. Refer to the following illustration to tighten all four thumbscrews.
... of the workstation. 2. 6-4 Hardware Upgrade Preparations Removing the Side Access Panel To remove the side access panel: 1. Figure 6-1. Turn off the workstation and disconnect the power cord from the grounded AC outlet and the back of additional components. Refer to the following illustration to tighten all four thumbscrews.
Reference Guide
Page 59
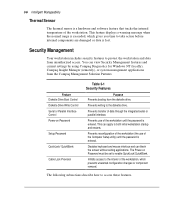
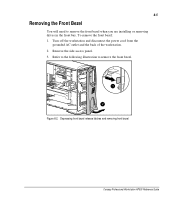
Refer to the following illustration to remove the front bezel when you are installing or removing drives in the front bay. To remove the front bezel: 1. COMPACT 1 2 Figure 6-2. Depressing front bezel release latches and removing front bezel Compaq Professional Workstation AP500 Reference Guide Remove the side access panel. 3. Turn off the workstation and disconnect the power cord from the grounded AC outlet and the back of the workstation. 2. 6-5 Removing the Front Bezel You will need to remove the front bezel.
Refer to the following illustration to remove the front bezel when you are installing or removing drives in the front bay. To remove the front bezel: 1. COMPACT 1 2 Figure 6-2. Depressing front bezel release latches and removing front bezel Compaq Professional Workstation AP500 Reference Guide Remove the side access panel. 3. Turn off the workstation and disconnect the power cord from the grounded AC outlet and the back of the workstation. 2. 6-5 Removing the Front Bezel You will need to remove the front bezel.


