Reference Guide
Page 4
......3-2 Compaq Diagnostics for Windows NT 3-3 Fault Management...3-4 SMART III Hard Drive Fault Prediction 3-5 ECC Fault Prediction and Prefailure Warranty 3-5 Proactive Backup...3-5 Surge-Tolerant Power Supply 3-5 Thermal Sensor ...3-6 Security Management...3-6 Disabling Diskette Boot or Diskette Write 3-7 Disabling a Serial Port or Parallel Port 3-8 Password Security ...3-9 QuickLock/QuickBlank 3-15 Cable Lock Provision 3-17 Configuration Management 3-19 Upgrading the ROM 3-20 FailSafe Boot Block ROM 3-22 Remote Security Management 3-24 Remote Wakeup and Remote Shutdown 3-25 Dual...
......3-2 Compaq Diagnostics for Windows NT 3-3 Fault Management...3-4 SMART III Hard Drive Fault Prediction 3-5 ECC Fault Prediction and Prefailure Warranty 3-5 Proactive Backup...3-5 Surge-Tolerant Power Supply 3-5 Thermal Sensor ...3-6 Security Management...3-6 Disabling Diskette Boot or Diskette Write 3-7 Disabling a Serial Port or Parallel Port 3-8 Password Security ...3-9 QuickLock/QuickBlank 3-15 Cable Lock Provision 3-17 Configuration Management 3-19 Upgrading the ROM 3-20 FailSafe Boot Block ROM 3-22 Remote Security Management 3-24 Remote Wakeup and Remote Shutdown 3-25 Dual...
Reference Guide
Page 21
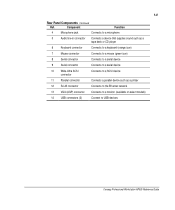
... 6 Keyboard connector Connects to a keyboard (orange icon) 7 Mouse connector Connects to a mouse (green icon) 8 Serial connector Connects to a serial device 9 Serial connector Connects to a serial device 10 Wide-Ultra SCSI connector Connects to a SCSI device 11 Parallel connector Connects a parallel device such as a printer 12 RJ-45 connector Connects to the Ethernet network 13 VGA (AGP) connector Connects to a monitor (available on select models) 14 USB connectors (2) Connect to USB devices Compaq Professional Workstation AP500 Reference Guide 1-9 Rear Panel Components...
... 6 Keyboard connector Connects to a keyboard (orange icon) 7 Mouse connector Connects to a mouse (green icon) 8 Serial connector Connects to a serial device 9 Serial connector Connects to a serial device 10 Wide-Ultra SCSI connector Connects to a SCSI device 11 Parallel connector Connects a parallel device such as a printer 12 RJ-45 connector Connects to the Ethernet network 13 VGA (AGP) connector Connects to a monitor (available on select models) 14 USB connectors (2) Connect to USB devices Compaq Professional Workstation AP500 Reference Guide 1-9 Rear Panel Components...
Reference Guide
Page 30
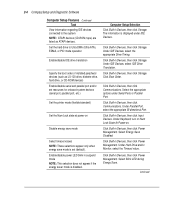
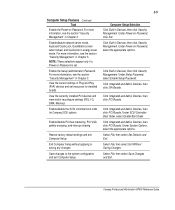
... Devices, then click Power Management. 2-4 Compaq Setup and Diagnostic Software Computer Setup Features Continued Task View information regarding IDE devices connected to Ultra-DMA (Ultra-ATA), EDMA, or PIO mode operation Enable/disable IDE drive translation Specify the boot order of installed peripheral devices (such as ATAPI devices. Select Blink LED during Energy Save. Select Energy Save Disabled. Under IDE Devices, select IDE Drive Translation. Set the hard drive to the system NOTE: ATAPI devices (CD-ROM, tape) are listed...
... Devices, then click Power Management. 2-4 Compaq Setup and Diagnostic Software Computer Setup Features Continued Task View information regarding IDE devices connected to Ultra-DMA (Ultra-ATA), EDMA, or PIO mode operation Enable/disable IDE drive translation Specify the boot order of installed peripheral devices (such as ATAPI devices. Select Blink LED during Energy Save. Select Energy Save Disabled. Under IDE Devices, select IDE Drive Translation. Set the hard drive to the system NOTE: ATAPI devices (CD-ROM, tape) are listed...
Reference Guide
Page 31
... Boot Order. Enable the Setup (administrator) Password. Enable/disable network server mode, keyboard QuickLock, QuickBlank screen when locked, and QuickLock in Devices, then click PCI Boards. For more information, see the section "Security Management" in Devices, then click Security Management. View the current settings of Plug and Play (PnP) devices and set . Click Built-in Chapter 3. Under Setup Password, select Enable Setup Password. Under System Options, select the appropriate options. Select File, then select Set Defaults and Exit. Compaq Professional Workstation AP500...
... Boot Order. Enable the Setup (administrator) Password. Enable/disable network server mode, keyboard QuickLock, QuickBlank screen when locked, and QuickLock in Devices, then click PCI Boards. For more information, see the section "Security Management" in Devices, then click Security Management. View the current settings of Plug and Play (PnP) devices and set . Click Built-in Chapter 3. Under Setup Password, select Enable Setup Password. Under System Options, select the appropriate options. Select File, then select Set Defaults and Exit. Compaq Professional Workstation AP500...
Reference Guide
Page 42
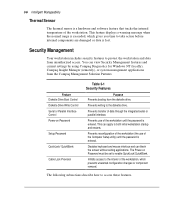
Feature Diskette Drive Boot Control Diskette Drive Write Control Serial or Parallel Interface Control Power-on Password must be set to both initial workstation startup and restarts. The following subsections describe how to protect the workstation and data from unauthorized access. Prevents transfer of the workstation. Disables keyboard and mouse interface and can view Security Management features and current settings by using Compaq Diagnostics for Windows NT (locally), Compaq Insight Manager (remotely), or system management applications...
Feature Diskette Drive Boot Control Diskette Drive Write Control Serial or Parallel Interface Control Power-on Password must be set to both initial workstation startup and restarts. The following subsections describe how to protect the workstation and data from unauthorized access. Prevents transfer of the workstation. Disables keyboard and mouse interface and can view Security Management features and current settings by using Compaq Diagnostics for Windows NT (locally), Compaq Insight Manager (remotely), or system management applications...
Reference Guide
Page 48
... Ethernet network ready, which means that will automatically detect network connection speed and adjust accordingly. 4-1 Chapter 4 Network Communications This chapter provides information about networks and the hardware connectors and software device drivers that allow you can share resources such as a printer, to exchange information from device to device and to run common software programs. NOTE: For more information about installing your network connection is active, you to access a network. Compaq Professional Workstation AP500 Reference Guide...
... Ethernet network ready, which means that will automatically detect network connection speed and adjust accordingly. 4-1 Chapter 4 Network Communications This chapter provides information about networks and the hardware connectors and software device drivers that allow you can share resources such as a printer, to exchange information from device to device and to run common software programs. NOTE: For more information about installing your network connection is active, you to access a network. Compaq Professional Workstation AP500 Reference Guide...

Reference Guide
Page 98
... saver feature has been enabled. Display Problems Problem Blank screen Table 11-3 Solving Display Problems Possible Cause Monitor is not turned on and the monitor light is not formatted. Press any key or type your password and wait a few moments for the drive type. Check connections. The cable connections are using the wrong diskette type for the screen to the grounded AC outlet. 11-6 Troubleshooting Solving Diskette Drive Problems Continued Problem Possible Cause Drive cannot read a diskette...
... saver feature has been enabled. Display Problems Problem Blank screen Table 11-3 Solving Display Problems Possible Cause Monitor is not turned on and the monitor light is not formatted. Press any key or type your password and wait a few moments for the drive type. Check connections. The cable connections are using the wrong diskette type for the screen to the grounded AC outlet. 11-6 Troubleshooting Solving Diskette Drive Problems Continued Problem Possible Cause Drive cannot read a diskette...
Reference Guide
Page 103
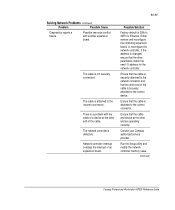
... are operating correctly. Contact your Compaq authorized service provider. The cable is securely attached to the incorrect connector. Solving Network Problems Continued Problem Possible Cause Diagnostics reports a failure. Possible resource conflict with the cable or a device at the other end of the cable. Either remove and reconfigure the conflicting expansion board, or reconfigure the network controller. If the address is a problem with another expansion board. Run the Setup utility and modify the network controller memory...
... are operating correctly. Contact your Compaq authorized service provider. The cable is securely attached to the incorrect connector. Solving Network Problems Continued Problem Possible Cause Diagnostics reports a failure. Possible resource conflict with the cable or a device at the other end of the cable. Either remove and reconfigure the conflicting expansion board, or reconfigure the network controller. If the address is a problem with another expansion board. Run the Setup utility and modify the network controller memory...
Reference Guide
Page 121
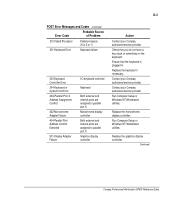
...utilities. D-2 POST Error Messages POST Error Messages and Codes Continued Error Code Probable Source of Problem 172-1 Configuration Nonvolatile Memory Invalid NVRAM Configuration error 201-Memory Error 202-Memory Type Mismatch 203-Memory Address Error 205-Memory Error 206-Secondary cache controller failure 207-ECC Corrected Single Bit Errors in DIMM Pair(s) RAM failure RAM failure RAM failure Cache memory error Cache memory controller or RAM failure A memory error on one of the installed DIMMs has been detected and corrected with this error. Reboot. Run Diagnostics to complete boot...
...utilities. D-2 POST Error Messages POST Error Messages and Codes Continued Error Code Probable Source of Problem 172-1 Configuration Nonvolatile Memory Invalid NVRAM Configuration error 201-Memory Error 202-Memory Type Mismatch 203-Memory Address Error 205-Memory Error 206-Secondary cache controller failure 207-ECC Corrected Single Bit Errors in DIMM Pair(s) RAM failure RAM failure RAM failure Cache memory error Cache memory controller or RAM failure A memory error on one of the installed DIMMs has been detected and corrected with this error. Reboot. Run Diagnostics to complete boot...
Reference Guide
Page 122
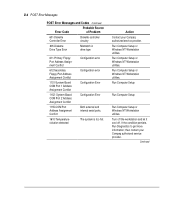
... 501-Display Adapter Failure I/O keyboard controller Keyboard Both external and internal ports are assigned to parallel port X. Run Computer Setup or Windows NT Workstation utilities. Contact your Compaq authorized service provider. Monochrome display controller Both external and internal ports are assigned to parallel port X. D-3 POST Error Messages and Codes Continued Error Code Probable Source of Problem 212-Failed Processor Failed processor (X is plugged in. Replace the monochrome display controller. Replace the graphics display controller. Replace the keyboard if...
... 501-Display Adapter Failure I/O keyboard controller Keyboard Both external and internal ports are assigned to parallel port X. Run Computer Setup or Windows NT Workstation utilities. Contact your Compaq authorized service provider. Monochrome display controller Both external and internal ports are assigned to parallel port X. D-3 POST Error Messages and Codes Continued Error Code Probable Source of Problem 212-Failed Processor Failed processor (X is plugged in. Replace the monochrome display controller. Replace the graphics display controller. Replace the keyboard if...
Reference Guide
Page 123
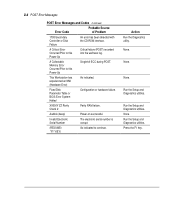
...Diskette Controller Error Diskette controller circuitry 605-Diskette Drive Type Error Mismatch in drive type 611-Primary Floppy Port Address Assignment Conflict 612-Secondary Floppy Port Address Assignment Conflict 1151-System Board COM Port 1 Address Assignment Conflict 1152- If the condition persists, Run Diagnostics to get more information; System Board COM Port 2 Address Assignment Conflict 1155-COM Port Address Assignment Conflict 1610-Temperature violation detected Configuration error Configuration error Configuration Error Configuration Error Both external and internal serial ports...
...Diskette Controller Error Diskette controller circuitry 605-Diskette Drive Type Error Mismatch in drive type 611-Primary Floppy Port Address Assignment Conflict 612-Secondary Floppy Port Address Assignment Conflict 1151-System Board COM Port 1 Address Assignment Conflict 1152- If the condition persists, Run Diagnostics to get more information; System Board COM Port 2 Address Assignment Conflict 1155-COM Port Address Assignment Conflict 1610-Temperature violation detected Configuration error Configuration error Configuration Error Configuration Error Both external and internal serial ports...
Reference Guide
Page 125
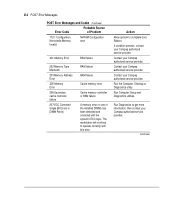
... Table or BIOS Error System Halted Configuration or hardware failure. None. A Critical Error Occurred Prior to continue. Action Run the Diagnostics utility. None. XX000Y ZZ Parity Check 2 Parity RAM failure. Run the Setup and Diagnostics utilities. D-6 POST Error Messages POST Error Messages and Codes Continued Error Code Probable Source of Problem 1793-Secondary Controller or Disk Failure An error has been detected with the CD-ROM interface. Run the Setup and Diagnostics utilities. Audible (beep) Power-on successful. Invalid Electronic Serial Number The...
... Table or BIOS Error System Halted Configuration or hardware failure. None. A Critical Error Occurred Prior to continue. Action Run the Diagnostics utility. None. XX000Y ZZ Parity Check 2 Parity RAM failure. Run the Setup and Diagnostics utilities. D-6 POST Error Messages POST Error Messages and Codes Continued Error Code Probable Source of Problem 1793-Secondary Controller or Disk Failure An error has been detected with the CD-ROM interface. Run the Setup and Diagnostics utilities. Audible (beep) Power-on successful. Invalid Electronic Serial Number The...
Reference Guide
Page 128
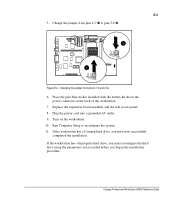
... E-2. Replace the expansion board assembly and the side access panel. 8. Run Computer Setup to pins 5-6 6. Turn on the back of the workstation. 7. If the workstation has a third-party hard drive, you must reconfigure the hard drive using the parameters you recorded before you have now successfully completed the installation. E-3 5. Change the jumper from pins 6-7 to reconfigure the system. 11. If the workstation has a Compaq hard drive, you began the installation procedure. Compaq Professional...
... E-2. Replace the expansion board assembly and the side access panel. 8. Run Computer Setup to pins 5-6 6. Turn on the back of the workstation. 7. If the workstation has a third-party hard drive, you must reconfigure the hard drive using the parameters you recorded before you have now successfully completed the installation. E-3 5. Change the jumper from pins 6-7 to reconfigure the system. 11. If the workstation has a Compaq hard drive, you began the installation procedure. Compaq Professional...

Reference Guide
Page 130
... Setup E-1 battery replacement notice A-8 bay configurations installing drives 8-1 beeps, when detecting an invalid system ROM 3-22 bezel, blank drive illustrated 8-3 boot order specifying peripheral devices 2- 4 specifying SCSI controllers 2-5 bus priority, setting 2-3 buttons CD-ROM drive ejector 1-7 power 3-26 power switch 1-7 C cable lock, installing 3-17 Canadian Notice A-4 Caps Lock key 1-11 CDRH regulations A-6 CD-ROM drive 1-7 bay configurations 8-1 cleaning 5-3 inserting 5-1 operating precautions 5-3 removing CD 5-2 troubleshooting 11-15 using CD-ROM software 5-2 Compaq Professional...
... Setup E-1 battery replacement notice A-8 bay configurations installing drives 8-1 beeps, when detecting an invalid system ROM 3-22 bezel, blank drive illustrated 8-3 boot order specifying peripheral devices 2- 4 specifying SCSI controllers 2-5 bus priority, setting 2-3 buttons CD-ROM drive ejector 1-7 power 3-26 power switch 1-7 C cable lock, installing 3-17 Canadian Notice A-4 Caps Lock key 1-11 CDRH regulations A-6 CD-ROM drive 1-7 bay configurations 8-1 cleaning 5-3 inserting 5-1 operating precautions 5-3 removing CD 5-2 troubleshooting 11-15 using CD-ROM software 5-2 Compaq Professional...

Reference Guide
Page 131
... 6-2 internal 6-6 rear panel 1-8 Computer Checkup (TEST) accessing 2-1 described 2-6 running 2-6 test options 2-7 Computer Setup accessing 2-1 described 2-2 exiting without saving changes 2-5 restoring factory default settings 2-5 saving changes and exiting 2-5 summary of features 2-3 using 2-3 configuration management ACPI 3-28 described 3-19 dual-state power button 3-26 power management 3-27 remote security management 3-24 remote system installation 3-26 remote wakeup and remote shutdown 3-25 upgrading the ROM 3-20 configuration, system 6-3 connectors 1-3 Accelerated Graphics Port graphics...
... 6-2 internal 6-6 rear panel 1-8 Computer Checkup (TEST) accessing 2-1 described 2-6 running 2-6 test options 2-7 Computer Setup accessing 2-1 described 2-2 exiting without saving changes 2-5 restoring factory default settings 2-5 saving changes and exiting 2-5 summary of features 2-3 using 2-3 configuration management ACPI 3-28 described 3-19 dual-state power button 3-26 power management 3-27 remote security management 3-24 remote system installation 3-26 remote wakeup and remote shutdown 3-25 upgrading the ROM 3-20 configuration, system 6-3 connectors 1-3 Accelerated Graphics Port graphics...
Reference Guide
Page 132
... Compaq Diagnostics for Windows NT diagnostics partition, managing 2-9 DIMM 6-12 DIMM installation 7-3 DIMMs 7-2 diskette drive I-3 bay configurations 8-1 enabling/disabling diskette boot 2-3, 3-7 enabling/disabling diskette write 2-3, 3-7 troubleshooting 11-5 viewing current devices and setting resources 2-3 diskette drive connector 6-11 display troubleshooting 11-6 DMI, described 3-30 drive bays 1-3, 8-2 drive bezel removing 8-3 drive bezel, removing illustrated 8-3 drive controller 1-2 drive locations 8-1 drive timing, setting 2-4 driver ESS 1869 5-4 obtaining 3-29 drives CD-ROM 1-7 dual...
... Compaq Diagnostics for Windows NT diagnostics partition, managing 2-9 DIMM 6-12 DIMM installation 7-3 DIMMs 7-2 diskette drive I-3 bay configurations 8-1 enabling/disabling diskette boot 2-3, 3-7 enabling/disabling diskette write 2-3, 3-7 troubleshooting 11-5 viewing current devices and setting resources 2-3 diskette drive connector 6-11 display troubleshooting 11-6 DMI, described 3-30 drive bays 1-3, 8-2 drive bezel removing 8-3 drive bezel, removing illustrated 8-3 drive controller 1-2 drive locations 8-1 drive timing, setting 2-4 driver ESS 1869 5-4 obtaining 3-29 drives CD-ROM 1-7 dual...
Reference Guide
Page 134
... devices, viewing information 2-4 IDE drive translation, enabling/disabling 2-4 infrared interface control 3-6 inserting CD-ROM drive 5-1 Insight Management Agents, described 3-30 I /O delay, setting 2-3 Compaq Professional Workstation AP500 Reference Guide See Compaq Insight Manager INSPECT utility See View System Information (INSPECT) installing additional memory 7-1 AGP graphics controller 9-6 battery E-1 DIMMs 7-3 hard drive 8-6, 8-9 network driver 4-2 PCI or ISA board 9-4 Pentium II processor 10-1 installing processor power module integration management Compaq Insight Manager 3-30 Compaq...
... devices, viewing information 2-4 IDE drive translation, enabling/disabling 2-4 infrared interface control 3-6 inserting CD-ROM drive 5-1 Insight Management Agents, described 3-30 I /O delay, setting 2-3 Compaq Professional Workstation AP500 Reference Guide See Compaq Insight Manager INSPECT utility See View System Information (INSPECT) installing additional memory 7-1 AGP graphics controller 9-6 battery E-1 DIMMs 7-3 hard drive 8-6, 8-9 network driver 4-2 PCI or ISA board 9-4 Pentium II processor 10-1 installing processor power module integration management Compaq Insight Manager 3-30 Compaq...
Reference Guide
Page 136
... 3-14 network cable to RJ-45 connector 4-2 controller 4-1 installing driver 4-2 Token Ring 4-1 troubleshooting 11-10 network connector 1-9 network controller 1-3 network server mode, enabling/disabling 2-5 NIC NC3121 4-1 Num Lock key 1-11 Num Lock state, setting 2-4 P parallel connector 1-9 disabling 2-4, 3-8 enabling 2-4 interface control 3-6 I-7 passwords See also Power-on Password; Setup Password changing 3-11 clearing 3-12 establishing 3-9 Pause key 1-11 PCI bus mastering, enabling/disabling 2-5 PCI devices, viewing currently installed devices 2-5 PCI or ISA expansion board 9-4 PCI VGA...
... 3-14 network cable to RJ-45 connector 4-2 controller 4-1 installing driver 4-2 Token Ring 4-1 troubleshooting 11-10 network connector 1-9 network controller 1-3 network server mode, enabling/disabling 2-5 NIC NC3121 4-1 Num Lock key 1-11 Num Lock state, setting 2-4 P parallel connector 1-9 disabling 2-4, 3-8 enabling 2-4 interface control 3-6 I-7 passwords See also Power-on Password; Setup Password changing 3-11 clearing 3-12 establishing 3-9 Pause key 1-11 PCI bus mastering, enabling/disabling 2-5 PCI devices, viewing currently installed devices 2-5 PCI or ISA expansion board 9-4 PCI VGA...

Reference Guide
Page 137
...drive 11-5 display 11-6 hardware installation 11-9 memory 11-14 minor 11-3 monitor 11-6 network 11-10 printer 11-8 processor 1-2 upgrading 10-3 viewing speed and type 2-3 processor power module 6-12 installing 10-2 product features 1-1 product name, viewing 2-3 prompted diagnostics 2-7 Q quick check diagnostics 2-7 QuickBoot, selecting 2-3 QuickLock/QuickBlank described 3-6, 3-15 disabling 2-5 enabling 2-5, 3-15 R reconfiguring the workstation 6-3 reinserting removable hard drive cage 6-10 Remote Management Administrators Guide 3-21 remote ROM flash 3-21 remote security management 3-24 remote...
...drive 11-5 display 11-6 hardware installation 11-9 memory 11-14 minor 11-3 monitor 11-6 network 11-10 printer 11-8 processor 1-2 upgrading 10-3 viewing speed and type 2-3 processor power module 6-12 installing 10-2 product features 1-1 product name, viewing 2-3 prompted diagnostics 2-7 Q quick check diagnostics 2-7 QuickBoot, selecting 2-3 QuickLock/QuickBlank described 3-6, 3-15 disabling 2-5 enabling 2-5, 3-15 R reconfiguring the workstation 6-3 reinserting removable hard drive cage 6-10 Remote Management Administrators Guide 3-21 remote ROM flash 3-21 remote security management 3-24 remote...
Reference Guide
Page 139
... Setup Simple Network Management Protocol, fault notices 3-4 SMART III hard drive fault prediction 3-5 SmartStart for Workstations 1-2, 1-5 SNMP, receiving fault notices 3-4 software 1-3 Logitech OEM MouseWare 1-10 obtaining support software 3-29 preinstalled 1-5 SmartStart for Workstations 1-2, 1-5 Software Installation Guide 1-5 software problems, solving 11-3 special function keys 1-11 specifications F-1 standard features 1-2 standard interfaces 1-3 Support Software CD Kit 3-29 support software, obtaining 3-29 surge-tolerant power supply 3-5 suspend mode 3-26 enabling/disabling power LED...
... Setup Simple Network Management Protocol, fault notices 3-4 SMART III hard drive fault prediction 3-5 SmartStart for Workstations 1-2, 1-5 SNMP, receiving fault notices 3-4 software 1-3 Logitech OEM MouseWare 1-10 obtaining support software 3-29 preinstalled 1-5 SmartStart for Workstations 1-2, 1-5 Software Installation Guide 1-5 software problems, solving 11-3 special function keys 1-11 specifications F-1 standard features 1-2 standard interfaces 1-3 Support Software CD Kit 3-29 support software, obtaining 3-29 surge-tolerant power supply 3-5 suspend mode 3-26 enabling/disabling power LED...


