
User Manual
Page 5
... Your Phone to the Wireless Network 29 Determining Your Wireless Router Security Type 30 Using Wi-Fi Protected Setup with the Cisco SPA 525G/525G2 33 Manually Adding a Wireless Profile on the Cisco SPA 525G/525G2 34 Uploading Security Certificates to the Phone 36 Verifying Phone Startup 37 Upgrading Your Phone's Firmware 37... Viewing and Returning Missed Calls 43 Returning a Missed Call 43 Viewing a List of Missed Calls 43 Turning the Missed Calls Shortcut On and Off 44 Cisco Small Business IP Phone SPA 525G/G2 (SIP...
... Your Phone to the Wireless Network 29 Determining Your Wireless Router Security Type 30 Using Wi-Fi Protected Setup with the Cisco SPA 525G/525G2 33 Manually Adding a Wireless Profile on the Cisco SPA 525G/525G2 34 Uploading Security Certificates to the Phone 36 Verifying Phone Startup 37 Upgrading Your Phone's Firmware 37... Viewing and Returning Missed Calls 43 Returning a Missed Call 43 Viewing a List of Missed Calls 43 Turning the Missed Calls Shortcut On and Off 44 Cisco Small Business IP Phone SPA 525G/G2 (SIP...
User Manual
Page 36
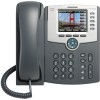
...Enter the IP address of the following options: • Wireless Profile-Use this method to a previously configured network. Cisco Small Business IP Phone SPA 525G/SPA 525G2 User Guide (SIP) 33 Installing Your Phone Connecting Your Phone to the Computer Network 2 STEP 5 Scroll to your router... Setup configuration menu. On your wireless connection. STEP 2 Choose one of the following options: Push Button Configuration: a. c. See Manually Adding a Wireless Profile on your router. Connect to Wi-Fi Configuration and press the Right Arrow key. Using Wi-Fi Protected Setup with...
...Enter the IP address of the following options: • Wireless Profile-Use this method to a previously configured network. Cisco Small Business IP Phone SPA 525G/SPA 525G2 User Guide (SIP) 33 Installing Your Phone Connecting Your Phone to the Computer Network 2 STEP 5 Scroll to your router... Setup configuration menu. On your wireless connection. STEP 2 Choose one of the following options: Push Button Configuration: a. c. See Manually Adding a Wireless Profile on your router. Connect to Wi-Fi Configuration and press the Right Arrow key. Using Wi-Fi Protected Setup with...

User Manual
Page 37
... it may reboot before the Wi-Fi connection is enabled. Save your router has SSID (router name) broadcast disabled, it (see Manually Adding a Network, page 35). Press the Right Arrow key to Wi-Fi Configuration. Your phone may not appear in the list of available networks..., scroll to the desired network and click Add to the Computer Network 2 e. STEP 2 In the list of networks. Cisco Small Business IP Phone SPA 525G/SPA 525G2 User Guide (SIP) 34 In that allows you need to setup wireless devices using a PIN. Installing Your Phone Connecting Your Phone to...
... it may reboot before the Wi-Fi connection is enabled. Save your router has SSID (router name) broadcast disabled, it (see Manually Adding a Network, page 35). Press the Right Arrow key to Wi-Fi Configuration. Your phone may not appear in the list of available networks..., scroll to the desired network and click Add to the Computer Network 2 e. STEP 2 In the list of networks. Cisco Small Business IP Phone SPA 525G/SPA 525G2 User Guide (SIP) 34 In that allows you need to setup wireless devices using a PIN. Installing Your Phone Connecting Your Phone to...
User Manual
Page 38
..., choose whether the phone should check for the server certificate, enter the User ID, and configure the Root certificate and User certificate (see the "Uploading Security Certificates to the Phone" section on page 36). See You must enter the Cipher Type (TKIP or AES ...Protocol (MSCHV2, MSCHAP, PAP, CHAP, or MD5), and enter the User ID and password. - Cisco Small Business IP Phone SPA 525G/SPA 525G2 User Guide (SIP) 35 STEP 4 To save as a wireless profile, press Save. LEAP-Enter the User ID and password. - Manually Adding a Network STEP 1 From the Wireless Profile screen, press Option ...
..., choose whether the phone should check for the server certificate, enter the User ID, and configure the Root certificate and User certificate (see the "Uploading Security Certificates to the Phone" section on page 36). See You must enter the Cipher Type (TKIP or AES ...Protocol (MSCHV2, MSCHAP, PAP, CHAP, or MD5), and enter the User ID and password. - Cisco Small Business IP Phone SPA 525G/SPA 525G2 User Guide (SIP) 35 STEP 4 To save as a wireless profile, press Save. LEAP-Enter the User ID and password. - Manually Adding a Network STEP 1 From the Wireless Profile screen, press Option ...
User Manual
Page 90
... time and date from a Network Time Protocol server. Enter the name or the IP address of the server and press Save. • Set Current Time Manually-Press the Right Arrow key to Greenwich Mean Time, or Western European Time. STEP 2 Scroll to On or Off. Press Set. Press the Right Arrow... Administration and press Select. Press the Right Arrow key to change the time zone. Use the Up and Down Arrow keys to change the time. Cisco Small Business IP Phone SPA 525G/SPA 525G2 User Guide (SIP) 87
... time and date from a Network Time Protocol server. Enter the name or the IP address of the server and press Save. • Set Current Time Manually-Press the Right Arrow key to Greenwich Mean Time, or Western European Time. STEP 2 Scroll to On or Off. Press Set. Press the Right Arrow... Administration and press Select. Press the Right Arrow key to change the time zone. Use the Up and Down Arrow keys to change the time. Cisco Small Business IP Phone SPA 525G/SPA 525G2 User Guide (SIP) 87
User Manual
Page 103
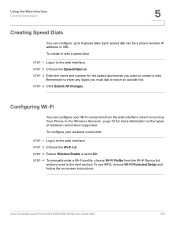
... digits you want to create or edit. STEP 4 Click Submit All Changes. STEP 3 Ensure Wireless Enable is set to the web interface. STEP 4 To manually enter a Wi-Fi profile, choose Wi-Fi Profile from the web interface. STEP 3 Enter the name and number for more information on -screen instructions... Cisco Small Business IP Phone SPA 525G/SPA 525G2 User Guide (SIP) 100 See Connecting Your Phone to the Wireless Network, page 29 for the speed dial entries you must dial...
... digits you want to create or edit. STEP 4 Click Submit All Changes. STEP 3 Ensure Wireless Enable is set to the web interface. STEP 4 To manually enter a Wi-Fi profile, choose Wi-Fi Profile from the web interface. STEP 3 Enter the name and number for more information on -screen instructions... Cisco Small Business IP Phone SPA 525G/SPA 525G2 User Guide (SIP) 100 See Connecting Your Phone to the Wireless Network, page 29 for the speed dial entries you must dial...

User Manual
Page 114
... location of this document. However, in use the Cisco SPA 9000 Setup Wizard. Cisco Small Business IP Phone SPA 525G/SPA 525G2 User Guide (SIP) 111 To configure the Cisco SPA 500S: • If the Cisco SPA 500S and attached Cisco SPA 525G/525G2 are used with phone connectivity. there...: - See Appendix A, "Where to which the Cisco SPA 500S is ringing. - Configuration of the Cisco SPA 500S and assignment of a line button gives you want to manually configure the Cisco SPA 500S using the Setup Wizard, see the Cisco SPA 500 Series and Wireless IP Phone Administration Guide...
... location of this document. However, in use the Cisco SPA 9000 Setup Wizard. Cisco Small Business IP Phone SPA 525G/SPA 525G2 User Guide (SIP) 111 To configure the Cisco SPA 500S: • If the Cisco SPA 500S and attached Cisco SPA 525G/525G2 are used with phone connectivity. there...: - See Appendix A, "Where to which the Cisco SPA 500S is ringing. - Configuration of the Cisco SPA 500S and assignment of a line button gives you want to manually configure the Cisco SPA 500S using the Setup Wizard, see the Cisco SPA 500 Series and Wireless IP Phone Administration Guide...


