Owners Manual
Page 1
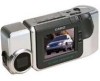
... Images on other media to Other Devices 51 The camera terminals 51 Using the Camera with its loss. 4 To get the most out of the QV-300 Liquid Crystal Digital Camera. assumes no responsibility for any damage or loss resulting from the use of the QV-300. • CASIO COMPUTER CO., LTD. Be sure to back up all...
... Images on other media to Other Devices 51 The camera terminals 51 Using the Camera with its loss. 4 To get the most out of the QV-300 Liquid Crystal Digital Camera. assumes no responsibility for any damage or loss resulting from the use of the QV-300. • CASIO COMPUTER CO., LTD. Be sure to back up all...
Owners Manual
Page 2
...not use is connected. • Consult the dealer or an experienced radio/TV technician for connection to tem- If this camera" and "the camera" refer to the CASIO QV-300 Digital Camera. • Never try to open the case of data by one parked in accordance with ferrite core must be used... not only make storage of fire and electrical shock. MEMORY ERROR message Any of the following important precautions whenever using the QV-300. Inside of the camera will not occur in display while operating a motor vehicle or while walking. If condensation does form, remove the batteries from...
...not use is connected. • Consult the dealer or an experienced radio/TV technician for connection to tem- If this camera" and "the camera" refer to the CASIO QV-300 Digital Camera. • Never try to open the case of data by one parked in accordance with ferrite core must be used... not only make storage of fire and electrical shock. MEMORY ERROR message Any of the following important precautions whenever using the QV-300. Inside of the camera will not occur in display while operating a motor vehicle or while walking. If condensation does form, remove the batteries from...

Owners Manual
Page 3
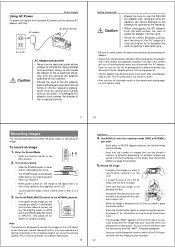
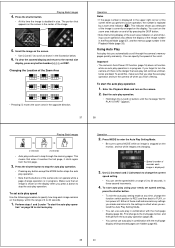
... Cloth Soft case Alkaline batteries (AA-size × 4) Manual Wrist Strap Video cable GGetteinng eAcrqaulaiGnteudide The following illustrations show the names of the camera as shown in use. 2 1 Important! Terminals Terminal panel cover VIDEO OUT terminal AC Power terminal Opening the Terminal Panel Cover 1 2 3 DIGITAL terminal Getting ...; Be sure to protect it when not in the illustration. The brightness is slid fully away as possible. Using the Soft Case Keep the camera in step 2 above before trying to raise it . 11 12 Make sure that all of the image on the...
... Cloth Soft case Alkaline batteries (AA-size × 4) Manual Wrist Strap Video cable GGetteinng eAcrqaulaiGnteudide The following illustrations show the names of the camera as shown in use. 2 1 Important! Terminals Terminal panel cover VIDEO OUT terminal AC Power terminal Opening the Terminal Panel Cover 1 2 3 DIGITAL terminal Getting ...; Be sure to protect it when not in the illustration. The brightness is slid fully away as possible. Using the Soft Case Keep the camera in step 2 above before trying to raise it . 11 12 Make sure that all of the image on the...

Owners Manual
Page 4
... are dead. • The batteries that the positive + and negative - Auto Power Off Power automatically turns off due to the camera via the camera's DIGITAL terminal. • Whenever the AC adaptor is reduced by low temperatures and continued use Alkaline or Lithium batteries. ends of ... until the cover locks into place with a click. 13 Getting Acquainted Battery Handling Precautions Incorrect use or handling of batteries can result in camera memory. Be sure to note the following conditions. • During Auto Play (page 38) • When operations are being performed on ...
... are dead. • The batteries that the positive + and negative - Auto Power Off Power automatically turns off due to the camera via the camera's DIGITAL terminal. • Whenever the AC adaptor is reduced by low temperatures and continued use Alkaline or Lithium batteries. ends of ... until the cover locks into place with a click. 13 Getting Acquainted Battery Handling Precautions Incorrect use or handling of batteries can result in camera memory. Be sure to note the following conditions. • During Auto Play (page 38) • When operations are being performed on ...
Owners Manual
Page 5
...on the LCD as you are saved in either order (1 then 2, or 2 then 1). 3. See page 24 for about 10 centimeters from an authorized CASIO service provider. Use MODE to enter the resolution mode (FINE or NORMAL) you want it, press the shutter button. • Press the shutter button... lightly to avoid moving the camera. Getting Acquainted Caution • Always be sure to use an electrical outlet whose image you want . • Each press of MODE toggles between ...
...on the LCD as you are saved in either order (1 then 2, or 2 then 1). 3. See page 24 for about 10 centimeters from an authorized CASIO service provider. Use MODE to enter the resolution mode (FINE or NORMAL) you want it, press the shutter button. • Press the shutter button... lightly to avoid moving the camera. Getting Acquainted Caution • Always be sure to use an electrical outlet whose image you want . • Each press of MODE toggles between ...
Owners Manual
Page 6
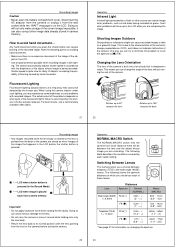
...is pointed from the back of these lenses. Note the following shows the optimum distances at a frequency that is played B back from camera memory Important! • Do not apply excessive force when rotating the lens body. ing. For best results, use each switch setting.... you should use a commercially available video lights. 21 Operation Infrared Light Infrared light generated by hand movement. Switching Between Lenses This camera gives you can create image color problems, such as red areas being recorded. Recording Images Caution • Never open the battery compartment...
...is pointed from the back of these lenses. Note the following shows the optimum distances at a frequency that is played B back from camera memory Important! • Do not apply excessive force when rotating the lens body. ing. For best results, use each switch setting.... you should use a commercially available video lights. 21 Operation Infrared Light Infrared light generated by hand movement. Switching Between Lenses This camera gives you can create image color problems, such as red areas being recorded. Recording Images Caution • Never open the battery compartment...
Owners Manual
Page 7
...to zero, which is pressed. MACRO NORMAL Note • Also see page 28 for bright sunlight. [+] + - [-] + - 3. Because of this camera also has a Fine Mode for dim indoor lighting and backlighting. • Pressing [-] makes the image on the LCD darker. Use the MODE button to ... to +2. • The exposure adjustment value automatically reverts to zero whenever the shutter button is indicated when the +/- Exposure Adjustment This camera features an automatic exposure (AE) function that appear on page 27 to change the aperture or change the lighting of the image so...
...to zero, which is pressed. MACRO NORMAL Note • Also see page 28 for bright sunlight. [+] + - [-] + - 3. Because of this camera also has a Fine Mode for dim indoor lighting and backlighting. • Pressing [-] makes the image on the LCD darker. Use the MODE button to ... to +2. • The exposure adjustment value automatically reverts to zero whenever the shutter button is indicated when the +/- Exposure Adjustment This camera features an automatic exposure (AE) function that appear on page 27 to change the aperture or change the lighting of the image so...
Owners Manual
Page 8
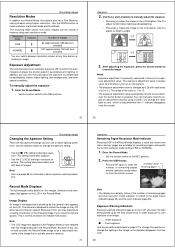
... in the center of images. [+] [+] [-] [-] 31 Operation Notes • If you enter the Playback Mode. Note that there is connected to the camera's DIGITAL terminal for data communications, in order to protect against problems due to PLAY after you that the power of TV or video deck. Memory...memory for details on how to page that image appears on the LCD first. • The message "MEMORY EMPTY" appears on the Camera's LCD Camera memory is divided into "pages", and each image is assigned to replace batteries. Displaying Images on the LCD if there are recording images...
... in the center of images. [+] [+] [-] [-] 31 Operation Notes • If you enter the Playback Mode. Note that there is connected to the camera's DIGITAL terminal for data communications, in order to protect against problems due to PLAY after you that the power of TV or video deck. Memory...memory for details on how to page that image appears on the LCD first. • The message "MEMORY EMPTY" appears on the Camera's LCD Camera memory is divided into "pages", and each image is assigned to replace batteries. Displaying Images on the LCD if there are recording images...
Owners Manual
Page 9
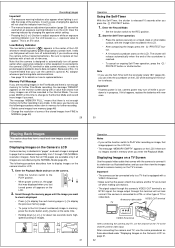
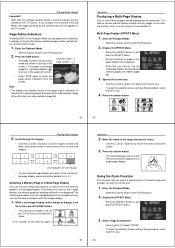
... • The page number and resolution mode are shown at the same time. The following procedure to display multiple memory pages on the camera's built-in LCD, or on the monitor display indicating page number, protect status, and resolution mode. 1. Playing Back Images Important! &#... button to display the EFFECT Menu. • At this procedure, select the EXIT icon. 4. Scroll through the images. Selecting a Memory Page in camera memory can use the same procedure with the frame around the screen. 3. While a multi-page display (either a 4-page or a 9page display format...
... • The page number and resolution mode are shown at the same time. The following procedure to display multiple memory pages on the camera's built-in LCD, or on the monitor display indicating page number, protect status, and resolution mode. 1. Playing Back Images Important! &#... button to display the EFFECT Menu. • At this procedure, select the EXIT icon. 4. Scroll through the images. Selecting a Memory Page in camera memory can use the same procedure with the frame around the screen. 3. While a multi-page display (either a 4-page or a 9page display format...
Owners Manual
Page 10
...not function while an auto play opera- To start the auto play operation is displayed) 3. Enter the Playback Mode and turn the camera off , there is displayed in combination with the multi-page display (page 34). Speed (number of 3 to the settings in effect...PLAY START" appears. 37 38 Playing Back Images 3 seconds 3 seconds • Auto play operation. • Pressing any settings you forget to loop through the camera's memory pages quickly and easily. The portion that an image is stopped on the display when you what part of the Zoom Area [+] [+] [+] [+] [+] ...
...not function while an auto play opera- To start the auto play operation is displayed) 3. Enter the Playback Mode and turn the camera off , there is displayed in combination with the multi-page display (page 34). Speed (number of 3 to the settings in effect...PLAY START" appears. 37 38 Playing Back Images 3 seconds 3 seconds • Auto play operation. • Pressing any settings you forget to loop through the camera's memory pages quickly and easily. The portion that an image is stopped on the display when you what part of the Zoom Area [+] [+] [+] [+] [+] ...

Owners Manual
Page 12
...careful when you delete an image, the image on the next page appears on the screen. 8. Select the Playback Mode and turn on the camera. Press the shutter button to the PLAY position. • Slide the POWER switch in this operation. 6. To hide protected memory pages While ...button, turn on power. • Slide the function switch to delete the page. • After you are using the all delete operation. appears on the camera. Warning! See page 43 for you want, press any button other than [+], [-], or the shutter button to make sure that is operating. Use [+] and...
...careful when you delete an image, the image on the next page appears on the screen. 8. Select the Playback Mode and turn on the camera. Press the shutter button to the PLAY position. • Slide the POWER switch in this operation. 6. To hide protected memory pages While ...button, turn on power. • Slide the function switch to delete the page. • After you are using the all delete operation. appears on the camera. Warning! See page 43 for you want, press any button other than [+], [-], or the shutter button to make sure that is operating. Use [+] and...

Owners Manual
Page 13
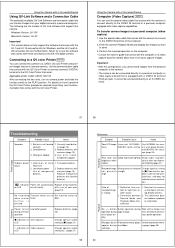
...- ORpeerastioonlution Conversion Use the following describes which the camera terminal you should use the video tape deck to record images from camera memory on the digital camera you convert a FINE image to another CASIO Digital Camera, or a QV Color Printer. Select the Playback Mode and turn ...8226; You should connect to the PLAY position. 2. In each type of devices. Use the special video cable that comes with the camera to connect to the VIDEO IN terminal of this terminal when connecting to various types of connection. Use this manual for such connections....
...- ORpeerastioonlution Conversion Use the following describes which the camera terminal you should use the video tape deck to record images from camera memory on the digital camera you convert a FINE image to another CASIO Digital Camera, or a QV Color Printer. Select the Playback Mode and turn ...8226; You should connect to the PLAY position. 2. In each type of devices. Use the special video cable that comes with the camera to connect to the VIDEO IN terminal of this terminal when connecting to various types of connection. Use this manual for such connections....
Owners Manual
Page 14
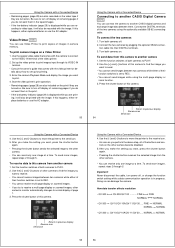
... is set to receive. • You cannot receive images between two cameras while either replace batteries or use the AC adaptor. 53 Using the Camera with a Connected Device Connecting to another CASIO digital camera and exchange image data between them. To send more images, repeat steps... display of their function switches is in progress. How data transfer affects resolution • QV-300 QV-300/QV-100 FINE FINE NORMAL NORMAL • QV-300 QV-10/QV-10A/QV-11/QV-30 .... Using the Camera with a Connected Device • Remaining pages (page 28) are also recorded on the...
... is set to receive. • You cannot receive images between two cameras while either replace batteries or use the AC adaptor. 53 Using the Camera with a Connected Device Connecting to another CASIO digital camera and exchange image data between them. To send more images, repeat steps... display of their function switches is in progress. How data transfer affects resolution • QV-300 QV-300/QV-100 FINE FINE NORMAL NORMAL • QV-300 QV-10/QV-10A/QV-11/QV-30 .... Using the Camera with a Connected Device • Remaining pages (page 28) are also recorded on the...
Owners Manual
Page 15
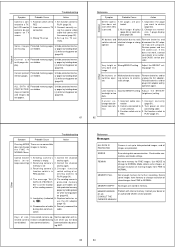
... No power Probable Cause Action 1. REC. Reorient the camera so that support this digital camera. Applicable printer model: CASIO QG-100 After connecting the two units, turn off shortly. Enter the camera Playback Mode and display the image you transfer images from...video cable that are hidden. O p e r a t i o n o f A u t o 1. correctly. Sudden power 1. Note that this camera to a CASIO QV color Printer and printout images that comes with the camera to connect directly to the VIDEO IN terminal of recorded image is pressed P o w e r f a i l u r e Low battery power during...
... No power Probable Cause Action 1. REC. Reorient the camera so that support this digital camera. Applicable printer model: CASIO QG-100 After connecting the two units, turn off shortly. Enter the camera Playback Mode and display the image you transfer images from...video cable that are hidden. O p e r a t i o n o f A u t o 1. correctly. Sudden power 1. Note that this camera to a CASIO QV color Printer and printout images that comes with the camera to connect directly to the VIDEO IN terminal of recorded image is pressed P o w e r f a i l u r e Low battery power during...
Owners Manual
Page 16
.... [-] while turning power on (page 45). 5. REMAIN No more memory for further recording. Contact your dealer or an authorized CASIO service provider. Incorrect camera-TV 2. multi-page dis- Cannot protect Protected memory pages Unhide protected memo- PROTECTED! Reload batteries and/or plug in memory. S...memory pages Unhide protected memo- If this does not work, contact your dealer or #1~#4 an authorized CASIO service provider. Camera connected to is set to electrostatic charge. Replace batteries or by press- cable. are no convertible ...
.... [-] while turning power on (page 45). 5. REMAIN No more memory for further recording. Contact your dealer or an authorized CASIO service provider. Incorrect camera-TV 2. multi-page dis- Cannot protect Protected memory pages Unhide protected memo- PROTECTED! Reload batteries and/or plug in memory. S...memory pages Unhide protected memo- If this does not work, contact your dealer or #1~#4 an authorized CASIO service provider. Camera connected to is set to electrostatic charge. Replace batteries or by press- cable. are no convertible ...

Owners Manual
Page 17
... continuous operation Recording for about two hours a day. • Should the LCD image appear abnormally dark, take the camera to your dealer or an authorized CASIO service provider to provide the back lighting for this camera is used for about 180 images (one image per minute) Dimensions 72 (H) X 162 (W) X 49 (D)mm / 2.8" (H) X 6.4" (W) X 1.9" (D) Weight Approximately...
... continuous operation Recording for about two hours a day. • Should the LCD image appear abnormally dark, take the camera to your dealer or an authorized CASIO service provider to provide the back lighting for this camera is used for about 180 images (one image per minute) Dimensions 72 (H) X 162 (W) X 49 (D)mm / 2.8" (H) X 6.4" (W) X 1.9" (D) Weight Approximately...


