User Guide
Page 9
...Accompaniment E-32 Using an Intro Pattern E-34 Using a Fill-in Pattern E-34 Using a Rhythm Variation E-34 Using a Fill-in this manual may be sent and received using the USB port Company and product names used in Pattern with a Variation Rhythm E-35 Synchro Starting Accompaniment ... the Selections in the Song Bank Tunes E-48 General MIDI Tone E-49 Changing the Settings E-49 Troubleshooting E-51 Specifications E-53 Care of your keyboard E-54 Appendix A-1 Tone List/Note Table A-1 Drum Assignment List A-6 FINGERED Chord Chart A-7 Rhythm List A-8 Song List A-9 MIDI messages that ...
...Accompaniment E-32 Using an Intro Pattern E-34 Using a Fill-in Pattern E-34 Using a Rhythm Variation E-34 Using a Fill-in this manual may be sent and received using the USB port Company and product names used in Pattern with a Variation Rhythm E-35 Synchro Starting Accompaniment ... the Selections in the Song Bank Tunes E-48 General MIDI Tone E-49 Changing the Settings E-49 Troubleshooting E-51 Specifications E-53 Care of your keyboard E-54 Appendix A-1 Tone List/Note Table A-1 Drum Assignment List A-6 FINGERED Chord Chart A-7 Rhythm List A-8 Song List A-9 MIDI messages that ...
User Guide
Page 11
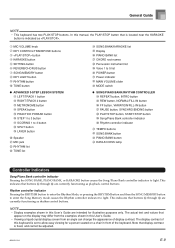
...the SONG BANK, PIANO BANK, or KARAOKE button causes the Song/Piano Bank controller indicator to light. The display contrast of the keyboard. Rhythm controller indicator Pressing the RHYTHM button to enter the Rhythm Mode, or pressing the RHYTHM button and then the SONG MEMORY... indicates that buttons X through \ are currently functioning as playback control buttons. General Guide NOTE • This keyboard has two PLAY/STOP buttons. NOTE • Display examples shown in this manual, the PLAY/STOP button that display contrast is fixed, and cannot be adjusted. 655A-E-011A E-9 In this...
...the SONG BANK, PIANO BANK, or KARAOKE button causes the Song/Piano Bank controller indicator to light. The display contrast of the keyboard. Rhythm controller indicator Pressing the RHYTHM button to enter the Rhythm Mode, or pressing the RHYTHM button and then the SONG MEMORY... indicates that buttons X through \ are currently functioning as playback control buttons. General Guide NOTE • This keyboard has two PLAY/STOP buttons. NOTE • Display examples shown in this manual, the PLAY/STOP button that display contrast is fixed, and cannot be adjusted. 655A-E-011A E-9 In this...
User Guide
Page 16
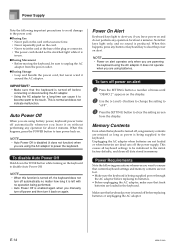
... the AC adaptor. Power Supply Note the following precautions whenever you want to ensure that current keyboard settings and memory contents are not lost. • Make sure the keyboard is enabled again when you manually turn off power and then turn it back on again. GDuring Movement • Before moving... the keyboard, be sure to unplug the AC adaptor from the display. GDuring Storage • Loop and ...
... the AC adaptor. Power Supply Note the following precautions whenever you want to ensure that current keyboard settings and memory contents are not lost. • Make sure the keyboard is enabled again when you manually turn off power and then turn it back on again. GDuring Movement • Before moving... the keyboard, be sure to unplug the AC adaptor from the display. GDuring Storage • Loop and ...
User Guide
Page 49
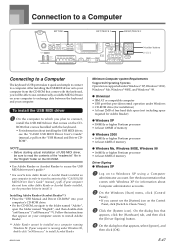
... the USB MIDI driver 1 On the computer to which you will be installed on the "USB Manual and Driver CDROM". Installing Adobe Reader (Acrobat Reader**) • Place the "USB Manual and Driver CD-ROM" into your computer is supported under Windows 98, double-click "ar505enu.exe"...install the USB MIDI driver that comes on the CDROM that comes with the keyboard. • For information about Computer administrator accounts. 2 On the Windows [Start] menu, click [Control Panel]. • If you cannot see the "CASIO USB MIDI Driver User's Guide" (manual_e.pdf) on a computer running ...
... the USB MIDI driver 1 On the computer to which you will be installed on the "USB Manual and Driver CDROM". Installing Adobe Reader (Acrobat Reader**) • Place the "USB Manual and Driver CD-ROM" into your computer is supported under Windows 98, double-click "ar505enu.exe"...install the USB MIDI driver that comes on the CDROM that comes with the keyboard. • For information about Computer administrator accounts. 2 On the Windows [Start] menu, click [Control Panel]. • If you cannot see the "CASIO USB MIDI Driver User's Guide" (manual_e.pdf) on a computer running ...
User Guide
Page 50
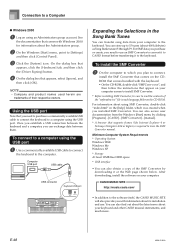
... installing SMF Converter, be sure to read the contents of the SMF Converter by clicking [Programs] - [CASIO] - [SMF Converter] - [manual]. * A browser that appears, select [Ignore], and then click [OK]. Computer USB port USB cable USB connector Keyboard USB port Expanding the Selections in the [help] folder, which you plan to connect, install the...
... installing SMF Converter, be sure to read the contents of the SMF Converter by clicking [Programs] - [CASIO] - [SMF Converter] - [manual]. * A browser that appears, select [Ignore], and then click [OK]. Computer USB port USB cable USB connector Keyboard USB port Expanding the Selections in the [help] folder, which you plan to connect, install the...

User Guide
Page 56
... detergent. Avoid use lacquer, thinner or similar chemicals for concern. They are no cause for cleaning. This condition should correct itself when the keyboard is almost dry. These lines are subject to direct sunlight, or place it is brought back to temperature extremes. Care of your... squeeze until it near an air conditioner, or in the finish of the case of this keyboard. NOTE • You may notice lines in any extremely hot place. Extremely high or low temperature can be disabled manually. 2.5W + 2.5W 9V 7.7W 96.0 x 37.5 x 14.6 cm (37 13/16 x 14 3/4 x 5 3/4 inch)...
... detergent. Avoid use lacquer, thinner or similar chemicals for concern. They are no cause for cleaning. This condition should correct itself when the keyboard is almost dry. These lines are subject to direct sunlight, or place it is brought back to temperature extremes. Care of your... squeeze until it near an air conditioner, or in the finish of the case of this keyboard. NOTE • You may notice lines in any extremely hot place. Extremely high or low temperature can be disabled manually. 2.5W + 2.5W 9V 7.7W 96.0 x 37.5 x 14.6 cm (37 13/16 x 14 3/4 x 5 3/4 inch)...


