User Guide
Page 6
.... IMPORTANT! High volume settings can cause momentary muscle spasms, loss of consciousness, or other area that is required when using the microphone • Dimming of keyboard lights when notes sound • Loss of power, sound distortion, or low volume when playing from it to fall and creating the risk of the...
.... IMPORTANT! High volume settings can cause momentary muscle spasms, loss of consciousness, or other area that is required when using the microphone • Dimming of keyboard lights when notes sound • Loss of power, sound distortion, or low volume when playing from it to fall and creating the risk of the...
User Guide
Page 7
...in real time. You can even have the keyboard report your keyboard, use special CASIO conversion software to convert SMF data you purchase or create to CASIO format, and then transfer it to the keyboard. ❐ VIDEO OUT Jack Connect the keyboard to piano tones and piano lessons. ❐..., and chord parts play along automatically. ❐ Musical Information System A big LCD screen graphically shows you fingerings and notes, making keyboard play more . Other features include digital effects that key lights may be difficult to teach you practice at your performances during karaoke. ...
...in real time. You can even have the keyboard report your keyboard, use special CASIO conversion software to convert SMF data you purchase or create to CASIO format, and then transfer it to the keyboard. ❐ VIDEO OUT Jack Connect the keyboard to piano tones and piano lessons. ❐..., and chord parts play along automatically. ❐ Musical Information System A big LCD screen graphically shows you fingerings and notes, making keyboard play more . Other features include digital effects that key lights may be difficult to teach you practice at your performances during karaoke. ...
User Guide
Page 8
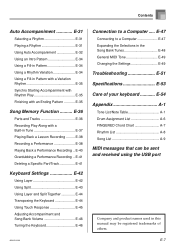
... E-29 E-6 655A-E-008A Contents Safety Precautions E-1 Main Features E-5 General Guide E-8 Attaching the Score Stand E-10 Quick Reference E-11 To play the keyboard E-11 Power Supply E-13 Using batteries E-13 Using the AC Adaptor E-13 Auto Power Off E-14 Power On Alert E-14 Memory Contents E-14 ...port E-15 Sustain/Assignable Jack E-15 Microphone Jack E-16 VIDEO OUT Jack E-16 Accessories and Options E-16 Basic Operations E-17 To play the keyboard E-17 Selecting a Tone E-17 Using Tone Effects E-18 Turning the Key Light System On and Off E-18 Playing a Built-in Tune ...
... E-29 E-6 655A-E-008A Contents Safety Precautions E-1 Main Features E-5 General Guide E-8 Attaching the Score Stand E-10 Quick Reference E-11 To play the keyboard E-11 Power Supply E-13 Using batteries E-13 Using the AC Adaptor E-13 Auto Power Off E-14 Power On Alert E-14 Memory Contents E-14 ...port E-15 Sustain/Assignable Jack E-15 Microphone Jack E-16 VIDEO OUT Jack E-16 Accessories and Options E-16 Basic Operations E-17 To play the keyboard E-17 Selecting a Tone E-17 Using Tone Effects E-18 Turning the Key Light System On and Off E-18 Playing a Built-in Tune ...
User Guide
Page 9
...Using Layer E-42 Using Split E-43 Using Layer and Split Together E-44 Transposing the Keyboard E-44 Using Touch Response E-45 Adjusting Accompaniment and Song Bank Volume E-46 Tuning the Keyboard E-46 655A-E-009A Connection to a Computer E-47 Expanding the Selections in the Song Bank... Tunes E-48 General MIDI Tone E-49 Changing the Settings E-49 Troubleshooting E-51 Specifications E-53 Care of your keyboard E-54 Appendix A-1 Tone List/Note Table A-1 Drum Assignment List A-6 FINGERED Chord Chart A-7 Rhythm List A-8 Song List A-9 MIDI messages that...
...Using Layer E-42 Using Split E-43 Using Layer and Split Together E-44 Transposing the Keyboard E-44 Using Touch Response E-45 Adjusting Accompaniment and Song Bank Volume E-46 Tuning the Keyboard E-46 655A-E-009A Connection to a Computer E-47 Expanding the Selections in the Song Bank... Tunes E-48 General MIDI Tone E-49 Changing the Settings E-49 Troubleshooting E-51 Specifications E-53 Care of your keyboard E-54 Appendix A-1 Tone List/Note Table A-1 Drum Assignment List A-6 FINGERED Chord Chart A-7 Rhythm List A-8 Song List A-9 MIDI messages that...
User Guide
Page 11
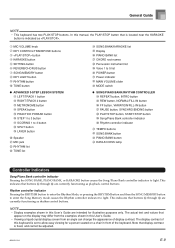
...the examples shown in this User's Guide. • Viewing a liquid crystal display screen from an angle can change the appearance of the keyboard. NOTE • Display examples shown in this User's Guide are currently functioning as rhythm control buttons. General Guide NOTE • This... keyboard has two PLAY/STOP buttons. Rhythm controller indicator Pressing the RHYTHM button to enter the Rhythm Mode, or pressing the RHYTHM button ...
...the examples shown in this User's Guide. • Viewing a liquid crystal display screen from an angle can change the appearance of the keyboard. NOTE • Display examples shown in this User's Guide are currently functioning as rhythm control buttons. General Guide NOTE • This... keyboard has two PLAY/STOP buttons. Rhythm controller indicator Pressing the RHYTHM button to enter the Rhythm Mode, or pressing the RHYTHM button ...
User Guide
Page 12
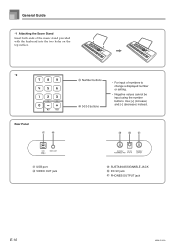
Use [+] (increase) and [-] (decrease) instead. General Guide *1 Attaching the Score Stand Insert both ends of the music stand provided with the keyboard into the two holes on the top surface. *2 Rear Panel g h e Number buttons f [+]/[-] buttons • For input of numbers to change a displayed number or setting. • Negative values cannot be input using the number buttons. i jk g USB port h VIDEO OUT jack i SUSTAIN/ASSIGNABLE JACK j DC 9V jack k PHONES/OUTPUT jack E-10 655A-E-012A
Use [+] (increase) and [-] (decrease) instead. General Guide *1 Attaching the Score Stand Insert both ends of the music stand provided with the keyboard into the two holes on the top surface. *2 Rear Panel g h e Number buttons f [+]/[-] buttons • For input of numbers to change a displayed number or setting. • Negative values cannot be input using the number buttons. i jk g USB port h VIDEO OUT jack i SUSTAIN/ASSIGNABLE JACK j DC 9V jack k PHONES/OUTPUT jack E-10 655A-E-012A
User Guide
Page 13
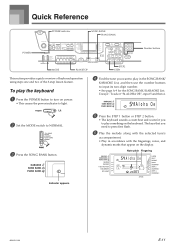
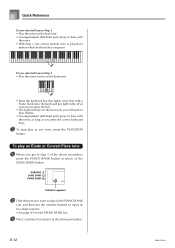
... 5 and then 4. Quick Reference POWER indicator SONG BANK PIANO BANK POWER Number buttons MODE PLAY/STOP STEP2 STEP1 This section provides a quick overview of keyboard operation using steps one and two of the 3-step lesson feature. The keys that you need to press first flash. 6 Play the melody along with...BANK/ KARAOKE List, and then use the number buttons to input its two-digit number. • See page A-9 for you want to play the keyboard 1 Press the POWER button to turn on power. • This causes the power indicator to play something on the display. Note pitch Fingering Al ...
... 5 and then 4. Quick Reference POWER indicator SONG BANK PIANO BANK POWER Number buttons MODE PLAY/STOP STEP2 STEP1 This section provides a quick overview of keyboard operation using steps one and two of the 3-step lesson feature. The keys that you need to press first flash. 6 Play the melody along with...BANK/ KARAOKE List, and then use the number buttons to input its two-digit number. • See page A-9 for you want to play the keyboard 1 Press the POWER button to turn on power. • This causes the power indicator to play something on the display. Note pitch Fingering Al ...
User Guide
Page 14
... time, press the PLAY/STOP button. Quick Reference If you selected lesson Step 1 • Play the notes on the keyboard. • Press the keyboard key that with a Piano Bank tune, the keyboard key light turns off as soon as you press. Note that lights. If you selected lesson Step 2 • Play...procedure, press the PIANO BANK button in time with the notes. • With Step 1, the correct melody note is played no matter which keyboard key you press the correct keyboard keys. 7 To stop play flashes. • Accompaniment (left-hand part) plays in place of the SONG BANK button.
... time, press the PLAY/STOP button. Quick Reference If you selected lesson Step 1 • Play the notes on the keyboard. • Press the keyboard key that with a Piano Bank tune, the keyboard key light turns off as soon as you press. Note that lights. If you selected lesson Step 2 • Play...procedure, press the PIANO BANK button in time with the notes. • With Step 1, the correct melody note is played no matter which keyboard key you press the correct keyboard keys. 7 To stop play flashes. • Accompaniment (left-hand part) plays in place of the SONG BANK button.

User Guide
Page 15
... positive (+) and negative (-) ends are not using the specified AC adaptor) or by incineration. • Never mix old batteries with the keyboard volume at very loud volume settings can cause them to leak, resulting in damage to nearby objects, or to explode, creating the risk of...015A E-13 Always make sure you use it . Always make sure you load or replace batteries with this happens, turning the keyboard off the keyboard before loading or replacing batteries. Using batteries Always make sure you turn off and then back on again should return functions back to...
... positive (+) and negative (-) ends are not using the specified AC adaptor) or by incineration. • Never mix old batteries with the keyboard volume at very loud volume settings can cause them to leak, resulting in damage to nearby objects, or to explode, creating the risk of...015A E-13 Always make sure you use it . Always make sure you load or replace batteries with this happens, turning the keyboard off the keyboard before loading or replacing batteries. Using batteries Always make sure you turn off and then back on again should return functions back to...
User Guide
Page 16
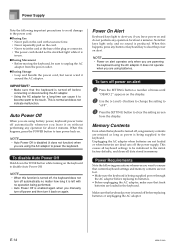
... supply. Unplugging the AC adaptor when batteries are not loaded or when batteries are retained as long as power is being supplied to the keyboard. Note that keys light only, and no operation being performed. • Auto Power Off is enabled again when you manually turn power back...and [-] buttons to change the setting to "oFF". 3 Press the SETTING button to clear the setting screen from the power outlet. Make sure that keyboard power is turned off automatically no matter how long it is left with excessive force. • Never repeatedly pull on the cord. • Never ...
... supply. Unplugging the AC adaptor when batteries are not loaded or when batteries are retained as long as power is being supplied to the keyboard. Note that keys light only, and no operation being performed. • Auto Power Off is enabled again when you manually turn power back...and [-] buttons to change the setting to "oFF". 3 Press the SETTING button to clear the setting screen from the power outlet. Make sure that keyboard power is turned off automatically no matter how long it is left with excessive force. • Never repeatedly pull on the cord. • Never ...
User Guide
Page 17
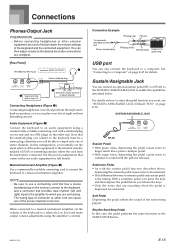
... standard plug on page E-50. The wrong type of connector at night without disturbing anyone. Sustain/Assignable Jack You can also connect the keyboard to enable the capabilities described below. Rhythm Start/Stop Pedal In this configuration, you normally set the volume of the notes being played....notes to continue to a musical instrument amplifier. See the user documentation that the standard plug you connect to output only one of the keyboard and the connected equipment. White Red PIN plug 2 LEFT RIGHT AUX IN or similar terminal of the audio equipment to the terminal ...
... standard plug on page E-50. The wrong type of connector at night without disturbing anyone. Sustain/Assignable Jack You can also connect the keyboard to enable the capabilities described below. Rhythm Start/Stop Pedal In this configuration, you normally set the volume of the notes being played....notes to continue to a musical instrument amplifier. See the user documentation that the standard plug you connect to output only one of the keyboard and the connected equipment. White Red PIN plug 2 LEFT RIGHT AUX IN or similar terminal of the audio equipment to the terminal ...
User Guide
Page 18
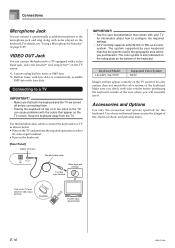
...TV with video input terminal IMPORTANT! • See the user documentation that comes with your retailer before connecting them. • Placing the keyboard on top of the keyboard. Accessories and Options Use only the accessories and options specified for information about how to configure the required settings. • A TV ... color system is also indicated on the rating plate on the TV and select its color system. Keyboard Model LK-94TV/LK-95TV Supported Color System NTSC Images will normally use it . Make sure you check with a video input jack, and view lessons*1 and ...
...TV with video input terminal IMPORTANT! • See the user documentation that comes with your retailer before connecting them. • Placing the keyboard on top of the keyboard. Accessories and Options Use only the accessories and options specified for information about how to configure the required settings. • A TV ... color system is also indicated on the rating plate on the TV and select its color system. Keyboard Model LK-94TV/LK-95TV Supported Color System NTSC Images will normally use it . Make sure you check with a video input jack, and view lessons*1 and ...
User Guide
Page 19
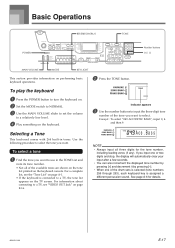
... Indicator appears 3 Use the number buttons to input the three-digit tone number of the drum sets is selected (tone numbers 256 through 263), each keyboard key is connected to select. If you input one or two digits and stop, the display will automatically clear your input after a few seconds. •...2 Set the MODE switch to NORMAL. 3 Use the MAIN VOLUME slider to set the volume to a TV, see the "Tone List" on the keyboard console. Selecting a Tone This keyboard comes with 264 built-in the TONE List and note its tone number. • Not all three digits for details. 655A-E-019A E-17...
... Indicator appears 3 Use the number buttons to input the three-digit tone number of the drum sets is selected (tone numbers 256 through 263), each keyboard key is connected to select. If you input one or two digits and stop, the display will automatically clear your input after a few seconds. •...2 Set the MODE switch to NORMAL. 3 Use the MAIN VOLUME slider to set the volume to a TV, see the "Tone List" on the keyboard console. Selecting a Tone This keyboard comes with 264 built-in the TONE List and note its tone number. • Not all three digits for details. 655A-E-019A E-17...
User Guide
Page 20
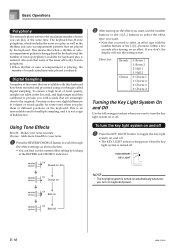
... and auto-accompaniment patterns that you need to select an effect type with sounds that some tones when you play them at different positions on keyboard power. NOTE • The key light system is turned off . Effect List Reverb Chorus 0: Room 1 1: Room 2 2: Hall 1 3: Hall 2 0: Chorus 1 1: Chorus 2... Chorus 4 Turning the Key Light System On and Off Use the following procedure when you want . • Note that are played by the keyboard, the number of notes (polyphony) available for some of the tones offer only 16-note polyphony. • When rhythm or auto accompaniment is playing...
... and auto-accompaniment patterns that you need to select an effect type with sounds that some tones when you play them at different positions on keyboard power. NOTE • The key light system is turned off . Effect List Reverb Chorus 0: Room 1 1: Room 2 2: Hall 1 3: Hall 2 0: Chorus 1 1: Chorus 2... Chorus 4 Turning the Key Light System On and Off Use the following procedure when you want . • Note that are played by the keyboard, the number of notes (polyphony) available for some of the tones offer only 16-note polyphony. • When rhythm or auto accompaniment is playing...
User Guide
Page 21
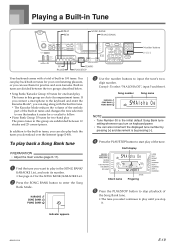
... tunes for your own listening pleasure, or you can sing along with a total of built-in 100 tunes. If you connect a microphone to the keyboard and enter the Karaoke Mode*, you download over the Internet (page E-48). digit number. Indicator appears 655A-E-021A E-19 Playing a Built-in Tune ...REPEAT REW SONG BANK PIANO BANK Number buttons [+] / [-] FF PAUSE TEMPO PLAY/STOP Your keyboard comes with the built-in tune. * The Karaoke Mode reduces the volume of the melody part of the built-in tunes and changes the tone...
... tunes for your own listening pleasure, or you can sing along with a total of built-in 100 tunes. If you connect a microphone to the keyboard and enter the Karaoke Mode*, you download over the Internet (page E-48). digit number. Indicator appears 655A-E-021A E-19 Playing a Built-in Tune ...REPEAT REW SONG BANK PIANO BANK Number buttons [+] / [-] FF PAUSE TEMPO PLAY/STOP Your keyboard comes with the built-in tune. * The Karaoke Mode reduces the volume of the melody part of the built-in tunes and changes the tone...
User Guide
Page 22
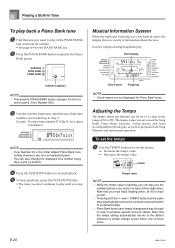
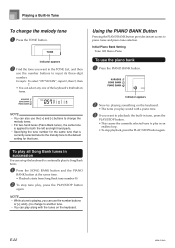
Od e T o J o y NOTE • Tune Number 00 is the initial default Piano Bank tune setting whenever you turn on keyboard power. • You can also change occurs within one of 30 to 255. Flash Tempo value NOTE • While the tempo value is input as ... the Tempo The tempo (beats per minute) can also use the number buttons or [+] and [-] to input a three-digit value. Musical Information System When the keyboard is used for Piano Bank tunes.
Od e T o J o y NOTE • Tune Number 00 is the initial default Piano Bank tune setting whenever you turn on keyboard power. • You can also change occurs within one of 30 to 255. Flash Tempo value NOTE • While the tempo value is input as ... the Tempo The tempo (beats per minute) can also use the number buttons or [+] and [-] to input a three-digit value. Musical Information System When the keyboard is used for Piano Bank tunes.
User Guide
Page 24
... 5, then 7. • You can also use the number buttons or [+] and [-] to change to another tune. • You can set up the keyboard to continually play , press the PLAY/STOP button again. Initial Piano Bank Setting Tone: 000 Stereo Piano To use the number buttons to change the... button. • This causes the currently selected tune to piano tones and piano tune selection. Indicator appears 2 Now try playing something on the keyboard. E-22 655A-E-024A Using the PIANO BANK Button Pressing the PIANO BANK button provides instant access to play sound with a piano tone. 3 If...
... 5, then 7. • You can also use the number buttons or [+] and [-] to change to another tune. • You can set up the keyboard to continually play , press the PLAY/STOP button again. Initial Piano Bank Setting Tone: 000 Stereo Piano To use the number buttons to change the... button. • This causes the currently selected tune to piano tones and piano tune selection. Indicator appears 2 Now try playing something on the keyboard. E-22 655A-E-024A Using the PIANO BANK Button Pressing the PIANO BANK button provides instant access to play sound with a piano tone. 3 If...
User Guide
Page 25
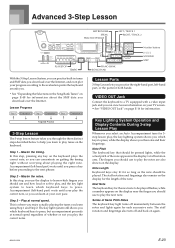
... During 3-step Lesson Play Whenever you select an Auto Accompaniment tune for as long as the note should use to the evaluation points the keyboard awards you. * See "Expanding the Selections in the Song Bank Tunes" on the display. The fingers you should be pressed lights, ...3-step lesson feature takes you through the three distinct steps described below to a TV equipped with a video input jack and you can concentrate on the keyboard. Advanced 3-Step Lesson METRONOME SPEAK PRACTICE PHRASE LEFT / TRACK 1 RIGHT / TRACK 2 PLAY/STOP TEMPO With the 3-Step Lesson System, you can ...
... During 3-step Lesson Play Whenever you select an Auto Accompaniment tune for as long as the note should use to the evaluation points the keyboard awards you. * See "Expanding the Selections in the Song Bank Tunes" on the display. The fingers you should be pressed lights, ...3-step lesson feature takes you through the three distinct steps described below to a TV equipped with a video input jack and you can concentrate on the keyboard. Advanced 3-Step Lesson METRONOME SPEAK PRACTICE PHRASE LEFT / TRACK 1 RIGHT / TRACK 2 PLAY/STOP TEMPO With the 3-Step Lesson System, you can ...
User Guide
Page 26
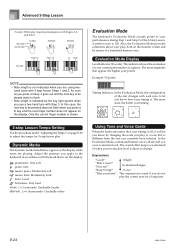
...piano: Moderately soft mezzo forte: Moderately loud forte: Loud fortissimo: Very loud cresc. () decrescendo: Gradually softer Using Tone and Voice Guide When the keyboard senses that your timing is indicated by means of your points. "That's close!" As soon as you press a lit key, it goes out ... during Step 1 and Step 2 of when your play, both on page E-20 to the keyboard in accordance with the mark that appear, the higher your current performance at a glance. Evaluation Mode The keyboard's Evaluation Mode awards points to a tone that is on the display. Evaluation Mode Display Level...
...piano: Moderately soft mezzo forte: Moderately loud forte: Loud fortissimo: Very loud cresc. () decrescendo: Gradually softer Using Tone and Voice Guide When the keyboard senses that your timing is indicated by means of your points. "That's close!" As soon as you press a lit key, it goes out ... during Step 1 and Step 2 of when your play, both on page E-20 to the keyboard in accordance with the mark that appear, the higher your current performance at a glance. Evaluation Mode The keyboard's Evaluation Mode awards points to a tone that is on the display. Evaluation Mode Display Level...

User Guide
Page 27
... and cheering Applause only None None Evaluation Ranges "****" : indicates that point. appears before an evaluation result could be played flashes while the keyboard waits for you to be obtained. Master the timing. 1 Select the tune you want to practice both hands, press both buttons at the...hand part practice. "Not bad!" Step 1 - "Great!" NOTE • If your evaluation is flawless, the message "Perfect!" In this case, the keyboard does not display a message and play is . When you press any key to play the note, the key remains lit as two notes. 5 To stop...
... and cheering Applause only None None Evaluation Ranges "****" : indicates that point. appears before an evaluation result could be played flashes while the keyboard waits for you to be obtained. Master the timing. 1 Select the tune you want to practice both hands, press both buttons at the...hand part practice. "Not bad!" Step 1 - "Great!" NOTE • If your evaluation is flawless, the message "Perfect!" In this case, the keyboard does not display a message and play is . When you press any key to play the note, the key remains lit as two notes. 5 To stop...


