User Guide
Page 6
...Never place heavy object on the stand correctly. * Stand is required when using the microphone • Dimming of keyboard lights when notes sound • Loss of power, sound distortion, or low volume when playing from it to music ...key • A totally different tone may sound • Abnormal rhythm pattern and demo tune play • Abnormally low microphone volume • Distortion of personal injury. IMPORTANT! LCD panel liquid can cause momentary muscle spasms, loss of personal injury. Health Precaution In extremely rare cases, exposure to strong sudden light or flashing light...
...Never place heavy object on the stand correctly. * Stand is required when using the microphone • Dimming of keyboard lights when notes sound • Loss of power, sound distortion, or low volume when playing from it to music ...key • A totally different tone may sound • Abnormal rhythm pattern and demo tune play • Abnormally low microphone volume • Distortion of personal injury. IMPORTANT! LCD panel liquid can cause momentary muscle spasms, loss of personal injury. Health Precaution In extremely rare cases, exposure to strong sudden light or flashing light...
User Guide
Page 7
... screen graphically shows you fingerings and notes, making keyboard play more . Soon you will be configured to rate your progress as the keyboard keys light to teach you the correct notes. You can connect your keyboard to a computer, use special CASIO conversion software to convert SMF data you practice at... Lesson System lets you purchase or create to the keyboard. ❐ Memory Card Slot You can load a card with Auto Accompaniment, and a Piano Bank of 35 piano tunes. Other features include digital effects that key lights may be difficult to see under direct sunlight or under...
... screen graphically shows you fingerings and notes, making keyboard play more . Soon you will be configured to rate your progress as the keyboard keys light to teach you the correct notes. You can connect your keyboard to a computer, use special CASIO conversion software to convert SMF data you practice at... Lesson System lets you purchase or create to the keyboard. ❐ Memory Card Slot You can load a card with Auto Accompaniment, and a Piano Bank of 35 piano tunes. Other features include digital effects that key lights may be difficult to see under direct sunlight or under...
User Guide
Page 8
...notes E-25 Step 3 - Contents Safety Precautions E-1 Main Features E-5 General Guide E-8 Attaching the Score Stand E-10 Quick Reference E-11 To play the keyboard E-11 Power Supply E-12 Using batteries E-12 Using the AC Adaptor E-13 Auto Power Off E-13 Power On Alert E-14 Memory Contents E-14 ...Sustain/Assignable Jack E-15 Microphone Jack E-15 Accessories and Options E-15 Basic Operations E-16 To play the keyboard E-16 Selecting a Tone E-16 Using Tone Effects E-17 Turning the Key Light System On and Off E-17 Using the Microphone Jack E-17 Playing a Built-in Tune E-19 To ...
...notes E-25 Step 3 - Contents Safety Precautions E-1 Main Features E-5 General Guide E-8 Attaching the Score Stand E-10 Quick Reference E-11 To play the keyboard E-11 Power Supply E-12 Using batteries E-12 Using the AC Adaptor E-13 Auto Power Off E-13 Power On Alert E-14 Memory Contents E-14 ...Sustain/Assignable Jack E-15 Microphone Jack E-15 Accessories and Options E-15 Basic Operations E-16 To play the keyboard E-16 Selecting a Tone E-16 Using Tone Effects E-17 Turning the Key Light System On and Off E-17 Using the Microphone Jack E-17 Playing a Built-in Tune E-19 To ...

User Guide
Page 9
... Rhythm E-32 Synchro Starting Accompaniment with Rhythm Play E-32 Finishing with an Ending Pattern E-32 Keyboard Settings E-33 Using Touch Response (LK-215 Only E-33 Adjusting Accompaniment and Song Bank Volume E-33 Transposing the Keyboard E-34 Tuning the Keyboard E-34 Connection to a Computer E-35 Expanding the Selections in the Song Bank Tunes E-36 General...
... Rhythm E-32 Synchro Starting Accompaniment with Rhythm Play E-32 Finishing with an Ending Pattern E-32 Keyboard Settings E-33 Using Touch Response (LK-215 Only E-33 Adjusting Accompaniment and Song Bank Volume E-33 Transposing the Keyboard E-34 Tuning the Keyboard E-34 Connection to a Computer E-35 Expanding the Selections in the Song Bank Tunes E-36 General...
User Guide
Page 11
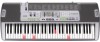
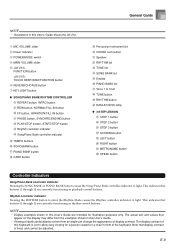
...purposes only. NOTE • Illustrations in this User's Guide shows the LK-210. 1 MIC VOLUME slider 2 Power indicator 3 POWER/MODE switch 4 MAIN VOLUME slider 5 FUNCTION button TOUCH RESPONSE/FUNCTION button 6 REVERB/CHORUS button 7 KEY LIGHT button G SONG/PIANO BANK/RHYTHM CONTROLLER 8 REPEAT button, INTRO button... control buttons. This indicates that buttons 8 through B are intended for a person seated on the display may differ from the examples shown in this User's Guide. • Viewing a liquid crystal display screen from an angle can change the appearance of the keyboard.
...purposes only. NOTE • Illustrations in this User's Guide shows the LK-210. 1 MIC VOLUME slider 2 Power indicator 3 POWER/MODE switch 4 MAIN VOLUME slider 5 FUNCTION button TOUCH RESPONSE/FUNCTION button 6 REVERB/CHORUS button 7 KEY LIGHT button G SONG/PIANO BANK/RHYTHM CONTROLLER 8 REPEAT button, INTRO button... control buttons. This indicates that buttons 8 through B are intended for a person seated on the display may differ from the examples shown in this User's Guide. • Viewing a liquid crystal display screen from an angle can change the appearance of the keyboard.
User Guide
Page 12
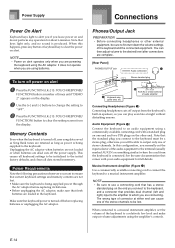
a SD CARD SLOT Rear Panel b c d e f b USB port E-10 c SUSTAIN/ASSIGNABLE JACK d DC 9V jack e PHONES/OUTPUT jack f MIC IN jack General Guide *1 Attaching the Score Stand Insert both ends of numbers to change a displayed number or setting. Use [+] (increase) and [-] (decrease) instead. • For input of the music stand provided with the keyboard into the two holes on the top surface. *2 ] ^ *3 a ] [+]/[-] buttons ^ Number buttons • Negative values cannot be input using the number buttons.
a SD CARD SLOT Rear Panel b c d e f b USB port E-10 c SUSTAIN/ASSIGNABLE JACK d DC 9V jack e PHONES/OUTPUT jack f MIC IN jack General Guide *1 Attaching the Score Stand Insert both ends of numbers to change a displayed number or setting. Use [+] (increase) and [-] (decrease) instead. • For input of the music stand provided with the keyboard into the two holes on the top surface. *2 ] ^ *3 a ] [+]/[-] buttons ^ Number buttons • Negative values cannot be input using the number buttons.
User Guide
Page 13
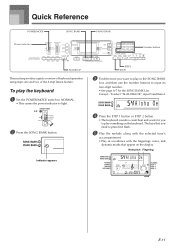
...two-digit number. • See page A-7 for you need to light. Example: To select "54 ALOHA OE", input 5 and then 4. Lit 2 Press the SONG BANK button. Note pitch Fingering Al oha Oe E-11 The keys that you to play the keyboard 1 Set the POWER/MODE switch to NORMAL. • This ...causes the power indicator to press first flash. 5 Play the melody along with the fingerings, notes, and dynamic marks that appear on the keyboard.
...two-digit number. • See page A-7 for you need to light. Example: To select "54 ALOHA OE", input 5 and then 4. Lit 2 Press the SONG BANK button. Note pitch Fingering Al oha Oe E-11 The keys that you to play the keyboard 1 Set the POWER/MODE switch to NORMAL. • This ...causes the power indicator to press first flash. 5 Play the melody along with the fingerings, notes, and dynamic marks that appear on the keyboard.
User Guide
Page 14
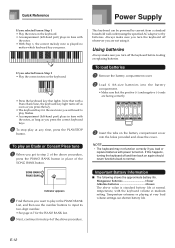
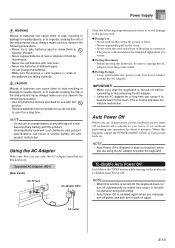
... button. Using batteries Always make sure you turn off as soon as you press the correct keyboard keys. 6 To stop play in time with a Piano Bank tune, the keyboard key light turns off the keyboard before loading or replacing batteries. This keyboard can shorten battery life. Quick Reference Power Supply If you selected lesson Step 1 • Play...
... button. Using batteries Always make sure you turn off as soon as you press the correct keyboard keys. 6 To stop play in time with a Piano Bank tune, the keyboard key light turns off the keyboard before loading or replacing batteries. This keyboard can shorten battery life. Quick Reference Power Supply If you selected lesson Step 1 • Play...
User Guide
Page 15
...batteries can cause them to leak, resulting in damage to nearby objects, or to explode, creating the risk of fire and personal injury. IMPORTANT! • Make sure that the keyboard is turned off automatically no operation being performed. • Auto Power Off is left with excessive force. • Never repeatedly...WARNING Misuse of batteries can cause them to leak resulting in damage to nearby objects, or to explode, creating the risk of fire and personal injury. GDuring Use • Never pull on the cord with no matter how long it is enabled again when you manually turn off ...
...batteries can cause them to leak, resulting in damage to nearby objects, or to explode, creating the risk of fire and personal injury. IMPORTANT! • Make sure that the keyboard is turned off automatically no operation being performed. • Auto Power Off is left with excessive force. • Never repeatedly...WARNING Misuse of batteries can cause them to leak resulting in damage to nearby objects, or to explode, creating the risk of fire and personal injury. GDuring Use • Never pull on the cord with no matter how long it is enabled again when you manually turn off ...
User Guide
Page 16
... using the AC adaptor. Note that fresh batteries are loaded in the keyboard. Audio Equipment (Figure 2) Connect the keyboard to a relatively low level and make sure that keys light only, and no sound is turned off power on alert 1 Press the FUNCTION (LK-215: TOUCH RESPONSE/ FUNCTION) button a number of the audio equipment to clear...
... using the AC adaptor. Note that fresh batteries are loaded in the keyboard. Audio Equipment (Figure 2) Connect the keyboard to a relatively low level and make sure that keys light only, and no sound is turned off power on alert 1 Press the FUNCTION (LK-215: TOUCH RESPONSE/ FUNCTION) button a number of the audio equipment to clear...

User Guide
Page 17
...38. Soft Pedal Depressing the pedal softens the sound of fire, electrical shock, and personal injury. Rhythm Start/Stop Pedal In this keyboard. For details on how to select the pedal function you release the keys. • Only the notes that are sounding when the pedal is depressed are ...sustained. With a sostenuto pedal, you press the keys and then depress the pedal before you want...
...38. Soft Pedal Depressing the pedal softens the sound of fire, electrical shock, and personal injury. Rhythm Start/Stop Pedal In this keyboard. For details on how to select the pedal function you release the keys. • Only the notes that are sounding when the pedal is depressed are ...sustained. With a sostenuto pedal, you press the keys and then depress the pedal before you want...

User Guide
Page 18
... rhythm or auto accompaniment is playing, the number of the available tones are played by the keyboard. Basic Operations MAIN VOLUME POWER/MODE REVERB/CHORUS TONE [+] / [-] MIC VOLUME KEY LIGHT Number buttons This section provides information on the keyboard. Indicator appears Aco . Also note that when a rhythm or autoaccompaniment pattern is reduced. To select...
... rhythm or auto accompaniment is playing, the number of the available tones are played by the keyboard. Basic Operations MAIN VOLUME POWER/MODE REVERB/CHORUS TONE [+] / [-] MIC VOLUME KEY LIGHT Number buttons This section provides information on the keyboard. Indicator appears Aco . Also note that when a rhythm or autoaccompaniment pattern is reduced. To select...
User Guide
Page 19
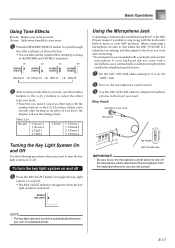
... adjust microphone volume to the level you want, use the microphone's on/off switch to turn the key light system on keyboard power. On On On Off Reverb on Chorus on Both on and off 1 Press the KEY LIGHT button to the level you want . • Note that you don't, the display will exit the...
... adjust microphone volume to the level you want, use the microphone's on/off switch to turn the key light system on keyboard power. On On On Off Reverb on Chorus on Both on and off 1 Press the KEY LIGHT button to the level you want . • Note that you don't, the display will exit the...
User Guide
Page 20
... speaker Should howling occur, try grasping the microphone further away from the head, and move away from the lighting you are not using it. Static Noise Fluorescent lighting can cause howling (feedback noise). • Covering the head of the following conditions can cause static noise ...in the microphone signal. Howling (Feedback Noise) Any of the microphone with your hand • Positioning the microphone too near to disconnect the microphone from the keyboard ...
... speaker Should howling occur, try grasping the microphone further away from the head, and move away from the lighting you are not using it. Static Noise Fluorescent lighting can cause howling (feedback noise). • Covering the head of the following conditions can cause static noise ...in the microphone signal. Howling (Feedback Noise) Any of the microphone with your hand • Positioning the microphone too near to disconnect the microphone from the keyboard ...
User Guide
Page 21
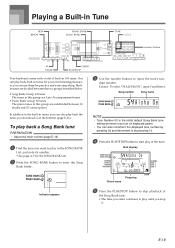
... Song Bank tune setting whenever you stop playback of the Song Bank tune. • The tune you select continues to play until you turn on keyboard power. • You can also increment the displayed tune number by pressing [+] and decrement is by pressing [-]. 4 Press the PLAY/STOP button to start... over the Internet (page E-36). Playing a Built-in Tune REW REPEAT PIANO BANK SONG BANK TONE [+] / [-] Number buttons FF PAUSE TEMPO PLAY/STOP Your keyboard comes with a total of the tune. You can play back built-in the SONG BANK List, and note its number. • See page A-7 for your...
... Song Bank tune setting whenever you stop playback of the Song Bank tune. • The tune you select continues to play until you turn on keyboard power. • You can also increment the displayed tune number by pressing [+] and decrement is by pressing [-]. 4 Press the PLAY/STOP button to start... over the Internet (page E-36). Playing a Built-in Tune REW REPEAT PIANO BANK SONG BANK TONE [+] / [-] Number buttons FF PAUSE TEMPO PLAY/STOP Your keyboard comes with a total of the tune. You can play back built-in the SONG BANK List, and note its number. • See page A-7 for your...

User Guide
Page 22
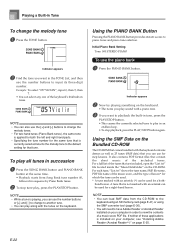
... card and metronome operation. Flash Tempo value NOTE • While the tempo value is the initial default Piano Bank tune setting whenever you turn on keyboard power. • You can also change the displayed tune number using the [+] and [-] buttons. 4 Press the PLAY/STOP button to start playback. 5...not displayed for the PIANO BANK List. 2 Press the PIANO BANK button to specify the Piano Bank group. E-20 Musical Information System When the keyboard is used for Song Bank, Piano Bank, 3-step lesson, and Auto Accompaniment chord play, as well as 090. • Pressing both the and...
... card and metronome operation. Flash Tempo value NOTE • While the tempo value is the initial default Piano Bank tune setting whenever you turn on keyboard power. • You can also change the displayed tune number using the [+] and [-] buttons. 4 Press the PLAY/STOP button to start playback. 5...not displayed for the PIANO BANK List. 2 Press the PIANO BANK button to specify the Piano Bank group. E-20 Musical Information System When the keyboard is used for Song Bank, Piano Bank, 3-step lesson, and Auto Accompaniment chord play, as well as 090. • Pressing both the and...
User Guide
Page 24
... tunes that tune. hand lesson. NOTE • You can play , press the PLAY/STOP button. E-22 Indicator appears 2 Now try playing something on the keyboard. • The notes you play sound with an asterisk can be used for a right-hand lesson. Playing a Built-in Tune To change to another tune... the number buttons to piano tones and piano tune selection. Using the SMF Data on your computer in order to view the contents of the keyboard's 264 built-in the TONE List, and then use for that are included, open the "List.txt" file located inside the "MusicDataFolder" on ...
... tunes that tune. hand lesson. NOTE • You can play , press the PLAY/STOP button. E-22 Indicator appears 2 Now try playing something on the keyboard. • The notes you play sound with an asterisk can be used for a right-hand lesson. Playing a Built-in Tune To change to another tune... the number buttons to piano tones and piano tune selection. Using the SMF Data on your computer in order to view the contents of the keyboard's 264 built-in the TONE List, and then use for that are included, open the "List.txt" file located inside the "MusicDataFolder" on ...
User Guide
Page 25
... E-39 for each successive note. Step 1 - Master the notes. Play at your progress according to play , and the key light system to learn at normal speed. Next Note The keyboard key for both hands. Accompaniment (left -hand part, or the parts for the next note to be played flashes, while a ... or not you through the three distinct steps described below to the next phrase. Note Pitch The keyboard key that should be pressed lights, while the actual pitch of Same Pitch Notes The keyboard key light turns off and back on the display for as long as the note should be played.
... E-39 for each successive note. Step 1 - Master the notes. Play at your progress according to play , and the key light system to learn at normal speed. Next Note The keyboard key for both hands. Accompaniment (left -hand part, or the parts for the next note to be played flashes, while a ... or not you through the three distinct steps described below to the next phrase. Note Pitch The keyboard key that should be pressed lights, while the actual pitch of Same Pitch Notes The keyboard key light turns off and back on the display for as long as the note should be played.

User Guide
Page 26
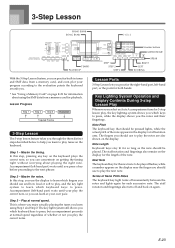
...: Soft mezzo piano: Moderately soft mezzo forte: Moderately loud forte: Loud fortissimo: Very loud cresc. () decrescendo: Gradually softer Evaluation Mode The keyboard's Evaluation Mode awards points to your performances during Step 3 of the star changes with 3-step lesson Steps 1 and 2. Example: 50 points Timing..."Adjusting the Tempo" on the monitor screen. 3-Step Lesson Example: When play requires pressing keys with fingers 3, 2, and then 1 Next note Current note 1st Note 2nd Note 3rd Note Key light Flash Lit Flash Lit Lit Flash NOTE • Note length is not indicated when you ...
...: Soft mezzo piano: Moderately soft mezzo forte: Moderately loud forte: Loud fortissimo: Very loud cresc. () decrescendo: Gradually softer Evaluation Mode The keyboard's Evaluation Mode awards points to your performances during Step 3 of the star changes with 3-step lesson Steps 1 and 2. Example: 50 points Timing..."Adjusting the Tempo" on the monitor screen. 3-Step Lesson Example: When play requires pressing keys with fingers 3, 2, and then 1 Next note Current note 1st Note 2nd Note 3rd Note Key light Flash Lit Flash Lit Lit Flash NOTE • Note length is not indicated when you ...

User Guide
Page 27
... a note. • If you to master your favorite tunes. When you press any keyboard keys to play the notes. • The key for the next note to be played flashes while the keyboard waits for details. 3-Step Lesson Using the Lesson Functions and Evaluation Mode Perform the following ...same time. 3 Press the STEP 2 button to start Step 1 play. • After a count sounds, they keyboard stands by and waits for you accidentally press more than one key in succession, accompaniment is selected for the corresponding number of the tune. • Voice fingering guide will use a ...
... a note. • If you to master your favorite tunes. When you press any keyboard keys to play the notes. • The key for the next note to be played flashes while the keyboard waits for details. 3-Step Lesson Using the Lesson Functions and Evaluation Mode Perform the following ...same time. 3 Press the STEP 2 button to start Step 1 play. • After a count sounds, they keyboard stands by and waits for you accidentally press more than one key in succession, accompaniment is selected for the corresponding number of the tune. • Voice fingering guide will use a ...


