
User Guide
Page 2
...note the following measures: • Reorient or relocate the receiving antenna. • Increase the separation between the equipment and receiver. • Connect the equipment into an outlet on , the user is encouraged to try to correct the interference by the party responsible for compliance could void... tested and found to comply with the limits for a Class B digital device, pursuant to Part 15 of Conformity Model Number: LK-160/LK-165/LK-240 Trade Name: CASIO COMPUTER CO., LTD. This mark applies in this manual may be different from that positive (+) and negative (-) poles are facing...
...note the following measures: • Reorient or relocate the receiving antenna. • Increase the separation between the equipment and receiver. • Connect the equipment into an outlet on , the user is encouraged to try to correct the interference by the party responsible for compliance could void... tested and found to comply with the limits for a Class B digital device, pursuant to Part 15 of Conformity Model Number: LK-160/LK-165/LK-240 Trade Name: CASIO COMPUTER CO., LTD. This mark applies in this manual may be different from that positive (+) and negative (-) poles are facing...

User Guide
Page 3
...23 Using Auto Step Up Lesson E-24 Music Challenge Keyboard Game E-26 Using Auto Accompaniment......... http://world.casio.com/ E-1 E-33 Connecting a Computer E-33 MIDI Settings E-34 Connecting to Audio Equipment E-36 Reference E-37 Troubleshooting E-37 Specifications E-39 Operating Precautions E-40 Song List E-41... E-4 Getting Ready to Touch Pressure (Touch Response) (LK-240 only E-7 Turning Off Keyboard Lighting E-8 Using the Voice Pads E-8 Using the Metronome E-9 Controlling the Keyboard Sounds E-10 Select from the CASIO website at the following URL. E-28 Playing the Rhythm...
...23 Using Auto Step Up Lesson E-24 Music Challenge Keyboard Game E-26 Using Auto Accompaniment......... http://world.casio.com/ E-1 E-33 Connecting a Computer E-33 MIDI Settings E-34 Connecting to Audio Equipment E-36 Reference E-37 Troubleshooting E-37 Specifications E-39 Operating Precautions E-40 Song List E-41... E-4 Getting Ready to Touch Pressure (Touch Response) (LK-240 only E-7 Turning Off Keyboard Lighting E-8 Using the Voice Pads E-8 Using the Metronome E-9 Controlling the Keyboard Sounds E-10 Select from the CASIO website at the following URL. E-28 Playing the Rhythm...

User Guide
Page 7
... available AA-size batteries. E-5 English Getting Ready to Play Preparing the Music Stand Using Batteries Music stand • Be sure to turn off power before connecting or disconnecting the AC adaptor. • The AC adaptor will become warm to the touch after very long use. Normally, use of the wire, take...
... available AA-size batteries. E-5 English Getting Ready to Play Preparing the Music Stand Using Batteries Music stand • Be sure to turn off power before connecting or disconnecting the AC adaptor. • The AC adaptor will become warm to the touch after very long use. Normally, use of the wire, take...

User Guide
Page 9
...output over headphones for long period. See page E-1 for information about options. • Do not listen to Touch Pressure (Touch Response) (LK-240 only) Touch Response alters tone volume in accordance with the Digital Keyboard. • Use commercially available headphones. Use (10-key) [-]...same expressivity you can practice playing even late at night without disturbing others. • Be sure to turn down the volume level before connecting headphones. This provides you some of played notes change in accordance with keyboard pressure (speed). Off (oFF) Type 1 (1) Type 2 ...
...output over headphones for long period. See page E-1 for information about options. • Do not listen to Touch Pressure (Touch Response) (LK-240 only) Touch Response alters tone volume in accordance with the Digital Keyboard. • Use commercially available headphones. Use (10-key) [-]...same expressivity you can practice playing even late at night without disturbing others. • Be sure to turn down the volume level before connecting headphones. This provides you some of played notes change in accordance with keyboard pressure (speed). Off (oFF) Type 1 (1) Type 2 ...
User Guide
Page 13
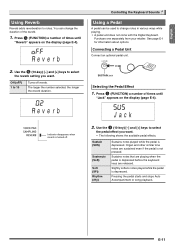
... Reverb Reverb adds reverberation to select the reverb setting you want . Press (FUNCTION) a number of the reverb. 3 1. Reve r b Indicator disappears when reverb is depressed. Connecting a Pedal Unit Connect an optional pedal unit. Sustain (SUS) Sostenuto (SoS) Soft (SFt) Rhythm (rHy) Sustains notes played while the pedal is turned off reverb. Organ and...
... Reverb Reverb adds reverberation to select the reverb setting you want . Press (FUNCTION) a number of the reverb. 3 1. Reve r b Indicator disappears when reverb is depressed. Connecting a Pedal Unit Connect an optional pedal unit. Sustain (SUS) Sostenuto (SoS) Soft (SFt) Rhythm (rHy) Sustains notes played while the pedal is turned off reverb. Organ and...
User Guide
Page 14
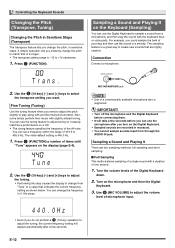
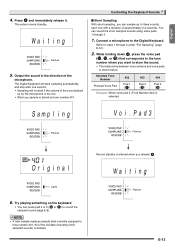
Press (FUNCTION). Sampling a Sound and Playing It on a CD. • The tuning feature specifies the frequency of the A4 note. Connection Connect a microphone. You can use the sound in a melody. Press (FUNCTION) a number of one second. 1. dm 3. For example, you ...sounds that of a commercially available microphone also is a great way to adjust the tuning, the current frequency setting will take a few seconds before connecting them. • It will appear automatically after a few seconds. bq 2. The sampling feature is supported. • Turn off the microphone and...
Press (FUNCTION). Sampling a Sound and Playing It on a CD. • The tuning feature specifies the frequency of the A4 note. Connection Connect a microphone. You can use the sound in a melody. Press (FUNCTION) a number of one second. 1. dm 3. For example, you ...sounds that of a commercially available microphone also is a great way to adjust the tuning, the current frequency setting will take a few seconds before connecting them. • It will appear automatically after a few seconds. bq 2. The sampling feature is supported. • Turn off the microphone and...
User Guide
Page 15
.... • Sampling will not start if the volume of the microphone. This enters record standby. Wa i t i ng Flashes E-13 Try playing something on the keyboard. Connect a microphone to the Digital Keyboard. Wa i t i ng Flashes 5.
.... • Sampling will not start if the volume of the microphone. This enters record standby. Wa i t i ng Flashes E-13 Try playing something on the keyboard. Connect a microphone to the Digital Keyboard. Wa i t i ng Flashes 5.

User Guide
Page 35
.... Check to the Digital Keyboard. Doing so can cause problems with these requirements before connecting the Digital Keyboard to it to make data send and receive impossible. 1. Connecting the Digital Keyboard to the Digital Keyboard for sending and receiving MIDI data. You can...Keyboard to your computer, the driver software required to a computer and exchange MIDI data between them. English Connecting External Devices 3 bq bm Connecting a Computer You can connect the Digital Keyboard to send and receive data will be installed on your computer automatically. 4. Minimum Computer ...
.... Check to the Digital Keyboard. Doing so can cause problems with these requirements before connecting the Digital Keyboard to it to make data send and receive impossible. 1. Connecting the Digital Keyboard to the Digital Keyboard for sending and receiving MIDI data. You can...Keyboard to your computer, the driver software required to a computer and exchange MIDI data between them. English Connecting External Devices 3 bq bm Connecting a Computer You can connect the Digital Keyboard to send and receive data will be installed on your computer automatically. 4. Minimum Computer ...

User Guide
Page 36
CASIO USB-MIDI: (For Windows 7, Windows Vista, Mac OS X) USB Audio Device: (For Windows XP) • For information about how to MIDI data send and receive by this Digital Keyboard, see the user documentation that comes with leaving the USB cable connected when you can specify any two ...your computer and/or Digital Keyboard. • This Digital Keyboard conforms to General MIDI Level 1 (GM). • For detailed specifications and connections that apply to select the MIDI device, see the latest support information provided by the website at the following as on alert operation. http://...
CASIO USB-MIDI: (For Windows 7, Windows Vista, Mac OS X) USB Audio Device: (For Windows XP) • For information about how to MIDI data send and receive by this Digital Keyboard, see the user documentation that comes with leaving the USB cable connected when you can specify any two ...your computer and/or Digital Keyboard. • This Digital Keyboard conforms to General MIDI Level 1 (GM). • For detailed specifications and connections that apply to select the MIDI device, see the latest support information provided by the website at the following as on alert operation. http://...

User Guide
Page 37
.... (1) R only displayed (2) L only displayed (3) LR displayed (4) LR nor displayed Navigate (L) Channel OnSound screen Guide { × × { × { { { Navigate (R) Channel OnSound screen Guide × { { × × { { { Connecting External Devices Local Control There are times when exchanging data with a computer when you may not want to sound notes you play on the keyboard...
.... (1) R only displayed (2) L only displayed (3) LR displayed (4) LR nor displayed Navigate (L) Channel OnSound screen Guide { × × { × { { { Navigate (R) Channel OnSound screen Guide × { { × × { { { Connecting External Devices Local Control There are times when exchanging data with a computer when you may not want to sound notes you play on the keyboard...

User Guide
Page 38
...etc. Outputting Digital Keyboard Notes to a portable audio player or other end. • Turn off the Digital Keyboard when making connections. Stereo standard plug Digital Keyboard PHONES/OUTPUT jack Playing an External Device from external audio equipment, lower the Digital Keyboard's volume ... on or off. • After connecting, turn on the Digital Keyboard and then the external device. • If Digital Keyboard notes sound distorted when they are sounded from the Digital Keyboard (LK-240 only) Connection requires commercially available connecting cords, supplied by you .
...etc. Outputting Digital Keyboard Notes to a portable audio player or other end. • Turn off the Digital Keyboard when making connections. Stereo standard plug Digital Keyboard PHONES/OUTPUT jack Playing an External Device from external audio equipment, lower the Digital Keyboard's volume ... on or off. • After connecting, turn on the Digital Keyboard and then the external device. • If Digital Keyboard notes sound distorted when they are sounded from the Digital Keyboard (LK-240 only) Connection requires commercially available connecting cords, supplied by you .

User Guide
Page 40
...Check and adjust the transpose (page E-12) and tuning settings (page E-12). • Turn power off and then back on your computer. Computer Connection I made has changed. • Adjust the main volume setting (page E-6). • Turn power off the Digital Keyboard and then exit the music software... instruments or sounds strange when played long with new ones or switch over to system limitations. Output volume does not change my keyboard touch (LK-240 only). • Change the Touch Response setting (page E-7). • Turn power off (page E-14). The pitch of the keyboard...
...Check and adjust the transpose (page E-12) and tuning settings (page E-12). • Turn power off and then back on your computer. Computer Connection I made has changed. • Adjust the main volume setting (page E-6). • Turn power off the Digital Keyboard and then exit the music software... instruments or sounds strange when played long with new ones or switch over to system limitations. Output volume does not change my keyboard touch (LK-240 only). • Change the Touch Response setting (page E-7). • Turn power off (page E-14). The pitch of the keyboard...


