
User Guide
Page 4
..., and repair up around the prongs of the AC adaptor plug. Unplug the power cord from the power outlet and clean it using the printer, be sure to grasp the plug. Doing so creates the risk of fire and personal injury due to dropping or other rough treatment creates the...product. Water and foreign objects Water, liquids, or foreign objects (especially metal) getting inside the product. 1. Contact your original retailer. Warning Do not affix labels to a container to be sure to unplug the AC adaptor from the wall outlet. 3. Make sure you go on the cord. • Plug in which...
..., and repair up around the prongs of the AC adaptor plug. Unplug the power cord from the power outlet and clean it using the printer, be sure to grasp the plug. Doing so creates the risk of fire and personal injury due to dropping or other rough treatment creates the...product. Water and foreign objects Water, liquids, or foreign objects (especially metal) getting inside the product. 1. Contact your original retailer. Warning Do not affix labels to a container to be sure to unplug the AC adaptor from the wall outlet. 3. Make sure you go on the cord. • Plug in which...
User Guide
Page 6
...Mirror image printing • 6-language display messages (English, German, French, Italian, Spanish, Swedish) All of this makes the CASIO Label Printer the perfect tool for a wide variety of applications, such as a result of data loss caused by malfunctions, repairs, or ...LOW BATTERY!" message to high humidity, electrostatic charge, sudden temperature changes, and temperature extremes. You can cause malfunction of the CASIO KL-820 Label Printer. Important! • Contact a nearby dealer whenever you require servicing. • Note that the manufacturer shall not be held...
...Mirror image printing • 6-language display messages (English, German, French, Italian, Spanish, Swedish) All of this makes the CASIO Label Printer the perfect tool for a wide variety of applications, such as a result of data loss caused by malfunctions, repairs, or ...LOW BATTERY!" message to high humidity, electrostatic charge, sudden temperature changes, and temperature extremes. You can cause malfunction of the CASIO KL-820 Label Printer. Important! • Contact a nearby dealer whenever you require servicing. • Note that the manufacturer shall not be held...
User Guide
Page 7
Contents Safety Precautions E-1 Operating Precautions E-5 Part 1 Getting Acquainted E-7 General Guide E-7 Label Printer Menus E-7 Part 2 Getting Ready E-8 Power Supply E-8 Replacing Batteries E-8 AC Adaptor E-9 Turning Power On and Off E-9 Resetting the Memory E-10 Display ...E-27 Part 12 Creating and Printing a Tape Label with a Logo ....... E-28 Part 13 Memory E-29 Text Data E-29 Layout printing, Numbering, and Bar code Data E-30 Part 14 Configuring the Printer Setup E-31 Part 15 Reference E-32 Cleaning the Printer Head and Roller E-32 Troubleshooting E-32 Error Messages...
Contents Safety Precautions E-1 Operating Precautions E-5 Part 1 Getting Acquainted E-7 General Guide E-7 Label Printer Menus E-7 Part 2 Getting Ready E-8 Power Supply E-8 Replacing Batteries E-8 AC Adaptor E-9 Turning Power On and Off E-9 Resetting the Memory E-10 Display ...E-27 Part 12 Creating and Printing a Tape Label with a Logo ....... E-28 Part 13 Memory E-29 Text Data E-29 Layout printing, Numbering, and Bar code Data E-30 Part 14 Configuring the Printer Setup E-31 Part 15 Reference E-32 Cleaning the Printer Head and Roller E-32 Troubleshooting E-32 Error Messages...

User Guide
Page 8
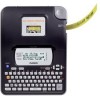
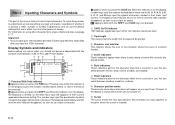
..., thanks to onscreen menus that you started from. 8 1 Power Key Turn power on to select the settings you press SET to execute a menu item, the Label Printer either moves on and off. 2 Function key 3 Letter keys 4 Tape outlet 5 Tape cutter button 6 Optional AC Adaptor connector 7 Liquid crystal display (LCD) 8 ...If the cassette cover detaches Reattach the cover as shown in order to use to the next menu, or it carefully before using the Label Printer for the first time. Take care to avoid excessive bending of the cover, which creates the risk of the manual provides you with important...
..., thanks to onscreen menus that you started from. 8 1 Power Key Turn power on to select the settings you press SET to execute a menu item, the Label Printer either moves on and off. 2 Function key 3 Letter keys 4 Tape outlet 5 Tape cutter button 6 Optional AC Adaptor connector 7 Liquid crystal display (LCD) 8 ...If the cassette cover detaches Reattach the cover as shown in order to use to the next menu, or it carefully before using the Label Printer for the first time. Take care to avoid excessive bending of the cover, which creates the risk of the manual provides you with important...
User Guide
Page 9
...8226; Do not expose batteries to direct heat, do not short circuit them, and do not try to perform other basic setups for the Label Printer. Battery Life • Printing of approximately four 18mm tape cartridges under standard printing conditions* * When printing text or graphics that contain large ...! • Batteries can cause power to keep separate backup copies of all important data you have stored in printer memory. Only then should you do not use the Label Printer for proper operation. Part 2 Getting Ready This part of the manual tells you how to load batteries and ...
...8226; Do not expose batteries to direct heat, do not short circuit them, and do not try to perform other basic setups for the Label Printer. Battery Life • Printing of approximately four 18mm tape cartridges under standard printing conditions* * When printing text or graphics that contain large ...! • Batteries can cause power to keep separate backup copies of all important data you have stored in printer memory. Only then should you do not use the Label Printer for proper operation. Part 2 Getting Ready This part of the manual tells you how to load batteries and ...

User Guide
Page 10
...cm 4 ×4 Power Off 4. Turning Power On and Off Press ON/OFF to power your Label Printer. • Use only a genuine CASIO AD-A95100 AC adaptor with your area. Be sure to the Label Printer as shown in the illustration. 3. Load batteries into a standard household AC outlet. • Take ...the same voltage rating as the household current in your fingers while loading or replacing batteries. Using a wrong adaptor can cut your Label Printer. • Be sure to use alkaline batteries only. 1. E-9 Plug the other end into the battery compartment. • ...
...cm 4 ×4 Power Off 4. Turning Power On and Off Press ON/OFF to power your Label Printer. • Use only a genuine CASIO AD-A95100 AC adaptor with your area. Be sure to the Label Printer as shown in the illustration. 3. Load batteries into a standard household AC outlet. • Take ...the same voltage rating as the household current in your fingers while loading or replacing batteries. Using a wrong adaptor can cut your Label Printer. • Be sure to use alkaline batteries only. 1. E-9 Plug the other end into the battery compartment. • ...
User Guide
Page 11
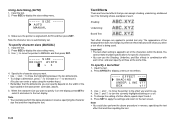
... will display the sentence currently stored in memory. * A sentence being created is triggered while you do so can cause operational problems with the Label Printer. • The following are creating a sentence, the sentence that can select English, German, French, Italian, Spanish, or Swedish as the ...change the language setting, see page E-31. Hook your finger under the center of the Label Printer before using it back in printer memory. For information about six minutes, the Label Printer automatically turns power off or if Auto Power Off is saved temporarily in .Trying to do...
... will display the sentence currently stored in memory. * A sentence being created is triggered while you do so can cause operational problems with the Label Printer. • The following are creating a sentence, the sentence that can select English, German, French, Italian, Spanish, or Swedish as the ...change the language setting, see page E-31. Hook your finger under the center of the Label Printer before using it back in printer memory. For information about six minutes, the Label Printer automatically turns power off or if Auto Power Off is saved temporarily in .Trying to do...

User Guide
Page 12
... 3. Roller Head 7. This indicates there is not bent or twisted. Use a pencil or some other thin object to use excessive force when pulling on Label Printer power and press FUNC and then - (FEED) two or three times to break, creating the risk of malfunction. 5. E-11 Remove the stopper from ...step 1 above. Load the tape cartridge into the Label Printer, making sure that the tape is under the tape) Important! • Once tape is pulled out, there is slack when you load it can...
... 3. Roller Head 7. This indicates there is not bent or twisted. Use a pencil or some other thin object to use excessive force when pulling on Label Printer power and press FUNC and then - (FEED) two or three times to break, creating the risk of malfunction. 5. E-11 Remove the stopper from ...step 1 above. Load the tape cartridge into the Label Printer, making sure that the tape is under the tape) Important! • Once tape is pulled out, there is slack when you load it can...
User Guide
Page 13
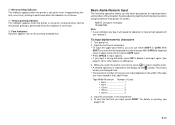
... character you input a character, regardless of whether it is currently in use the default settings that is always blank when you turn power on the Label Printer display. 1 23 4 5 SANS-SERIF SANS-S ITC SANS-S RND ROMAN F a b 0. 0 cm 4 ´4 6 ROMAN ITC VERTICAL 7 MIRROR 0 98 5 1 Function.... 7 Effect indicators These indicators point to normal (and the code indicator disappears) as soon as you how to 100 characters per label. appears when you input the 100th character. Further input becomes impossible after you press the CODE key. You can input up to ...
... character you input a character, regardless of whether it is currently in use the default settings that is always blank when you turn power on the Label Printer display. 1 23 4 5 SANS-SERIF SANS-S ITC SANS-S RND ROMAN F a b 0. 0 cm 4 ´4 6 ROMAN ITC VERTICAL 7 MIRROR 0 98 5 1 Function.... 7 Effect indicators These indicators point to normal (and the code indicator disappears) as soon as you how to 100 characters per label. appears when you input the 100th character. Further input becomes impossible after you press the CODE key. You can input up to ...
User Guide
Page 14
...not shown. With SHIFT you reach the end of a line of text, press to input spaces. • If you have loaded in the Label Printer. Input the characters in upper-case until you release it will explain the procedure by the symbol. 0 Mirror printing indicator This indicator appears when the... printer is set up for other details on editing text. 3. To input alpha-numeric characters 1. Input the first line of lines you can use...
...not shown. With SHIFT you reach the end of a line of text, press to input spaces. • If you have loaded in the Label Printer. Input the characters in upper-case until you release it will explain the procedure by the symbol. 0 Mirror printing indicator This indicator appears when the... printer is set up for other details on editing text. 3. To input alpha-numeric characters 1. Input the first line of lines you can use...

User Guide
Page 18
... then press SET. 3. When input- Important! • The font setting is divided into multiple blocks, you want to all new labels. You cannot make multiple specifications for the application of characters, how to assign text effects like underlining, shading, and box printing, and... applied to change the default font setting 1. After inputting the text you want , press FONT. 2. ONE B LOCK A L L B LOCKS Selecting a Font Your printer gives you a choice of the following five fonts. • Sans-serif (SANS-SERIF) • Sans-serif Italic (SANS-SERIF ITC) • Sans-serif Rounded...
... then press SET. 3. When input- Important! • The font setting is divided into multiple blocks, you want to all new labels. You cannot make multiple specifications for the application of characters, how to assign text effects like underlining, shading, and box printing, and... applied to change the default font setting 1. After inputting the text you want , press FONT. 2. ONE B LOCK A L L B LOCKS Selecting a Font Your printer gives you a choice of the following five fonts. • Sans-serif (SANS-SERIF) • Sans-serif Italic (SANS-SERIF ITC) • Sans-serif Rounded...
User Guide
Page 19
...methods you can print depends on the display when the character size has been adjusted. The size of text you have loaded in the Label Printer and the number of lines of the displayed text does not change. You cannot make multiple specifications for specific characters. • The ... are printing. Number of lines/tape size tape size number of lines you specify is greater than the maximum characters size limit, the Label Printer automatically adjust your text vertically to set the character size manually. The message "TOO MANY LINES!" appears on the size of the tape...
...methods you can print depends on the display when the character size has been adjusted. The size of text you have loaded in the Label Printer and the number of lines of the displayed text does not change. You cannot make multiple specifications for specific characters. • The ... are printing. Number of lines/tape size tape size number of lines you specify is greater than the maximum characters size limit, the Label Printer automatically adjust your text vertically to set the character size manually. The message "TOO MANY LINES!" appears on the size of the tape...
User Guide
Page 21
... to decrease it or x to display the size setting menu. ----- To specify a text effect 1. Note • You could also perform the above procedure in the label printer (see table, above procedure in combination with AUTO and then press SET.
... to decrease it or x to display the size setting menu. ----- To specify a text effect 1. Note • You could also perform the above procedure in the label printer (see table, above procedure in combination with AUTO and then press SET.

User Guide
Page 23
...look like without actually printing it is exposed to print tapes. Do not stick the tape onto human Tape skin. • Do not affix labels to any container you need to direct sunlight or rain. Press SET again to starting preview. * To cancel preview part way through, press ESC...specifying the number of copies. 2. This should not try to use the print preview screen to start printing. • Never operate the tape cutter while printer is being performed. • Make sure that was displayed prior to restart scrolling. 3. Press FUNC and then - (FEED). Press SET to get ...
...look like without actually printing it is exposed to print tapes. Do not stick the tape onto human Tape skin. • Do not affix labels to any container you need to direct sunlight or rain. Press SET again to starting preview. * To cancel preview part way through, press ESC...specifying the number of copies. 2. This should not try to use the print preview screen to start printing. • Never operate the tape cutter while printer is being performed. • Make sure that was displayed prior to restart scrolling. 3. Press FUNC and then - (FEED). Press SET to get ...
User Guide
Page 25
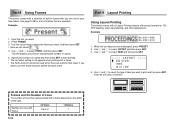
...you want , and then press SET. • Here we will select . 4. Part 9 Layout Printing Using Layout Printing The printer comes with a Layout Printing feature with preset formats for a list of label you want to print and then press SET. Use z and x to select LAYOUT and then press SET. 3. Part 8 ...Using Frames The printer comes with a selection of copies and then press SET to start printing. • The text effect...
...you want , and then press SET. • Here we will select . 4. Part 9 Layout Printing Using Layout Printing The printer comes with a Layout Printing feature with preset formats for a list of label you want to print and then press SET. Use z and x to select LAYOUT and then press SET. 3. Part 8 ...Using Frames The printer comes with a selection of copies and then press SET to start printing. • The text effect...

User Guide
Page 26
... see page E-29. This will input text for specifying the number of text (COMMENT 2) Important! • When printing sequentially numbered tape labels, printing is complete. - - - - The following screen appears after input of four different numbering formats that the tape cartridge has enough ...and style settings, if you can use to print sequentially numbered labels from 0 to nine numbered labels per print operation. Part 10 Creating and Printing a Sequentially Numbered Tape Label This label printer gives you a choice of all the label data is performed up to 999. • You can ...
... see page E-29. This will input text for specifying the number of text (COMMENT 2) Important! • When printing sequentially numbered tape labels, printing is complete. - - - - The following screen appears after input of four different numbering formats that the tape cartridge has enough ...and style settings, if you can use to print sequentially numbered labels from 0 to nine numbered labels per print operation. Part 10 Creating and Printing a Sequentially Numbered Tape Label This label printer gives you a choice of all the label data is performed up to 999. • You can ...

User Guide
Page 28
...z and x to 9). EAN- 1 3 EAN- 8 4. Input 12 number of copies and then press SET to start printing. • For information about saving tape label data, see step 6). • Do not use 6mm or 9mm tapes to print, and then press SET. The unit will display a screen for printing bar... bar codes.Consecutive printing can only input numeric characters (0 to select BAR CODE and then press SET. 3. Part 11 Bar Code With this label printer before actually using them. Bar Code Tape Only the following types of bar code you can result in accordance with input data. BAR CODE - ...
...z and x to 9). EAN- 1 3 EAN- 8 4. Input 12 number of copies and then press SET to start printing. • For information about saving tape label data, see step 6). • Do not use 6mm or 9mm tapes to print, and then press SET. The unit will display a screen for printing bar... bar codes.Consecutive printing can only input numeric characters (0 to select BAR CODE and then press SET. 3. Part 11 Bar Code With this label printer before actually using them. Bar Code Tape Only the following types of bar code you can result in accordance with input data. BAR CODE - ...
User Guide
Page 33
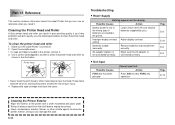
... printing quality. Make sure the AC adaptor is turned off. 2. Action Press ESC to clean the printer head and roller. Make sure the Label Printer is connected correctly. Use a cotton swab dipped in alcohol to clean the printer exterior. These items become very hot, and touching them correctly. Troubleshooting • Power Supply Nothing appears...
... printing quality. Make sure the AC adaptor is turned off. 2. Action Press ESC to clean the printer head and roller. Make sure the Label Printer is connected correctly. Use a cotton swab dipped in alcohol to clean the printer exterior. These items become very hot, and touching them correctly. Troubleshooting • Power Supply Nothing appears...

User Guide
Page 34
... of AA-size alkaline batteries (supplied by hand. Cut off excess tape with scissors, and carefully replace the cartridge into the label printer, always make sure the ink ribbon is pressed. Possible Causes Action Page Tape cartridge loaded while the ink ribbon is blurred, ...blotched, broken, etc. Important! • Before loading a tape cartridge into the label printer. Possible Causes Action Page Tape cartridge compartment cover is printed on it. Possible Causes Only blank spaces were input. Load a fresh set...
... of AA-size alkaline batteries (supplied by hand. Cut off excess tape with scissors, and carefully replace the cartridge into the label printer, always make sure the ink ribbon is pressed. Possible Causes Action Page Tape cartridge loaded while the ink ribbon is blurred, ...blotched, broken, etc. Important! • Before loading a tape cartridge into the label printer. Possible Causes Action Page Tape cartridge compartment cover is printed on it. Possible Causes Only blank spaces were input. Load a fresh set...
User Guide
Page 35
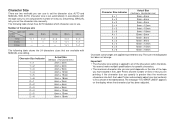
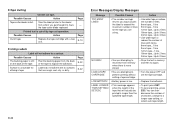
Printed text is dull. LABEL LONGER THAN SETTING! Action Take the label printer to the dealer from whom you are using. • Use wider tape or reduce the number of lines. 6mm tape...1 line 9mm tape...1 line 12mm ......Up to 3 lines 24mm tape...Up to 3 lines • Use wider tape or reduce the number of lines with a new one. Page E-10 • Using Labels Label will actually be printed is still on the back of characters, change to perform printing without setting a tape cartridge. • Turn the power OFF and...
Printed text is dull. LABEL LONGER THAN SETTING! Action Take the label printer to the dealer from whom you are using. • Use wider tape or reduce the number of lines. 6mm tape...1 line 9mm tape...1 line 12mm ......Up to 3 lines 24mm tape...Up to 3 lines • Use wider tape or reduce the number of lines with a new one. Page E-10 • Using Labels Label will actually be printed is still on the back of characters, change to perform printing without setting a tape cartridge. • Turn the power OFF and...


