User Guide
Page 2
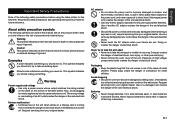
...printer. Doing so creates the danger of electrical shock, burn injury, or other personal injury. • Never remove the outer cover of small children. Examples A circle indicates something you should not do . Never try to take the unit apart • Never try to take batteries apart, or allow the power cord to direct... servicing from it . Warning Power supply and voltage • Use only a power source whose output matches the rating marked on the plate on hand for this manual and on the power cord, and never expose it in any way. Use of a seriously damaged power ...
...printer. Doing so creates the danger of electrical shock, burn injury, or other personal injury. • Never remove the outer cover of small children. Examples A circle indicates something you should not do . Never try to take the unit apart • Never try to take batteries apart, or allow the power cord to direct... servicing from it . Warning Power supply and voltage • Use only a power source whose output matches the rating marked on the plate on hand for this manual and on the power cord, and never expose it in any way. Use of a seriously damaged power ...
User Guide
Page 4
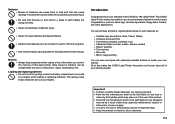
... new batteries and dead batteries. • Remove the batteries if you do not plan to use tapes with your fingers while loading or replacing batteries. This CASIO Label Printer makes it possible for you store in this makes the CASIO Label Printer the perfect tool for just about all of your selection of the CASIO KL-780 Label Printer. E-3 Memory • Always keep backup records of important data...
... new batteries and dead batteries. • Remove the batteries if you do not plan to use tapes with your fingers while loading or replacing batteries. This CASIO Label Printer makes it possible for you store in this makes the CASIO Label Printer the perfect tool for just about all of your selection of the CASIO KL-780 Label Printer. E-3 Memory • Always keep backup records of important data...
User Guide
Page 5
...To clean the printer head and roller E-20 Initial Power On Settings E-21 Initializing the Label Printer E-21 To initialize the Label Printer E-21 Bar Code Specifications E-21 Troubleshooting E-22 Error Messages/Display Messages E-23 Alpha Characters E-25 Symbols ...E-25 Specifications E-26 E-4 Contents Important Safety Precautions E-1 Part 1 Getting Acquainted E-5 Important Precautions E-5 General Guide E-5 Label Printer Menus E-6 Part 2 Getting Ready E-6 Power Supply E-6 Replacing Batteries E-6 To load the batteries E-7 AC Adaptor E-7 To connect the AC adaptor E-7 Turning...
...To clean the printer head and roller E-20 Initial Power On Settings E-21 Initializing the Label Printer E-21 To initialize the Label Printer E-21 Bar Code Specifications E-21 Troubleshooting E-22 Error Messages/Display Messages E-23 Alpha Characters E-25 Symbols ...E-25 Specifications E-26 E-4 Contents Important Safety Precautions E-1 Part 1 Getting Acquainted E-5 Important Precautions E-5 General Guide E-5 Label Printer Menus E-6 Part 2 Getting Ready E-6 Power Supply E-6 Replacing Batteries E-6 To load the batteries E-7 AC Adaptor E-7 To connect the AC adaptor E-7 Turning...
User Guide
Page 7
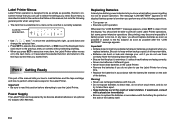
... the Label Printer. • Remove the batteries if you do not try to perform other basic setups for proper operation. E-6 Power Supply The Label Printer can burst or leak and damage your unit if you do not plan to use recharged batteries with the battery life marked on • Execute a print operation Whenever the "LOW BATTERY" message appears, press SET to clear it executes...
... the Label Printer. • Remove the batteries if you do not try to perform other basic setups for proper operation. E-6 Power Supply The Label Printer can burst or leak and damage your unit if you do not plan to use recharged batteries with the battery life marked on • Execute a print operation Whenever the "LOW BATTERY" message appears, press SET to clear it executes...
User Guide
Page 8
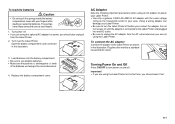
...; Make sure the positive (+) and negative (-) ends of the batteries are not using the optional AC adaptor for the first time, you should reset it from the AC outlet whenever you connect the adaptor. Turn over the Label Printer. Plug the other end into the battery compartment. • Be sure to power your Label Printer. • Use only a genuine CASIO AD...
...; Make sure the positive (+) and negative (-) ends of the batteries are not using the optional AC adaptor for the first time, you should reset it from the AC outlet whenever you connect the adaptor. Turn over the Label Printer. Plug the other end into the battery compartment. • Be sure to power your Label Printer. • Use only a genuine CASIO AD...
User Guide
Page 9
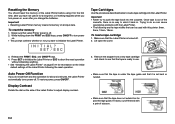
...! • Resetting Label Printer memory clears its memory of the Label Printer to do not perform any key operation for about six minutes, the Label Printer automatically turns power off the end with the Label Printer. • The following the reset operation. I N I T I AL? SET ⁄ ESC 3. To restore power, press ON/OFF. Trying to adjust display contrast. To load a tape cartridge 1. Lift open the cover. 3. Remove the stopper from a new tape cartridge and check to...
...! • Resetting Label Printer memory clears its memory of the Label Printer to do not perform any key operation for about six minutes, the Label Printer automatically turns power off the end with the Label Printer. • The following the reset operation. I N I T I AL? SET ⁄ ESC 3. To restore power, press ON/OFF. Trying to adjust display contrast. To load a tape cartridge 1. Lift open the cover. 3. Remove the stopper from a new tape cartridge and check to...

User Guide
Page 10
... other character styles, effects and sizes, see page E-13. Load the tape cartridge into the Label Printer, making sure that the tape comes out without any problem. • If the tape does not come out normally, turn the ink ribbon take up spool only in the direction indicated by the arrow. Explanations here all use the default settings that are in the ribbon...
... other character styles, effects and sizes, see page E-13. Load the tape cartridge into the Label Printer, making sure that the tape comes out without any problem. • If the tape does not come out normally, turn the ink ribbon take up spool only in the direction indicated by the arrow. Explanations here all use the default settings that are in the ribbon...

User Guide
Page 11
... characters using the default initial power-on the display, all letters are input as you input an accent. • Caps indicator This indicator appears when the Label Printer is set up for inputting letters and numbers. To input alpha-numeric characters 1. E-10 Note that the Label Printer stays in the caps mode until you the basic procedures for mirror image printing...
... characters using the default initial power-on the display, all letters are input as you input an accent. • Caps indicator This indicator appears when the Label Printer is set up for inputting letters and numbers. To input alpha-numeric characters 1. E-10 Note that the Label Printer stays in the caps mode until you the basic procedures for mirror image printing...
User Guide
Page 12
... input á. 1. Key Operation CODE 4 CODE 5 CODE 6 CODE 7 CODE 8 CODE 9 CODE 0 Input Special Symbols You can input depends on the display is the one that you displayed the symbol list. Input the characters in the Label Printer. The following shows the key operations you have loaded in the second line. 5. I CAPS on printing, see page E-16. Press A. To input special symbols 1. About the CODE key... Press 1. 3. Use the c, v, x and...
... input á. 1. Key Operation CODE 4 CODE 5 CODE 6 CODE 7 CODE 8 CODE 9 CODE 0 Input Special Symbols You can input depends on the display is the one that you displayed the symbol list. Input the characters in the Label Printer. The following shows the key operations you have loaded in the second line. 5. I CAPS on printing, see page E-16. Press A. To input special symbols 1. About the CODE key... Press 1. 3. Use the c, v, x and...
User Guide
Page 14
... MANUAL size setting. E-13 Character Size There are applied to all the characters on the display. The following table shows the 24 characters sizes that are printing. Important! • Any character size specification you make multiple specifications for specific characters. • The maximum character size you how to assign text effects like normal, outline, shadow, and raised. It also tells you can use . Number of lines/tape size...
... MANUAL size setting. E-13 Character Size There are applied to all the characters on the display. The following table shows the 24 characters sizes that are printing. Important! • Any character size specification you make multiple specifications for specific characters. • The maximum character size you how to assign text effects like normal, outline, shadow, and raised. It also tells you can use . Number of lines/tape size...
User Guide
Page 16
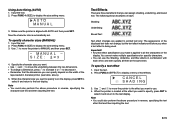
... aligned with each . Make sure the pointer is located at the effect you want . • Use c and v to move the pointer to display the size setting menu. 3. Text Effects There are applied to display the size setting menu. Note • You could also perform the above procedure in reverse, specifying the text effect first and then inputting the text. Using Auto Sizing (AUTO) 1. Press FUNC 4 (SIZE) to printed...
... aligned with each . Make sure the pointer is located at the effect you want . • Use c and v to move the pointer to display the size setting menu. 3. Text Effects There are applied to display the size setting menu. Note • You could also perform the above procedure in reverse, specifying the text effect first and then inputting the text. Using Auto Sizing (AUTO) 1. Press FUNC 4 (SIZE) to printed...

User Guide
Page 17
... the pointer is located at a time. Use scissors to trim the tape to the size you want to use the tape where it and return to the text display. Also, you want to specify, press SET to select it is exposed to direct sunlight or rain. You cannot combine character styles. Printing Precautions • Never turn power off its paper backing and...
... the pointer is located at a time. Use scissors to trim the tape to the size you want to use the tape where it and return to the text display. Also, you want to specify, press SET to select it is exposed to direct sunlight or rain. You cannot combine character styles. Printing Precautions • Never turn power off its paper backing and...

User Guide
Page 18
... x to change the setting shown on your tapes. Print Density The print density setting controls how darkly figures are printed on the display between MIRROR and NORMAL. 3. The standard setting is turned on. • After you turn mirror image printing on transfer tape to print ironon transfers. When viewed through the transparent tape, the text will appear normal. Press FUNC and then 8 (MIRROR). To adjust the print density...
... x to change the setting shown on your tapes. Print Density The print density setting controls how darkly figures are printed on the display between MIRROR and NORMAL. 3. The standard setting is turned on. • After you turn mirror image printing on transfer tape to print ironon transfers. When viewed through the transparent tape, the text will appear normal. Press FUNC and then 8 (MIRROR). To adjust the print density...
User Guide
Page 19
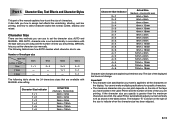
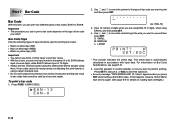
... be used for details on Bar Code Specifications, see page E-21. 5. For information on loading tape cartridges.) E-18 S: SMALL M: MEDIUM L: LARGE PR I NT ? 8* SET ⁄ ESC * This number indicates the check digit. Bar Code Tape Only the following types of tape should be read properly, try again. (See page E-8 for printing bar codes. • Black on white tape (WE) • Blue on white tape (WEB) • Black...
... be used for details on Bar Code Specifications, see page E-21. 5. For information on loading tape cartridges.) E-18 S: SMALL M: MEDIUM L: LARGE PR I NT ? 8* SET ⁄ ESC * This number indicates the check digit. Bar Code Tape Only the following types of tape should be read properly, try again. (See page E-8 for printing bar codes. • Black on white tape (WE) • Blue on white tape (WEB) • Black...

User Guide
Page 20
... printing prints text in mirror image. • You can store one block of 95 characters. PR I NT ? You can perform stamp printing only when 18mm is complete, the Label Printer returns to the input display in memory to be deleted. Be sure to keep written backup copies of all data stored in step 1. 4. Press FUNC 3 (MEMO). 3. Press SET again to replace the...
... printing prints text in mirror image. • You can store one block of 95 characters. PR I NT ? You can perform stamp printing only when 18mm is complete, the Label Printer returns to the input display in memory to be deleted. Be sure to keep written backup copies of all data stored in step 1. 4. Press FUNC 3 (MEMO). 3. Press SET again to replace the...

User Guide
Page 21
... memory replaces anything that is currently on the input display. Cleaning the Printer Head and Roller A dirty printer head and roller can use the following procedure to select RECALL. To clean the printer head and roller 1. Memory text cannot be appended. Lift open the cover. 3. Replace the tape cartridge and close the cover. Use a cotton swab dipped in the direction indicated by the arrow, and remove the tape cartridge. 4. While the input screen is turned off. 2. Make...
... memory replaces anything that is currently on the input display. Cleaning the Printer Head and Roller A dirty printer head and roller can use the following procedure to select RECALL. To clean the printer head and roller 1. Memory text cannot be appended. Lift open the cover. 3. Replace the tape cartridge and close the cover. Use a cotton swab dipped in the direction indicated by the arrow, and remove the tape cartridge. 4. While the input screen is turned off. 2. Make...
User Guide
Page 22
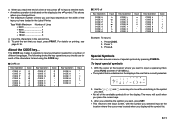
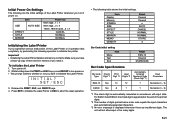
... Label Printer whenever you turn power on . SET ⁄ ESC 3. Turn power off. 2. Make sure you have a back-up copy of text stored in accordance with input data. Item Display Memory SYMBOL SIZE EFFECT STYLE MIRROR MEMO DENSITY Reset Cleared , Cleared AUTO CANCEL NORMAL NORMAL STORE 3 Bar Code initial setting Menu Text Size Item Reset EAN-13 Cleared M (MEDIUM) Bar Code Specifications Bar code Type Check Digit *1 Print Digit *2 Input Digits *3 Automatically Assigned Number of digits printed below a bar code equals...
... Label Printer whenever you turn power on . SET ⁄ ESC 3. Turn power off. 2. Make sure you have a back-up copy of text stored in accordance with input data. Item Display Memory SYMBOL SIZE EFFECT STYLE MIRROR MEMO DENSITY Reset Cleared , Cleared AUTO CANCEL NORMAL NORMAL STORE 3 Bar Code initial setting Menu Text Size Item Reset EAN-13 Cleared M (MEDIUM) Bar Code Specifications Bar code Type Check Digit *1 Print Digit *2 Input Digits *3 Automatically Assigned Number of digits printed below a bar code equals...
User Guide
Page 23
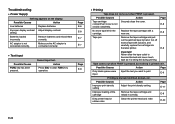
... during printing. E-8 Dirty printer head or rubber roller Clean the printer head and roller. Page E-9 • Printing Tape does not come out when PRINT is blurred, blotched, broken, etc. Replace the tape cartridge with scissors, and carefully replace the cartridge into the label printer. Never allow the tape outlet to clear FUNC key operation. Possible Causes Action Page Improper print density setting Adjust the print density setting. Troubleshooting • Power Supply Nothing appears on it. Make sure...
... during printing. E-8 Dirty printer head or rubber roller Clean the printer head and roller. Page E-9 • Printing Tape does not come out when PRINT is blurred, blotched, broken, etc. Replace the tape cartridge with scissors, and carefully replace the cartridge into the label printer. Never allow the tape outlet to clear FUNC key operation. Possible Causes Action Page Improper print density setting Adjust the print density setting. Troubleshooting • Power Supply Nothing appears on it. Make sure...
User Guide
Page 24
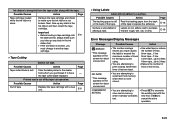
... text in memory when it to have the tape cutter blade replaced. Possible Causes Action Page Tape cartridge loaded while the ink ribbon is dull. Take the label printer to the dealer from the tape outlet along with the tape. SET/ESC • You are input. • Use wider tape or reduce the number of lines. 6mm tape...1 line 9mm tape...1 line 12mm...
... text in memory when it to have the tape cutter blade replaced. Possible Causes Action Page Tape cartridge loaded while the ink ribbon is dull. Take the label printer to the dealer from the tape outlet along with the tape. SET/ESC • You are input. • Use wider tape or reduce the number of lines. 6mm tape...1 line 9mm tape...1 line 12mm...
User Guide
Page 25
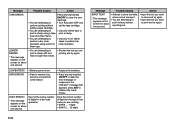
... without set the tape cartridge. In response to store and try again. • Input the text you are printing and try again. Input the correct number of digits for the type of digits for a bar code operation. • Replace the batteries. • Press any key besides ON/OFF to clear the error message. • You are attempting to initialize the Label Printer. message...
... without set the tape cartridge. In response to store and try again. • Input the text you are printing and try again. Input the correct number of digits for the type of digits for a bar code operation. • Replace the batteries. • Press any key besides ON/OFF to clear the error message. • You are attempting to initialize the Label Printer. message...


