Owners Manual
Page 4
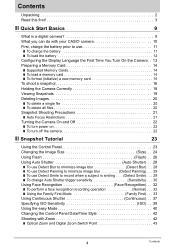
... 3 ❚❙ Quick Start Basics 9 What is a digital camera 9 What you can do with your CASIO camera 10 First, charge the battery prior to use 11 ❚ To charge the battery 11 ❚ To load the battery 12 Configuring the Display Language the First Time You Turn On the Camera. . 13 Preparing a Memory Card 14 ❚ Supported Memory Cards 14 ❚ To load a memory card 14 ❚ To format (initialize) a new memory card 15 To shoot a snapshot 16...
... 3 ❚❙ Quick Start Basics 9 What is a digital camera 9 What you can do with your CASIO camera 10 First, charge the battery prior to use 11 ❚ To charge the battery 11 ❚ To load the battery 12 Configuring the Display Language the First Time You Turn On the Camera. . 13 Preparing a Memory Card 14 ❚ Supported Memory Cards 14 ❚ To load a memory card 14 ❚ To format (initialize) a new memory card 15 To shoot a snapshot 16...

Owners Manual
Page 7
...; Playing a Movie 116 ❚ Viewing User Documentation PDF Files) . . 116 ❚ User Registration 116 Files and Folders 117 Memory Card Data 118 ❚❙ Other Settings (Set Up) 120 Selecting a REC Mode Screen Layout R Panel) . 120 Selecting a PLAY Mode Screen Layout P Display) . 121 Configuring Camera Sound Settings Sounds) . 121 Changing the Menu Screen Color Menu Color) . 122 Configuring a Startup Image Startup) . 122 Specifying the File Name Serial Number Generation Rule . . . . . (File No.) . 123 Configuring World Time Settings World Time) . 123 Time Stamping...
...; Playing a Movie 116 ❚ Viewing User Documentation PDF Files) . . 116 ❚ User Registration 116 Files and Folders 117 Memory Card Data 118 ❚❙ Other Settings (Set Up) 120 Selecting a REC Mode Screen Layout R Panel) . 120 Selecting a PLAY Mode Screen Layout P Display) . 121 Configuring Camera Sound Settings Sounds) . 121 Changing the Menu Screen Color Menu Color) . 122 Configuring a Startup Image Startup) . 122 Specifying the File Name Serial Number Generation Rule . . . . . (File No.) . 123 Configuring World Time Settings World Time) . 123 Time Stamping...

Owners Manual
Page 12
... to be cleared. You will cause its date and time settings to replace the battery, see page 140. 2 1 Checking Remaining Battery Power As battery power is restored. • See page 161 for the flash setting (page 26). • Enable the Auto Power Off and the Sleep features to protect against the camera, slide it in the illustration. 2. Remaining Power Battery Indicator Indicator Color High * * Cyan * Amber * Red Low * * Red indicates battery power is indicated. Open the battery cover.
... to be cleared. You will cause its date and time settings to replace the battery, see page 140. 2 1 Checking Remaining Battery Power As battery power is restored. • See page 161 for the flash setting (page 26). • Enable the Auto Power Off and the Sleep features to protect against the camera, slide it in the illustration. 2. Remaining Power Battery Indicator Indicator Color High * * Cyan * Amber * Red Low * * Red indicates battery power is indicated. Open the battery cover.

Owners Manual
Page 13
... change the settings later (pages 125, 126). Press [SET]. • If you make a mistake, you want and then press [SET]. 6. Use [8] and [2] to select the language you can change it. Configuring the Display Language the First Time You Turn On the Camera The first time you will cause the wrong date and time data to set the date and time correctly will be recorded with images. 1. The selected area is highlighted in red...
... change the settings later (pages 125, 126). Press [SET]. • If you make a mistake, you want and then press [SET]. 6. Use [8] and [2] to select the language you can change it. Configuring the Display Language the First Time You Turn On the Camera The first time you will cause the wrong date and time data to set the date and time correctly will be recorded with images. 1. The selected area is highlighted in red...

Owners Manual
Page 49
... monitor screen on /off immediately (page 130). In the PLAY mode, use [8] (DISP) during audio recording to turn off [8] (DISP) Playback end [MENU] 49 Recording Movie Images and Audio Press [SET] to resume playback. Voice Recording Playback Controls Fast forward/fast reverse [4] [6] Play/pause [SET] Jump to marker While playback is displayed in place of recording at 5.5KB per second) To play back an audio recording 1. About audio data • Audio files can use [4] and [6] to display...
... monitor screen on /off immediately (page 130). In the PLAY mode, use [8] (DISP) during audio recording to turn off [8] (DISP) Playback end [MENU] 49 Recording Movie Images and Audio Press [SET] to resume playback. Voice Recording Playback Controls Fast forward/fast reverse [4] [6] Play/pause [SET] Jump to marker While playback is displayed in place of recording at 5.5KB per second) To play back an audio recording 1. About audio data • Audio files can use [4] and [6] to display...

Owners Manual
Page 64
...-speed Continuous Shutter, some BEST SHOT scenes (ID Photo, White board, etc., For YouTube) Using Auto Shutter (Auto Shutter) Procedure [r] (REC) * [MENU] * REC Tab * Auto Shutter For details, see the Control Panel procedure on the image size and quality settings, whether or not a memory card is in the camera, and the flash charge condition. The shutter is released and the image is ready after a fixed amount of time. „ 10 sec , 2 sec 10-second Self-timer 2-second Self-timer • When shooting...
...-speed Continuous Shutter, some BEST SHOT scenes (ID Photo, White board, etc., For YouTube) Using Auto Shutter (Auto Shutter) Procedure [r] (REC) * [MENU] * REC Tab * Auto Shutter For details, see the Control Panel procedure on the image size and quality settings, whether or not a memory card is in the camera, and the flash charge condition. The shutter is released and the image is ready after a fixed amount of time. „ 10 sec , 2 sec 10-second Self-timer 2-second Self-timer • When shooting...

Owners Manual
Page 66
... using normal Auto Focus before the image is turned on Quick Shutter. • Some images may be shot without waiting for Auto Focus. Setting [4]/[6] key operation Metering Changes the Metering Mode (page 72) EV Shift Adjusts the EV shift value (page 70) White Balance Changes the white balance setting (page 71) ISO Changes the ISO Sensitivity setting (page 39) Self-timer Sets the self-timer time (page 64) Off Cancels [4] and [6] key assignments Shooting with Quick Shutter (Quick Shutter) Procedure [r] (REC) * [MENU] * REC Tab * Quick Shutter When Quick Shutter is recorded...
... using normal Auto Focus before the image is turned on Quick Shutter. • Some images may be shot without waiting for Auto Focus. Setting [4]/[6] key operation Metering Changes the Metering Mode (page 72) EV Shift Adjusts the EV shift value (page 70) White Balance Changes the white balance setting (page 71) ISO Changes the ISO Sensitivity setting (page 39) Self-timer Sets the self-timer time (page 64) Off Cancels [4] and [6] key assignments Shooting with Quick Shutter (Quick Shutter) Procedure [r] (REC) * [MENU] * REC Tab * Quick Shutter When Quick Shutter is recorded...

Owners Manual
Page 67
...-screen grid can use this setting to record it. When digital zoom is turned off . Functions Supported by Icon Help • REC Mode, Flash, Metering Mode, White Balance, Self-timer, EV Shift 67 Advanced Settings Turning Digital Zoom On or Off (Digital Zoom) Procedure [r] (REC) * [MENU] * REC Tab * Digital Zoom You can be displayed on the display for certain icons when you press the shutter button to turn digital zoom on or off , operating the zoom controller zooms the image with optical zoom only. Using Icon Help (Icon Help) Procedure [r] (REC) * [MENU] * REC Tab * Icon Help While...
...-screen grid can use this setting to record it. When digital zoom is turned off . Functions Supported by Icon Help • REC Mode, Flash, Metering Mode, White Balance, Self-timer, EV Shift 67 Advanced Settings Turning Digital Zoom On or Off (Digital Zoom) Procedure [r] (REC) * [MENU] * REC Tab * Digital Zoom You can be displayed on the display for certain icons when you press the shutter button to turn digital zoom on or off , operating the zoom controller zooms the image with optical zoom only. Using Icon Help (Icon Help) Procedure [r] (REC) * [MENU] * REC Tab * Icon Help While...

Owners Manual
Page 80
... the movie will continue to be used for the "Images" setting - If you want. Playing a Slideshow on the Camera (Slideshow) Procedure [p] (PLAY) * [MENU] * PLAY Tab * Slideshow Start Images Time Interval Effect Starts the slideshow Specifies the type of snapshots only, and the "Interval" setting is ignored. • The currently selected image change effect setting is selected. Before and after playback of movies and audio snapshots will displayed. For information about menu operations, see...
... the movie will continue to be used for the "Images" setting - If you want. Playing a Slideshow on the Camera (Slideshow) Procedure [p] (PLAY) * [MENU] * PLAY Tab * Slideshow Start Images Time Interval Effect Starts the slideshow Specifies the type of snapshots only, and the "Interval" setting is ignored. • The currently selected image change effect setting is selected. Before and after playback of movies and audio snapshots will displayed. For information about menu operations, see...

Owners Manual
Page 95
... largest serial number. 1Use [4] and [6] to select the file you recorded with this camera. • When a copied image appears on the full-month calendar screen, it was copied (page 77). 95 Other Playback Functions (PLAY) Copies a single file on the date that it is displayed on the memory card to select "Copy" and then press [SET]. It cannot be copied from the camera's built-in memory to a memory card or from built-in camera memory to a memory card.
... largest serial number. 1Use [4] and [6] to select the file you recorded with this camera. • When a copied image appears on the full-month calendar screen, it was copied (page 77). 95 Other Playback Functions (PLAY) Copies a single file on the date that it is displayed on the memory card to select "Copy" and then press [SET]. It cannot be copied from the camera's built-in memory to a memory card or from built-in camera memory to a memory card.
Owners Manual
Page 96
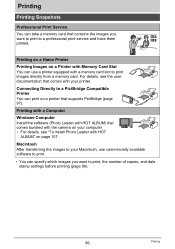
... to print images directly from a memory card. Printing with a Computer Windows Computer Install the software (Photo Loader with HOT ALBUM) that comes bundled with a memory card slot to print, the number of copies, and date stamp settings before printing (page 99). 96 Printing Connecting Directly to a PictBridge Compatible Printer You can take a memory card that comes with your Macintosh, use commercially available software to print. • You can use a printer equipped with the camera on your computer. • For details, see the user documentation...
... to print images directly from a memory card. Printing with a Computer Windows Computer Install the software (Photo Loader with HOT ALBUM) that comes bundled with a memory card slot to print, the number of copies, and date stamp settings before printing (page 99). 96 Printing Connecting Directly to a PictBridge Compatible Printer You can take a memory card that comes with your Macintosh, use commercially available software to print. • You can use a printer equipped with the camera on your computer. • For details, see the user documentation...

Owners Manual
Page 97
... and print images without going through a computer. . Failure to insert the connector fully can connect the camera directly to a printer 1. Turn on the camera is fully inserted, you still will be able to see the metal part of the USB cable connector, connect the cable to select "PTP (PictBridge)", and then press [SET]. . Small connector • Make sure that the 6 mark on the camera and press [MENU]. 2.
... and print images without going through a computer. . Failure to insert the connector fully can connect the camera directly to a printer 1. Turn on the camera is fully inserted, you still will be able to see the metal part of the USB cable connector, connect the cable to select "PTP (PictBridge)", and then press [SET]. . Small connector • Make sure that the 6 mark on the camera and press [MENU]. 2.

Owners Manual
Page 101
... Camera's Time Stamp setting (page 124). • The camera's Time Stamp setting imprints the date into images using the bundled Photo Loader with HOT ALBUM (page 103) software (Windows only). Standards Supported by the Camera • PictBridge This is recorded with the camera's Time Stamp function. . Configure DPOF settings (page 99). Configuring computer settings You can use information about shooting conditions that support Exif Print, printer upgrades, etc. 101 Printing You can cause the two stamps to be deleted. • Do not turn date stamping...
... Camera's Time Stamp setting (page 124). • The camera's Time Stamp setting imprints the date into images using the bundled Photo Loader with HOT ALBUM (page 103) software (Windows only). Standards Supported by the Camera • PictBridge This is recorded with the camera's Time Stamp function. . Configure DPOF settings (page 99). Configuring computer settings You can use information about shooting conditions that support Exif Print, printer upgrades, etc. 101 Printing You can cause the two stamps to be deleted. • Do not turn date stamping...
Owners Manual
Page 117
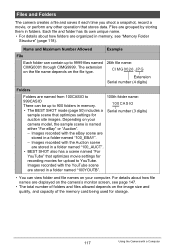
... Using the Camera with the Auction scene are displayed on your camera model, the sample scene is named either "For eBay" or "Auction". - Images recorded with the eBay scene are named from 100CASIO to 9999 files named CIMG0001 through CIMG9999. Files are stored in folders. Files and Folders The camera creates a file and saves it each time you shoot a snapshot, record a movie, or perform any other operation that optimizes settings for...
... Using the Camera with the Auction scene are displayed on your camera model, the sample scene is named either "For eBay" or "Auction". - Images recorded with the eBay scene are named from 100CASIO to 9999 files named CIMG0001 through CIMG9999. Files are stored in folders. Files and Folders The camera creates a file and saves it each time you shoot a snapshot, record a movie, or perform any other operation that optimizes settings for...

Owners Manual
Page 126
.... 1 23 Configuring Sleep State Settings (Sleep) Procedure [MENU] * Set Up Tab * Sleep This feature turns off the monitor screen whenever no camera operation is disabled under any button to a computer or other device - While the camera is connected to turn the monitor screen back on , Auto Power Off takes priority. 126 Other Settings (Set Up) Press any of time. During Auto Shutter standby - During Voice Recording playback or recording - Specifying the Display Language (Language) Procedure [MENU] * Set Up Tab * Language .
.... 1 23 Configuring Sleep State Settings (Sleep) Procedure [MENU] * Set Up Tab * Sleep This feature turns off the monitor screen whenever no camera operation is disabled under any button to a computer or other device - While the camera is connected to turn the monitor screen back on , Auto Power Off takes priority. 126 Other Settings (Set Up) Press any of time. During Auto Shutter standby - During Voice Recording playback or recording - Specifying the Display Language (Language) Procedure [MENU] * Set Up Tab * Language .

Owners Manual
Page 127
... camera turns off whenever [r] (REC) or [p] (PLAY) is always 5 minutes in the PLAY mode. • Change this setting to anything besides "Disable" before connecting to a computer or other device - While the camera is performed for image viewing. 127 Other Settings (Set Up) Configuring Auto Power Settings (Auto Power Off) Procedure [MENU] * Set Up Tab * Auto Power Off Auto Power Off turns off the camera whenever no camera operation is connected to a TV for a preset amount of the following conditions. - Trigger Time Settings...
... camera turns off whenever [r] (REC) or [p] (PLAY) is always 5 minutes in the PLAY mode. • Change this setting to anything besides "Disable" before connecting to a computer or other device - While the camera is performed for image viewing. 127 Other Settings (Set Up) Configuring Auto Power Settings (Auto Power Off) Procedure [MENU] * Set Up Tab * Auto Power Off Auto Power Off turns off the camera whenever no camera operation is connected to a TV for a preset amount of the following conditions. - Trigger Time Settings...

Owners Manual
Page 129
... open the battery cover while formatting is in progress. It cannot be performed correctly and the camera may not be undone. Formatting may stop operating normally. Protected images - Pre-recorded face data for details about the camera's factory default settings. BEST SHOT mode user setups - The settings below are not reset. Formatting Built-in Memory or a Memory Card (Format) Procedure [MENU] * Set Up Tab * Format If a memory card is loaded in the camera, this operation will delete the following data. - Make sure you do not need...
... open the battery cover while formatting is in progress. It cannot be performed correctly and the camera may not be undone. Formatting may stop operating normally. Protected images - Pre-recorded face data for details about the camera's factory default settings. BEST SHOT mode user setups - The settings below are not reset. Formatting Built-in Memory or a Memory Card (Format) Procedure [MENU] * Set Up Tab * Format If a memory card is loaded in the camera, this operation will delete the following data. - Make sure you do not need...

Owners Manual
Page 151
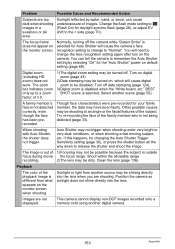
... trying to your computer, delete images you no longer need, or use it off . When composing the image, make sure the subject is dirty, clean it again. Turn off the camera and wait until the charge operation finishes. 3)If the message "Memory Full" appears, transfer images to use a different memory card. 1)If the lens is located inside the focus frame. 151 Appendix Troubleshooting Problem Power Supply Power does not turn off . 2)The subject may...
... trying to your computer, delete images you no longer need, or use it off . When composing the image, make sure the subject is dirty, clean it again. Turn off the camera and wait until the charge operation finishes. 3)If the message "Memory Full" appears, transfer images to use a different memory card. 1)If the lens is located inside the focus frame. 151 Appendix Troubleshooting Problem Power Supply Power does not turn off . 2)The subject may...
Owners Manual
Page 153
... dark when shooting images in a seashore or ski area. This camera cannot display non-DCF images recorded onto a memory card using another scene (page 50). The focus frame does not appear on the camera. Turn on digital zoom (page 43). 2)Date stamping may be disabled. Turn off . Other possible causes may have been faulty. If this happens, try changing the Auto Shutter Trigger Sensitivity setting (page 30), or press the shutter button all the...
... dark when shooting images in a seashore or ski area. This camera cannot display non-DCF images recorded onto a memory card using another scene (page 50). The focus frame does not appear on the camera. Turn on digital zoom (page 43). 2)Date stamping may be disabled. Turn off . Other possible causes may have been faulty. If this happens, try changing the Auto Shutter Trigger Sensitivity setting (page 30), or press the shutter button all the...

Owners Manual
Page 154
... means that , configure each setting. The date and time setting is not possible if the camera cannot find a shape to initialize the camera's setup (page 129). Change the display language setting (page 126). Images cannot be transferred over a USB connection. 1)The USB cable may be a problem with the type of snapshots. • Snapshots created using MOTION PRINT • Movies • Snapshots recorded with another camera 2)With keystone correction and color restoration, editing is off...
... means that , configure each setting. The date and time setting is not possible if the camera cannot find a shape to initialize the camera's setup (page 129). Change the display language setting (page 126). Images cannot be transferred over a USB connection. 1)The USB cable may be a problem with the type of snapshots. • Snapshots created using MOTION PRINT • Movies • Snapshots recorded with another camera 2)With keystone correction and color restoration, editing is off...


