Owners Manual
Page 3
... QUICK START GUIDE First, charge the battery 18 To configure display language and clock settings ..... 19 To record an image 20 To view a recorded image 21 To delete an image 21 22 GETTING READY About This Manual 22 General Guide 23 Camera 23 USB Cradle 25 Monitor Screen Contents 26 REC Modes 26 PLAY Mode 29 Changing the Contents of the Monitor Screen 30 Attaching the Strap 32 Power Requirements 33 Loading the Rechargeable Battery 33 To charge...
... QUICK START GUIDE First, charge the battery 18 To configure display language and clock settings ..... 19 To record an image 20 To view a recorded image 21 To delete an image 21 22 GETTING READY About This Manual 22 General Guide 23 Camera 23 USB Cradle 25 Monitor Screen Contents 26 REC Modes 26 PLAY Mode 29 Changing the Contents of the Monitor Screen 30 Attaching the Strap 32 Power Requirements 33 Loading the Rechargeable Battery 33 To charge...
Owners Manual
Page 5
...Specifying Color Saturation 127 Specifying Contrast 128 Resetting the Camera 128 Using the Shortcut Menu (EX Menu 129 130 PLAYBACK Basic Playback Operation 130 Playing an Audio Snapshot 131 Zooming the Display Image 132 Resizing an Image 133 Cropping an Image 134 Playing and Editing a Movie 135 Playing a Movie 135 Editing a Movie 136 Capturing a Still Image from a Movie (MOTION PRINT) 140 Adjusting White Balance of a Recorded Image ....... 141 Adjusting Image Brightness 143 Displaying the 9-image View 145 Displaying the Calendar Screen 146 Playing a Slideshow...
...Specifying Color Saturation 127 Specifying Contrast 128 Resetting the Camera 128 Using the Shortcut Menu (EX Menu 129 130 PLAYBACK Basic Playback Operation 130 Playing an Audio Snapshot 131 Zooming the Display Image 132 Resizing an Image 133 Cropping an Image 134 Playing and Editing a Movie 135 Playing a Movie 135 Editing a Movie 136 Capturing a Still Image from a Movie (MOTION PRINT) 140 Adjusting White Balance of a Recorded Image ....... 141 Adjusting Image Brightness 143 Displaying the 9-image View 145 Displaying the Calendar Screen 146 Playing a Slideshow...
Owners Manual
Page 6
... World Time settings 172 Changing the Display Language 173 Changing the USB Port Protocol 173 Configuring [ ] (REC) and [ ] (PLAY) Power On/Off Functions 174 Formatting Built-in Memory 175 177 USING A MEMORY CARD Using a Memory Card 178 To insert a memory card into the camera 178 To replace the memory card 179 Formatting a Memory Card 179 Copying Files 181 To copy all the files in built-in memory to a memory card 181 To copy a specific file from a memory card to built-in memory 182 184 PRINTING IMAGES DPOF 185 To configure print settings for a single image...
... World Time settings 172 Changing the Display Language 173 Changing the USB Port Protocol 173 Configuring [ ] (REC) and [ ] (PLAY) Power On/Off Functions 174 Formatting Built-in Memory 175 177 USING A MEMORY CARD Using a Memory Card 178 To insert a memory card into the camera 178 To replace the memory card 179 Formatting a Memory Card 179 Copying Files 181 To copy all the files in built-in memory to a memory card 181 To copy a specific file from a memory card to built-in memory 182 184 PRINTING IMAGES DPOF 185 To configure print settings for a single image...

Owners Manual
Page 7
... Playing a Movie 221 Editing a Movie 224 Viewing User Documentation (PDF Files) 225 User Registration 226 Exiting the Menu Application 226 Using the Camera with a Macintosh Computer ....... 227 About the bundled CD-ROM 227 Computer System Requirements 228 Managing Images on a Macintosh 229 Viewing User Documentation (PDF Files) 230 To register as a camera user 230 231 APPENDIX Menu Reference 231 Indicator Lamp Reference 234 Troubleshooting Guide 237 If you have problems installing the USB driver... 242 Display Messages 243 Specifications...
... Playing a Movie 221 Editing a Movie 224 Viewing User Documentation (PDF Files) 225 User Registration 226 Exiting the Menu Application 226 Using the Camera with a Macintosh Computer ....... 227 About the bundled CD-ROM 227 Computer System Requirements 228 Managing Images on a Macintosh 229 Viewing User Documentation (PDF Files) 230 To register as a camera user 230 231 APPENDIX Menu Reference 231 Indicator Lamp Reference 234 Troubleshooting Guide 237 If you have problems installing the USB driver... 242 Display Messages 243 Specifications...

Owners Manual
Page 8
..., product and service names used herein may arise through the use of the EX-Z750. • CASIO COMPUTER CO., LTD. assumes no responsibility for any damage or loss resulting from the use of this manual. • CASIO COMPUTER CO., LTD. Except as a result of malfunction, repairs, or battery replacement. INTRODUCTION IMPORTANT! • The contents of this User's Guide may differ somewhat by the screens and configuration...
..., product and service names used herein may arise through the use of the EX-Z750. • CASIO COMPUTER CO., LTD. assumes no responsibility for any damage or loss resulting from the use of this manual. • CASIO COMPUTER CO., LTD. Except as a result of malfunction, repairs, or battery replacement. INTRODUCTION IMPORTANT! • The contents of this User's Guide may differ somewhat by the screens and configuration...
Owners Manual
Page 11
... sounds to play whenever you turn on the camera's monitor screen. INTRODUCTION • Audio Snapshot Mode (page 114) Use this mode to record snapshots that date, which makes shooting under difficult lighting conditions easier than ever before. • EX Menu (page 129) EX Menu gives you short-cut menu access to four frequently-used when specifying images and quantities for printing by professional print services. • PictBridge and USB DIRECT-PRINT support (page 188) Connect directly to a PictBridge or USB DIRECT-PRINT compatible printer...
... sounds to play whenever you turn on the camera's monitor screen. INTRODUCTION • Audio Snapshot Mode (page 114) Use this mode to record snapshots that date, which makes shooting under difficult lighting conditions easier than ever before. • EX Menu (page 129) EX Menu gives you short-cut menu access to four frequently-used when specifying images and quantities for printing by professional print services. • PictBridge and USB DIRECT-PRINT support (page 188) Connect directly to a PictBridge or USB DIRECT-PRINT compatible printer...
Owners Manual
Page 15
... USB cradle while a data communication operation is manufactured using precision digital components. Inside of the following areas. - Removing the battery or memory card, or setting the camera onto the USB cradle while the camera is still flashing after you turn off the camera - Any of a closed vehicle, especially one parked in file memory. - Near air conditioners, heaters, or other areas subject to direct sunlight - Disconnecting the USB cable, removing the camera from the USB...
... USB cradle while a data communication operation is manufactured using precision digital components. Inside of the following areas. - Removing the battery or memory card, or setting the camera onto the USB cradle while the camera is still flashing after you turn off the camera - Any of a closed vehicle, especially one parked in file memory. - Near air conditioners, heaters, or other areas subject to direct sunlight - Disconnecting the USB cable, removing the camera from the USB...
Owners Manual
Page 45
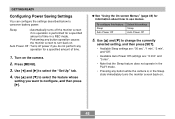
... operate in the PLAY mode. • Pressing any operation for a specified amount of time. 1. Press [MENU]. 3. GETTING READY Configuring Power Saving Settings You can configure the settings described below to select the "Set Up" tab. 4. Auto Power Off : Turns off the monitor screen if no operation is in a REC mode. Use [̆] and [̄] to turn back on . 45 Use [̇] and [̈] to conserve battery power. Turn on the camera. 2. G See "Using the On-screen...
... operate in the PLAY mode. • Pressing any operation for a specified amount of time. 1. Press [MENU]. 3. GETTING READY Configuring Power Saving Settings You can configure the settings described below to select the "Set Up" tab. 4. Auto Power Off : Turns off the monitor screen if no operation is in a REC mode. Use [̆] and [̄] to turn back on . 45 Use [̇] and [̈] to conserve battery power. Turn on the camera. 2. G See "Using the On-screen...
Owners Manual
Page 49
... settings before using the camera. 49 • A built-in backup battery retains the date and time settings of an image when printing (page 191). The following are the conditions when power is dead or removed from the USB cradle while the rechargeable battery is not being supplied to individually change the language (page 173) or clock (page 169) settings. • You will need to use the camera's menu to the camera...
... settings before using the camera. 49 • A built-in backup battery retains the date and time settings of an image when printing (page 191). The following are the conditions when power is dead or removed from the USB cradle while the rechargeable battery is not being supplied to individually change the language (page 173) or clock (page 169) settings. • You will need to use the camera's menu to the camera...
Owners Manual
Page 52
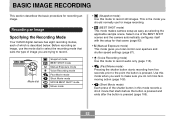
... Image Specifying the Recording Mode Your CASIO digital camera has eight recording modes, each of the shutter button in this mode records a short movie that starts before the button is pressed and ends after the button is described below. Before recording an image, use for image recording. • (BEST SHOT mode) This mode makes camera setup as easy as selecting the applicable sample scene. Mode dial Snapshot mode BEST SHOT mode Manual Exposure mode Voice Recording mode Past Movie mode Short Movie mode MOVIE BEST SHOT mode Movie mode • (Snapshot mode) Use this mode to record...
... Image Specifying the Recording Mode Your CASIO digital camera has eight recording modes, each of the shutter button in this mode records a short movie that starts before the button is pressed and ends after the button is described below. Before recording an image, use for image recording. • (BEST SHOT mode) This mode makes camera setup as easy as selecting the applicable sample scene. Mode dial Snapshot mode BEST SHOT mode Manual Exposure mode Voice Recording mode Past Movie mode Short Movie mode MOVIE BEST SHOT mode Movie mode • (Snapshot mode) Use this mode to record...
Owners Manual
Page 148
... the next image. • When the slideshow comes to a movie file, it plays the movie and its audio once. • When the slideshow comes to a voice recording file or an audio snapshot, it plays the audio once. • The audio of time you can use [̆] and [̄] to adjust the volume level. 148 With all other "Interval" settings, movies and all buttons are played back...
... the next image. • When the slideshow comes to a movie file, it plays the movie and its audio once. • When the slideshow comes to a voice recording file or an audio snapshot, it plays the audio once. • The audio of time you can use [̆] and [̄] to adjust the volume level. 148 With all other "Interval" settings, movies and all buttons are played back...
Owners Manual
Page 153
... start audio recording. 6. In the PLAY mode, use [̇] and [̈] to re-record is low. • You cannot add audio to complete the procedure. 5. Movie images and the voice recording file icon - Recording stops after audio recording is too far from the subject. • The (Audio) icon appears on the monitor Microphone screen after about 30 seconds or when you press the shutter button. • This deletes...
... start audio recording. 6. In the PLAY mode, use [̇] and [̈] to re-record is low. • You cannot add audio to complete the procedure. 5. Movie images and the voice recording file icon - Recording stops after audio recording is too far from the subject. • The (Audio) icon appears on the monitor Microphone screen after about 30 seconds or when you press the shutter button. • This deletes...
Owners Manual
Page 156
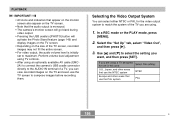
... mode or the PLAY mode, press [MENU]. 2. Perform volume level adjustment using TV controls. • After using an optionally available AV cable (EMC2A) to connect the camera's USB cradle connector directly to the AUDIO IN terminal of the TV screen, recorded images may not fill the entire screen. • For video output, the audio volume level is monaural. • The camera's monitor screen will go blank during video output. • Pressing the USB cradle's [PHOTO] button...
... mode or the PLAY mode, press [MENU]. 2. Perform volume level adjustment using TV controls. • After using an optionally available AV cable (EMC2A) to connect the camera's USB cradle connector directly to the AUDIO IN terminal of the TV screen, recorded images may not fill the entire screen. • For video output, the audio volume level is monaural. • The camera's monitor screen will go blank during video output. • Pressing the USB cradle's [PHOTO] button...
Owners Manual
Page 158
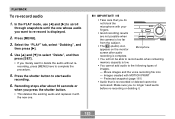
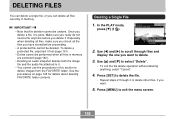
... delete. 3. Press [SET] to delete the file. • Repeat steps 2 through files and display the one you delete it. Press [MENU] to select "Delete". • To exit the file delete operation without deleting anything, select "Cancel". 4. DELETING FILES DELETING FILES You can delete all files in memory are protected (page 162). • Deleting an audio snapshot deletes both the image file and the audio file attached to it. • You cannot use the procedures in memory. Deleting a Single File 1. To delete a protected file...
... delete. 3. Press [SET] to delete the file. • Repeat steps 2 through files and display the one you delete it. Press [MENU] to select "Delete". • To exit the file delete operation without deleting anything, select "Cancel". 4. DELETING FILES DELETING FILES You can delete all files in memory are protected (page 162). • Deleting an audio snapshot deletes both the image file and the audio file attached to it. • You cannot use the procedures in memory. Deleting a Single File 1. To delete a protected file...
Owners Manual
Page 175
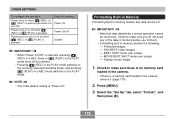
... camera, remove it . BEST SHOT mode user setups - MOVIE BEST SHOT mode user setups - Check to make sure you do not need any data stored in memory deletes the following. - Check to the PLAY mode. Select the "Set Up" tab, select "Format", and then press [̈]. 175 NOTE • The initial default setting is a memory card loaded in a REC mode switches to make sure there is no memory card loaded in the camera. • If there is "Power On". Protected images - Formatting Built-in Memory Formatting...
... camera, remove it . BEST SHOT mode user setups - MOVIE BEST SHOT mode user setups - Check to make sure you do not need any data stored in memory deletes the following. - Check to the PLAY mode. Select the "Set Up" tab, select "Format", and then press [̈]. 175 NOTE • The initial default setting is a memory card loaded in a REC mode switches to make sure there is no memory card loaded in the camera. • If there is "Power On". Protected images - Formatting Built-in Memory Formatting...
Owners Manual
Page 195
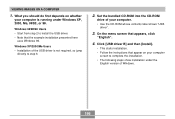
... Me. 195 VIEWING IMAGES ON A COMPUTER IMPORTANT! • Low battery power can slow down suddenly during data communication. • If you are using battery power without installing the USB driver first. • USB driver installation is no memory card loaded in the camera before you place it onto the USB cradle. • Certain computer models, connecting through a USB hub, and other system conditions can cause the camera to power down data transfer and even cause operational problems. Do...
... Me. 195 VIEWING IMAGES ON A COMPUTER IMPORTANT! • Low battery power can slow down suddenly during data communication. • If you are using battery power without installing the USB driver first. • USB driver installation is no memory card loaded in the camera before you place it onto the USB cradle. • Certain computer models, connecting through a USB hub, and other system conditions can cause the camera to power down data transfer and even cause operational problems. Do...
Owners Manual
Page 196
Click [USB driver B] and then [Install]. • This starts installation. • Follow the instructions that appear on whether your computer is not required, so jump directly to step 6. 2. Windows XP/2000/Me Users • Installation of the USB driver is running under the English version of your computer screen to install the USB driver. • Note that appears, click "English". 4. On the menu screen that the example installation presented here uses Windows 98. Windows 98SE...
Click [USB driver B] and then [Install]. • This starts installation. • Follow the instructions that appear on whether your computer is not required, so jump directly to step 6. 2. Windows XP/2000/Me Users • Installation of the USB driver is running under the English version of your computer screen to install the USB driver. • Note that appears, click "English". 4. On the menu screen that the example installation presented here uses Windows 98. Windows 98SE...

Owners Manual
Page 212
... in combination with useful applications for image transfer Software Name - Install the USB driver Type B (page 194). Installation of images transferred to a computer Photo Loader 2.3 * DirectX 9.0c CD-ROM Software Supported Windows Versions XP/2000/Me 98SE/98 XP/2000/Me/98SE/98 Required Operation Use the USB cradle to a computer for using computer running under Windows (see page 227). Purpose USB connection to establish a connection between the camera and computer. Install Photo Loader 2.3 (page...
... in combination with useful applications for image transfer Software Name - Install the USB driver Type B (page 194). Installation of images transferred to a computer Photo Loader 2.3 * DirectX 9.0c CD-ROM Software Supported Windows Versions XP/2000/Me 98SE/98 XP/2000/Me/98SE/98 Required Operation Use the USB cradle to a computer for using computer running under Windows (see page 227). Purpose USB connection to establish a connection between the camera and computer. Install Photo Loader 2.3 (page...
Owners Manual
Page 236
... [CHARGE] lamp [USB] lamp [CHARGE] lamp Color Red Green Amber Red Status Lit Lit Lit Flashing [USB] lamp Meaning Color Status Charging Charging complete Charge standby Charge error Green Lit USB connection Green Flashing Accessing memory 236 Memory card is locked. / Cannot Lit create folder. / Memory is unformatted. These lamps light and flash to indicate the current operational status of the following operations is being performed: delete, DPOF, Pattern 3 image protect, copy, format, power down, image resizing, image trimming, after recording, MOTION PRINT, movie...
... [CHARGE] lamp [USB] lamp [CHARGE] lamp Color Red Green Amber Red Status Lit Lit Lit Flashing [USB] lamp Meaning Color Status Charging Charging complete Charge standby Charge error Green Lit USB connection Green Flashing Accessing memory 236 Memory card is locked. / Cannot Lit create folder. / Memory is unformatted. These lamps light and flash to indicate the current operational status of the following operations is being performed: delete, DPOF, Pattern 3 image protect, copy, format, power down, image resizing, image trimming, after recording, MOTION PRINT, movie...

Owners Manual
Page 241
... Remove the battery from the camera, reinsert it, and then try again. Other 241 APPENDIX Symptom All buttons and switches are disabled. USB communication is off . After confirming that the computer is turned off . while the camera was connected to another device. Cannot transfer files over a USB connection. 1) Camera is not set securely on the USB cradle. 2) USB cable is not connected securely. 3) USB driver is not installed. 4) Camera is not accessing camera memory, disconnect the USB cable...
... Remove the battery from the camera, reinsert it, and then try again. Other 241 APPENDIX Symptom All buttons and switches are disabled. USB communication is off . After confirming that the computer is turned off . while the camera was connected to another device. Cannot transfer files over a USB connection. 1) Camera is not set securely on the USB cradle. 2) USB cable is not connected securely. 3) USB driver is not installed. 4) Camera is not accessing camera memory, disconnect the USB cable...


