Owners Manual
Page 3
... QUICK START GUIDE First, charge the battery 16 To configure display language and clock settings ..... 17 To record an image 18 To view a recorded image 19 To delete an image 19 20 GETTING READY About This Manual 20 General Guide 21 Camera 21 USB Cradle 23 Monitor Screen Contents 24 Changing the Contents of the Monitor Screen 26 Attaching the Strap 28 Power Requirements 29 Loading and Removing the Rechargeable Battery 29 To charge the battery 31 Power...
... QUICK START GUIDE First, charge the battery 16 To configure display language and clock settings ..... 17 To record an image 18 To view a recorded image 19 To delete an image 19 20 GETTING READY About This Manual 20 General Guide 21 Camera 21 USB Cradle 23 Monitor Screen Contents 24 Changing the Contents of the Monitor Screen 26 Attaching the Strap 28 Power Requirements 29 Loading and Removing the Rechargeable Battery 29 To charge the battery 31 Power...

Owners Manual
Page 4
... Aiming the Camera 49 Recording an Image 50 Using the Optical Viewfinder 54 Using Zoom 55 Optical Zoom 55 Digital Zoom 57 Using the Flash 59 Flash Unit Status 60 Changing the Flash Intensity Setting 61 Using Flash Assist 61 Using the Self-timer 63 Specifying Image Size 65 Specifying Image Quality 66 68 OTHER RECORDING FUNCTIONS Selecting the Focus Mode 68 Using Auto Focus 69 Using the Macro Mode 71 Using Pan Focus 72 Using the Infinity Mode 73 Using Manual Focus 74 Using Focus Lock 75 Exposure Compensation (EV Shift 76 4 Adjusting White Balance 78...
... Aiming the Camera 49 Recording an Image 50 Using the Optical Viewfinder 54 Using Zoom 55 Optical Zoom 55 Digital Zoom 57 Using the Flash 59 Flash Unit Status 60 Changing the Flash Intensity Setting 61 Using Flash Assist 61 Using the Self-timer 63 Specifying Image Size 65 Specifying Image Quality 66 68 OTHER RECORDING FUNCTIONS Selecting the Focus Mode 68 Using Auto Focus 69 Using the Macro Mode 71 Using Pan Focus 72 Using the Infinity Mode 73 Using Manual Focus 74 Using Focus Lock 75 Exposure Compensation (EV Shift 76 4 Adjusting White Balance 78...
Owners Manual
Page 6
... Time settings 141 Changing the Display Language 142 Changing the USB Port Protocol 143 Configuring [ ] (REC) and [ ] (PLAY) Power On/Off Functions 144 Formatting Built-in Memory 145 146 USING A MEMORY CARD Using a Memory Card 147 To insert a memory card into the camera 147 To remove a memory card from the camera 148 Formatting a Memory Card 148 Copying Files 150 To copy all the files in built-in memory to a memory card 150 To copy a specific file from a memory card to built-in memory 151 152 PRINTING IMAGES DPOF 153 To configure print settings for a single image...
... Time settings 141 Changing the Display Language 142 Changing the USB Port Protocol 143 Configuring [ ] (REC) and [ ] (PLAY) Power On/Off Functions 144 Formatting Built-in Memory 145 146 USING A MEMORY CARD Using a Memory Card 147 To insert a memory card into the camera 147 To remove a memory card from the camera 148 Formatting a Memory Card 148 Copying Files 150 To copy all the files in built-in memory to a memory card 150 To copy a specific file from a memory card to built-in memory 151 152 PRINTING IMAGES DPOF 153 To configure print settings for a single image...
Owners Manual
Page 7
...-ROM in Windows ... 186 Getting Started 187 Selecting a Language 187 Viewing the Contents of the "Read me" File 187 Installing an Application 188 Viewing User Documentation (PDF Files) 188 User Registration 189 Exiting the Menu Application 189 Installing Software from the CD-ROM on a Macintosh 189 Installing Software 189 Viewing User Documentation (PDF Files) 190 192 APPENDIX Menu Reference 192 Indicator Lamp Reference 195 Troubleshooting Guide 198 If you have problems installing the USB driver... 201 Display Messages 202 Specifications 204 7
...-ROM in Windows ... 186 Getting Started 187 Selecting a Language 187 Viewing the Contents of the "Read me" File 187 Installing an Application 188 Viewing User Documentation (PDF Files) 188 User Registration 189 Exiting the Menu Application 189 Installing Software from the CD-ROM on a Macintosh 189 Installing Software 189 Viewing User Documentation (PDF Files) 190 192 APPENDIX Menu Reference 192 Indicator Lamp Reference 195 Troubleshooting Guide 198 If you have problems installing the USB driver... 201 Display Messages 202 Specifications 204 7
Owners Manual
Page 8
... trademarks of malfunction, repairs, or battery replacement. assumes no responsibility for any loss or claims by deletion of data as stipulated above, all important data on other related rights to these applications revert to the use of this User's Guide may also be held liable for any damages or losses suffered by the screens and configuration of the actual camera. • The...
... trademarks of malfunction, repairs, or battery replacement. assumes no responsibility for any loss or claims by deletion of data as stipulated above, all important data on other related rights to these applications revert to the use of this User's Guide may also be held liable for any damages or losses suffered by the screens and configuration of the actual camera. • The...
Owners Manual
Page 11
... camera's monitor screen. A printer that date, which helps to make searching for printing by professional print services. • PRINT Image Matching III Compatible (page 159) Images include PRINT Image Matching III data (mode setting and other camera setup information). Album contents can also be viewed and printed using a DPOF compatible printer. Each day of the full-month calendar shows a thumbnail of the first image recorded for that supports PRINT Image Matching III reads this mode to play whenever you recorded them . • Selectable Sound Settings...
... camera's monitor screen. A printer that date, which helps to make searching for printing by professional print services. • PRINT Image Matching III Compatible (page 159) Images include PRINT Image Matching III data (mode setting and other camera setup information). Album contents can also be viewed and printed using a DPOF compatible printer. Each day of the full-month calendar shows a thumbnail of the first image recorded for that supports PRINT Image Matching III reads this mode to play whenever you recorded them . • Selectable Sound Settings...
Owners Manual
Page 12
...) Connect directly to a USB DIRECT-PRINT or PictBridge compatible printer and you can print images without going through the camera's viewfinder. Always leave maintenance and repair work up to a CASIO authorized service center. • Never look at the sun or any other bright light through a computer. • Bundled with Photo Loader and Photohands (page 184) Your camera comes bundled with Photo Loader, the popular application that makes image retouching quick and easy...
...) Connect directly to a USB DIRECT-PRINT or PictBridge compatible printer and you can print images without going through the camera's viewfinder. Always leave maintenance and repair work up to a CASIO authorized service center. • Never look at the sun or any other bright light through a computer. • Bundled with Photo Loader and Photohands (page 184) Your camera comes bundled with Photo Loader, the popular application that makes image retouching quick and easy...

Owners Manual
Page 14
... the error. Inside of test images and check the results to record important images, make sure you turn off the camera - Before using the camera to ensure that the camera is designed for proper operation before using precision digital components. I Operating conditions • This camera is configured correctly and operating properly (page 16). Removing the battery or memory card, or setting the camera onto the USB cradle while the camera is still flashing after you first record a number...
... the error. Inside of test images and check the results to record important images, make sure you turn off the camera - Before using the camera to ensure that the camera is designed for proper operation before using precision digital components. I Operating conditions • This camera is configured correctly and operating properly (page 16). Removing the battery or memory card, or setting the camera onto the USB cradle while the camera is still flashing after you first record a number...

Owners Manual
Page 25
Memory card selected for data storage. (page 146) 25 Memory card selected for data storage. (page 146) 0 Shutter speed value (page 52) • An out of the following functions will cause Icon Help (page 103) text to turn off Icon Help if you want (page 103). Flash mode, Focus mode, White balance, Self-timer, REC mode I PLAY Mode 12 3 4 F 5 6 E 7 8 9 0 D CBA 1 PLAY mode file type (page 108) Snapshot Movie Audio Snapshot Voice Recording 2 Image protection indicator (page 128) 3 Folder number/File number (page 127) Example : When a file named CIMG0023.JPG...
Memory card selected for data storage. (page 146) 25 Memory card selected for data storage. (page 146) 0 Shutter speed value (page 52) • An out of the following functions will cause Icon Help (page 103) text to turn off Icon Help if you want (page 103). Flash mode, Focus mode, White balance, Self-timer, REC mode I PLAY Mode 12 3 4 F 5 6 E 7 8 9 0 D CBA 1 PLAY mode file type (page 108) Snapshot Movie Audio Snapshot Voice Recording 2 Image protection indicator (page 128) 3 Folder number/File number (page 127) Example : When a file named CIMG0023.JPG...

Owners Manual
Page 41
... conserve battery power. G See "Using the On-screen Menus" (page 42) for a specified amount of time in a REC mode. While a slideshow is performed for a specified amount of time. 1. Turn on . When the camera is in the Sleep state immediately turns the monitor screen back on. • The Auto Power Off and Sleep features are disabled in progress - While playing back a voice recording file - GETTING READY Configuring Power Saving Settings You...
... conserve battery power. G See "Using the On-screen Menus" (page 42) for a specified amount of time in a REC mode. While a slideshow is performed for a specified amount of time. 1. Turn on . When the camera is in the Sleep state immediately turns the monitor screen back on. • The Auto Power Off and Sleep features are disabled in progress - While playing back a voice recording file - GETTING READY Configuring Power Saving Settings You...
Owners Manual
Page 110
... an image on the monitor screen while a flipped image is displayed. • You cannot use [̇] and [̈] to scroll to show someone standing in front of you want . 2. IMPORTANT! • Note that you want . 3. In the PLAY mode, use [̇] and [̈] to scroll through images on the monitor screen and display the one you cannot play a movie, or a voice recording file on the monitor screen. [SET] Shutter button 1.
... an image on the monitor screen while a flipped image is displayed. • You cannot use [̇] and [̈] to scroll to show someone standing in front of you want . 2. IMPORTANT! • Note that you want . 3. In the PLAY mode, use [̇] and [̈] to scroll through images on the monitor screen and display the one you cannot play a movie, or a voice recording file on the monitor screen. [SET] Shutter button 1.

Owners Manual
Page 123
... memory capacity is displayed. 2. Press [MENU]. 3. Adding audio to re-record is low. • The following types of audio recording are not supported. - PLAYBACK To re-record audio 1. IMPORTANT! • Keep the microphone Microphone on the monitor screen after about 30 seconds or when you press the shutter button. • This deletes the existing audio and replaces it . 123 Make sure you merely want to a movie image...
... memory capacity is displayed. 2. Press [MENU]. 3. Adding audio to re-record is low. • The following types of audio recording are not supported. - PLAYBACK To re-record audio 1. IMPORTANT! • Keep the microphone Microphone on the monitor screen after about 30 seconds or when you press the shutter button. • This deletes the existing audio and replaces it . 123 Make sure you merely want to a movie image...

Owners Manual
Page 137
... last file number used for generating the serial number used and increment it, regardless of whether files are deleted or whether the memory card is replaced with a new one Find the highest file number in the current folder and increment it Select this setting: Continue Reset Using the Alarm You can configure up to three alarms that cause the camera to sound only once (Once) or at the same time...
... last file number used for generating the serial number used and increment it, regardless of whether files are deleted or whether the memory card is replaced with a new one Find the highest file number in the current folder and increment it Select this setting: Continue Reset Using the Alarm You can configure up to three alarms that cause the camera to sound only once (Once) or at the same time...

Owners Manual
Page 161
VIEWING IMAGES ON A COMPUTER IMPORTANT! • Low battery power can cause the camera to power down suddenly during data communication. • If you are using battery power without installing the USB driver first. • USB driver installation is not required, so jump directly to a computer running under the English version of the USB driver is not required in memory to a computer, make sure there is running one of the above operating systems without the AC...
VIEWING IMAGES ON A COMPUTER IMPORTANT! • Low battery power can cause the camera to power down suddenly during data communication. • If you are using battery power without installing the USB driver first. • USB driver installation is not required, so jump directly to a computer running under the English version of the USB driver is not required in memory to a computer, make sure there is running one of the above operating systems without the AC...
Owners Manual
Page 169
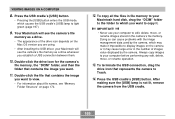
VIEWING IMAGES ON A COMPUTER 8. Your Macintosh will see "Memory Folder Structure" on the camera or it . Always copy images to edit, delete, move , or rename operation. 13. To terminate the USB connection, drag the drive icon that represents the camera to display images on page 172. 12. To copy all the files in file memory to your Macintosh hard disk, drag the "DCIM" folder to the folder to which you are using. • After...
VIEWING IMAGES ON A COMPUTER 8. Your Macintosh will see "Memory Folder Structure" on the camera or it . Always copy images to edit, delete, move , or rename operation. 13. To terminate the USB connection, drag the drive icon that represents the camera to display images on page 172. 12. To copy all the files in file memory to your Macintosh hard disk, drag the "DCIM" folder to the folder to which you are using. • After...

Owners Manual
Page 183
...;] to select "Delete", and then press [SET]. • This deletes the album and returns to your computer. About the bundled CD-ROM (CASIO Digital Camera Software) The CD-ROM (CASIO Digital Camera Software) that makes it possible for using Windows XP, do not install the USB driver from the CD-ROM Your digital camera comes bundled with a computer. Installing the Software from the CD-ROM. With Windows XP, you need on your computer...
...;] to select "Delete", and then press [SET]. • This deletes the album and returns to your computer. About the bundled CD-ROM (CASIO Digital Camera Software) The CD-ROM (CASIO Digital Camera Software) that makes it possible for using Windows XP, do not install the USB driver from the CD-ROM Your digital camera comes bundled with a computer. Installing the Software from the CD-ROM. With Windows XP, you need on your computer...

Owners Manual
Page 184
... to install DirectX if you read the user documentation for the camera, Photo Loader, and Photohands, all of this manual for more information. 184 You do not need to handle movie files recorded using a digital camera. Adobe Reader (for Windows) This is included on the bundled CD-ROM. • See the user documentation files (PDF) on the bundled "CASIO Digital Camera Software" CD-ROM for details about using Photohands. See "Viewing User Documentation (PDF files...
... to install DirectX if you read the user documentation for the camera, Photo Loader, and Photohands, all of this manual for more information. 184 You do not need to handle movie files recorded using a digital camera. Adobe Reader (for Windows) This is included on the bundled CD-ROM. • See the user documentation files (PDF) on the bundled "CASIO Digital Camera Software" CD-ROM for details about using Photohands. See "Viewing User Documentation (PDF files...

Owners Manual
Page 193
... Time Date Style Adjust Language Sleep Auto Power Off REC / PLAY USB Format Reset Startup / Half Shutter /Shutter / Operation / Volume On (Selectable image) / Off Continue / Reset Home / World Home Time setup (city, DST, etc.) World Time setup (city, DST, etc.) YY/MM/DD / DD/MM/YY / MM/DD/YY Time setting / English / Français / Deutsch / Español / Italiano / Português / / / 30 sec / 1 min / 2 min / Off 2 min / 5 min Power On / Power On/Off / Disable Mass Storage (USB DIRECT- PRINT...
... Time Date Style Adjust Language Sleep Auto Power Off REC / PLAY USB Format Reset Startup / Half Shutter /Shutter / Operation / Volume On (Selectable image) / Off Continue / Reset Home / World Home Time setup (city, DST, etc.) World Time setup (city, DST, etc.) YY/MM/DD / DD/MM/YY / MM/DD/YY Time setting / English / Français / Deutsch / Español / Italiano / Português / / / 30 sec / 1 min / 2 min / Off 2 min / 5 min Power On / Power On/Off / Disable Mass Storage (USB DIRECT- PRINT...

Owners Manual
Page 200
... connection between the camera and USB cradle. 2) Check all connections. 3) Install the USB driver on your computer (page 160). 4) Press the [USB] button on the USB cradle. Circuit problem caused by electrostatic charge, impact, etc. Monitor screen is off . Playback APPENDIX Symptom Color of the playback image is different from the image on the monitor screen during recording. Images are disabled. Cannot transfer files over a USB connection. 1) Camera is loaded in a REC mode). This camera cannot display non-DCF images recorded onto a memory card using...
... connection between the camera and USB cradle. 2) Check all connections. 3) Install the USB driver on your computer (page 160). 4) Press the [USB] button on the USB cradle. Circuit problem caused by electrostatic charge, impact, etc. Monitor screen is off . Playback APPENDIX Symptom Color of the playback image is different from the image on the monitor screen during recording. Images are disabled. Cannot transfer files over a USB connection. 1) Camera is loaded in a REC mode). This camera cannot display non-DCF images recorded onto a memory card using...

Owners Manual
Page 201
... Windows 98 before installing the USB driver from the bundled CD-ROM (CASIO Digital Camera Software), or if you have another type of driver installed. APPENDIX If you have problems installing the USB driver... For information about how to re-install the camera's USB driver. You may not be able to install the USB driver properly if you will make it is connected. This will need to re-install the USB driver, see the USB driver's "Read me" file on "CASIO Digital Camera Software...
... Windows 98 before installing the USB driver from the bundled CD-ROM (CASIO Digital Camera Software), or if you have another type of driver installed. APPENDIX If you have problems installing the USB driver... For information about how to re-install the camera's USB driver. You may not be able to install the USB driver properly if you will make it is connected. This will need to re-install the USB driver, see the USB driver's "Read me" file on "CASIO Digital Camera Software...


