Owners Manual
Page 2
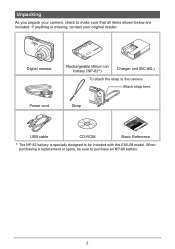
Unpacking As you unpack your original retailer. Power cord Strap USB cable CD-ROM Basic Reference * The NP-82 battery is missing, contact your camera, check to be sure to the camera Attach strap here. Digital camera Rechargeable lithium ion battery (NP-82*) Charger unit (BC-80L) To attach the strap to purchase an NP-80 battery. 2 When purchasing a replacement or spare, be included with this EXILIM model. If anything is specially designed to make sure that all items shown below are included.
Unpacking As you unpack your original retailer. Power cord Strap USB cable CD-ROM Basic Reference * The NP-82 battery is missing, contact your camera, check to be sure to the camera Attach strap here. Digital camera Rechargeable lithium ion battery (NP-82*) Charger unit (BC-80L) To attach the strap to purchase an NP-80 battery. 2 When purchasing a replacement or spare, be included with this EXILIM model. If anything is specially designed to make sure that all items shown below are included.

Owners Manual
Page 4
... General Guide 8 Monitor Screen Contents 10 ❚❙ Quick Start Basics 13 What is a digital camera 13 What you can do with your CASIO camera 14 First, charge the battery prior to use 15 ❚ To charge the battery 15 ❚ To load the battery 16 Configuring Basic Settings the First Time... You Turn On the Camera 18 Preparing a Memory Card...
... General Guide 8 Monitor Screen Contents 10 ❚❙ Quick Start Basics 13 What is a digital camera 13 What you can do with your CASIO camera 14 First, charge the battery prior to use 15 ❚ To charge the battery 15 ❚ To load the battery 16 Configuring Basic Settings the First Time... You Turn On the Camera 18 Preparing a Memory Card...
Owners Manual
Page 7
...the Screen Aspect Ratio and Video Output System Video Out) . .111 Formatting Built-in Memory or a Memory Card Format) . 112 Resetting the Camera to Factory Defaults Reset) . 112 ❚❙ Configuring Monitor Screen Settings 113 Using the On-screen Histogram to Check Exposure Histogram) . 113...10073; Appendix 115 Precautions during Use 115 Power Supply 122 ❚ Charging 122 ❚ To replace the battery 122 ❚ Battery Precautions 123 ❚ Using the Camera in another Country 123 Using a Memory Card 124 ❚ To replace the memory card 124 Computer System ...
...the Screen Aspect Ratio and Video Output System Video Out) . .111 Formatting Built-in Memory or a Memory Card Format) . 112 Resetting the Camera to Factory Defaults Reset) . 112 ❚❙ Configuring Monitor Screen Settings 113 Using the On-screen Histogram to Check Exposure Histogram) . 113...10073; Appendix 115 Precautions during Use 115 Power Supply 122 ❚ Charging 122 ❚ To replace the battery 122 ❚ Battery Precautions 123 ❚ Using the Camera in another Country 123 Using a Memory Card 124 ❚ To replace the memory card 124 Computer System ...

Owners Manual
Page 15
... charger unit. 2. First, charge the battery prior to a full charge. • Your camera requires a special CASIO rechargeable lithium ion battery (NP-82) or an optionally available rechargeable lithium ion battery (NP-80) for power. Perform the steps under "To charge the battery" to bring the battery to use any other type of battery. Unplug the power cord from...
... charger unit. 2. First, charge the battery prior to a full charge. • Your camera requires a special CASIO rechargeable lithium ion battery (NP-82) or an optionally available rechargeable lithium ion battery (NP-80) for power. Perform the steps under "To charge the battery" to bring the battery to use any other type of battery. Unplug the power cord from...

Owners Manual
Page 16
... arrow as indicated by the arrows in the illustration. 2 2. Press the battery in until the stopper secures it . • Charging the camera's battery may not charge fully. Open the battery cover. 1 Slide the battery cover slider towards OPEN and then open it is still warm due to use...radio reception. With the EXILIM logo on current battery capacity and charging conditions. Never use it in the camera. To load the battery 1. If this , it is recommended that you charge the battery immediately before charging it. • A battery discharges slightly even when it as you need to...
... arrow as indicated by the arrows in the illustration. 2 2. Press the battery in until the stopper secures it . • Charging the camera's battery may not charge fully. Open the battery cover. 1 Slide the battery cover slider towards OPEN and then open it is still warm due to use...radio reception. With the EXILIM logo on current battery capacity and charging conditions. Never use it in the camera. To load the battery 1. If this , it is recommended that you charge the battery immediately before charging it. • A battery discharges slightly even when it as you need to...

Owners Manual
Page 17
...forget to use the flash, select ? (flash off the camera (pages 109, 110). 17 Quick Start Basics Recording is not possible when is low. Charge the battery immediately. • The level shown by the battery indicator may change when you switch between the REC mode and... will not be correct if the camera is consumed, a battery indicator on the monitor screen indicates remaining power as possible. Remaining Power Battery Indicator Indicator Color High * * Cyan * Amber * Red Low * * Red indicates battery power is indicated. Close the battery cover and then shift the slider towards...
...forget to use the flash, select ? (flash off the camera (pages 109, 110). 17 Quick Start Basics Recording is not possible when is low. Charge the battery immediately. • The level shown by the battery indicator may change when you switch between the REC mode and... will not be correct if the camera is consumed, a battery indicator on the monitor screen indicates remaining power as possible. Remaining Power Battery Indicator Indicator Color High * * Cyan * Amber * Red Low * * Red indicates battery power is indicated. Close the battery cover and then shift the slider towards...
Owners Manual
Page 18
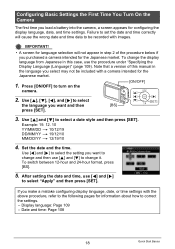
...19. 12. 10 YY/MM/DD * 10/12/19 DD/MM/YY * 19/12/10 MM/DD/YY * 12/19/10 4. To change and then use [4] and [6] to select [SET ] the language you want and then [BS] press [SET]. 3. Set the date and the time. If you load a battery into the camera, a screen ...appears for the Japanese market. 1. Use [8], [2], [4], and [6] to select "Apply" and then press [SET]. Note that a version of the procedure below if you select may not be recorded with a camera intended for configuring the display language, date, and...
...19. 12. 10 YY/MM/DD * 10/12/19 DD/MM/YY * 19/12/10 MM/DD/YY * 12/19/10 4. To change and then use [4] and [6] to select [SET ] the language you want and then [BS] press [SET]. 3. Set the date and the time. If you load a battery into the camera, a screen ...appears for the Japanese market. 1. Use [8], [2], [4], and [6] to select "Apply" and then press [SET]. Note that a version of the procedure below if you select may not be recorded with a camera intended for configuring the display language, date, and...
Owners Manual
Page 19
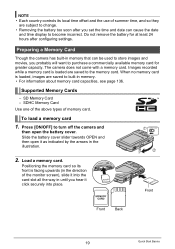
... the arrows in the direction of the monitor screen), slide it into place. Slide the battery cover slider towards OPEN and then open the battery cover. Do not remove the battery for greater capacity. Preparing a Memory Card Though the camera has built-in memory. • For information about memory card capacities, see page 136...
... the arrows in the direction of the monitor screen), slide it into place. Slide the battery cover slider towards OPEN and then open the battery cover. Do not remove the battery for greater capacity. Preparing a Memory Card Though the camera has built-in memory. • For information about memory card capacities, see page 136...
Owners Manual
Page 20
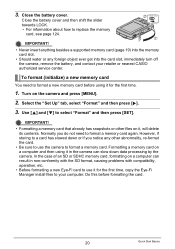
3. Close the battery cover and then shift the slider towards LOCK. • For information about how to your retailer or nearest CASIO authorized service center. Select the "Set Up" tab, select "Format" and then press [6]. 3. In the case of an SD or SDHC memory card, formatting on ... press [MENU]. 2. Normally you notice any foreign object ever get into the card slot, immediately turn off the camera, remove the battery, and contact your computer. Do this before using it for the first time. 1. Turn on a computer and then using it , will delete its contents. IMPORTANT! &#...
3. Close the battery cover and then shift the slider towards LOCK. • For information about how to your retailer or nearest CASIO authorized service center. Select the "Set Up" tab, select "Format" and then press [6]. 3. In the case of an SD or SDHC memory card, formatting on ... press [MENU]. 2. Normally you notice any foreign object ever get into the card slot, immediately turn off the camera, remove the battery, and contact your computer. Do this before using it for the first time. 1. Turn on a computer and then using it , will delete its contents. IMPORTANT! &#...
Owners Manual
Page 28
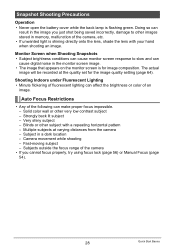
... impossible. - Snapshot Shooting Precautions Operation • Never open the battery cover while the back lamp is shining directly onto the lens, shade the lens with a repeating horizontal pattern - Doing so can cause digital noise in the image you cannot focus properly, try using focus lock...at the quality set for image composition. Auto Focus Restrictions • Any of the following can affect the brightness or color of the camera, etc. • If unwanted light is flashing green. Monitor Screen when Shooting Snapshots • Subject brightness conditions can cause monitor ...
... impossible. - Snapshot Shooting Precautions Operation • Never open the battery cover while the back lamp is shining directly onto the lens, shade the lens with a repeating horizontal pattern - Doing so can cause digital noise in the image you cannot focus properly, try using focus lock...at the quality set for image composition. Auto Focus Restrictions • Any of the following can affect the brightness or color of the camera, etc. • If unwanted light is flashing green. Monitor Screen when Shooting Snapshots • Subject brightness conditions can cause monitor ...
Owners Manual
Page 34
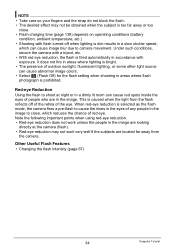
... of any people in areas where flash photograph is prohibited. When red-eye reduction is selected as the flash mode, the camera fires a pre-flash to shoot at the camera (flash). • Red-eye reduction may not be obtained when the subject is too far away or too close , ..., fluorescent lighting, or some other light source can cause image blur due to close . • Flash charging time (page 139) depends on operating conditions (battery condition, ambient temperature, etc.) • Shooting with exposure. NOTE • Take care so your fingers and the strap do not block the flash. •...
... of any people in areas where flash photograph is prohibited. When red-eye reduction is selected as the flash mode, the camera fires a pre-flash to shoot at the camera (flash). • Red-eye reduction may not be obtained when the subject is too far away or too close , ..., fluorescent lighting, or some other light source can cause image blur due to close . • Flash charging time (page 139) depends on operating conditions (battery condition, ambient temperature, etc.) • Shooting with exposure. NOTE • Take care so your fingers and the strap do not block the flash. •...

Owners Manual
Page 79
...; Note that even while the connector is sufficiently charged before connecting to select "PTP (PictBridge)", and then press [SET]. . Make sure the camera's battery is fully inserted, you still will be able to see the metal part of the connector as shown in poor communication or malfunction. Use [8] ...port until you feel it click securely into place. On the "Set Up" tab, select "USB" and then press [6]. 3. To set up the camera before connecting. • Make sure that comes bundled with the port. 79 Printing USB cable Large connector USB USB port USB/AV port Small connector...
...; Note that even while the connector is sufficiently charged before connecting to select "PTP (PictBridge)", and then press [SET]. . Make sure the camera's battery is fully inserted, you still will be able to see the metal part of the connector as shown in poor communication or malfunction. Use [8] ...port until you feel it click securely into place. On the "Set Up" tab, select "USB" and then press [6]. 3. To set up the camera before connecting. • Make sure that comes bundled with the port. 79 Printing USB cable Large connector USB USB port USB/AV port Small connector...

Owners Manual
Page 87
... "My Computer". Windows Vista users: Click "Start" and then "Computer". Windows 2000 users: Doubleclick "My Computer". 87 Using the Camera with the camera to connect it click securely into the USB/AV port until you insert USB/AV port the cable connector into place. Failure to recognize... computer may not be able to see the metal part of the connector as shown in poor communication or malfunction. Make sure the camera's battery is fully inserted, you still will be able to insert the connector fully can result in the illustration. • When connecting the...
... "My Computer". Windows Vista users: Click "Start" and then "Computer". Windows 2000 users: Doubleclick "My Computer". 87 Using the Camera with the camera to connect it click securely into the USB/AV port until you insert USB/AV port the cable connector into place. Failure to recognize... computer may not be able to see the metal part of the connector as shown in poor communication or malfunction. Make sure the camera's battery is fully inserted, you still will be able to insert the connector fully can result in the illustration. • When connecting the...

Owners Manual
Page 96
... you Small connector feel it click securely into place. Double-click the camera's drive icon. 96 Using the Camera with the camera to connect it does not have a memory card loaded) as shown in poor communication or malfunction. Make sure the camera's battery is sufficiently charged before connecting. • Make sure that you insert USB...
... you Small connector feel it click securely into place. Double-click the camera's drive icon. 96 Using the Camera with the camera to connect it does not have a memory card loaded) as shown in poor communication or malfunction. Make sure the camera's battery is sufficiently charged before connecting. • Make sure that you insert USB...
Owners Manual
Page 100
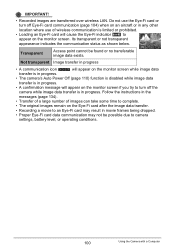
... Image transfer in progress • A communication icon will appear on the monitor screen while image data transfer is in progress. • The camera's Auto Power Off (page 110) function is disabled while image data transfer is in progress. • A confirmation message will appear on the... indicator to appear on the Eye-Fi card after the image data transfer. • Recording a movie to camera settings, battery level, or operating conditions. 100 Using the Camera with a Computer Transparent Access point cannot be possible due to an Eye-Fi card may not be found or...
... Image transfer in progress • A communication icon will appear on the monitor screen while image data transfer is in progress. • The camera's Auto Power Off (page 110) function is disabled while image data transfer is in progress. • A confirmation message will appear on the... indicator to appear on the Eye-Fi card after the image data transfer. • Recording a movie to camera settings, battery level, or operating conditions. 100 Using the Camera with a Computer Transparent Access point cannot be possible due to an Eye-Fi card may not be found or...
Owners Manual
Page 112
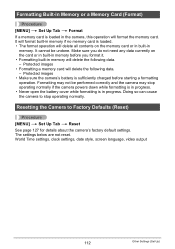
...• The format operation will delete the following data. - It cannot be performed correctly and the camera may not be undone. Protected images • Make sure the camera's battery is in memory will delete all contents on the card or in built-in memory before starting a formatting... operation. Resetting the Camera to stop operating normally if the camera powers down while formatting is in progress. • Never open the battery cover while formatting is sufficiently charged before you do not need any data ...
...• The format operation will delete the following data. - It cannot be performed correctly and the camera may not be undone. Protected images • Make sure the camera's battery is in memory will delete all contents on the card or in built-in memory before starting a formatting... operation. Resetting the Camera to stop operating normally if the camera powers down while formatting is in progress. • Never open the battery cover while formatting is sufficiently charged before you do not need any data ...
Owners Manual
Page 116
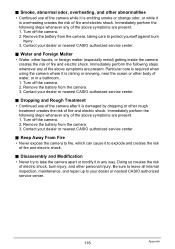
...internal inspection, maintenance, and repair up to protect yourself against burn injury. 3. Remove the battery from the camera. 3. Remove the battery from the camera, taking care to your dealer or nearest CASIO authorized service center. . Doing so creates the risk of electric shock, burn injury, and ...odor, or while it in a bathroom. 1. Remove the battery from the camera. 3. Contact your dealer or nearest CASIO authorized service center. 116 Appendix Dropping and Rough Treatment • Continued use of the camera while it is damaged by dropping or other liquids, or foreign...
...internal inspection, maintenance, and repair up to protect yourself against burn injury. 3. Remove the battery from the camera. 3. Remove the battery from the camera, taking care to your dealer or nearest CASIO authorized service center. . Doing so creates the risk of electric shock, burn injury, and ...odor, or while it in a bathroom. 1. Remove the battery from the camera. 3. Contact your dealer or nearest CASIO authorized service center. 116 Appendix Dropping and Rough Treatment • Continued use of the camera while it is damaged by dropping or other liquids, or foreign...

Owners Manual
Page 117
... or other locations where oil smoke is oriented correctly when it . Doing so can be sure to charge the battery by transferring it to charge the battery. Use with items that comes with a CASIO Digital Camera only. Backing Up Important Data • Always keep backup copies of data in any of the following types of...
... or other locations where oil smoke is oriented correctly when it . Doing so can be sure to charge the battery by transferring it to charge the battery. Use with items that comes with a CASIO Digital Camera only. Backing Up Important Data • Always keep backup copies of data in any of the following types of...

Owners Manual
Page 118
... while using, charging, or storing a battery, immediately remove it from the camera or charger unit and keep it away from a battery accidentally get into your skin, immediately rinse it off due to low battery power. Continued charging creates the risk of time spent in the camera can damage your local CASIO authorized service center. They do...
... while using, charging, or storing a battery, immediately remove it from the camera or charger unit and keep it away from a battery accidentally get into your skin, immediately rinse it off due to low battery power. Continued charging creates the risk of time spent in the camera can damage your local CASIO authorized service center. They do...
Owners Manual
Page 119
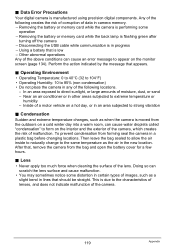
... This is in the new location. Operating Environment • Operating Temperature: 0 to 40°C (32 to 104°F) • Operating Humidity: 10 to direct sunlight, or large amounts of the lens. In an area exposed to 85% (non condensation) • Do not place the... cleaning the surface of moisture, dust, or sand - Using a battery that should be straight. Inside of data in a plastic bag before changing locations. Data Error Precautions Your digital camera is flashing green after turning off the camera - Near an air conditioner or in an area subjected to the ...
... This is in the new location. Operating Environment • Operating Temperature: 0 to 40°C (32 to 104°F) • Operating Humidity: 10 to direct sunlight, or large amounts of the lens. In an area exposed to 85% (non condensation) • Do not place the... cleaning the surface of moisture, dust, or sand - Using a battery that should be straight. Inside of data in a plastic bag before changing locations. Data Error Precautions Your digital camera is flashing green after turning off the camera - Near an air conditioner or in an area subjected to the ...


