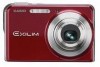
Owners Manual
Page 7
... the File Name Serial Number Generation Rule 201 Changing the Camera Date and Time Setting . . . 202 Using World Time 204 ■ Configuring World Time Settings 204 Changing the Display Language 206 Changing the USB Port Protocol 207 [ ] (REC) and [ ] (PLAY) Button Settings . . 208 Formatting Built-in Memory 209 PRINTING 210 Types of Printing 210 Using Professional Print Service 211 Using Your Printer to Print Images 212 Using DPOF to Specify Images to be Printed and the Number of Copies 215 ■ Date Stamping 218 Supported Protocols 219 USING THE CAMERA...
... the File Name Serial Number Generation Rule 201 Changing the Camera Date and Time Setting . . . 202 Using World Time 204 ■ Configuring World Time Settings 204 Changing the Display Language 206 Changing the USB Port Protocol 207 [ ] (REC) and [ ] (PLAY) Button Settings . . 208 Formatting Built-in Memory 209 PRINTING 210 Types of Printing 210 Using Professional Print Service 211 Using Your Printer to Print Images 212 Using DPOF to Specify Images to be Printed and the Number of Copies 215 ■ Date Stamping 218 Supported Protocols 219 USING THE CAMERA...
Owners Manual
Page 21
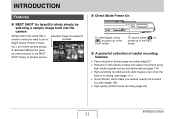
...; Direct Mode Power On To view images, press [ ] to power up in the REC mode. ■ A powerful collection of useful recording features • Face recognition during image recording (page 87) • Reduction of the effects of sample scenes. INTRODUCTION Features ■ BEST SHOT for beautiful shots simply by selecting a sample image built into the camera Simply select the scene that is not being used (page 111) • Quick Shutter...
...; Direct Mode Power On To view images, press [ ] to power up in the REC mode. ■ A powerful collection of useful recording features • Face recognition during image recording (page 87) • Reduction of the effects of sample scenes. INTRODUCTION Features ■ BEST SHOT for beautiful shots simply by selecting a sample image built into the camera Simply select the scene that is not being used (page 111) • Quick Shutter...
Owners Manual
Page 44
... [ ] (PLAY). Use the procedure under "Configuring Display Language, Date, and Time Settings" (page 11) to the PLAY mode. IMPORTANT! • Pressing [ON/OFF] or [ ] (REC) to turn on . ■ Turning Power Off Press [ON/OFF] (Power). NOTE • Pressing [ ] (PLAY) while in the REC mode switches to configure the settings correctly. IMPORTANT! • Failure to turn off when you can change the settings (pages 202, 206). Holding the lens with images. • If you make...
... [ ] (PLAY). Use the procedure under "Configuring Display Language, Date, and Time Settings" (page 11) to the PLAY mode. IMPORTANT! • Pressing [ON/OFF] or [ ] (REC) to turn on . ■ Turning Power Off Press [ON/OFF] (Power). NOTE • Pressing [ ] (PLAY) while in the REC mode switches to configure the settings correctly. IMPORTANT! • Failure to turn off when you can change the settings (pages 202, 206). Holding the lens with images. • If you make...
Owners Manual
Page 45
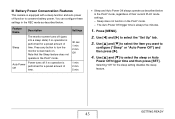
... the PLAY mode, regardless of their current PLAY mode settings. - ■ Battery Power Conservation Features This camera is equipped with a sleep function and auto power off (goes into a sleep state) if no operation is Auto Power performed for a preset amount of time. Press [MENU]. 2. You can configure these settings in the REC mode as described below . Note that the Sleep feature does not operate in the PLAY mode. - GETTING READY 45 Use...
... the PLAY mode, regardless of their current PLAY mode settings. - ■ Battery Power Conservation Features This camera is equipped with a sleep function and auto power off (goes into a sleep state) if no operation is Auto Power performed for a preset amount of time. Press [MENU]. 2. You can configure these settings in the REC mode as described below . Note that the Sleep feature does not operate in the PLAY mode. - GETTING READY 45 Use...
Owners Manual
Page 46
... the same time settings, Auto Power Off takes priority. • Sleep and Auto Power Off are disabled under the following data is stored in built-in memory. During a slideshow - During Voice Recording playback or recording - NOTE • Images can store images you to a memory card. - Start-up to you shoot with Record Family - In addition to memory card storage, the camera also has built-in memory for test purposes, emergency use, etc. BEST SHOT mode user image information - FAVORITE folder -
... the same time settings, Auto Power Off takes priority. • Sleep and Auto Power Off are disabled under the following data is stored in built-in memory. During a slideshow - During Voice Recording playback or recording - NOTE • Images can store images you to a memory card. - Start-up to you shoot with Record Family - In addition to memory card storage, the camera also has built-in memory for test purposes, emergency use, etc. BEST SHOT mode user image information - FAVORITE folder -
Owners Manual
Page 56
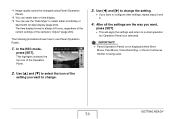
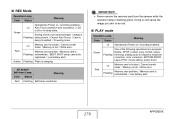
... operation (no Operation Panel icon selected). GETTING READY 56 The time display format is being used. The following procedure shows how to select either month/day or day/month for date display (page 203). IMPORTANT! • Panel (Operation Panel) is not displayed while Short Movie, Past Movie, Voice Recording, or Zoom Continuous Shutter is always 24 hours, regardless of the current settings of the Operation Panel. 2. *1 Image quality cannot be changed using Panel (Operation...
... operation (no Operation Panel icon selected). GETTING READY 56 The time display format is being used. The following procedure shows how to select either month/day or day/month for date display (page 203). IMPORTANT! • Panel (Operation Panel) is not displayed while Short Movie, Past Movie, Voice Recording, or Zoom Continuous Shutter is always 24 hours, regardless of the current settings of the Operation Panel. 2. *1 Image quality cannot be changed using Panel (Operation...
Owners Manual
Page 65
... just shot. To return to focus again. NOTE • The aperture value indicates the size of time that lets light into the camera. This will remain on the monitor screen as seconds (1/1000 second, etc.) The camera adjusts this setting automatically. • Shutter speed indicates the amount of the opening . Shutter speed is too close, etc.). Checking a Snapshot A snapshot will display the snapshot you shoot it . Perform the following operation to...
... just shot. To return to focus again. NOTE • The aperture value indicates the size of time that lets light into the camera. This will remain on the monitor screen as seconds (1/1000 second, etc.) The camera adjusts this setting automatically. • Shutter speed indicates the amount of the opening . Shutter speed is too close, etc.). Checking a Snapshot A snapshot will display the snapshot you shoot it . Perform the following operation to...
Owners Manual
Page 83
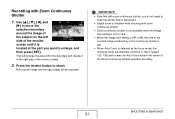
... image and the right image will enlarge the area within the boundary and display it is located at the part you do not need to keep the shutter button depressed. • Digital zoom is selected as the focus mode, the metering mode automatically switches to "Spot" (pages 125, 136) and locates the Auto Focus area in the right side of the monitor screen. 2. Press the shutter button to shoot...
... image and the right image will enlarge the area within the boundary and display it is located at the part you do not need to keep the shutter button depressed. • Digital zoom is selected as the focus mode, the metering mode automatically switches to "Spot" (pages 125, 136) and locates the Auto Focus area in the right side of the monitor screen. 2. Press the shutter button to shoot...
Owners Manual
Page 109
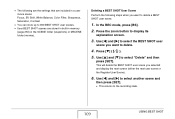
... a user movie scene: Focus, EV Shift, White Balance, Color Filter, Sharpness, Saturation, Contrast • You can store up to 999 BEST SHOT user scenes. • User BEST SHOT scenes are stored in built-in memory (page 253) in the SCENE folder (snapshots) or MSCENE folder (movies). This will delete the BEST SHOT user scene you selected and display the next screen (either the next user scene or the Register User Scene). 6. Use...
... a user movie scene: Focus, EV Shift, White Balance, Color Filter, Sharpness, Saturation, Contrast • You can store up to 999 BEST SHOT user scenes. • User BEST SHOT scenes are stored in built-in memory (page 253) in the SCENE folder (snapshots) or MSCENE folder (movies). This will delete the BEST SHOT user scene you selected and display the next screen (either the next user scene or the Register User Scene). 6. Use...
Owners Manual
Page 130
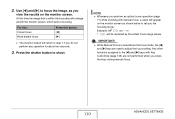
... the shutter button to adjust the focus setting. Use [W] and [X] to step 1 if you perform an optical zoom operation (page 71) while shooting with Key Customize (page 145) are not performed when you view the results on the monitor screen as the focus mode, the [W] and [X] keys are used to shoot. At this button: [W] [X] • The monitor screen will be replaced by the actual focus range values. IMPORTANT! • While Manual Focus...
... the shutter button to adjust the focus setting. Use [W] and [X] to step 1 if you perform an optical zoom operation (page 71) while shooting with Key Customize (page 145) are not performed when you view the results on the monitor screen as the focus mode, the [W] and [X] keys are used to shoot. At this button: [W] [X] • The monitor screen will be replaced by the actual focus range values. IMPORTANT! • While Manual Focus...
Owners Manual
Page 158
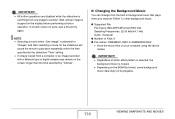
... can change from one image to SSBGM009.WAV • Store the music files on your computer using the above names. NOTE • Selecting a movie when "One Image" is stopped on the BGM file format, some background music data may remain on the screen longer than the time specified by the slideshow "Time" setting. • In image copied from a computer or an image recorded with a different type of digital camera...
... can change from one image to SSBGM009.WAV • Store the music files on your computer using the above names. NOTE • Selecting a movie when "One Image" is stopped on the BGM file format, some background music data may remain on the screen longer than the time specified by the slideshow "Time" setting. • In image copied from a computer or an image recorded with a different type of digital camera...
Owners Manual
Page 171
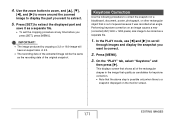
... a separate file. • To exit the cropping procedure at an angle. Use the zoom button to zoom, and [S], [T], [W], and [X] to move around the zoomed image to display the part you press [SET], press [MENU]. Press [SET] to extract. 5. Performing keystone correction on the monitor screen. 171 EDITING IMAGES IMPORTANT! • The image produced by cropping a 3:2 or 16:9 image will have an aspect ratio of 4:3. • The recording date of...
... a separate file. • To exit the cropping procedure at an angle. Use the zoom button to zoom, and [S], [T], [W], and [X] to move around the zoomed image to display the part you press [SET], press [MENU]. Press [SET] to extract. 5. Performing keystone correction on the monitor screen. 171 EDITING IMAGES IMPORTANT! • The image produced by cropping a 3:2 or 16:9 image will have an aspect ratio of 4:3. • The recording date of...
Owners Manual
Page 187
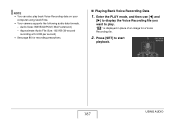
...; Playing Back Voice Recording Data 1. Audio Data: WAVE/ADPCM (.WAV extension) - Enter the PLAY mode, and then use [W] and [X] to display the Voice Recording file you want to start playback. 187 USING AUDIO Approximate Audio File Size: 165 KB (30-second recording at 5.5 KB per second) • See page 86 for a Voice Recording file. 2. Press [SET] to play back Voice Recording data on your computer using QuickTime. • Your camera supports the following audio data formats. - NOTE...
...; Playing Back Voice Recording Data 1. Audio Data: WAVE/ADPCM (.WAV extension) - Enter the PLAY mode, and then use [W] and [X] to display the Voice Recording file you want to start playback. 187 USING AUDIO Approximate Audio File Size: 165 KB (30-second recording at 5.5 KB per second) • See page 86 for a Voice Recording file. 2. Press [SET] to play back Voice Recording data on your computer using QuickTime. • Your camera supports the following audio data formats. - NOTE...
Owners Manual
Page 194
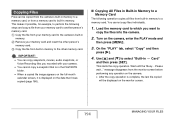
... operation copies all files from a memory card to a memory card. message disappears from the monitor screen before performing any operation on the camera. • After the copy operation is displayed on the date that is in the FAVORITE folder. • When a copied file image appears on the full-month calendar screen, it is complete, the last file copied will be copied from the camera's built-in memory to the other memory card. Load the memory card to which you recorded...
... operation copies all files from a memory card to a memory card. message disappears from the monitor screen before performing any operation on the camera. • After the copy operation is displayed on the date that is in the FAVORITE folder. • When a copied file image appears on the full-month calendar screen, it is complete, the last file copied will be copied from the camera's built-in memory to the other memory card. Load the memory card to which you recorded...

Owners Manual
Page 215
... recorded on the monitor screen. Printing will turn off . 12. will need to recall hard-to print, the number of Copies DPOF (Digital Print Order Format) lets you specify which images you will appear on the memory card. IMPORTANT! • Some printers may ignore time stamp settings or may support different printing protocols. After you can configure settings while viewing the actual images on or off the camera. Use [S] and [T] to be Printed and the Number of copies, and whether date stamping...
... recorded on the monitor screen. Printing will turn off . 12. will need to recall hard-to print, the number of Copies DPOF (Digital Print Order Format) lets you specify which images you will appear on the memory card. IMPORTANT! • Some printers may ignore time stamp settings or may support different printing protocols. After you can configure settings while viewing the actual images on or off the camera. Use [S] and [T] to be Printed and the Number of copies, and whether date stamping...
Owners Manual
Page 251
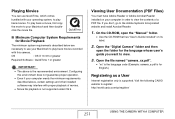
... supported. Viewing User Documentation (PDF Files) You must have Adobe Reader or Adobe Acrobat Reader installed on its label. 2. Configuring this camera. Open the file named "camera_xx.pdf". • "xx" is the language code (Example: camera_e.pdf is for English.) Registering as a User Internet registration only is the recommended environment. Open the "Digital Camera" folder and then open the "Manual" folder. • Use the CD-ROM that has "User's Guide included" on your operating system, to play...
... supported. Viewing User Documentation (PDF Files) You must have Adobe Reader or Adobe Acrobat Reader installed on its label. 2. Configuring this camera. Open the file named "camera_xx.pdf". • "xx" is the language code (Example: camera_e.pdf is for English.) Registering as a User Internet registration only is the recommended environment. Open the "Digital Camera" folder and then open the "Manual" folder. • Use the CD-ROM that has "User's Guide included" on your operating system, to play...
Owners Manual
Page 253
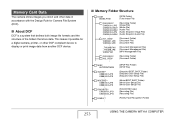
....JPG • • • FAMILY*2 • • • (Snapshot BEST SHOT Folder) (Snapshot User Setup File) (Snapshot User Setup File) (Movie BEST SHOT Folder) (Movie User Setup File) (Movie User Setup File) (FAVORITE Folder) (Recording File) (Recording File) (Family Face Recognition Folder) 253 USING THE CAMERA WITH A COMPUTER This makes it possible for a digital camera, printer, or other data in accordance with the Design Rule for Camera File System (DCF). ■ About DCF DCF is a system that defines both image file formats and the structure of the...
....JPG • • • FAMILY*2 • • • (Snapshot BEST SHOT Folder) (Snapshot User Setup File) (Snapshot User Setup File) (Movie BEST SHOT Folder) (Movie User Setup File) (Movie User Setup File) (FAVORITE Folder) (Recording File) (Recording File) (Family Face Recognition Folder) 253 USING THE CAMERA WITH A COMPUTER This makes it possible for a digital camera, printer, or other data in accordance with the Design Rule for Camera File System (DCF). ■ About DCF DCF is a system that defines both image file formats and the structure of the...
Owners Manual
Page 278
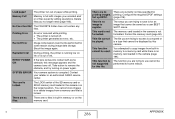
...: Delete, DPOF, protect, copy, format, resize, Flashing trimming, adding audio to be registered. / Low battery alert. Doing so will cause the image you shot to snapshot, keystone correction, color correction, MOTION PRINT, Layout Print, movie editing, power down . ■ REC Mode Operation Lamp Color Status Meaning Green Operational (Power on , recording enabled). Lit Memory card is locked. / Cannot create folder. / Memory is full. / Write error. Lit Memory card is locked. / Cannot create folder. / Memory is full. / Write error. Red Memory card problem. / Memory...
...: Delete, DPOF, protect, copy, format, resize, Flashing trimming, adding audio to be registered. / Low battery alert. Doing so will cause the image you shot to snapshot, keystone correction, color correction, MOTION PRINT, Layout Print, movie editing, power down . ■ REC Mode Operation Lamp Color Status Meaning Green Operational (Power on , recording enabled). Lit Memory card is locked. / Cannot create folder. / Memory is full. / Write error. Lit Memory card is locked. / Cannot create folder. / Memory is full. / Write error. Red Memory card problem. / Memory...
Owners Manual
Page 284
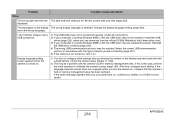
... wrong USB communication protocol may not be installed incorrectly. The messages on the display The wrong display language is the case, perform the reset operation to initialize the camera's setup (page 150). Problem Possible Causes and Action Other The wrong date and time are connecting (page 207). 5) If the camera is not turned on, turn power back on, contact your retailer or a CASIO service center. 284 APPENDIX If the language selection screen...
... wrong USB communication protocol may not be installed incorrectly. The messages on the display The wrong display language is the case, perform the reset operation to initialize the camera's setup (page 150). Problem Possible Causes and Action Other The wrong date and time are connecting (page 207). 5) If the camera is not turned on, turn power back on, contact your retailer or a CASIO service center. 284 APPENDIX If the language selection screen...
Owners Manual
Page 286
... CASIO service center. The LOCK switch of paper while printing. You cannot store images to or delete images from built-in memory to use cannot be performed for this camera. There is not The memory card loaded in the camera (page 194). This card is no longer need (page 196). Format the memory card (page 50). This file cannot be used. The file you no image to copy images from a memory card that cannot be displayed by editing operations...
... CASIO service center. The LOCK switch of paper while printing. You cannot store images to or delete images from built-in memory to use cannot be performed for this camera. There is not The memory card loaded in the camera (page 194). This card is no longer need (page 196). Format the memory card (page 50). This file cannot be used. The file you no image to copy images from a memory card that cannot be displayed by editing operations...


