
Owners Manual
Page 1
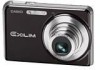
E Digital Camera EX-S880 User's Guide Thank you for purchasing this CASIO product. • Before using it, be sure to read the precautions contained in this User's Guide. • Keep the User's Guide in a safe place for future reference. • For the most up-to-date information about this product, visit the official EXILIM Website at http://www.exilim.com/ K838PCM1DMX 1
E Digital Camera EX-S880 User's Guide Thank you for purchasing this CASIO product. • Before using it, be sure to read the precautions contained in this User's Guide. • Keep the User's Guide in a safe place for future reference. • For the most up-to-date information about this product, visit the official EXILIM Website at http://www.exilim.com/ K838PCM1DMX 1
Owners Manual
Page 2
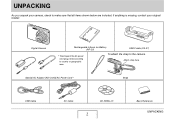
Digital Camera Rechargeable Lithium Ion Battery (NP-20) USB Cradle (CA-37) * The shape of the AC power cord plug varies according to the camera. Special AC Adaptor (AD-C52G)/AC Power Cord * Strap USB Cable AV Cable CD-ROMs (2) 2 Basic Reference UNPACKING UNPACKING As you unpack your original retailer. If anything is missing, contact your camera, check to make sure that all items shown below are included. Attach strap here. To attach the strap to country or geographic area.
Digital Camera Rechargeable Lithium Ion Battery (NP-20) USB Cradle (CA-37) * The shape of the AC power cord plug varies according to the camera. Special AC Adaptor (AD-C52G)/AC Power Cord * Strap USB Cable AV Cable CD-ROMs (2) 2 Basic Reference UNPACKING UNPACKING As you unpack your original retailer. If anything is missing, contact your camera, check to make sure that all items shown below are included. Attach strap here. To attach the strap to country or geographic area.
Owners Manual
Page 3
...UNPACKING 2 QUICK START BASICS 9 First, charge the battery 9 Configuring Display Language, Date, and Time Settings 11 Using a Memory Card 13 Shooting a Snapshot 15 Viewing Snapshots 17 Shooting a Movie 18 Viewing a Movie 19 Deleting a File 20 INTRODUCTION 21 Features...9632; Battery Precautions 42 Using the Camera in another Country 43 Turning Power On and Off 43 Using a Memory Card 46 ■ Supported Memory Cards 47 ■ Loading a Memory Card into the Camera 48 ■ Replacing the Memory Card 49 ■ Formatting a Memory Card 50 Using On-screen Menus 52 ...
...UNPACKING 2 QUICK START BASICS 9 First, charge the battery 9 Configuring Display Language, Date, and Time Settings 11 Using a Memory Card 13 Shooting a Snapshot 15 Viewing Snapshots 17 Shooting a Movie 18 Viewing a Movie 19 Deleting a File 20 INTRODUCTION 21 Features...9632; Battery Precautions 42 Using the Camera in another Country 43 Turning Power On and Off 43 Using a Memory Card 46 ■ Supported Memory Cards 47 ■ Loading a Memory Card into the Camera 48 ■ Replacing the Memory Card 49 ■ Formatting a Memory Card 50 Using On-screen Menus 52 ...
Owners Manual
Page 4
SHOOTING A SNAPSHOT 62 Holding the Camera Correctly 62 Shooting a Snapshot 63 ■ Specifying Image Size 66 ■ Specifying Image Quality 68 ■ Turning Off the AF Assist Lamp 69 ■ Snapshot ...-Movie 102 USING BEST SHOT 104 Reducing the Effects of Hand and Subject Movement 110 Taking Bright Images without Flash 111 Shooting Images of Business Cards and Documents (Business Shot 112 Restoring an Old Photograph 115 Recording Snapshots into a Multi-image Layout (Layout Shots 117 Auto Tracking a Moving Subject (Auto Framing...
SHOOTING A SNAPSHOT 62 Holding the Camera Correctly 62 Shooting a Snapshot 63 ■ Specifying Image Size 66 ■ Specifying Image Quality 68 ■ Turning Off the AF Assist Lamp 69 ■ Snapshot ...-Movie 102 USING BEST SHOT 104 Reducing the Effects of Hand and Subject Movement 110 Taking Bright Images without Flash 111 Shooting Images of Business Cards and Documents (Business Shot 112 Restoring an Old Photograph 115 Recording Snapshots into a Multi-image Layout (Layout Shots 117 Auto Tracking a Moving Subject (Auto Framing...
Owners Manual
Page 5
...135 Specifying the Metering Mode 136 Reducing the Effects of Overexposure and Underexposure 138 Enhancing Human Skin Textures 139 Using the Camera's Color Filter Effects 139 Controlling Image Sharpness 140 Controlling Color Saturation 140 Adjusting Image Contrast 141 Date Stamping Snapshots 141 Using... Audio Snapshot 152 Viewing a Movie 153 ■ Playing Back a Movie with Anti Shake 155 Playing a Slideshow on the Camera 156 Viewing Camera Images on a TV 162 Zooming the Displayed Image 165 Using the 12-image Screen 166 Using the Calendar Screen 166 Using Image...
...135 Specifying the Metering Mode 136 Reducing the Effects of Overexposure and Underexposure 138 Enhancing Human Skin Textures 139 Using the Camera's Color Filter Effects 139 Controlling Image Sharpness 140 Controlling Color Saturation 140 Adjusting Image Contrast 141 Date Stamping Snapshots 141 Using... Audio Snapshot 152 Viewing a Movie 153 ■ Playing Back a Movie with Anti Shake 155 Playing a Slideshow on the Camera 156 Viewing Camera Images on a TV 162 Zooming the Displayed Image 165 Using the 12-image Screen 166 Using the Calendar Screen 166 Using Image...

Owners Manual
Page 6
... Image (Layout Print 176 Adjusting White Balance of a Recorded Image 177 Adjusting Image Brightness 178 Reducing the Effects of Underexposure 179 Editing a Movie on the Camera 180 Creating a Snapshot of a Movie Frame (MOTION PRINT 182 USING AUDIO 184 Adding Audio to a Snapshot 184 Recording Audio Only (Voice Recording 186 MANAGING YOUR...
... Image (Layout Print 176 Adjusting White Balance of a Recorded Image 177 Adjusting Image Brightness 178 Reducing the Effects of Underexposure 179 Editing a Movie on the Camera 180 Creating a Snapshot of a Movie Frame (MOTION PRINT 182 USING AUDIO 184 Adding Audio to a Snapshot 184 Recording Audio Only (Voice Recording 186 MANAGING YOUR...
Owners Manual
Page 7
... Settings 198 Turning the Startup Screen On or Off 200 Specifying the File Name Serial Number Generation Rule 201 Changing the Camera Date and Time Setting . . . 202 Using World Time 204 ■ Configuring World Time Settings 204 Changing the Display ... Storing Images on a Macintosh 245 ■ Transfer of Images from the Camera and Management of Images on Your Macintosh 250 ■ Playing Movies 251 ■ Viewing User Documentation (PDF Files) 251 ■ Registering as a User 251 Reading Files Directly from a Memory Card . . . . 252 Memory Card Data 253 CONTENTS 7
... Settings 198 Turning the Startup Screen On or Off 200 Specifying the File Name Serial Number Generation Rule 201 Changing the Camera Date and Time Setting . . . 202 Using World Time 204 ■ Configuring World Time Settings 204 Changing the Display ... Storing Images on a Macintosh 245 ■ Transfer of Images from the Camera and Management of Images on Your Macintosh 250 ■ Playing Movies 251 ■ Viewing User Documentation (PDF Files) 251 ■ Registering as a User 251 Reading Files Directly from a Memory Card . . . . 252 Memory Card Data 253 CONTENTS 7
Owners Manual
Page 8
... ■ Transferring documents from a computer running Windows 257 ■ Transferring documents from a Macintosh 259 Viewing a Transferred Document on the Camera 261 ■ Rotating a Document Page 262 Managing Document Data on the Camera. . . . . . 264 ■ Protecting Document Data 264 ■ Deleting Document Data 265 APPENDIX 268 General Guide 268 Monitor Screen Contents 270...
... ■ Transferring documents from a computer running Windows 257 ■ Transferring documents from a Macintosh 259 Viewing a Transferred Document on the Camera 261 ■ Rotating a Document Page 262 Managing Document Data on the Camera. . . . . . 264 ■ Protecting Document Data 264 ■ Deleting Document Data 265 APPENDIX 268 General Guide 268 Monitor Screen Contents 270...
Owners Manual
Page 9
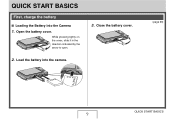
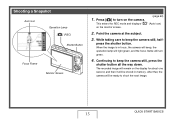
While pressing lightly on the cover, slide it in the direction indicated by the arrow to open. 2. Load the battery into the Camera 1. QUICK START BASICS First, charge the battery ■ Loading the Battery into the camera. 3. Open the battery cover. Close the battery cover. (page 36) QUICK START BASICS 9
While pressing lightly on the cover, slide it in the direction indicated by the arrow to open. 2. Load the battery into the Camera 1. QUICK START BASICS First, charge the battery ■ Loading the Battery into the camera. 3. Open the battery cover. Close the battery cover. (page 36) QUICK START BASICS 9
Owners Manual
Page 10
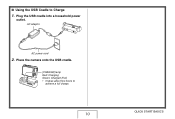
AC adaptor AC power cord 2. ■ Using the USB Cradle to achieve a full charge. 10 QUICK START BASICS Place the camera onto the USB cradle. [CHARGE] lamp Red: Charging Green: Charged (Full) • It takes about two hours to Charge 1. Plug the USB cradle into a household power outlet.
AC adaptor AC power cord 2. ■ Using the USB Cradle to achieve a full charge. 10 QUICK START BASICS Place the camera onto the USB cradle. [CHARGE] lamp Red: Charging Green: Charged (Full) • It takes about two hours to Charge 1. Plug the USB cradle into a household power outlet.

Owners Manual
Page 11
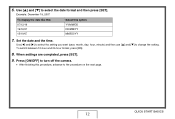
Use [S] and [T] to select the summer time (DST) setting you will use the camera and then press [SET]. 4. Configuring Display Language, Date, and Time Settings [ON/OFF] (Power) (pages 202, 206) 1. Use [S], [T], [W], and [X] to select the language you can ... [X] to select the area where you want and then press [SET]. 3. The settings on this page are required the first time you turn on the camera after purchasing it. • If you make a mistake when configuring the language, date, and time settings, you want and then press [SET]. Use [S] and [T] to...
Use [S] and [T] to select the summer time (DST) setting you will use the camera and then press [SET]. 4. Configuring Display Language, Date, and Time Settings [ON/OFF] (Power) (pages 202, 206) 1. Use [S], [T], [W], and [X] to select the language you can ... [X] to select the area where you want and then press [SET]. 3. The settings on this page are required the first time you turn on the camera after purchasing it. • If you make a mistake when configuring the language, date, and time settings, you want and then press [SET]. Use [S] and [T] to...
Owners Manual
Page 12
... 19, 2007 To display the date like this: 07/12/19 19/12/07 12/19/07 Select this procedure, advance to turn off the camera. • After finishing this option: YY/MM/DD DD/MM/YY MM/DD/YY 7. To switch between 12-hour and 24-hour format, press [BS...
... 19, 2007 To display the date like this: 07/12/19 19/12/07 12/19/07 Select this procedure, advance to turn off the camera. • After finishing this option: YY/MM/DD DD/MM/YY MM/DD/YY 7. To switch between 12-hour and 24-hour format, press [BS...
Owners Manual
Page 13
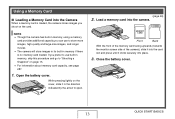
...it clicks securely into place. 3. Load a memory card into the camera. MEMCOARRYD MEMORY CARD Front Back With the front of the memory card facing upwards (towards the monitor screen side of the camera), slide it into the card slot and press until it in the direction indicated ...8226; For information about memory card capacity, see page 287. 1. Using a Memory Card ■ Loading a Memory Card into the Camera When a memory card is no memory card loaded. QUICK START BASICS 13 NOTE • Though the camera has built-in memory, using a memory card provides additional capacity you shoot...
...it clicks securely into place. 3. Load a memory card into the camera. MEMCOARRYD MEMORY CARD Front Back With the front of the memory card facing upwards (towards the monitor screen side of the camera), slide it into the card slot and press until it in the direction indicated ...8226; For information about memory card capacity, see page 287. 1. Using a Memory Card ■ Loading a Memory Card into the Camera When a memory card is no memory card loaded. QUICK START BASICS 13 NOTE • Though the camera has built-in memory, using a memory card provides additional capacity you shoot...
Owners Manual
Page 14
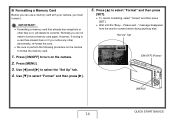
However, if storing to a card has slowed down or if you do not need to perform the following procedure on the camera. 2. Use [T] to select "Format" and then press [SET]. • To cancel formatting, select "Cancel" and then press [SET]. • Wait until the "...! • Formatting a memory card that already has snapshots or other abnormality, re-format the card. • Be sure to format a memory card again. Press [ON/OFF] to turn on the camera to select the "Set Up" tab. 4. ■ Formatting a Memory Card Before you can use a memory card with your camera, you must format it , ...
However, if storing to a card has slowed down or if you do not need to perform the following procedure on the camera. 2. Use [T] to select "Format" and then press [SET]. • To cancel formatting, select "Cancel" and then press [SET]. • Wait until the "...! • Formatting a memory card that already has snapshots or other abnormality, re-format the card. • Be sure to format a memory card again. Press [ON/OFF] to turn on the camera to select the "Set Up" tab. 4. ■ Formatting a Memory Card Before you can use a memory card with your camera, you must format it , ...
Owners Manual
Page 15
... ] to shoot the next image. While taking care to keep the camera still, half- After that, the camera will be stored in focus, the camera will beep, the operation lamp will light green, and the focus frame will turn on the camera. (page 62) This enters the REC mode and displays " " (...about one second, and then it will remain on the monitor screen. 2. press the shutter button. QUICK START BASICS 15 Continuing to keep the camera still, press the shutter button all the way down. Shooting a Snapshot Auto icon Operation Lamp [ ] (REC) Shutter Button Focus Frame Monitor Screen...
... ] to shoot the next image. While taking care to keep the camera still, half- After that, the camera will be stored in focus, the camera will beep, the operation lamp will light green, and the focus frame will turn on the camera. (page 62) This enters the REC mode and displays " " (...about one second, and then it will remain on the monitor screen. 2. press the shutter button. QUICK START BASICS 15 Continuing to keep the camera still, press the shutter button all the way down. Shooting a Snapshot Auto icon Operation Lamp [ ] (REC) Shutter Button Focus Frame Monitor Screen...
Owners Manual
Page 16
Half-press Full-press Press lightly until the button stops. QUICK START BASICS 16 Snapshot Image Size and Image Quality Your camera lets you half-press the shutter button, the camera automatically adjusts exposure and focuses on a website, etc. You can change the image size and quality settings as required to shoot a smaller...
Half-press Full-press Press lightly until the button stops. QUICK START BASICS 16 Snapshot Image Size and Image Quality Your camera lets you half-press the shutter button, the camera automatically adjusts exposure and focuses on a website, etc. You can change the image size and quality settings as required to shoot a smaller...
Owners Manual
Page 17
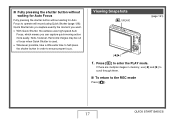
... without waiting for Auto Focus to enter the PLAY mode. Quick Shutter lets you capture exactly the moment you want. • With Quick Shutter, the camera uses high-speed Auto Focus, which means you can capture quick moving action more easily. Press [ ] to operate will record using Quick Shutter (page 128...
... without waiting for Auto Focus to enter the PLAY mode. Quick Shutter lets you capture exactly the moment you want. • With Quick Shutter, the camera uses high-speed Auto Focus, which means you can capture quick moving action more easily. Press [ ] to operate will record using Quick Shutter (page 128...

Owners Manual
Page 18
..., use the "HQ" (High Quality) or "HQ Wide" setting for movies. Press [ ] to stop recording. Movie Image Quality Your camera lets you select from among six image quality settings (UHQ, UHQ Wide, HQ, HQ Wide, Normal, LP) for movie recording. For details, see pages 94 ...
..., use the "HQ" (High Quality) or "HQ Wide" setting for movies. Press [ ] to stop recording. Movie Image Quality Your camera lets you select from among six image quality settings (UHQ, UHQ Wide, HQ, HQ Wide, Normal, LP) for movie recording. For details, see pages 94 ...
Owners Manual
Page 21
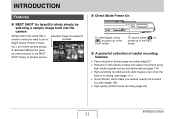
... images, press [ ] to power up in the PLAY mode. INTRODUCTION Features ■ BEST SHOT for beautiful shots simply by selecting a sample image built into the camera Simply select the scene that is not being used (page 111) • Quick Shutter, which helps you capture exactly the moment you want to shoot...
... images, press [ ] to power up in the PLAY mode. INTRODUCTION Features ■ BEST SHOT for beautiful shots simply by selecting a sample image built into the camera Simply select the scene that is not being used (page 111) • Quick Shutter, which helps you capture exactly the moment you want to shoot...
Owners Manual
Page 22
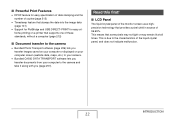
... for easy athome printing on a printer that supports one of these standards, without a computer (page 212) ■ Document transfer to the camera • Bundled Photo Transport software (page 239) lets you transfer images saved on your computer or displayed on your computer screen (website data..., maps, etc.) to your camera. • Bundled CASIO DATA TRANSPORT software lets you transfer documents from your computer to the characteristics of the liquid crystal panel, and does not indicate ...
... for easy athome printing on a printer that supports one of these standards, without a computer (page 212) ■ Document transfer to the camera • Bundled Photo Transport software (page 239) lets you transfer images saved on your computer or displayed on your computer screen (website data..., maps, etc.) to your camera. • Bundled CASIO DATA TRANSPORT software lets you transfer documents from your computer to the characteristics of the liquid crystal panel, and does not indicate ...


