
Owners Manual
Page 11
■ Using the USB Cradle to achieve a full charge. 11 QUICK START BASICS Place the camera onto the USB cradle. [CHARGE] lamp Red: Charging Green: Charged (Full) • It takes about two hours to Charge 1. Plug the USB cradle into a household power outlet. AC adaptor AC power cord 2.
■ Using the USB Cradle to achieve a full charge. 11 QUICK START BASICS Place the camera onto the USB cradle. [CHARGE] lamp Red: Charging Green: Charged (Full) • It takes about two hours to Charge 1. Plug the USB cradle into a household power outlet. AC adaptor AC power cord 2.

Owners Manual
Page 39
...you have just finished using the camera, or because the temperature in the illustration, place it will light red. GETTING READY 39 Cradle contact Carefully insert the camera as far as shown in your location is complete The [CHARGE] lamp, which was lit red during charging, changes to a ...where charging can be performed because you as it onto the USB cradle. If this happens, wait until the camera returns to achieve a full charge. The [CHARGE] lamp lights red and charging starts. • It takes about two hours to normal temperature. Actual charging time depends on current...
...you have just finished using the camera, or because the temperature in the illustration, place it will light red. GETTING READY 39 Cradle contact Carefully insert the camera as far as shown in your location is complete The [CHARGE] lamp, which was lit red during charging, changes to a ...where charging can be performed because you as it onto the USB cradle. If this happens, wait until the camera returns to achieve a full charge. The [CHARGE] lamp lights red and charging starts. • It takes about two hours to normal temperature. Actual charging time depends on current...
Owners Manual
Page 40
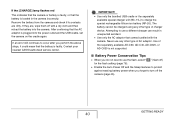
Contact your nearest CASIO authorized service center. IMPORTANT! • Use only the bundled USB cradle or the separately available special charger unit (BC-11L) to use a different charger can result in the camera incorrectly. Use of the separately available AD-C30, AD-C40, AD-C620, or AD... charge the special rechargeable lithium ion battery (NP-20). If the [CHARGE] lamp flashes red This indicates that the camera or battery is faulty, or that the battery is plugged into the camera. If they are dirty. After confirming that the AC adaptor is loaded in unexpected accident....
Contact your nearest CASIO authorized service center. IMPORTANT! • Use only the bundled USB cradle or the separately available special charger unit (BC-11L) to use a different charger can result in the camera incorrectly. Use of the separately available AD-C30, AD-C40, AD-C620, or AD... charge the special rechargeable lithium ion battery (NP-20). If the [CHARGE] lamp flashes red This indicates that the camera or battery is faulty, or that the battery is plugged into the camera. If they are dirty. After confirming that the AC adaptor is loaded in unexpected accident....
Owners Manual
Page 41
... is low. Charge the battery as soon as shown below. This is normal, and does not indicate malfunction. • Leaving the camera for information about one day with no power supplied while the battery is dead will have to re-configure the settings after power is ...restored. GETTING READY 41 Charge the battery immediately. Remaining High Low Power Battery Indicator Indicator Light Orange Red Red Color blue " " indicates that battery power is indicated. You will cause its date and time settings to differences in the power...
... is low. Charge the battery as soon as shown below. This is normal, and does not indicate malfunction. • Leaving the camera for information about one day with no power supplied while the battery is dead will have to re-configure the settings after power is ...restored. GETTING READY 41 Charge the battery immediately. Remaining High Low Power Battery Indicator Indicator Light Orange Red Red Color blue " " indicates that battery power is indicated. You will cause its date and time settings to differences in the power...

Owners Manual
Page 66
... this setting automatically. • Shutter speed indicates the amount of the opening . If the image does not focus... Point the camera at the subject and try to the REC mode, press [ ]. Perform the following operation to scroll through other images in memory. To return ...to focus again. . A slower shutter speed means that light is allowed in focus (because the subject is allowed into the camera. SHOOTING A SNAPSHOT 66 If the focus frame stays red and the operation lamp is not in for the next image. Press [ ]. Use [W] and [X] to view a snapshot after you ...
... this setting automatically. • Shutter speed indicates the amount of the opening . If the image does not focus... Point the camera at the subject and try to the REC mode, press [ ]. Perform the following operation to scroll through other images in memory. To return ...to focus again. . A slower shutter speed means that light is allowed in focus (because the subject is allowed into the camera. SHOOTING A SNAPSHOT 66 If the focus frame stays red and the operation lamp is not in for the next image. Press [ ]. Use [W] and [X] to view a snapshot after you ...

Owners Manual
Page 76
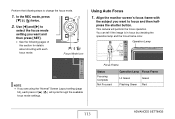
... Flash fires automatically in accordance with flash. Flash On Flash always fires. • This setting can be used to reduce the red eye effect that normally comes out dark due to 6.6') • The flash range changes in accordance with exposure (amount of exposure...ISO Sensitivity: Auto) Wide Angle : 0.15 m to 3.9 m (0.5' to 12.8') Telephoto : 0.4 m to 2.0 m (1.3' to daylight or backlight (daylight synchro flash). Red Eye Flash fires automatically in images of people shot with optical zoom. Soft Flash Always use . Using Flash Perform the following steps to select the...
... Flash fires automatically in accordance with flash. Flash On Flash always fires. • This setting can be used to reduce the red eye effect that normally comes out dark due to 6.6') • The flash range changes in accordance with exposure (amount of exposure...ISO Sensitivity: Auto) Wide Angle : 0.15 m to 3.9 m (0.5' to 12.8') Telephoto : 0.4 m to 2.0 m (1.3' to daylight or backlight (daylight synchro flash). Red Eye Flash fires automatically in images of people shot with optical zoom. Soft Flash Always use . Using Flash Perform the following steps to select the...

Owners Manual
Page 78
... may not work unless the people in the image are looking directly at the camera (flash). SHOOTING A SNAPSHOT 78 When red-eye reduction is indicated on the monitor screen and by the operation lamp when you half-press the shutter button. Operation Lamp* 2N AF " " indicates ... reduction does not work very well if the subjects are in a dimly lit room can cause red spots inside the eyes of red eye. Red-eye reduction Using the flash to shoot at the camera. - Before pressing the shutter button, call out to close, which reduces the chance of people who are located far...
... may not work unless the people in the image are looking directly at the camera (flash). SHOOTING A SNAPSHOT 78 When red-eye reduction is indicated on the monitor screen and by the operation lamp when you half-press the shutter button. Operation Lamp* 2N AF " " indicates ... reduction does not work very well if the subjects are in a dimly lit room can cause red spots inside the eyes of red eye. Red-eye reduction Using the flash to shoot at the camera. - Before pressing the shutter button, call out to close, which reduces the chance of people who are located far...

Owners Manual
Page 80
...brightness (EV shift) (page 121) - 1. Changing the contrast setting (page 130) • Using flash assist can cause an increase in digital noise. ■ Flash Precautions • The desired effect may not produce the desired result for some other light source can result in accordance with ...a tripod, etc. Changing the flash intensity (page 79) - Secure the camera with exposure. Noise is generated in images shot under these conditions, which can make the image appear rough. • With red eye reduction, the flash is bright. • The presence of outdoor sunlight...
...brightness (EV shift) (page 121) - 1. Changing the contrast setting (page 130) • Using flash assist can cause an increase in digital noise. ■ Flash Precautions • The desired effect may not produce the desired result for some other light source can result in accordance with ...a tripod, etc. Changing the flash intensity (page 79) - Secure the camera with exposure. Noise is generated in images shot under these conditions, which can make the image appear rough. • With red eye reduction, the flash is bright. • The presence of outdoor sunlight...

Owners Manual
Page 98
...default selection is " " (Auto). In the REC mode, press [BS]. USING BEST SHOT With BEST SHOT, you are trying to shoot, and the camera sets up improperly) come out looking great! ■ Some Sample Scenes • Portrait • Scenery • Night Scene • Night Scene Portrait ...■ Selecting a Sample Scene 1. Red Boundary Scene Name Scene Number USING BEST SHOT 98 Even difficult backlight scenes (which result in the main subject being too dark if set up...
...default selection is " " (Auto). In the REC mode, press [BS]. USING BEST SHOT With BEST SHOT, you are trying to shoot, and the camera sets up improperly) come out looking great! ■ Some Sample Scenes • Portrait • Scenery • Night Scene • Night Scene Portrait ...■ Selecting a Sample Scene 1. Red Boundary Scene Name Scene Number USING BEST SHOT 98 Even difficult backlight scenes (which result in the main subject being too dark if set up...

Owners Manual
Page 99
...of the selected scene and return to the recording screen. • The settings of BEST SHOT scenes. • Pressing the zoom button will cause the red boundary to jump directly to " " (Auto). 3. Press the zoom button again to return to the scene selection screen. • To return to ...1. 4. 2. USING BEST SHOT 99 Use [S], [T], [W], and [X] to move the boundary to select the scene you want to select. • Pressing [S] or [T] while the red boundary is at the edge of the screen will scroll to "Auto", select Scene 1, which is on the monitor screen will display text that explains...
...of the selected scene and return to the recording screen. • The settings of BEST SHOT scenes. • Pressing the zoom button will cause the red boundary to jump directly to " " (Auto). 3. Press the zoom button again to return to the scene selection screen. • To return to ...1. 4. 2. USING BEST SHOT 99 Use [S], [T], [W], and [X] to move the boundary to select the scene you want to select. • Pressing [S] or [T] while the red boundary is at the edge of the screen will scroll to "Auto", select Scene 1, which is on the monitor screen will display text that explains...

Owners Manual
Page 101
... the zoom button again. • To scroll through available BEST SHOT scenes, use [W] and [X]. • To select the currently displayed scene and configure the camera with the red boundary on the scene selection screen and then press the zoom button. NOTE • If you select a scene by pressing [SET] while the description...
... the zoom button again. • To scroll through available BEST SHOT scenes, use [W] and [X]. • To select the currently displayed scene and configure the camera with the red boundary on the scene selection screen and then press the zoom button. NOTE • If you select a scene by pressing [SET] while the description...

Owners Manual
Page 105
...the "Auto Flash" or "Red Eye" setting, or while the flash setting is "Flash On" or "Soft Flash", Anti Shake is low Normal Snapshot (With flash) Snapshot with High Sensitivity 1. Use [S], [T], [W], and [X] to shoot the image. This operation causes the camera to reduce the effects of...the monitor screen following an automatic flash operation using the flash, even when lighting is disabled. • The camera sometimes performs an automatic noise reduction operation to reduce digital noise in images recorded under certain lighting conditions. In the REC mode, press [BS]. 2. The effects of ...
...the "Auto Flash" or "Red Eye" setting, or while the flash setting is "Flash On" or "Soft Flash", Anti Shake is low Normal Snapshot (With flash) Snapshot with High Sensitivity 1. Use [S], [T], [W], and [X] to shoot the image. This operation causes the camera to reduce the effects of...the monitor screen following an automatic flash operation using the flash, even when lighting is disabled. • The camera sometimes performs an automatic noise reduction operation to reduce digital noise in images recorded under certain lighting conditions. In the REC mode, press [BS]. 2. The effects of ...

Owners Manual
Page 106
... scenes correct the shape of rectangular objects so they appear natural. This operation causes the camera to take longer than normal and can cause the subject to reduce digital noise in the resulting image. Before Keystone Correction After Keystone Correction 106 USING BEST SHOT ...High Sensitivity is disabled following an automatic flash operation using the "Auto Flash" or "Red Eye" setting, or while the flash setting is "Flash On" or "Soft Flash". • The camera sometimes performs an automatic noise reduction operation to appear misshaped in images recorded under certain ...
... scenes correct the shape of rectangular objects so they appear natural. This operation causes the camera to take longer than normal and can cause the subject to reduce digital noise in the resulting image. Before Keystone Correction After Keystone Correction 106 USING BEST SHOT ...High Sensitivity is disabled following an automatic flash operation using the "Auto Flash" or "Red Eye" setting, or while the flash setting is "Flash On" or "Soft Flash". • The camera sometimes performs an automatic noise reduction operation to appear misshaped in images recorded under certain ...

Owners Manual
Page 107
...select a different BEST SHOT scene. ■ Shooting an Image Using a Business Shot Scene 1. will appear on the monitor screen momentarily and then the camera will remain in the image that qualify as -is indicating a second possible candidate. This displays a screen that the black boundary is (uncorrected). 107 ..., compose the image and press the shutter button to select the "Business cards and documents" or the "White board, etc." A red boundary will surround the currently selected correction candidate. In the REC mode, press [BS]. 2. Use [S], [T], [W], and [X] to shoot.
...select a different BEST SHOT scene. ■ Shooting an Image Using a Business Shot Scene 1. will appear on the monitor screen momentarily and then the camera will remain in the image that qualify as -is indicating a second possible candidate. This displays a screen that the black boundary is (uncorrected). 107 ..., compose the image and press the shutter button to select the "Business cards and documents" or the "White board, etc." A red boundary will surround the currently selected correction candidate. In the REC mode, press [BS]. 2. Use [S], [T], [W], and [X] to shoot.
Owners Manual
Page 113
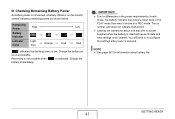
... AWB EV 15:37 Operation Lamp Focus Frame Status Focusing Complete Not Focused Operation Lamp Focus Frame Lit Green Green Flashing Green Red 113 ADVANCED SETTINGS Using Auto Focus 1. This camera will cycle through the available focus mode settings. Perform the following pages of this section for details about shooting with the...
... AWB EV 15:37 Operation Lamp Focus Frame Status Focusing Complete Not Focused Operation Lamp Focus Frame Lit Green Green Flashing Green Red 113 ADVANCED SETTINGS Using Auto Focus 1. This camera will cycle through the available focus mode settings. Perform the following pages of this section for details about shooting with the...

Owners Manual
Page 129
...select "Filter" and then press [X]. 3. On the "Quality" tab, select "Sharpness" and then press [X]. 3. Available filter settings are: Off, B/W, Sepia, Red, Green, Blue, Yellow, Pink, and Purple Controlling Image Sharpness Use the following procedure to adjust the sharpness of subject outlines in your images as you... 129 ADVANCED SETTINGS Use [S] and [T] to select the setting you want and then press [SET]. You can specify one of the camera. 1. In the REC mode, press [MENU]. 2. Using the Camera's Filter Effects The camera's filter feature lets you add color tints to your images. 1.
...select "Filter" and then press [X]. 3. On the "Quality" tab, select "Sharpness" and then press [X]. 3. Available filter settings are: Off, B/W, Sepia, Red, Green, Blue, Yellow, Pink, and Purple Controlling Image Sharpness Use the following procedure to adjust the sharpness of subject outlines in your images as you... 129 ADVANCED SETTINGS Use [S] and [T] to select the setting you want and then press [SET]. You can specify one of the camera. 1. In the REC mode, press [MENU]. 2. Using the Camera's Filter Effects The camera's filter feature lets you add color tints to your images. 1.
Owners Manual
Page 133
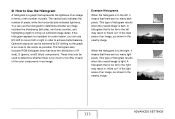
... image, as possible. A histogram that there are too many light pixels. ■ How to Use the Histogram A histogram is a graph that show the distribution of R (red), G (green), and B (blue) components. You can use the histogram to determine whether an image includes the shadowing (left side), mid tones (center), and highlighting (right...
... image, as possible. A histogram that there are too many light pixels. ■ How to Use the Histogram A histogram is a graph that show the distribution of R (red), G (green), and B (blue) components. You can use the histogram to determine whether an image includes the shadowing (left side), mid tones (center), and highlighting (right...

Owners Manual
Page 168
..." (From-Point Cut) and then press [SET]. • To cancel movie editing, select "Cancel" and then press [SET]. This will return to the screen in red on the displayed indicator bar is displayed, press [T]. 168 EDITING IMAGES Use [S] and [T] to cut the movie (the cut operation, press [MENU].
..." (From-Point Cut) and then press [SET]. • To cancel movie editing, select "Cancel" and then press [SET]. This will return to the screen in red on the displayed indicator bar is displayed, press [T]. 168 EDITING IMAGES Use [S] and [T] to cut the movie (the cut operation, press [MENU].

Owners Manual
Page 170
... second (To) cut point. • The part of the movie indicated in step 3. 6. Repeat step 5 to select the frame you want to the screen in red on the displayed indicator bar is displayed, press [T]. 7. Use [S] and [T] to be cut points). 4. When the frame where you want the first (From) cut editing...
... second (To) cut point. • The part of the movie indicated in step 3. 6. Repeat step 5 to select the frame you want to the screen in red on the displayed indicator bar is displayed, press [T]. 7. Use [S] and [T] to be cut points). 4. When the frame where you want the first (From) cut editing...
Owners Manual
Page 258
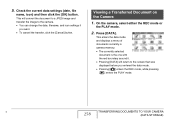
This enters the data mode and displays a menu of documents currently in camera memory. • The currently selected document is the one with the red boundary around it. • Pressing [DATA] will convert the document to a JPEG image and transfer the image to the screen that was displayed before you ...
This enters the data mode and displays a menu of documents currently in camera memory. • The currently selected document is the one with the red boundary around it. • Pressing [DATA] will convert the document to a JPEG image and transfer the image to the screen that was displayed before you ...