
Owners Manual
Page 2
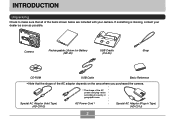
... items shown below are included with your dealer as soon as possible. AC Power Cord * Special AC Adaptor (Plug-in Type) (AD-C51J) 2 Camera Rechargeable Lithium Ion Battery (NP-20) USB Cradle (CA-25) Strap CD-ROM USB Cable Basic Reference • Note that all of the AC adaptor depends on the...
... items shown below are included with your dealer as soon as possible. AC Power Cord * Special AC Adaptor (Plug-in Type) (AD-C51J) 2 Camera Rechargeable Lithium Ion Battery (NP-20) USB Cradle (CA-25) Strap CD-ROM USB Cable Basic Reference • Note that all of the AC adaptor depends on the...
Owners Manual
Page 3
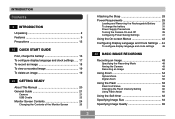
... of the Monitor Screen 26 Attaching the Strap 28 Power Requirements 29 Loading and Removing the Rechargeable Battery 29 To charge the battery 31 Power Supply Precautions 36 Turning the Camera On and Off 39 Configuring Power Saving Settings 41 Using the On-screen Menus 42 Configuring Display ... settings 45 48 BASIC IMAGE RECORDING Recording an Image 48 Specifying the Recording Mode 48 Aiming the Camera 49 Recording an Image 50 Using Zoom 54 Optical Zoom 54 Digital Zoom 56 Using the Flash 58 Flash Unit Status 59 Changing the Flash Intensity Setting 60 Using...
... of the Monitor Screen 26 Attaching the Strap 28 Power Requirements 29 Loading and Removing the Rechargeable Battery 29 To charge the battery 31 Power Supply Precautions 36 Turning the Camera On and Off 39 Configuring Power Saving Settings 41 Using the On-screen Menus 42 Configuring Display ... settings 45 48 BASIC IMAGE RECORDING Recording an Image 48 Specifying the Recording Mode 48 Aiming the Camera 49 Recording an Image 50 Using Zoom 54 Optical Zoom 54 Digital Zoom 56 Using the Flash 58 Flash Unit Status 59 Changing the Flash Intensity Setting 60 Using...
Owners Manual
Page 8
...from the use of Photo Loader and/or Photohands. • CASIO COMPUTER CO., LTD. assumes no responsibility for any damages or losses suffered by you or any loss or claims by the screens and configuration of the actual camera. • The SD logo is a registered trademark. &#...United States and/or other related rights to these applications revert to the use of malfunction, repairs, or battery replacement. software. Except as a result of the EX-S100. • CASIO COMPUTER CO., LTD. assumes no responsibility for any damage or loss caused by deletion of data as stipulated ...
...from the use of Photo Loader and/or Photohands. • CASIO COMPUTER CO., LTD. assumes no responsibility for any damages or losses suffered by you or any loss or claims by the screens and configuration of the actual camera. • The SD logo is a registered trademark. &#...United States and/or other related rights to these applications revert to the use of malfunction, repairs, or battery replacement. software. Except as a result of the EX-S100. • CASIO COMPUTER CO., LTD. assumes no responsibility for any damage or loss caused by deletion of data as stipulated ...
Owners Manual
Page 10
...adjust exposure as you press the shutter button all the way down without pausing, the camera immediately records the image without waiting for Auto Focus to be used to charge the camera's battery, and to transfer images to a computer. This means you can create images that include...you add a subject to a previously recorded background image. A Photo Stand feature lets you wait for the camera to Auto Focus. • Support for SD memory cards and MMC (MultiMedia Cards) for beautiful pictures every time. • Business Shot (page 88) Business Shot automatically corrects rectangular shapes ...
...adjust exposure as you press the shutter button all the way down without pausing, the camera immediately records the image without waiting for Auto Focus to be used to charge the camera's battery, and to transfer images to a computer. This means you can create images that include...you add a subject to a previously recorded background image. A Photo Stand feature lets you wait for the camera to Auto Focus. • Support for SD memory cards and MMC (MultiMedia Cards) for beautiful pictures every time. • Business Shot (page 88) Business Shot automatically corrects rectangular shapes ...
Owners Manual
Page 13
...use, and do not burn your fingers, remove the camera's battery and/or unplug the AC adaptor power cord from the power outlet, and contact your dealer or nearest CASIO authorized service center. • Never use any other device besides this camera. • Never cover the AC adaptor with a ...it can create the risk of fire and electric shock. INTRODUCTION • Keep the camera away from the camera, take it to your nearest CASIO authorized service center for repair. Next, remove the camera's battery and/or unplug the AC adaptor power cord from the power outlet, and contact your ...
...use, and do not burn your fingers, remove the camera's battery and/or unplug the AC adaptor power cord from the power outlet, and contact your dealer or nearest CASIO authorized service center. • Never use any other device besides this camera. • Never cover the AC adaptor with a ...it can create the risk of fire and electric shock. INTRODUCTION • Keep the camera away from the camera, take it to your nearest CASIO authorized service center for repair. Next, remove the camera's battery and/or unplug the AC adaptor power cord from the power outlet, and contact your ...
Owners Manual
Page 14
...is performing a record or memory access operation - Removing the battery or memory card, or setting the camera onto the USB cradle while the camera is being performed - Disconnecting the USB cable, removing the camera from the USB cradle, or disconnecting the AC adaptor from ...camera is manufactured using the camera! Any of the following areas. - Low battery power - I Test for use or keep the camera in the following creates the risk of corruption of a closed vehicle, especially one parked in the sun - INTRODUCTION I Data Error Precautions • Your digital camera...
...is performing a record or memory access operation - Removing the battery or memory card, or setting the camera onto the USB cradle while the camera is being performed - Disconnecting the USB cable, removing the camera from the USB cradle, or disconnecting the AC adaptor from ...camera is manufactured using the camera! Any of the following areas. - Low battery power - I Test for use or keep the camera in the following creates the risk of corruption of a closed vehicle, especially one parked in the sun - INTRODUCTION I Data Error Precautions • Your digital camera...
Owners Manual
Page 15
...to conditions that might cause condensation. • To keep condensation from forming, place the camera into a location that is the possibility that condensation can remove dust particles from the camera and leave the battery cover open for a few hours. I Lens • Never apply too much warmer or... colder than your fingers. This does not indicate malfunction. • If the exterior of the camera needs cleaning, wipe it into a ...
...to conditions that might cause condensation. • To keep condensation from forming, place the camera into a location that is the possibility that condensation can remove dust particles from the camera and leave the battery cover open for a few hours. I Lens • Never apply too much warmer or... colder than your fingers. This does not indicate malfunction. • If the exterior of the camera needs cleaning, wipe it into a ...
Owners Manual
Page 16
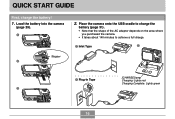
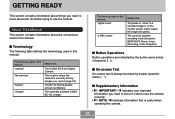
Place the camera onto the USB cradle to charge the battery (page 31). • Note that the shape of the AC adaptor depends on the area where you purchased the camera. • It takes about 140 minutes to achieve a full charge. 1 Inlet Type 2 Stopper 2 1 Plug-in Type [CHARGE] lamp Charging: Lights red Charging Complete: Lights green 3 16 Load the battery into the camera (page 29). 1 2. QUICK START GUIDE QUICK START GUIDE First, charge the battery! 1.
Place the camera onto the USB cradle to charge the battery (page 31). • Note that the shape of the AC adaptor depends on the area where you purchased the camera. • It takes about 140 minutes to achieve a full charge. 1 Inlet Type 2 Stopper 2 1 Plug-in Type [CHARGE] lamp Charging: Lights red Charging Complete: Lights green 3 16 Load the battery into the camera (page 29). 1 2. QUICK START GUIDE QUICK START GUIDE First, charge the battery! 1.
Owners Manual
Page 20
... is currently storing images you record (page 50) The NP-20 Rechargeable Lithium Ion Battery The optionally available CASIO BC-10L charger This term as used in this manual: "camera" "file memory" "battery" "charger" Means this: The CASIO EX-S100 Digital Camera The location where the camera is always enclosed by the button name inside of brackets ([ ]). indicates very important...
... is currently storing images you record (page 50) The NP-20 Rechargeable Lithium Ion Battery The optionally available CASIO BC-10L charger This term as used in this manual: "camera" "file memory" "battery" "charger" Means this: The CASIO EX-S100 Digital Camera The location where the camera is always enclosed by the button name inside of brackets ([ ]). indicates very important...
Owners Manual
Page 22
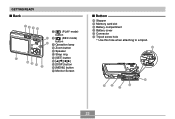
H I Back 78 9 0 7 [ ] (PLAY mode) button A 8 [ ] (REC mode) B button 9 Operation lamp ; GETTING READY I M LK J 22 Zoom button A Speaker B Strap ring G C [SET] button FE D C D E [DISP] button F [MENU] button G Monitor Screen I Bottom H Stopper I Memory card slot J Battery compartment K Battery cover L Connector M Tripod screw hole * Use this hole when attaching to a tripod.
H I Back 78 9 0 7 [ ] (PLAY mode) button A 8 [ ] (REC mode) B button 9 Operation lamp ; GETTING READY I M LK J 22 Zoom button A Speaker B Strap ring G C [SET] button FE D C D E [DISP] button F [MENU] button G Monitor Screen I Bottom H Stopper I Memory card slot J Battery compartment K Battery cover L Connector M Tripod screw hole * Use this hole when attaching to a tripod.
Owners Manual
Page 23
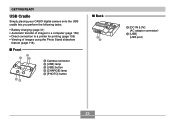
I Front 2 13 54 1 Camera connector 2 [USB] lamp 3 [USB] button 4 [CHARGE] lamp 5 [PHOTO] button I Back 6 7 6 [DC IN 5.3V] (AC adaptor connector) 7 [USB] (USB port) 23 GETTING READY USB Cradle Simply placing your CASIO digital camera onto the USB cradle lets you perform the following tasks. • Battery charging (page 31) • Automatic transfer of images to a computer (page 159) • Direct connection to a printer for printing (page 155) • Viewing of images using the Photo Stand slideshow feature (page 118).
I Front 2 13 54 1 Camera connector 2 [USB] lamp 3 [USB] button 4 [CHARGE] lamp 5 [PHOTO] button I Back 6 7 6 [DC IN 5.3V] (AC adaptor connector) 7 [USB] (USB port) 23 GETTING READY USB Cradle Simply placing your CASIO digital camera onto the USB cradle lets you perform the following tasks. • Battery charging (page 31) • Automatic transfer of images to a computer (page 159) • Direct connection to a printer for printing (page 155) • Viewing of images using the Photo Stand slideshow feature (page 118).
Owners Manual
Page 25
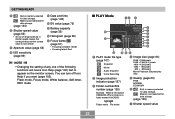
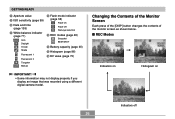
A Aperture value (page 52) B ISO sensitivity (page 99) C Date and time (page 138) D EV value (page 75) E Battery capacity (page 35) F Histogram (page 96) G Focus frame (page 51) • Focusing complete: Green • Focusing failed: Red NOTE • Changing the setting of any ...one of range aperture or shutter speed causes the corresponding monitor screen value to appear on the monitor screen. You can turn amber. Memory card selected for data storage. (page 145) 0 Shutter speed value (page 52) • An out of the following functions will cause Icon Help (page 102) text...
A Aperture value (page 52) B ISO sensitivity (page 99) C Date and time (page 138) D EV value (page 75) E Battery capacity (page 35) F Histogram (page 96) G Focus frame (page 51) • Focusing complete: Green • Focusing failed: Red NOTE • Changing the setting of any ...one of range aperture or shutter speed causes the corresponding monitor screen value to appear on the monitor screen. You can turn amber. Memory card selected for data storage. (page 145) 0 Shutter speed value (page 52) • An out of the following functions will cause Icon Help (page 102) text...
Owners Manual
Page 26
... 1 2 Fluorescent 2 Tungsten Manual B Flash mode indicator (page 58) Flash On Flash Off Red-eye reduction C REC modes (page 48) Snapshot BESTSHOT D Battery capacity (page 35) E Histogram (page 96) F EV value (page 75) IMPORTANT! • Some information may not display properly if you display an image that was recorded using a different digital camera model.
... 1 2 Fluorescent 2 Tungsten Manual B Flash mode indicator (page 58) Flash On Flash Off Red-eye reduction C REC modes (page 48) Snapshot BESTSHOT D Battery capacity (page 35) E Histogram (page 96) F EV value (page 75) IMPORTANT! • Some information may not display properly if you display an image that was recorded using a different digital camera model.
Owners Manual
Page 29
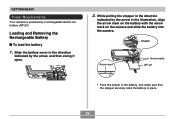
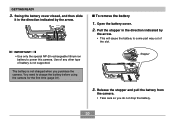
... NP-20 • Push the bottom of the battery, and make sure that the stopper securely locks the battery in the illustration, align the arrow mark on the battery with the arrow mark on the camera and slide the battery into the camera. While pulling the stopper in the direction indicated by... the arrow in place. 29 Loading and Removing the Rechargeable Battery I To load the...
... NP-20 • Push the bottom of the battery, and make sure that the stopper securely locks the battery in the illustration, align the arrow mark on the battery with the arrow mark on the camera and slide the battery into the camera. While pulling the stopper in the direction indicated by... the arrow in place. 29 Loading and Removing the Rechargeable Battery I To load the...
Owners Manual
Page 30
... This will cause the battery to come part way out of battery is not charged when you do not drop the battery. 30 I To remove the battery 1. IMPORTANT! • Use only the special NP-20 rechargeable lithium ion battery to charge the battery before using the camera for the first time (...page 31). Stopper 3. Swing the battery cover closed, and then slide it...
... This will cause the battery to come part way out of battery is not charged when you do not drop the battery. 30 I To remove the battery 1. IMPORTANT! • Use only the special NP-20 rechargeable lithium ion battery to charge the battery before using the camera for the first time (...page 31). Stopper 3. Swing the battery cover closed, and then slide it...
Owners Manual
Page 31
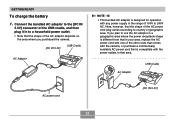
Note, however, that area. GETTING READY To charge the battery 1. USB Cradle AC Adaptor AC power cord [DC IN 5.3V] 31 If you purchased the camera. [DC IN 5.3V] USB Cradle AC Adaptor NOTE • The bundled AC adaptor is compatible with any power supply in that the shape of 100V ... power receptacle shape is different from that in your area, replace the AC power cord with one of the other ones that comes with the camera, or purchase a commercially available AC power cord that is designed for operation with the power outlets in the range of the AC power cord plug...
Note, however, that area. GETTING READY To charge the battery 1. USB Cradle AC Adaptor AC power cord [DC IN 5.3V] 31 If you purchased the camera. [DC IN 5.3V] USB Cradle AC Adaptor NOTE • The bundled AC adaptor is compatible with any power supply in that the shape of 100V ... power receptacle shape is different from that in your area, replace the AC power cord with one of the other ones that comes with the camera, or purchase a commercially available AC power cord that is designed for operation with the power outlets in the range of the AC power cord plug...
Owners Manual
Page 32
... as far as it will start right away if you try to charge immediately after using the camera (which causes battery to you are performing the charge operation. After charging is complete, remove the camera from 100V AC to find out if the shape of the AC adaptor power cord plug is compatible... optionally available AD-C40, AD-C620 and AD-C630 AC adaptors with this happens, simply wait until the battery reaches normal temperature. Set the camera onto the USB cradle. • Do not place the camera onto the USB cradle while it is too hot or too cold where you to 240V AC. If...
... as far as it will start right away if you try to charge immediately after using the camera (which causes battery to you are performing the charge operation. After charging is complete, remove the camera from 100V AC to find out if the shape of the AC adaptor power cord plug is compatible... optionally available AD-C40, AD-C620 and AD-C630 AC adaptors with this happens, simply wait until the battery reaches normal temperature. Set the camera onto the USB cradle. • Do not place the camera onto the USB cradle while it is too hot or too cold where you to 240V AC. If...
Owners Manual
Page 33
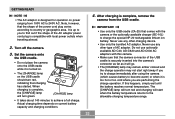
...steps. 1. If the contacts are the only operations that can be caused by any of the camera's battery, exchanging data with a dry cloth. 2. Remove the camera from the camera and check the battery contacts for dirt. Remove the battery from the USB cradle and see if it works normally. • The following are dirty, ... loaded. GETTING READY • If the [CHARGE] lamp starts flashing red, it is on the USB cradle after taking the above steps, contact a CASIO authorized service center. 33 I If the camera does not work normally This can be performed while the camera is loaded.
...steps. 1. If the contacts are the only operations that can be caused by any of the camera's battery, exchanging data with a dry cloth. 2. Remove the camera from the camera and check the battery contacts for dirt. Remove the battery from the USB cradle and see if it works normally. • The following are dirty, ... loaded. GETTING READY • If the [CHARGE] lamp starts flashing red, it is on the USB cradle after taking the above steps, contact a CASIO authorized service center. 33 I If the camera does not work normally This can be performed while the camera is loaded.
Owners Manual
Page 34
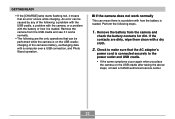
... 180 shots (90 minutes) 540 shots (90 minutes) 150 minutes 150 minutes Supported Battery: NP-20 (Rated Capacitance: 680mAh) Storage Medium: SD Memory Card *1 Number of service indicated. They do not guarantee that the battery will provide the amount of Shots (CIPA Standard) • Temperature: 23°C (73°F) • Monitor Screen: On...
... 180 shots (90 minutes) 540 shots (90 minutes) 150 minutes 150 minutes Supported Battery: NP-20 (Rated Capacitance: 680mAh) Storage Medium: SD Memory Card *1 Number of service indicated. They do not guarantee that the battery will provide the amount of Shots (CIPA Standard) • Temperature: 23°C (73°F) • Monitor Screen: On...
Owners Manual
Page 35
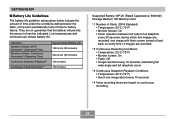
... If you will not be able to record images while the battery indicator is low. Battery Level High Low Indicator 35 The indicator means that you do not need the flash while recording, select (flash off the camera. GETTING READY • The above values are based on . ...I Tips to turn off ) for the flash mode. Repeated charging shortens battery life. • Battery life is used. Charge the battery immediately whenever either of these indicators appears.
... If you will not be able to record images while the battery indicator is low. Battery Level High Low Indicator 35 The indicator means that you do not need the flash while recording, select (flash off the camera. GETTING READY • The above values are based on . ...I Tips to turn off ) for the flash mode. Repeated charging shortens battery life. • Battery life is used. Charge the battery immediately whenever either of these indicators appears.


