
Owners Manual
Page 3
... proper operation before using the camera! 16 Data Error Precautions 17 Operating conditions 17 Condensation 18 Lens and Phase Differential Sensor 18 Other 18 19 QUICK START GUIDE First, charge the battery 19 To configure display language and clock settings ..... 21 To record an image 22 To view a recorded image 23 To delete an image 23 24 GETTING READY About This Manual 24 General Guide 26 Camera 26 Monitor Screen Contents 29 REC modes 29 PLAY mode 33 Changing the...
... proper operation before using the camera! 16 Data Error Precautions 17 Operating conditions 17 Condensation 18 Lens and Phase Differential Sensor 18 Other 18 19 QUICK START GUIDE First, charge the battery 19 To configure display language and clock settings ..... 21 To record an image 22 To view a recorded image 23 To delete an image 23 24 GETTING READY About This Manual 24 General Guide 26 Camera 26 Monitor Screen Contents 29 REC modes 29 PLAY mode 33 Changing the...

Owners Manual
Page 8
... Album Settings 234 Viewing Album Files 237 Saving an Album 239 To delete an album 240 Installing the Software from the CD-ROM 240 About the bundled CD-ROM (CASIO Digital Camera Software) 240 Computer System Requirements 242 Installing Software from the CD-ROM in Windows 243 Getting Started 244 Selecting a Language 244 Viewing the Contents of the "Read me" File 244 Installing an Application 245 Viewing User Documentation (PDF Files) 245 User Registration...
... Album Settings 234 Viewing Album Files 237 Saving an Album 239 To delete an album 240 Installing the Software from the CD-ROM 240 About the bundled CD-ROM (CASIO Digital Camera Software) 240 Computer System Requirements 242 Installing Software from the CD-ROM in Windows 243 Getting Started 244 Selecting a Language 244 Viewing the Contents of the "Read me" File 244 Installing an Application 245 Viewing User Documentation (PDF Files) 245 User Registration...
Owners Manual
Page 9
.... 9 INTRODUCTION Installing Software from the use of this manual. • CASIO COMPUTER CO., LTD. Be sure to back up all important data on a Macintosh 246 Installing Software 246 Viewing User Documentation (PDF Files) 247 249 APPENDIX Menu Reference 249 Indicator Lamp Reference 252 REC modes 252 PLAY mode 253 Rapid Charger 254 Troubleshooting Guide 255 If you or any loss or claims by deletion of data as a result of the EX-P700. • CASIO COMPUTER CO...
.... 9 INTRODUCTION Installing Software from the use of this manual. • CASIO COMPUTER CO., LTD. Be sure to back up all important data on a Macintosh 246 Installing Software 246 Viewing User Documentation (PDF Files) 247 249 APPENDIX Menu Reference 249 Indicator Lamp Reference 252 REC modes 252 PLAY mode 253 Rapid Charger 254 Troubleshooting Guide 255 If you or any loss or claims by deletion of data as a result of the EX-P700. • CASIO COMPUTER CO...
Owners Manual
Page 13
... III Compatible (page 215) Images include PRINT Image Matching III data (mode setting and other camera setup information). DPOF can be printed easily in the sequence you turn on the camera, press the shutter button half-way or all the way, or perform a key operation. • Card remote controller (page 144) • External flash connectability (page 149) • Conversion lens/close-up lens support (page 153) Use of a conversion lens enhances telephoto and wide angle shots...
... III Compatible (page 215) Images include PRINT Image Matching III data (mode setting and other camera setup information). DPOF can be printed easily in the sequence you turn on the camera, press the shutter button half-way or all the way, or perform a key operation. • Card remote controller (page 144) • External flash connectability (page 149) • Conversion lens/close-up lens support (page 153) Use of a conversion lens enhances telephoto and wide angle shots...

Owners Manual
Page 51
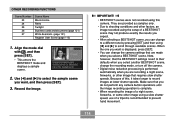
... Auto Power Off settings are: "2 min" and "5 min". • Note that the Sleep feature does not operate in the PLAY mode. • Pressing any operation for a specified amount of time. 1. Use [̆] and [̄] to turn back on the camera. 2. GETTING READY Configuring Power Saving Settings You can configure the settings described below to conserve battery power. Press [MENU]. 3. To configure this feature: Sleep Auto Power Off Select this setting: Sleep Auto Power...
... Auto Power Off settings are: "2 min" and "5 min". • Note that the Sleep feature does not operate in the PLAY mode. • Pressing any operation for a specified amount of time. 1. Use [̆] and [̄] to turn back on the camera. 2. GETTING READY Configuring Power Saving Settings You can configure the settings described below to conserve battery power. Press [MENU]. 3. To configure this feature: Sleep Auto Power Off Select this setting: Sleep Auto Power...
Owners Manual
Page 58
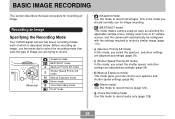
.... Recording an Image Specifying the Recording Mode Your CASIO digital camera has seven recording modes, each of image you are adjusted accordingly (page 94). • (Manual Exposure mode) This mode gives you should normally use for recording an image. Before recording an image, use the mode dial to select the recording mode that suits the type of which is the mode you total control over aperture and shutter speed settings (page 96). • (Movie mode) Use this mode to record movies (page 124). • (Voice Recording mode) Use this mode...
.... Recording an Image Specifying the Recording Mode Your CASIO digital camera has seven recording modes, each of image you are adjusted accordingly (page 94). • (Manual Exposure mode) This mode gives you should normally use for recording an image. Before recording an image, use the mode dial to select the recording mode that suits the type of which is the mode you total control over aperture and shutter speed settings (page 96). • (Movie mode) Use this mode to record movies (page 124). • (Voice Recording mode) Use this mode...
Owners Manual
Page 114
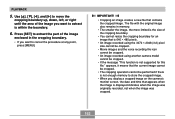
... you want is displayed, press [SET]. • You can change the recording mode, or turn off the camera. • Digital noise reduction processing is performed automatically when you do not perform any camera button operations until the image recording operation is recommended to shooting conditions and other factors, an image recorded using this , it takes longer to record images at lower shutter speeds. Because of a tripod is complete. • When recording the image of a night...
... you want is displayed, press [SET]. • You can change the recording mode, or turn off the camera. • Digital noise reduction processing is performed automatically when you do not perform any camera button operations until the image recording operation is recommended to shooting conditions and other factors, an image recorded using this , it takes longer to record images at lower shutter speeds. Because of a tripod is complete. • When recording the image of a night...
Owners Manual
Page 162
...; Movie images and the voice recording file icon cannot be cropped. • An image recorded using another camera model cannot be performed if there is not enough memory to extract is displayed indicates when the image was originally recorded, not when the image was cropped. 162 The file with the original image also remains in the cropping boundary. • If you display a cropped image on the camera's monitor screen, the date and time that...
...; Movie images and the voice recording file icon cannot be cropped. • An image recorded using another camera model cannot be performed if there is not enough memory to extract is displayed indicates when the image was originally recorded, not when the image was cropped. 162 The file with the original image also remains in the cropping boundary. • If you display a cropped image on the camera's monitor screen, the date and time that...
Owners Manual
Page 168
... adjust the volume level. • Images copied from another digital camera or a computer may take longer time to select "Cancel" and then press [SET]. 4. For information about configuring this setting: Images Time Interval Go here: "To specify the slideshow images" on page 169 "To specify the slideshow time" on page 170 "To set the slideshow interval" on the monitor screen before performing a button operation, or hold down the button...
... adjust the volume level. • Images copied from another digital camera or a computer may take longer time to select "Cancel" and then press [SET]. 4. For information about configuring this setting: Images Time Interval Go here: "To specify the slideshow images" on page 169 "To specify the slideshow time" on page 170 "To set the slideshow interval" on the monitor screen before performing a button operation, or hold down the button...

Owners Manual
Page 169
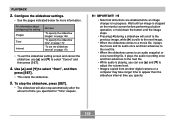
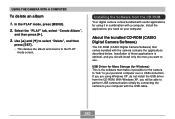
... snapshots, movies, and voice recording files are also played back during a slideshow. Use [̆] and [̄] to select the setting you want , and then press [SET]. Select "One image", and then press [̈]. 2. PLAYBACK To specify the slideshow images 1. Use [̆] and [̄] to select "Start", and then press [SET]. • This starts the slideshow. • The audio of [SET] returns to the menu screen without changing it...
... snapshots, movies, and voice recording files are also played back during a slideshow. Use [̆] and [̄] to select the setting you want , and then press [SET]. Select "One image", and then press [̈]. 2. PLAYBACK To specify the slideshow images 1. Use [̆] and [̄] to select "Start", and then press [SET]. • This starts the slideshow. • The audio of [SET] returns to the menu screen without changing it...

Owners Manual
Page 174
Press the shutter button to a movie image - IMPORTANT! • Keep the microphone Microphone on the monitor screen after about 30 seconds or when you press the shutter button. • This deletes the existing audio and replaces it . 174 Adding audio to a protected snapshot (page 181) • Audio that is low. • The following types of audio recording are not possible when the camera is...
Press the shutter button to a movie image - IMPORTANT! • Keep the microphone Microphone on the monitor screen after about 30 seconds or when you press the shutter button. • This deletes the existing audio and replaces it . 174 Adding audio to a protected snapshot (page 181) • Audio that is low. • The following types of audio recording are not possible when the camera is...

Owners Manual
Page 178
.... DELETING FILES DELETING FILES You can delete a single file, or you can delete all files currently in this section to delete images from the FAVORITE folder. Make sure you really do not need a file anymore before proceeding. • A protected file cannot be undone. IMPORTANT! • Note that file deletion cannot be deleted. Once you want to delete. 3. Deleting a Single File Perform the following steps when you delete a file, it . • You cannot use the procedures in memory.
.... DELETING FILES DELETING FILES You can delete a single file, or you can delete all files currently in this section to delete images from the FAVORITE folder. Make sure you really do not need a file anymore before proceeding. • A protected file cannot be undone. IMPORTANT! • Note that file deletion cannot be deleted. Once you want to delete. 3. Deleting a Single File Perform the following steps when you delete a file, it . • You cannot use the procedures in memory.
Owners Manual
Page 217
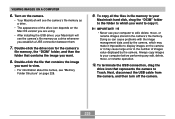
... the English version of Windows XP. 1. Set the bundled CD-ROM (CASIO Digital Camera Software) into the CD-ROM drive of your computer is running one of the special AC adaptor is recommended to power the camera during data communication. Use of the above operating systems without installing the USB driver first. • USB driver installation is no memory card loaded in the case of Windows. 217 What you connect the USB cable. Do...
... the English version of Windows XP. 1. Set the bundled CD-ROM (CASIO Digital Camera Software) into the CD-ROM drive of your computer is running one of the special AC adaptor is recommended to power the camera during data communication. Use of the above operating systems without installing the USB driver first. • USB driver installation is no memory card loaded in the case of Windows. 217 What you connect the USB cable. Do...
Owners Manual
Page 225
... icon that contains the image you are using. • After installing the USB driver, your computer before performing any edit, delete, move , or rename images stored in the camera's file memory. Always copy images to edit, delete, move , or rename operation. 10. Double-click the file that represents the camera to view. • For information about file names, see the camera's file memory as a drive. • The appearance of images value displayed by the camera...
... icon that contains the image you are using. • After installing the USB driver, your computer before performing any edit, delete, move , or rename images stored in the camera's file memory. Always copy images to edit, delete, move , or rename operation. 10. Double-click the file that represents the camera to view. • For information about file names, see the camera's file memory as a drive. • The appearance of images value displayed by the camera...
Owners Manual
Page 240
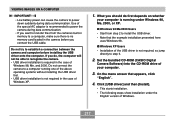
... are using Windows XP, do not install the USB driver from the CD-ROM Your digital camera comes bundled with useful applications for using it possible for Windows) This is the software that comes bundled with a computer. If you want to your computer. In the PLAY mode, press [MENU]. 2. About the bundled CD-ROM (CASIO Digital Camera Software) The CD-ROM (CASIO Digital Camera Software) that makes it in combination with the camera contains...
... are using Windows XP, do not install the USB driver from the CD-ROM Your digital camera comes bundled with useful applications for using it possible for Windows) This is the software that comes bundled with a computer. If you want to your computer. In the PLAY mode, press [MENU]. 2. About the bundled CD-ROM (CASIO Digital Camera Software) The CD-ROM (CASIO Digital Camera Software) that makes it in combination with the camera contains...

Owners Manual
Page 241
... adding a date stamp to your computer. Photohands (for Windows) Photohands includes retouching tools for adjusting image color, contrast, and brightness, for resizing images, and for Windows/Macintosh) This application automatically transfers image, audio snapshot, and voice recording WAV files from the camera to printed images. • See the user documentation file (PDF) on page 245 (Windows) and page 247 (Macintosh) of attaching images to view images using a digital camera. See "Viewing User Documentation (PDF files)" on the bundled "CASIO Digital Camera Software" CD...
... adding a date stamp to your computer. Photohands (for Windows) Photohands includes retouching tools for adjusting image color, contrast, and brightness, for resizing images, and for Windows/Macintosh) This application automatically transfers image, audio snapshot, and voice recording WAV files from the camera to printed images. • See the user documentation file (PDF) on page 245 (Windows) and page 247 (Macintosh) of attaching images to view images using a digital camera. See "Viewing User Documentation (PDF files)" on the bundled "CASIO Digital Camera Software" CD...

Owners Manual
Page 250
... menu Flash Focus White Balance ISO AF Area Metering Self-timer Cont. / BKT Flash Intensity Digital Zoom MF Position Zoom Position On / Off On / Off On / Off On / Off On / Off On / Off On / Off On / Off On / Off On / Off On / Off On / Off G Set Up tab menu Sounds Startup File No. World Time Date Style Adjust Language Sleep Auto Power Off USB Video Out Format Reset Startup / Half Shutter /Shutter / Operation / Volume On (Selectable image) / Off Continue / Reset Home / World Home Time setup...
... menu Flash Focus White Balance ISO AF Area Metering Self-timer Cont. / BKT Flash Intensity Digital Zoom MF Position Zoom Position On / Off On / Off On / Off On / Off On / Off On / Off On / Off On / Off On / Off On / Off On / Off On / Off G Set Up tab menu Sounds Startup File No. World Time Date Style Adjust Language Sleep Auto Power Off USB Video Out Format Reset Startup / Half Shutter /Shutter / Operation / Volume On (Selectable image) / Off Continue / Reset Home / World Home Time setup...
Owners Manual
Page 251
Create / Delete / Layout / Set Up / Cancel - PRINT) / PTP (PictBridge) NTSC / PAL Format / Cancel Reset / Cancel 251 Alarm setups Built-in Card / Card Built-in / Cancel G Set Up tab menu Sounds Startup File No. World Time Date Style Adjust Language Sleep Auto Power Off USB Video Out Format Reset Startup / Half Shutter /Shutter / Operation / Volume On (Selectable image) / Off Continue / Reset Home / World Home Time setup (city, DST, etc.) World Time setup (city, DST, etc.) YY/MM/DD / DD/MM/YY / MM/DD/YY Time setting / English / Fran...
Create / Delete / Layout / Set Up / Cancel - PRINT) / PTP (PictBridge) NTSC / PAL Format / Cancel Reset / Cancel 251 Alarm setups Built-in Card / Card Built-in / Cancel G Set Up tab menu Sounds Startup File No. World Time Date Style Adjust Language Sleep Auto Power Off USB Video Out Format Reset Startup / Half Shutter /Shutter / Operation / Volume On (Selectable image) / Off Continue / Reset Home / World Home Time setup (city, DST, etc.) World Time setup (city, DST, etc.) YY/MM/DD / DD/MM/YY / MM/DD/YY Time setting / English / Fran...
Owners Manual
Page 258
... display non-DCF images recorded onto a memory card using another device. 1) USB communication is in progress. 2) The monitor screen is turned off (in the camera. Images are disabled. USB connection. 2) USB driver is not installed. 3) Camera is turned off . Cannot transfer files over a 1) USB cable is not accessing camera memory, disconnect the USB cable. 2) Press [DISP] to another digital camera. Action Position the camera so sunlight does not shine directly into the lens during recording. Use a different card. Playback APPENDIX Symptom Color of the playback image...
... display non-DCF images recorded onto a memory card using another device. 1) USB communication is in progress. 2) The monitor screen is turned off (in the camera. Images are disabled. USB connection. 2) USB driver is not installed. 3) Camera is turned off . Cannot transfer files over a 1) USB cable is not accessing camera memory, disconnect the USB cable. 2) Press [DISP] to another digital camera. Action Position the camera so sunlight does not shine directly into the lens during recording. Use a different card. Playback APPENDIX Symptom Color of the playback image...
Owners Manual
Page 259
... camera's USB driver. If this happens, you use the USB cable to connect the camera to re-install the USB driver, see the USB driver's "Read me" file on "CASIO Digital Camera Software" CD-ROM that comes bundled with the camera. 259 For information about how to a computer running Windows 98 before installing the USB driver from the bundled CD-ROM (CASIO Digital Camera Software), or if you have another type of driver installed. APPENDIX If you have problems installing the USB driver...
... camera's USB driver. If this happens, you use the USB cable to connect the camera to re-install the USB driver, see the USB driver's "Read me" file on "CASIO Digital Camera Software" CD-ROM that comes bundled with the camera. 259 For information about how to a computer running Windows 98 before installing the USB driver from the bundled CD-ROM (CASIO Digital Camera Software), or if you have another type of driver installed. APPENDIX If you have problems installing the USB driver...


