Owners Manual
Page 5
...Icon Help 124 Assigning Functions to the [̇] and [̈] Keys 125 Specifying Power On Default Settings 125 Resetting the Camera 127 Using the Shortcut Menu (EX Menu 128 Installing the Lens Hood and a Lens Filter 129 130 PLAYBACK Basic Playback Operation 130 Playing an Audio Snapshot 131... View 143 Playing a Slideshow 144 Rotating the Display Image 146 Adding Audio to a Snapshot 147 To re-record audio 148 Displaying Camera Images on a TV Screen 149 Selecting the Video Input System 151 152 DELETING FILES Deleting a Single File 152 Deleting All Files 153 5
...Icon Help 124 Assigning Functions to the [̇] and [̈] Keys 125 Specifying Power On Default Settings 125 Resetting the Camera 127 Using the Shortcut Menu (EX Menu 128 Installing the Lens Hood and a Lens Filter 129 130 PLAYBACK Basic Playback Operation 130 Playing an Audio Snapshot 131... View 143 Playing a Slideshow 144 Rotating the Display Image 146 Adding Audio to a Snapshot 147 To re-record audio 148 Displaying Camera Images on a TV Screen 149 Selecting the Video Input System 151 152 DELETING FILES Deleting a Single File 152 Deleting All Files 153 5
Owners Manual
Page 11
...(page 182) Images include PRINT Image Matching III data (mode setting and other camera setup information). DPOF can print images without going through a computer. • Transfer images to your computer and create Video CDs. Though it can be printed easily in the sequence you edit movie files... on your PC. INTRODUCTION • Digital Print Order Format (DPOF) (page 174) Images can be used when specifying images...
...(page 182) Images include PRINT Image Matching III data (mode setting and other camera setup information). DPOF can print images without going through a computer. • Transfer images to your computer and create Video CDs. Though it can be printed easily in the sequence you edit movie files... on your PC. INTRODUCTION • Digital Print Order Format (DPOF) (page 174) Images can be used when specifying images...
Owners Manual
Page 149
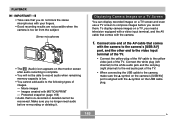
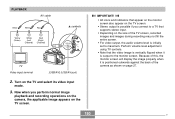
... Take care that you need audio before you no longer need a television equipped with a video input terminal, and the AV cable that comes with the camera to the camera's [USB/AV] port, and the other end to the video input terminal of the TV. • Connect the yellow plug of the AV cable to... memory capacity is aligned with MOTION PRINT - Make sure you record them. Displaying Camera Images on a TV Screen You can display recorded images on the camera's [USB/AV] port is low. • You cannot add audio to the yellow video jack of the TV. • When connecting the USB cable to the...
... Take care that you need audio before you no longer need a television equipped with a video input terminal, and the AV cable that comes with the camera to the camera's [USB/AV] port, and the other end to the video input terminal of the TV. • Connect the yellow plug of the AV cable to... memory capacity is aligned with MOTION PRINT - Make sure you record them. Displaying Camera Images on a TV Screen You can display recorded images on the camera's [USB/AV] port is low. • You cannot add audio to the yellow video jack of the TV. • When connecting the USB cable to the...
Owners Manual
Page 150
... positioned outwards against the back of this, the monitor screen will display the image properly when it is output to maximum. Because of the camera as shown on page 27. 150 D Perform volume level adjustment using TV controls. • Note that appear on the monitor screen also...output is possible if you perform normal image playback and recording operations on the camera, the applicable image appears on the TV and select its video input mode. 3. IMPORTANT! • All icons and indicators that the video image is vertically flipped when it is initially set to the monitor screen....
... positioned outwards against the back of this, the monitor screen will display the image properly when it is output to maximum. Because of the camera as shown on page 27. 150 D Perform volume level adjustment using TV controls. • Note that appear on the monitor screen also...output is possible if you perform normal image playback and recording operations on the camera, the applicable image appears on the TV and select its video input mode. 3. IMPORTANT! • All icons and indicators that the video image is vertically flipped when it is initially set to the monitor screen....
Owners Manual
Page 151
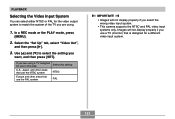
...", and then press [̈]. 3. Images will not display properly if you select the wrong video input system. • This camera supports the NTSC and PAL video input systems only. If you are using a TV designed for use in this setting: NTSC PAL IMPORTANT! • Images will not display ...the NTSC system Europe and other areas that is designed for the video output system to select the setting you want, and then press [SET]. PLAYBACK Selecting the Video Input System You can select either NTSC or PAL for a different video input system. 151 Use [̆] and [̄] to match ...
...", and then press [̈]. 3. Images will not display properly if you select the wrong video input system. • This camera supports the NTSC and PAL video input systems only. If you are using a TV designed for use in this setting: NTSC PAL IMPORTANT! • Images will not display ...the NTSC system Europe and other areas that is designed for the video output system to select the setting you want, and then press [SET]. PLAYBACK Selecting the Video Input System You can select either NTSC or PAL for a different video input system. 151 Use [̆] and [̄] to match ...
Owners Manual
Page 158
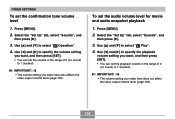
...]. • You can set the playback volume in the range of 0 (no sound) to specify the volume setting you make here does not affect the video output volume level (page 149). 158 Use [̇] and [̈] to 7 (loudest). OTHER SETTINGS To set the audio volume level for movie and audio ...[SET]. • You can set the volume in the range of 0 (no sound) to specify the playback volume setting you make here also affects the video output volume level (page 149). Select the "Set Up" tab, select "Sounds", and then press [̈]. 3. To set the confirmation tone volume level...
...]. • You can set the playback volume in the range of 0 (no sound) to specify the volume setting you make here does not affect the video output volume level (page 149). 158 Use [̇] and [̈] to 7 (loudest). OTHER SETTINGS To set the audio volume level for movie and audio ...[SET]. • You can set the volume in the range of 0 (no sound) to specify the playback volume setting you make here also affects the video output volume level (page 149). Select the "Set Up" tab, select "Sounds", and then press [̈]. 3. To set the confirmation tone volume level...
Owners Manual
Page 209
... codec. 4. On the Windows Media Player [Tools] menu, select [Options]. In the "Video acceleration" area click [Advanced]. 3. In the "Legacy video renderer" area, clear the "Use YUV Flipping" check box. 209 On the dialog box that was recorded with the camera. 3. Click the movie file that appears, open the [Performance] tab. 2. NOTE •...
... codec. 4. On the Windows Media Player [Tools] menu, select [Options]. In the "Video acceleration" area click [Advanced]. 3. In the "Legacy video renderer" area, clear the "Use YUV Flipping" check box. 209 On the dialog box that was recorded with the camera. 3. Click the movie file that appears, open the [Performance] tab. 2. NOTE •...
Owners Manual
Page 211
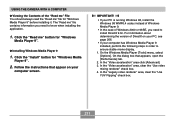
... in order to ensure stable movie display. 1. On the Windows Media Player [Tools] menu, select [Options]. In the "Legacy video renderer" area, clear the "Use YUV Flipping" check box. 211 For information about determining the version of DirectX on your computer screen.... In the "Video acceleration" area, clear the "Use video mixing renderer" check box. 4. G Installing Windows Media Player 9 1. USING THE CAMERA WITH A COMPUTER G Viewing the Contents of Windows 2000 or 98SE, you need to ...
... in order to ensure stable movie display. 1. On the Windows Media Player [Tools] menu, select [Options]. In the "Legacy video renderer" area, clear the "Use YUV Flipping" check box. 211 For information about determining the version of DirectX on your computer screen.... In the "Video acceleration" area, clear the "Use video mixing renderer" check box. 4. G Installing Windows Media Player 9 1. USING THE CAMERA WITH A COMPUTER G Viewing the Contents of Windows 2000 or 98SE, you need to ...
Owners Manual
Page 220
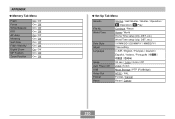
World Time Date Style Adjust Language Sleep Auto Power Off USB Video Out Format Reset Startup / Half Shutter / Shutter / Operation / Operation / Play Continue / Reset Home / World Home Time setup (city, DST, etc.) World Time setup (city, DST, ... / PTP (PictBridge) NTSC / PAL Format / Cancel Reset / Cancel 220 APPENDIX G Memory Tab Menu Flash Focus White Balance ISO AF Area Metering Self-timer Flash Intensity Digital Zoom MF Position Zoom Position On / Off On / Off On / Off On / Off On / Off On / Off On / Off On / Off On / Off On / Off...
World Time Date Style Adjust Language Sleep Auto Power Off USB Video Out Format Reset Startup / Half Shutter / Shutter / Operation / Operation / Play Continue / Reset Home / World Home Time setup (city, DST, etc.) World Time setup (city, DST, ... / PTP (PictBridge) NTSC / PAL Format / Cancel Reset / Cancel 220 APPENDIX G Memory Tab Menu Flash Focus White Balance ISO AF Area Metering Self-timer Flash Intensity Digital Zoom MF Position Zoom Position On / Off On / Off On / Off On / Off On / Off On / Off On / Off On / Off On / Off On / Off...

